- Thread starter
- #61
-
North American Clubhouses - East RegionCA.ON- SOTEC CA.ON- Upper Canada Land Cruisers CA.QC- Club TORQ CA.QC- Quebec Cruisers AL- DixieLand Cruisers AL- Hot South Cruisers FL- Florida Land Cruiser Association FL- Northwest Florida Toyota 4WD FL- Tampa Bay Land Cruiser Association GA- Pavement Pounders GA- Georgia Cruisers GA/FL/AL- Red Hills Land Cruiser Club GA- YOTA IL- Windy City Land Cruisers IN- Hoosier Cruisers IN- Indiana Land Cruisers KY- Kentucky Landcruiser MA/NH- Yankee Toys MI- Lake Michigan Land Cruisers MS- CottonLand Cruisers NC- Olde North State Cruisers NJ- Garden State Land Cruisers NY/CT/MA- FJNortheasters NY- Gotham City Land Cruisers OH- The Buckeye Birfield Syndicate PA- Keystone Cruisers PA- Steel City Land Cruiser Club SC- Palmetto State Land Cruiser Association SC- Upstate Cruisers SC- Swamp Fox Land Cruisers SC- Low Country Land Cruisers TN- Appalachia Cruisers TN- Bluff City Cruisers TN- STLCA VA- Bay to Blue Ridge Cruisers VA- COVA CRUISERS VA/DC/MD- Capital Land Cruiser Club VA/NC- Mid-Atlantic TLCA VA- Star City Land Cruisers VT/NH/MA/ME Acadian Overlanders WI- Land Cruiser Legends WV- Mountaineer Cruisers
-
North American Clubhouses - Central RegionCA.AB- Oil Country Cruisers CA.AB- Rocky Mountain Land Cruiser Association CA.AB- Toyota Ghost Wheelers AR- Razorback Land Cruisers AR/MO- Ozark Mountain Cruisers CO- BookCliff Cruisers CO- Colorado Land Cruisers CO- Derailed Cruisers CO- Rising Sun 4WD Club CO/WY- Horsetooth 4 Wheelers Cruiser Club IA- Tall Corn Cruisers KS/MO- Tornado Alley Cruisers LA- Bayou State Land Cruisers LA- Louisiana Land Krewesers MO- Gateway Cruisers MT- 406 Cruisers MT- Big Sky Cruisers NE- Flat Land Cruisers NM- High Desert Cruisers OK- Green Country Cruisers SD- Dakota Territory Cruisers TX- Alamo City Land Cruisers TX- Bayou City Land Cruisers TX- Lone Star Land Cruisers TX- Lone Star Land Cruisers - Austin Chapter TX- The White Trash of the Elwood Chapter TX- Toyota Trail Riders
-
North American Clubhouses - West RegionCA.BC- Coastal Cruisers CA.BC- Okanagan-Similkameen Land Cruisers CA.BC- Peace Canyon Toyota Swamp Donkeys CA.BC- Calgary Chapter: Swamp Donkeys
CA.BC- Vancouver Island Cruisers AZ- Copper State Cruisers CA- Beach-n-Toys CA- Central Coast Land Cruisers CA- Central Valley Crawlers CA- Gold Country Cruisers CA- Inland Empire Cruisers CA- L.A. County Trailcrew CA- Mountain Transit Authority CA- Pacific Mountain Cruisers CA- San Diego Cruisers CA - Santa Cruz Land Cruisers CA- SoCal 80's CA- Southern California Land Cruisers CA- Toyotally Awesome Cruisers HI- Hawaiian Island Land Cruisers ID- Treasure Valley Land Cruisers NV- Battle Born Cruisers of Northern Nevada NV- Southern Nevada Land Cruisers OR/CA- Jefferson State Cruisers OR- Cascade Cruisers OR- Central Oregon Cruisers OR- Portland Metro Cruisers UT- Red Rock Cruiser Club UT- Wasatch Cruisers WA- Central Washington Cruisers WA- North Sound Cruisers WA- South Sound Cruisers WA- Spokane Land Cruisers
Navigation
Install the app
How to install the app on iOS
Follow along with the video below to see how to install our site as a web app on your home screen.
Note: This feature may not be available in some browsers.
More options
Style variation
You are using an out of date browser. It may not display this or other websites correctly.
You should upgrade or use an alternative browser.
You should upgrade or use an alternative browser.
'88 4Runner SAS
- Thread starter John Stw
- Start date
This site may earn a commission from merchant affiliate
links, including eBay, Amazon, Skimlinks, and others.
More options
Who Replied?Good pics John and it came out great. 
- Thread starter
- #63
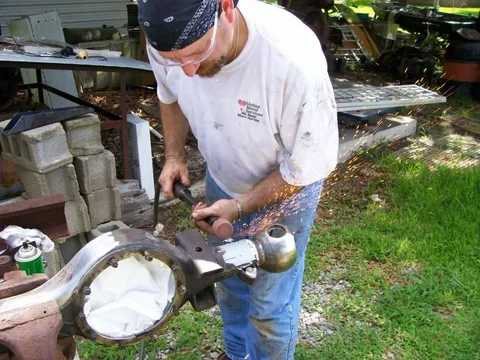
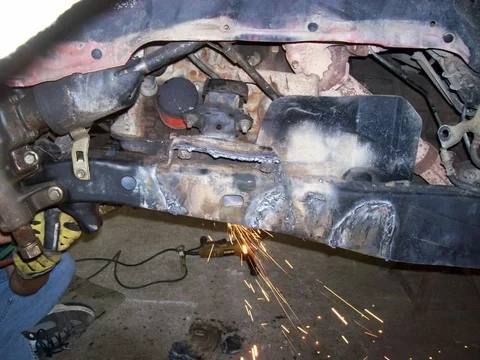
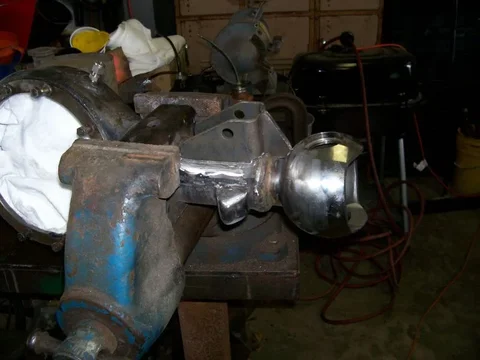
With the prep work done Albert started welding in the axle gusset and ball gussets. He used some stitch welds on the top gusset allowing him to only weld a little bit at a time and allowing the axle housing to cool between welds to prevent warping. We used the old knuckle rubber and felt seals along with the knuckles to test fit the ball gussets. With a little bit of grinding and fitting they were welded up.


- Thread starter
- #64
- Thread starter
- #65
Swweeeeet. Keep em comin.
me
me
- Thread starter
- #67
We then started installing the front hanger. Bolted the axle housing up and checked the shackle angles at different measurements according to hanger position. Decided on installing the hanger a half a inch forward compared to the existing cross brace. We filled in the gap between the hanger and brace with a piece of metal rod and Albert welded the two together. While working on the front end the motor mount covers were welded in also.


- Thread starter
- #68
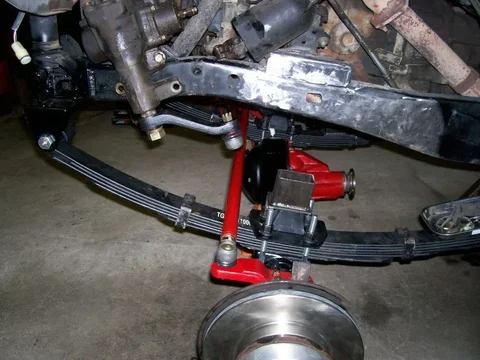
Now with the hanger and springs in place we started rebuilding the axle equipped with high steer kit from trail gear. They do not tell you on their web site that you will have to move your steering box, so the experienced team leader saved us some down time there.Thanks to Albert's research the problem with steering box was solved with the IFS steering box bracket kit from trail gear,ordered ahead of time. The shock hoops were also welded up after test fitting the shocks and position check.


- Thread starter
- #69
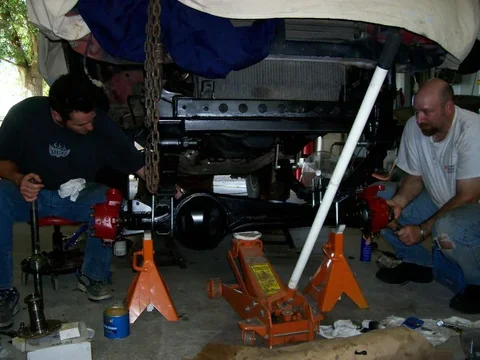
With the front almost done we started on the rear lift and relocating the brackets and rear shackle hangers, make sure to test fit and check shackle angles here. We followed the directions and checked but not good enough and we ended up having to add the spare set shackle hangers because the original spot made the rear sit to low. You can see the difference in springs and the need to relocate brackets.


J,
Great pics.. love to see em.
Tell me... what to you think caused such a different angle from the axle to the DS??? The axles were cut and turned, right??
Did you get the coupler you wanted to fix the issue?
Keep the pix comin

Bx
Great pics.. love to see em.
Tell me... what to you think caused such a different angle from the axle to the DS??? The axles were cut and turned, right??
Did you get the coupler you wanted to fix the issue?
Keep the pix comin

Bx
Nice pictures. Hope everything worked out on your 1st outing. How did you like the lower gears with the lockers ?
Did you fell tipsy with the RED DRAGON ? Whats the talk of a milk crate ?
I really like they way the SAS turned out. Man I want to go wheeling after seeing the pictures ya'll posted of Sicily Island.
Did you fell tipsy with the RED DRAGON ? Whats the talk of a milk crate ?
I really like they way the SAS turned out. Man I want to go wheeling after seeing the pictures ya'll posted of Sicily Island.
- Thread starter
- #72
Everything went fine as far as mechanically, and the suspension worked great. The low gears were just right to me, it pulled pretty strong in 4LO, hoping to have the front shaft problem solved soon.
- Thread starter
- #73
J,
Great pics.. love to see em.
Tell me... what to you think caused such a different angle from the axle to the DS??? The axles were cut and turned, right??
Did you get the coupler you wanted to fix the issue?
Keep the pix comin
Bx
The harsh angle was caused by the lift and the short distance between the axle and transfer case. Still trying to decide on the method to use to solve this issue, just trying to pick the most affective according to the research. A gear driven doubler would be perfect, but that is last on the list of options.
The harsh angle was caused by the lift and the short distance between the axle and transfer case. Still trying to decide on the method to use to solve this issue, just trying to pick the most affective according to the research. A gear driven doubler would be perfect, but that is last on the list of options.
~cough~ Square D-shaft ~cough~
Also check out this link. I had thoguth the problem was they had fabbed your D-shaft to long, I didn't not realise untill last weekend that it was binding because of it being an IFS CV.
Driveshaft CV Modification for Increased Angle
- Thread starter
- #75
Thanks Josh, its a good idea might have to try it.
Thanks Josh, its a good idea might have to try it.
Well the nice thing is if it doesnt work now it is imposible to mess it up right?
Yes your IFS CV is the main culprit. Even with the solid axle CV or your clearanced CV your angle will be bad. Here's my 4"TG kit with their long spline DS kit and am '85 CV shaft. This is after one trip to Rausch Creek. I'm running dual cases now which made a the angle much better. So start saving  .
.
You can shorten that DS yourself. Just cut out what you need get some pipe from Lowes (as a conector) center it in your freshly cut ends and weld it up.
My angle before duals, sorry no after shots yet.

You can shorten that DS yourself. Just cut out what you need get some pipe from Lowes (as a conector) center it in your freshly cut ends and weld it up.
My angle before duals, sorry no after shots yet.

- Thread starter
- #78
Going to try this flange and a single u-joint at the transfer case to fix the drive shaft problem.

http://www.inchwormgear.com/store/product_info.php?products_id=1002


http://www.inchwormgear.com/store/product_info.php?products_id=1002
Man it sure sounded simpler when we were talking about it. With out looking at the flange would not have thought you could not turn and redrill. . Marlin Crawler stuff for your truck did not show up yet, will call and see whats going on.
Last edited:
- Thread starter
- #80
It sounded simple, but the stock flange just isn't set up to allow for the new holes.
Users who are viewing this thread
Total: 1 (members: 0, guests: 1)

