Hi guys
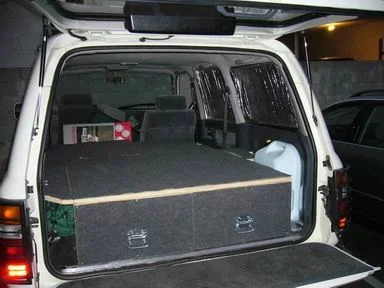
I just finished my drawers system this afternoon. I wanted to keep it cheap and simple, yet clean. I wouldn't say it's flawless but it works. Thanks to all Cruiserheads who did the same and explained it extensively here, I had a good idea of what I wanted. The challenge there was I don't have a garage and my landlord doesn't want me to work on the parking lot. So I made all of it in my kitchen two levels upstairs .
.
I used 3 sheets of 3/4 '' sanded plywood, lotsa 2" corners and more than 200 6x3/4 philips screws. I got 8' x 6' of leftover carpet for 15 bucks from Home Depot. So far, only the drawers fronts are carpeted (see pictures). Altogether, I kept the hardware budget under $300, new jigsaw included. I spent 18+ hours on it total, spawned on two weekends, including the one with the deadly California heat wave (I thank my sponsors, Arrowhead and Brita, for their support through these A/C-less days).
Some thoughts and advice: don't use a jigsaw, unless you're a 5 in carpentry. Use a circular instead.
The hugest pain however was to install the U-bolts under the floor. I managed to make it using Scotch tape to stick them and some more to extend the bolts so they could be guided through the holes. However, I brutally scratched my hands in the process.
The drawer mounts are raw, ie without slides. No budget, no know-how... Anyway, I don't plan to overload them.
Next step in the oncoming weeks: building another box to replace the right seat of the 2nd row, as the final purpose is to make it possible for two adults and one very young kid to sleep inside the rig during a one-month trip from LA to Colorado and back, through a number of Natl Parks, this fall.
This box and the drawers box should align to create a 6' 2" bed on the right side, whereas I would keep the left seat for the kid's, folding it (the seat, not the kid ) and cover it with another sheet of wood mounted on piano hinges. At night, the kid would sleep on a makeshift bed installed on the front seats. I hope I'm clear.
Thanks again guys for all the ideas here. Will post more pics when I'm tackling what's left to do on this project, very soon hopefully.
Cheers Grolar
1. Closed

2. Open

3. Closer look at the drawer

I just finished my drawers system this afternoon. I wanted to keep it cheap and simple, yet clean. I wouldn't say it's flawless but it works. Thanks to all Cruiserheads who did the same and explained it extensively here, I had a good idea of what I wanted. The challenge there was I don't have a garage and my landlord doesn't want me to work on the parking lot. So I made all of it in my kitchen two levels upstairs
I used 3 sheets of 3/4 '' sanded plywood, lotsa 2" corners and more than 200 6x3/4 philips screws. I got 8' x 6' of leftover carpet for 15 bucks from Home Depot. So far, only the drawers fronts are carpeted (see pictures). Altogether, I kept the hardware budget under $300, new jigsaw included. I spent 18+ hours on it total, spawned on two weekends, including the one with the deadly California heat wave (I thank my sponsors, Arrowhead and Brita, for their support through these A/C-less days).
Some thoughts and advice: don't use a jigsaw, unless you're a 5
 in carpentry. Use a circular instead.
The hugest pain however was to install the U-bolts under the floor. I managed to make it using Scotch tape to stick them and some more to extend the bolts so they could be guided through the holes. However, I brutally scratched my hands in the process.
The drawer mounts are raw, ie without slides. No budget, no know-how... Anyway, I don't plan to overload them.
Next step in the oncoming weeks: building another box to replace the right seat of the 2nd row, as the final purpose is to make it possible for two adults and one very young kid to sleep inside the rig during a one-month trip from LA to Colorado and back, through a number of Natl Parks, this fall.
This box and the drawers box should align to create a 6' 2" bed on the right side, whereas I would keep the left seat for the kid's, folding it (the seat, not the kid
Thanks again guys for all the ideas here. Will post more pics when I'm tackling what's left to do on this project, very soon hopefully.
Cheers Grolar
1. Closed
2. Open
3. Closer look at the drawer

 did you use any kind of sliders at all?


