
I am trying to dress up my engine compartment the way it is suppose to be. Right now there are vacuum hose laying all over the valve cover and just in disarray, so I was wondering if anyone has any pics of there engine compartment to find how to run them and find out which piece I am missing in order to secure them properly. This is what I have now.


Navigation
Install the app
How to install the app on iOS
Follow along with the video below to see how to install our site as a web app on your home screen.
Note: This feature may not be available in some browsers.
More options
Style variation
You are using an out of date browser. It may not display this or other websites correctly.
You should upgrade or use an alternative browser.
You should upgrade or use an alternative browser.
Looking for 3FE engine Pics
- Thread starter rfj62
- Start date
This site may earn a commission from merchant affiliate
links, including eBay, Amazon, Skimlinks, and others.
 dang, your engine compartment looks pretty rediculous, when i return home, i'll make sure to post a picture of mine, it doesnt nearly look that bad, phew/
- Thread starter
- #3
Pics
Thanks, I'd appreciate it.
Thanks, I'd appreciate it.
Wow, it may be jumbled, but it sure is clean. Has it spent most of it's life in the rust belt?
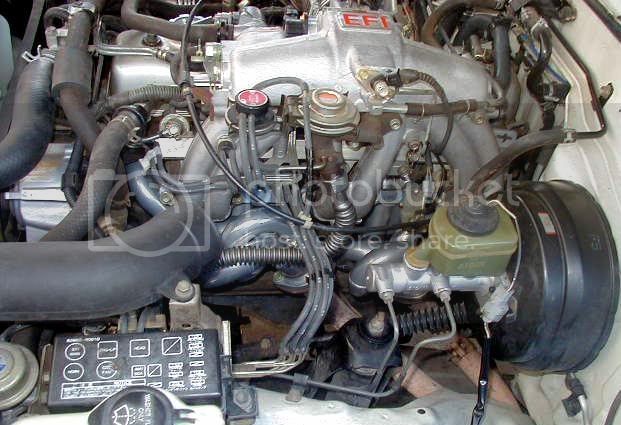
BTW, if you didn't already notice, there's a small coolant leak at the ??heat control valve?? connections ( extreme left of pic #1).
BTW, if you didn't already notice, there's a small coolant leak at the ??heat control valve?? connections ( extreme left of pic #1).
- Thread starter
- #5
Umm, I didn't realy notice that. thanks
It spent most of its life in NM.
It spent most of its life in NM.
Here's mine just after replacing the head and most vacuum hoses.

[edit: this post refers to the first set of pics in this thread, not the immediately preceeding post]
Be careful with the A/C lines where they run into the firewall. You see how your top A/C line is pulled away from the firewall? That rubber line becomes a hardline (you can just see it in the picture). This hardline is very easy to break. Fortunately it is still available new from Toyota and is inexpensive.
Be careful with the A/C lines where they run into the firewall. You see how your top A/C line is pulled away from the firewall? That rubber line becomes a hardline (you can just see it in the picture). This hardline is very easy to break. Fortunately it is still available new from Toyota and is inexpensive.


A couple of FJ62 shots from my old cruiser
a few shots


a few shots
one more

a few shots
What's that mounted just inboard of the driver's side horn?
- Thread starter
- #12
Thanks for the pics guys.
What is this piece of foam and where does it go??

What is this piece of foam and where does it go??
- Thread starter
- #13
PS line, Over of Under??
I noticed when I was looking at the pics that some people run their lines under the air box while some run them over. Which is the right way?
Over

Under

Moby, thanks for the advice. I tried pushing it back in but it won't stay, any suggestions?


I noticed when I was looking at the pics that some people run their lines under the air box while some run them over.
Which is the right way?Over
Under
Moby, thanks for the advice. I tried pushing it back in but it won't stay, any suggestions?
Driver's side of my FJ80 right after installing headers:
To me, the foam is just there to separate and pad the two AC hoses. Just move it to where the two hoses touch or are closest.
As far as over or under for the hoses, it doesn't matter as long as they are supported adequately and don't have tension on them.
As far as over or under for the hoses, it doesn't matter as long as they are supported adequately and don't have tension on them.
- Thread starter
- #16
BG Tx
Bg Tx, that engine looks really clean, I like the distributor cover, really brings it together.
Thats not some sort of leak is it?

1911, how do you like the headers, worth it?

Bg Tx, that engine looks really clean, I like the distributor cover, really brings it together.
Thats not some sort of leak is it?
1911, how do you like the headers, worth it?
I noticed when I was looking at the pics that some people run their lines under the air box while some run them over.
All of the pics I have seen have been over... but I am not sure it really matters.
Bg Tx... Thats not some sort of leak is it?
LEAK!?!?!
No leak, that is a sticker that is peeling up on the edges.I noticed when I was looking at the pics that some people run their lines under the air box while some run them over.
Over
View attachment 273543
Under
View attachment 273544
Moby, thanks for the advice. I tried pushing it back in but it won't stay, any suggestions?
when I put my engine back together the A/C lines ended up that way because I forgot how they went originally. I believe they are supposed to go over the air filter housing. I might put them back someday maybe when I can get my A/C to work.
I feel dirty just looking at all the clean engine bays. I really need to clean mine up.
Just wait'll you blow the plug above your #5 cylinder. When mine went it blasted oil all over my engine compartment. A couple cans of foaming degreaser later and my engine looks damn near factory fresh
