
- Joined
- Jul 5, 2010
- Threads
- 13
- Messages
- 310
Almost 2 years ago I started a landcruiser build. (You can read my build thread here.) Prior to buying my cruiser I barely even knew how to tell an FJ40 apart from a J**p. I was anything but a landcruiser nut. But I was at a point in my life where I needed a project, and I had a great friend with a near limitless knowlege of all things cruiser (plus a pretty good stockpile of extra parts), so I bought somebody else's project and made it my own. Since that time I can't count how many hours I've spent on Mud researching and learning about landcruisers.
Now that my cruiser is off to paint I have some time to button up a few of the little things I still need to do before reassembly. It's warming up here and I'm going to want to be spending as much time as possible with the top off during the summer. I figure a lot of you will, too. Detailing out how to build your own hard top storage dolly is one of the things I've been wanting to do to give back to the ih8Mud community.
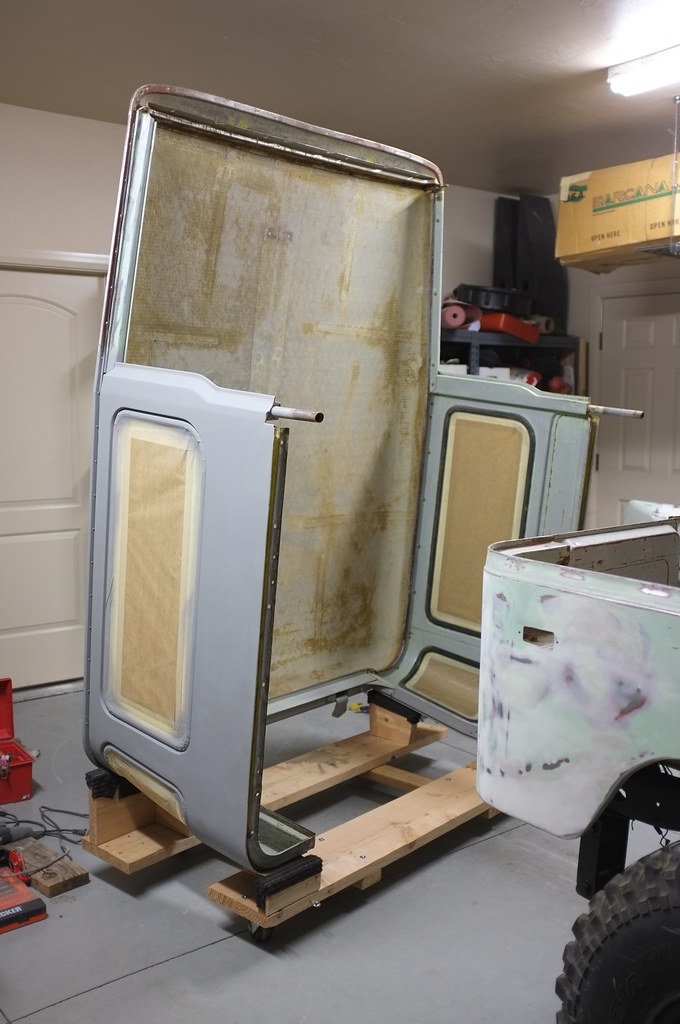
Some of you may have already seen pictures of the dolly in my build thread. For those of you who haven't, here is a picture of it in use. The idea was to have a way to store my hard top in as little space as possible and be able to work around it as needed. My garage ceiling is too low to hang the hard top with a hoist, and this setup is still compact enough to fit both the hard top and the landcruiser in the same garage parking space. It's not perfect, but overall I'd consider it a success.
Well, since pictures are worth a thousand words, I'm going to for the most part let the pictures do the talking. The design is my own. I apologize in advance if appears to plagarize from anybody else's work. I started with a clean slate. Feel free to borrow as much of the design as you want, and improve on it where you can.
The materials I used for the dolly were:
2x4 lumber
2x8 lumber
2x10 lumber
4x plate style swivel casters
some 3" 1/4-20 hex bolts and washers
1/4-20 T-nuts
some 1" diameter eyelets
a cheap welcome mat
a staple gun with 3/8" staples
wood glue and some 2 1/2" wood screws
Here it is from the top side, with a couple of notes. It should be pretty obvious how everything goes together.

Start by building the main frame, but don't attach the casters just yet. The hard top stores pretty close to vertical and you'll want to get your rear casters further back than I did if possible. Rolling mine in reverse, with the casters swiveled forward, I worry that if I were to hit a bump it could fall over. I'd recommend adding the eyelets and some straps between the hard top tubes and the dolly.

The front supports are fairly straightforward. I covered the pieces with the welcome mat before attaching them to the frame, hence the 3/8" gap. I used 2x8's for the double pieces, but you could just as easily use the leftover pieces of 2x10. The 8" long pieces of 2x4 line up with the corners of the 2x10, and the double 2x8 pieces line up with the inside edges of the 2x4's.

The rear pieces get a little more complicated. I actually screwed these up and had to do a bit of shaping to get everything to fit right. And since I didn't take pictures the first time (not that they would have done much good anyway) what you get are pics of my "corrected" dolly. I think this is the shape that I had originally intended to use, but I screwed up the piece in the next picture and instead of having this piece tilt forward to account for the slope of the back of the hard top it ended up perpendicular to the frame. I don't recall what the radius was for the curve, nor am I going to attempt to guess. Be sure to test fit how these pieces (including the spacing between them) fit your hard top so you don't end up with a lot of weight resting on a small area when you load the dolly. These rear pieces rest just above the rear quarter windows.

This piece gets a little tricky, and I'm sure my math doesn't work out exactly. Once again I used 2x8's here, but 2x10's would work just fine. The upper left corner will not match up with the other piece, giving you an inddication of how much shaping you will need to do. A flapdisk on an angle grinder worked well to shape the pieces. Once again, test fit everything to your hard top. I covered the pair of these pieces after they were assembled and shaped correctly. The angle of this piece does not quite line up with the double 2x8 pieces towards the front because of the slight bend to the hard top near the bottoms of the corner windows.

A couple of notes: I designed this based off of a 1970 (hatch style) hard top. There could very easily be interference problems with the ambulance door hinges or features from other years. Wrinkle top owners, you're probably on your own. The casters I used measured 3 3/4" tall, and with the hard top stored the overall height was 92" or so. Double check that you will be able to roll the dolly in and out of your garage, because taking the hard top off and setting it on the dolly is much easier to do outside.
I've apprecited all the feedback and positive response on my build thread. It keeps me going. I hope some of you find these instructions useful.
Brock
Now that my cruiser is off to paint I have some time to button up a few of the little things I still need to do before reassembly. It's warming up here and I'm going to want to be spending as much time as possible with the top off during the summer. I figure a lot of you will, too. Detailing out how to build your own hard top storage dolly is one of the things I've been wanting to do to give back to the ih8Mud community.
Some of you may have already seen pictures of the dolly in my build thread. For those of you who haven't, here is a picture of it in use. The idea was to have a way to store my hard top in as little space as possible and be able to work around it as needed. My garage ceiling is too low to hang the hard top with a hoist, and this setup is still compact enough to fit both the hard top and the landcruiser in the same garage parking space. It's not perfect, but overall I'd consider it a success.
Well, since pictures are worth a thousand words, I'm going to for the most part let the pictures do the talking. The design is my own. I apologize in advance if appears to plagarize from anybody else's work. I started with a clean slate. Feel free to borrow as much of the design as you want, and improve on it where you can.
The materials I used for the dolly were:
2x4 lumber
2x8 lumber
2x10 lumber
4x plate style swivel casters
some 3" 1/4-20 hex bolts and washers
1/4-20 T-nuts
some 1" diameter eyelets
a cheap welcome mat
a staple gun with 3/8" staples
wood glue and some 2 1/2" wood screws
Here it is from the top side, with a couple of notes. It should be pretty obvious how everything goes together.
Start by building the main frame, but don't attach the casters just yet. The hard top stores pretty close to vertical and you'll want to get your rear casters further back than I did if possible. Rolling mine in reverse, with the casters swiveled forward, I worry that if I were to hit a bump it could fall over. I'd recommend adding the eyelets and some straps between the hard top tubes and the dolly.
The front supports are fairly straightforward. I covered the pieces with the welcome mat before attaching them to the frame, hence the 3/8" gap. I used 2x8's for the double pieces, but you could just as easily use the leftover pieces of 2x10. The 8" long pieces of 2x4 line up with the corners of the 2x10, and the double 2x8 pieces line up with the inside edges of the 2x4's.
The rear pieces get a little more complicated. I actually screwed these up and had to do a bit of shaping to get everything to fit right. And since I didn't take pictures the first time (not that they would have done much good anyway) what you get are pics of my "corrected" dolly. I think this is the shape that I had originally intended to use, but I screwed up the piece in the next picture and instead of having this piece tilt forward to account for the slope of the back of the hard top it ended up perpendicular to the frame. I don't recall what the radius was for the curve, nor am I going to attempt to guess. Be sure to test fit how these pieces (including the spacing between them) fit your hard top so you don't end up with a lot of weight resting on a small area when you load the dolly. These rear pieces rest just above the rear quarter windows.
This piece gets a little tricky, and I'm sure my math doesn't work out exactly. Once again I used 2x8's here, but 2x10's would work just fine. The upper left corner will not match up with the other piece, giving you an inddication of how much shaping you will need to do. A flapdisk on an angle grinder worked well to shape the pieces. Once again, test fit everything to your hard top. I covered the pair of these pieces after they were assembled and shaped correctly. The angle of this piece does not quite line up with the double 2x8 pieces towards the front because of the slight bend to the hard top near the bottoms of the corner windows.
A couple of notes: I designed this based off of a 1970 (hatch style) hard top. There could very easily be interference problems with the ambulance door hinges or features from other years. Wrinkle top owners, you're probably on your own. The casters I used measured 3 3/4" tall, and with the hard top stored the overall height was 92" or so. Double check that you will be able to roll the dolly in and out of your garage, because taking the hard top off and setting it on the dolly is much easier to do outside.
I've apprecited all the feedback and positive response on my build thread. It keeps me going. I hope some of you find these instructions useful.
Brock
Last edited:


