welding advice for fender flare holes

This site may earn a commission from merchant affiliate
links, including eBay, Amazon, Skimlinks, and others.

BadReligion

SILVER Star
Joined
Aug 23, 2011
Threads
71
Messages
1,293
Location
Reno, NV
So I'm in the process of getting my 80 ready for this years Rubithon and part of that includes removing the fender flares. My plan is to remove them, then weld/sand the holes and do a roll on bedliner (tan al's liner) to finish the job. I know others have used metal tape or even some type of bondo as a filler under the liner, but I would really prefer to weld them shut. With that being said, last time I welded was back in metal shop in high school 11 years ago. Even though its been a while, I'd prefer to tackle this on my own. Would my novice skills and a cheap arc welder from harbor freight be up to the task?
 
You might want to get some scrap sheet metal to practice on first. Use a non-ferrous item such as a copper welding spoon on the backside of the hole to help with welding it shut. Be sure to clean away the paint and primer around the holes before you start. Most importantly, take your time.
 
In the past I have soldered holes like this closed-rat-tail file hole to shiny on inside hole-edges of steel-heat with propane torch-touch solder to hole. With practice can get solder in holes only. Works well if you're careful with heat can barely scorch paint. Maybe practice on something of similar thickness. If you do it right wont even need to sand if using bedliner. Perfected this years ago on cars that used to have trim held on with clips in holes and didn't have brazing torch.
 
Good advise above, practice on some sheet metal before you get busy on your rig.

I'm going thru this myself right now, half done. Notes to self after first day: turn power down to avoid too much burn thru, copper/brass spoon on back side is good, just need another set of hands unless you can find one with a magnet/clamp assembly to fit inside the panel space, I build up half-way, grind down, finish filling hole, grind again, be careful to not overheat the metal with welder and/or grinder, take your time.

Its a tedious process, patience is vital to a nice end product. Good luck...
 
The solder method is actually fairly easy once you get used to it. Try it. Quick tiny circles facing hole-then touch solder to hole-may have to hit quick again with torch. Got the idea years ago they used to braze up to dechrome-so why not use solder-which is considered top notch body repair and for years cars were built using it. Wish I had pics.
 
Having more experience with this than most...
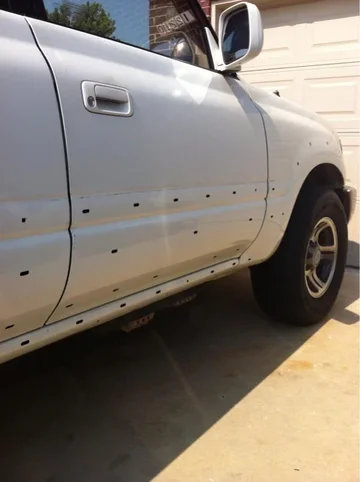
image-3849215887.webp

I'd originally planned liner, but having spent a year on rust abatement for an older LC, I'm changing plans back to paint and my welding job sucks for paint.

If liner is determined to be the definitive plan, this method would work fine.

Unless willing to pull panels to afford access to the back side of the hole, to back with an aluminum block, the holes are too large to fill with wire, without getting the panel too hot, even with a 110 mig, in my experience.

I didn't want to pull them ( in retrospect, I wish I had have and welded patches ) so wound up getting body nails, which are a composition that works well for filling holes and literally look like a sixteen penny nail.

Prepped by running a rebar wire tier in the hole to remove paint on the inside edge of the hole.

Inserted nail head in hole, tacked, moved to next.

Came back and tacked again, moved to next.

Repeat, as necessary.

Cut off the nails, grind the slag, primer, then liner.

It's a lot of hole to fill and not enough metal in the panel skin to puddle into a good patch.

In retrospect and with the experiences gained on a rusty Pig that should've been crushed, I would've pulled the panels and made 20GA patches for the holes.

Trace the hole ( or slots, in my case ) on paper, then transfer to flat stock.

Cut out of the flat stock to the inside of the traces line.

Run the wire out of the tip, then tack a 6-8" long piece to each of the patches, creating a handle.

Insert patches in hole, tack, tack, tack, tack then grind.

Little filler and she's ready for paint prep.

OR

Buy non-US body panels and call it a day, especially before welding the 162 holes that riddle the LX body shell.

image-3849215887.webp
 
The solder method is actually fairly easy once you get used to it.

Talked to several old timers around here that used to braise with lead and they all seemed to think the holes were entirely too large on a vertical surface, to do this, plus you need access to the back side.

Now, I can't differentiate which were easier on mine, all I know is it sucked butt, but there were some that were large enough that if they were stressed, it pop a "filler" be it solder, lead, or epoxy, out.

My opinion, not rooted in any actual experience beyond what's stated, is that the nail method works the best for liner. Give the wire a backer and when it heats does provide done degree of strength, by welding into the panel itself.

Still think the best way to do it is patching the hole with same gauge material.
 
I'll echo Chris' advise. I have solder and not a lot of experience with it but can't imagine how I'd fill this large of a hole with it. On a horizontal surface, maybe but not in this instance.

I should have looked at your thread Chris, I'm only filling in the 48 holes/slots in my '97 40th edition and its been fun using my MIG. I'm going to try the TIG on the last half to see if its any easier but doubt it will be. Its just a slow and tedious process...
 
Having more experience with this than most...


In retrospect and with the experiences gained on a rusty Pig that should've been crushed, I would've pulled the panels and made 20GA patches for the holes.

Trace the hole ( or slots, in my case ) on paper, then transfer to flat stock.

Cut out of the flat stock to the inside of the traces line.

Run the wire out of the tip, then tack a 6-8" long piece to each of the patches, creating a handle.

Insert patches in hole, tack, tack, tack, tack then grind.

Little filler and she's ready for paint prep.

OR

Buy non-US body panels and call it a day, especially before welding the 162 holes that riddle the LX body shell.

I'm glad my 80 isnt an LX! Thats a lot of holes. Lots of good ideas here but I think the above method might be the way to go. By creating "patches," the amount of filler is greatly reduced. I also like the handle idea. That way I dont have to try and get the copper spoon behind each of the holes. So would I be able to trim 20ga patches with tin snips?
 
... the holes are too large to fill with wire, without getting the panel too hot, ...

Agree, it could be done, but way too much work. Wherever possible/accessible I would use a small backer piece cut from 18G, slightly larger than the hole.

When accessible, hold/clamp it to the backside and tack it on. When not accessible, tack a handle (wire, nail, etc) onto the patch, work it through the hole, tack the patch on then break/cut the handle off.

Control the heat by working several holes at once. Tack once, move to the next hole, tack, repeat. Allow each site to cool to the touch before adding another tack.
 
I'll preface with the fact that ih8rust much more than mud, which can be attributed to the experience gained on Pigs.

My concern with a larger patch is the area that can't be primed. I realize that may doing petty, but having seen a two or three year old patch job on another project that began rusting in the overlap, it is a possibility

On my PP80, I'm seeing rust bleeding through the primer. Once lined, I don't think it'd be visible, but would eat at the skin under the liner, probably unnoticed until it was necessary to patch...which would be challenging with the liner.

All relative to how long one plans to keep, I guess, or how much you and your descendants want to be cursed by FOs.
 
Inthe rust belt you'd better clean up/cover/paint/whatever burned areas behind any of these processes or it will come right through anyway-it's bare.
 
...
My concern with a larger patch is the area that can't be primed. I realize that may doing petty, but having seen a two or three year old patch job on another project that began rusting in the overlap, it is a possibility
...

Not something we worry much about, but if you are in a rust bucket area, needs to be addressed. Doesn't matter if it's an overlap or glops of uneven metal from tacking/welding, both will hold moisture, need to be treated.

Inthe rust belt you'd better clean up/cover/paint/whatever burned areas behind any of these processes or it will come right through anyway-it's bare.

Yep, any area sanded, welded, etc, removes the factory rust preventive, the area needs to be retreated, inside and out. Any overlaps need to be seam sealed, the rest properly coated.
 
I have a dream.....

If the Pigs don't break or kill me and in the distant future, building a rust proof body to swap to my PP80 when the frame off occurs.

A dream of a perfect shell, one free of imperfections, like sunroofs and port installed rust accelerators at the roof rack and spoiler's feet. One with cakes fixed cargo glass and a headliner that allows for taller drivers.

Doors and hatch without the Al Capone-ish, fully automatic, bullet hole riddling, but perfect with clear glass and solid skin.

Dream where fenders that aren't holey ( I know it's not a word ) enough to preach to the choir, but pristine solid steel. Virgins to the "mall crawler" exterior most of the world was subjected to with flare flair.

Ahhhhhh.

A Venezuelan or Brazilian body, hopefully waxed regularly.

Blasted to the bare steel, three to four coats of epoxy primer, two coats of ceramic liner to the inside skins, followed by two coats of tinted white deadener.

Same coating schedule as above, topped with a layer of liner on the under body and inner fender wells.

Then, pristine Toyota white paint, as fresh as the driven snow .....
 
Not something we worry much about, but if you are in a rust bucket area, needs to be addressed.

Wouldn't think OK to be the rust belt, but whatever they treat roads with in the four events we had this year are through a top notch, high dollar PCd tie rod and drag link like it was butta.

Why I regret the interior skin sound mat, because I can't see what's going on there, unlike a frame I can continually wire wheel and paint.
 
IMO, the holes are not too big to fill with a mig welder, if you angle the tip and apply to the edge slowly it can be done. It takes time as you need to take breaks between to not overheat the panel. I have done several 80's this way.

An arc welder is going to be too hot to fill those holes.
 
TIG for me and patience... Plus TIG (pure argon no mix) will burn small amounts of oxidation. So glad I have a 92 only had flair holes. I also invested in a 20 dollar copper spoon with magnetic holder! Priceless.

But for half the price of a unit and gas and tungsten you could find a CL welder to do it for you... Quite a few folks on mud have gone that route.
 
Last edited:

Users who are viewing this thread

Back
Top Bottom