Weatherproof Connector Options? (1 Viewer)

This site may earn a commission from merchant affiliate
links, including eBay, Amazon, Skimlinks, and others.

PAToyota

Keystone Cruisers
SILVER Star
Joined
Oct 4, 2009
Threads
51
Messages
2,998
Location
South Central Pennsylvania
So, things have expanded from the Weather-Pack connectors since the last time I looked into things - Deutsch, Weather-tite, Metri-pack, Delphi-GT, Deutsch-DT, Superseal... Well, you get the idea...

I'm looking to do some wiring projects and want to get the connectors and the tools to be able to do things right.

Any advice on choosing a style of connector to run with?

Seems like a lot of different people are making "Weather-Pack" connectors - all billed as "Weather-Pack" but made by Astro-Pneumatic, Jackco, Fastronix, etc. I'm guessing the patent ran out (probably explains all the other ones too - to continue a patent)? But are the different brands all interchangeable?
 
I'm a fan of Burton Sub-Sea dry-mate connectors myself. Maybe because I designed the whole shell size 12 in the 5500 line? Naw......
Water tight to ~10,000 feet down. Plug and receptacle bodies are passivated 316SST by default, unless you order them in something more exotic. Their contacts are similar to MIL-38999 type contacts in the mate/de-mate region, but the back-sides (where you would connect with them) is not to the 38999 spec. The even use a similar nomenclature to the 38999 spec for the body size and number of contacts, but they will NOT mate with anything other than other Burton products or the couple mfg's who've cloned them.
image.jpg

:)
 
I'm about to pull the trigger on one of these JRready kits: Deutsch Crimping Tool - https://www.jrdtools.com/collections/deutsch-crimping-tool

Amazon has a number of options that include a crimping tool and a starter assortment of the pins, plugs, receptacles, and such. The JRready website currently has discounts, but it ships directly from China. I'm going to go through Amazon just to make it easier on myself if there are any issues and I have to return it.
 
Just an update. I did end up buying the JRready setup linked above.

But last week I had to do some Weather Pack work on a project (owner's requirement) and once again I'm reminded of how easy the Deutsch stuff is in comparison.

The first is just size. Top is a six pin Weather Pack, connectors, and seals versus the Deutsch on the bottom with six pin DT, pins, and wedges. The finished Weather Pack is about three times the size of the Deutsch setup.
IMG_6076.JPG


The next issue is assembly. As I said before, it's fussy. Where you just stick the solid Deutsch connector into the tool, insert the wire, and squeeze, the Weather Pack tool is stepped and you have to line up the tool so that it crimps around the seal and crimps around the wire. The arrows in the first photo are trying to point at the two steps. This isn't too bad at the bench, but doing it on a vehicle can be an absolute pain. Here I was trying to install connectors behind the shock tower and it was hard to see well enough up under the fender to make sure everything was lined up properly. The Deutsch tool makes the process much easier to do "blind" and still get good results.
IMG_6077.JPG

IMG_6078.JPG


Then, getting the crimped connector and seal properly seated into the body is clumsy. You push it into the back of the body, but it doesn't always latch. This is also when you find out if your crimp was good enough or if the wire pulls loose from the connector. The Deutsch with the wedges is much more straightforward.
Finally, actually using the connectors can be a pain. The crimped connectors move around in the body, so it can be difficult to get everything lined up so that the connectors go together. With the long six position plugs, I then actually had to use pliers to squeeze the two halves together. The Deutsch connectors line up much more easily and snap together - and apart - much easier. Granted, most of the time you're not putting these together and taking them apart often, but if you are I'd definitely recommend the Deutsch setup. Unpinning the connectors is also much easier with the Deutsch setup. For this headlight wiring, the wires would have to be unpinned to remove the headlight shell as everything feeds through a hollow threaded bolt (top of last photo). I screwed up and mislocated two wires and had to unpin them - resulting in having to recrimp one when I messed it up.

The Deutsch connectors are more expensive - particularly when you use the solid pins, but I feel it is worth it over the struggle I had with the Weather Packs if you're doing any amount of them.
 
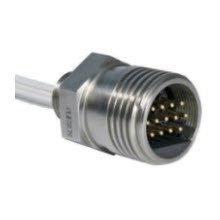
I went with the solid contacts, which are more expensive and require a more expensive crimp tool, but that's a lot easier than the stamped and formed contacts to assemble. The crimper is pretty idiot-proof as far as getting everything lined up and solidly crimped.
IMG_5669edit.JPG


Comparing the Weather Pack and Deutsch, I do like that you can use multiple wire gauges in the same Weather Pack connector by just changing the connectors and seals on the Weather Pack - for Deutsch you have to use different connectors (DTM for 16-24GA, DT for 14-18GA, DTP for 10-14, DTHD for 6-14GA). The downside to that flexibility is that the Weather Pack connectors are much bulkier for smaller situations - the connector is the same size whether you're doing 20GA or 12GA, just the seal and connector change. It can also be difficult to tell the connectors apart unless you really look at them - the number and size of the tangs that grip the wire are the only difference.

Fussy... I think that is my best comparison of the Weather Pack to the DT/DTP stuff.

The end result is ok, but getting there is... fussy... Well, and the end result is bulky.

With the Deutsch, you put the pin in the crimper and adjust the stop to bring the pin up flush. There is a go/no-go tool to set the tension on the crimper (in the crimper in the photo above). With the crimper set, strip your wire, stick it in the pin, and crimp. Push your pins into the connector, slide the locking wedge in place, and you're done.

As noted above, for the Weather Pack you have to align everything each time. Strip your wire, feed the terminal seal onto it, put a terminal on the wire, and crimp the back ears onto the seal a bit with your fingers so that everything holds together long enough to get it into the crimper. The crimper die has a "step" in it because there are the ears that crimp around the bare wire and then the back ears that crimp around the seal and the wire insulation. Too far forward and the back ears of the bare wire legs don't get crimped. Too far back and the portion to crimp the bare wire ears cuts into the seal. If you get all that right, you probably also have to adjust the tension on the crimper to get it to fully crimp the ears. With the connectors on the wires, push them into the connector and then snap the "keeper" down to lock things together.

I couldn't get the crimper to cleanly crimp the ears, so had to crimp first with one size up to get things going in the right direction and then crimp again with the proper size. Otherwise it would twist the connector and deform it. Also, the connectors for different gauges are determined by how many bare wire ears and how long the ears are on each one. The 20-18 ga ones have three ears, the 16-14 ga ones have two short ears, and the 12 ga ones have two longer ears. The short and long ones you pretty much have to compare side by side to see which are which. Of course, a few had gotten mixed up...

You can use stamped Deutsch connectors as well, but the connectors are different sizes and are more visually different. Still, I'm glad I went with the solid terminals after this experience with the stamped ones.
 
I detect a fiberglass buggy body on a Berrien chassis.......

I have come to use and order the two short tab/ear terminals on all wire gauges. Not correct at all, but I have yet to have a problem with this. All terminals get the "Pull Test" when removed from the crimper.
On my crimper the tabs for the seal need to be squeezed in - particularly the tab furthest from the crimper's pivot pin. I tend to load the terminal first, then insert the wire with the seal already in place at the edge of the insulation. Insertion depth is easy, the terminal goes all of the way in until the seal tabs are flush to the side of the crimper jaws.
 
A lot of quality sensors and devices use metripack connectors. I tend to incorporate them because they are so darn universally common.

I have never, ever used a weatherpack connector. I thought they were obsolete around 1989.
 
Good thread and thanks to everyone who’s contributed. The only thing I can add is to research your amperage requirements and check the amperage ratings of the specific terminals you’re going with. I looked for a month trying to find a bulkhead connector that had terminals that were rated for over 15 amps. Finally found TE Connectivity and Mouser Electronics which have pretty exhaustive catalogs of Deutsch, Aptiv, and other brand connectors and bulkheads. Most of the common bolt-fastened Deutsch bulkheads use their #16 contact pins and are only rated for 13.5 amps. You must graduate to their #12 contacts to get a 25 amp rating, #8 contact for a 50 amp rating, and a #4 for 100 amps.
I went with a Deutsch HD30 bulkhead with multiple contact sizes to accommodate my requirements. Deutsch also manufactures its DRB line of square/rectangular “jack-screw” bulkheads that have multiple contact sizes, but the smallest size is 48 pins.

01C04C7E-69CA-4651-8806-ACED23F101C8.png


A18134BC-CCCD-4B2C-9A6F-B0F5AE96A1CC.png


C3737BEB-E054-4295-9A89-DEC15906B088.png
 

Users who are viewing this thread

Back
Top Bottom