I wanted to get something done early this week on the truck while I’m waiting for some parts so I decided on this mini project. Wiring in the headlight warning buzzer took about two hours start to finish and was pretty easy. I am pretty bad with electronics so the only way I was able to do this was following Wayne Tangen’s instructions off the Yahoo 3FE group. The instructions are under his files and he has schematics and different directions for the 60 series and the 80 series. I am doing a quick writeup because if you don’t visit the 3FE Yahoo Group then you could’ve missed this easy project that could save your battery.
Here’s the instructions done by Wayne Tangen, they are done well so I will copy and paste them in first before showing my install pics:
“When Ken found the location of the ignition beeper a few days ago, it inspired me to figure out how to wire it in to my lights. I pulled the box out and reverse-engineered it. It turns out that the beeper is shown on page 3-1 of my FJ-62 wiring diagram and is called the "seat belt warning relay"!?! For those interested, here's how you could wire it up so lights left on would make it beep when you open the door:
1. Splice a wire into the fused taillight circuit. Probably the easiest way to do this is to pull the glove box and splice into the green wire for the glove box light. From there it's easy to route your wire alongside the existing wiring harness and down to the beeper box.
2. Cut the unlock warning switch wire. This is the red-white wire going to pin 3 of the beeper box.
3. If you want the beeper to only turn on when the lights have been left on, but not when the key has been left in the ignition, then tie pin 3 of the beeper box to your new wire from step 1. Be sure to insulate the exposed end of the unlock warning switch wire or you might start blowing dome light fuses.
4. If you want the beeper to turn on when the lights have been left on or when the key has been left in the ignition, the process is a bit more involved. Get a couple of general-purpose diodes (I used 1N4004s because I had some lying around) and solder their cathodes (banded ends) together; tie this common diode connection to pin 3 of the beeper box. Solder the anode (non-banded) end of one diode to the red-white wire going to the unlock warning switch, and tie the anode of the other diode to the wire you spliced in during step 1. Insulate all exposed metal and you're done!
I followed steps 1, 2, and 4 and the mods worked as expected. If anyone wants a schematic of the beeper circuit, I'll finish untangling it and post it here.
Wayne Tangen”
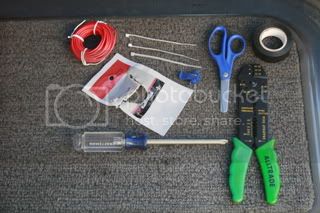
For this project you need a wire stripper, a few small zip ties, <4 feet of wire, 2 diodes, screwdriver, and electrical tape. To do it properly you should have a soldering iron and a splice connector but I did it with what I had. I may go back in later and solder them since they are easy to access.
Here’s the two diodes you need that cost 99 cents.

Here’s a picture of the splice connector I used to tap into the green glovebox light wire.

To get to the green glovebox wire you should take out the glovebox. It’s easy to do and requires only a few screws be taken out. You also have to unscrew the spring glove box light button.


Now that you know where to splice the green wire I’ll move on to the seat belt warning relay. It’s located in the passenger kick panel and it looks like this:

Here’s a shot with it next to the wiring and it’s connector.

This pic shows my final install with the two diodes connected up to green glovebox light wire, and the two ends to the red and white wire.

Wayne’s instructions were straight forward and offer two ways to do this so I won’t elaborate unless there are questions. I can take more pictures if anyone is unsure of disassembly or wiring.
-Randy
Here’s the instructions done by Wayne Tangen, they are done well so I will copy and paste them in first before showing my install pics:
“When Ken found the location of the ignition beeper a few days ago, it inspired me to figure out how to wire it in to my lights. I pulled the box out and reverse-engineered it. It turns out that the beeper is shown on page 3-1 of my FJ-62 wiring diagram and is called the "seat belt warning relay"!?! For those interested, here's how you could wire it up so lights left on would make it beep when you open the door:
1. Splice a wire into the fused taillight circuit. Probably the easiest way to do this is to pull the glove box and splice into the green wire for the glove box light. From there it's easy to route your wire alongside the existing wiring harness and down to the beeper box.
2. Cut the unlock warning switch wire. This is the red-white wire going to pin 3 of the beeper box.
3. If you want the beeper to only turn on when the lights have been left on, but not when the key has been left in the ignition, then tie pin 3 of the beeper box to your new wire from step 1. Be sure to insulate the exposed end of the unlock warning switch wire or you might start blowing dome light fuses.
4. If you want the beeper to turn on when the lights have been left on or when the key has been left in the ignition, the process is a bit more involved. Get a couple of general-purpose diodes (I used 1N4004s because I had some lying around) and solder their cathodes (banded ends) together; tie this common diode connection to pin 3 of the beeper box. Solder the anode (non-banded) end of one diode to the red-white wire going to the unlock warning switch, and tie the anode of the other diode to the wire you spliced in during step 1. Insulate all exposed metal and you're done!
I followed steps 1, 2, and 4 and the mods worked as expected. If anyone wants a schematic of the beeper circuit, I'll finish untangling it and post it here.
Wayne Tangen”
For this project you need a wire stripper, a few small zip ties, <4 feet of wire, 2 diodes, screwdriver, and electrical tape. To do it properly you should have a soldering iron and a splice connector but I did it with what I had. I may go back in later and solder them since they are easy to access.
Here’s the two diodes you need that cost 99 cents.
Here’s a picture of the splice connector I used to tap into the green glovebox light wire.
To get to the green glovebox wire you should take out the glovebox. It’s easy to do and requires only a few screws be taken out. You also have to unscrew the spring glove box light button.
Now that you know where to splice the green wire I’ll move on to the seat belt warning relay. It’s located in the passenger kick panel and it looks like this:
Here’s a shot with it next to the wiring and it’s connector.
This pic shows my final install with the two diodes connected up to green glovebox light wire, and the two ends to the red and white wire.
Wayne’s instructions were straight forward and offer two ways to do this so I won’t elaborate unless there are questions. I can take more pictures if anyone is unsure of disassembly or wiring.
-Randy


")
