- Thread starter
- #41
Navigation
Install the app
How to install the app on iOS
Follow along with the video below to see how to install our site as a web app on your home screen.
Note: This feature may not be available in some browsers.
More options
Style variation
You are using an out of date browser. It may not display this or other websites correctly.
You should upgrade or use an alternative browser.
You should upgrade or use an alternative browser.
Project Duragoat: My 1974 FJ40 Build Thread
- Thread starter Bsquared
- Start date
This site may earn a commission from merchant affiliate
links, including eBay, Amazon, Skimlinks, and others.
More options
Who Replied?- Thread starter
- #42
- Thread starter
- #44
- Thread starter
- #45
- Thread starter
- #46
Cross member Fabrication
Gusseted the 90's to add a little strength, driver side sits ontop of angle welded to scab plate on the frame. passenger side bolts to bottom of angle to allow the member to be removed. used 1/2 inch bolts. added gusset to the angle as well.
The V allows clearance for front drive shaft. there is plenty of room there. i'm sure it wold allow 4-6 inches of lift and still clear.


I was getting ready to be done by the time i added the gussets, again, welds not so pretty, but functional.


Gusseted the 90's to add a little strength, driver side sits ontop of angle welded to scab plate on the frame. passenger side bolts to bottom of angle to allow the member to be removed. used 1/2 inch bolts. added gusset to the angle as well.
The V allows clearance for front drive shaft. there is plenty of room there. i'm sure it wold allow 4-6 inches of lift and still clear.


I was getting ready to be done by the time i added the gussets, again, welds not so pretty, but functional.

djawahir
SILVER Star
Don't worry about the wiring. I'm sure you can sucker some fool into doing it for you!
djawahir
SILVER Star
No problem. I'll get your wiring squared away and you'll never have to worry about it. Just get the starter, fuel pump and tank. Then we can crank the engine and really piss off your neighbors.
- Thread starter
- #52
Fuel System
Started working on the fuel system. The first pic is the 3/8 fuel in line (top) and the 5/16 return line. I converted both to 6AN
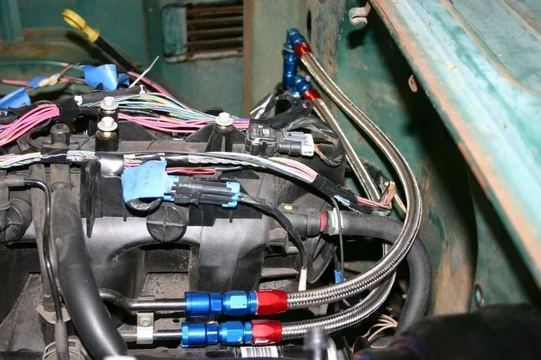
This pic shows a small custom bracket to manage the lines. Hopefully this will keep the lines from moving around too much, also I located the fuel filter in a handy spot. all std 6an fittings. The bracket was located on some existing firewall through holes with captured nuts.

This was my first time using the braided hose and fittings, it was easier than i thought it would be. i cut the line with a chop saw and metal abrasive blade, blew it out with compressed air. i will do a final flush on the system before firing the engine. These lines flow straight into the frame rail, pretty much protected all the way to the pump/tank.
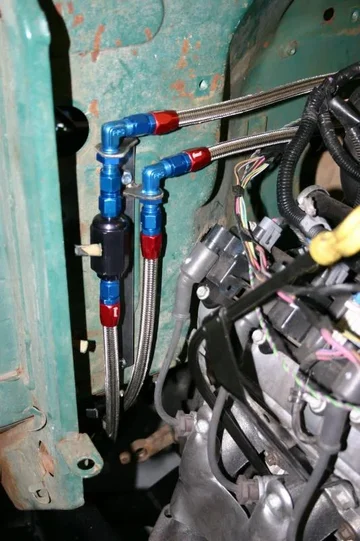


Started working on the fuel system. The first pic is the 3/8 fuel in line (top) and the 5/16 return line. I converted both to 6AN

This pic shows a small custom bracket to manage the lines. Hopefully this will keep the lines from moving around too much, also I located the fuel filter in a handy spot. all std 6an fittings. The bracket was located on some existing firewall through holes with captured nuts.

This was my first time using the braided hose and fittings, it was easier than i thought it would be. i cut the line with a chop saw and metal abrasive blade, blew it out with compressed air. i will do a final flush on the system before firing the engine. These lines flow straight into the frame rail, pretty much protected all the way to the pump/tank.

- Thread starter
- #53
More work on the fuel lines
More work on the fuel system, bulkhead connections near the fuel tank and plumbed the fuel pump. I ended up welding in a small patch where the original fuel lines passed through the tub. added 6AN bulkheads to barb fittings.
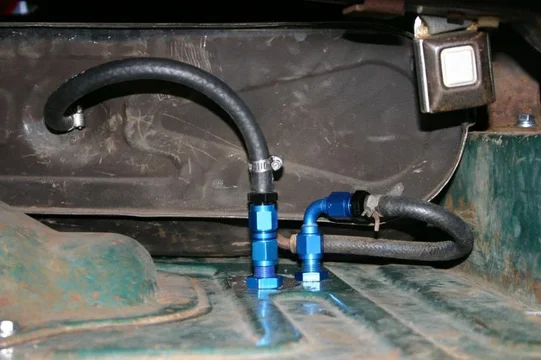
underside

fuel pump in the passenger side frame rail.


More work on the fuel system, bulkhead connections near the fuel tank and plumbed the fuel pump. I ended up welding in a small patch where the original fuel lines passed through the tub. added 6AN bulkheads to barb fittings.

underside

fuel pump in the passenger side frame rail.

orangefj45
Supporting Vendor
Nice going Brian! 
- Thread starter
- #55
- Thread starter
- #56
- Thread starter
- #58
Tackling the Wiring
No doubt, i was the most concerned about the wiring. the factory harness was a serious maze of wires. For the most part, i followed this guys Wiring Harness Information recommendations for removing the unneeded wires. Automatic trans controls, AC, Evap system, etc.
This is a picture of the current state of the harness. it will get bundled, taped, and covered once we get everything sorted out.

Here is a shot of my buddy Dylan who has been helping me get this mess sorted out. This guy is a wizard with a soldering iron!

Starting to make some of the primary power connections. Fabbed a small sheet metal plate while Dylan combined the lines for Ignition, Fuel Injectors, 02 sensors, etc. Used a small terminal block to connect all the relays power out.


No doubt, i was the most concerned about the wiring. the factory harness was a serious maze of wires. For the most part, i followed this guys Wiring Harness Information recommendations for removing the unneeded wires. Automatic trans controls, AC, Evap system, etc.
This is a picture of the current state of the harness. it will get bundled, taped, and covered once we get everything sorted out.

Here is a shot of my buddy Dylan who has been helping me get this mess sorted out. This guy is a wizard with a soldering iron!

Starting to make some of the primary power connections. Fabbed a small sheet metal plate while Dylan combined the lines for Ignition, Fuel Injectors, 02 sensors, etc. Used a small terminal block to connect all the relays power out.

- Thread starter
- #59
Tackling the Wiring
Added a small fuse block to run power to the key, odb2, and PCM.
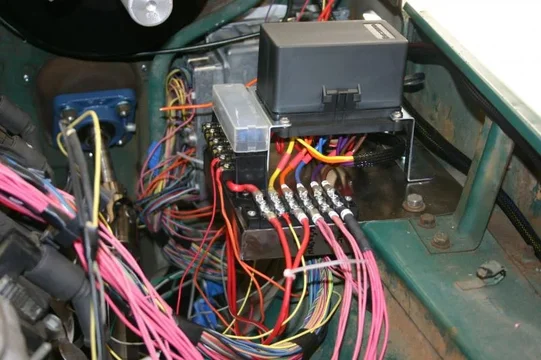
Here is a quick video that shows some general locations of the relay blocks, ODB2 connector, and where i mounted the computer.
Video of the electrical.

Added a small fuse block to run power to the key, odb2, and PCM.

Here is a quick video that shows some general locations of the relay blocks, ODB2 connector, and where i mounted the computer.
Video of the electrical.
- Thread starter
- #60
It Lives!!! The first fire!
For the past 6 months or so, have been waiting for this day to come. Flushed the fuel lines this morning and confirmed no leaks. Dylan hooked up the laptop to verify that everything that should be off was off, and we gave it a go.
I couldn't believe that it fired right up the very first time we tried. Nice work D!
Nothing like the sound of a V8 with open exhaust manifolds!
The First Fire!
For the past 6 months or so, have been waiting for this day to come. Flushed the fuel lines this morning and confirmed no leaks. Dylan hooked up the laptop to verify that everything that should be off was off, and we gave it a go.
I couldn't believe that it fired right up the very first time we tried. Nice work D!

Nothing like the sound of a V8 with open exhaust manifolds!
The First Fire!
Similar threads
- Replies
- 48
- Views
- 6K
Users who are viewing this thread
Total: 1 (members: 0, guests: 1)


