Navigation
Install the app
How to install the app on iOS
Follow along with the video below to see how to install our site as a web app on your home screen.
Note: This feature may not be available in some browsers.
More options
Style variation
You are using an out of date browser. It may not display this or other websites correctly.
You should upgrade or use an alternative browser.
You should upgrade or use an alternative browser.
I can make LPB box sides
- Thread starter Awl_TEQ
- Start date
This site may earn a commission from merchant affiliate
links, including eBay, Amazon, Skimlinks, and others.
More options
Who Replied?Whadaya makin' - a tank? The top rails aren't even 12 ga. I could go 14 ga. without to much trouble. Or you could get the inner walls and make it stonger by having made a box section.
The bed floor is one part I want to try and reproduce.
The plan is to do some road trips when my 45 is done, but that'll be another 12 months.
Edit - I checked this morning and the top rails are a thin 12 ga at about 0.100" thick....
ok, ok... 14 gauge will work
Very good chance I'll be going to Moab at the end of April. I'll have some room for stuff.
Awl_TEQ
Supporting Vendor
- Thread starter
- #46
71FJ40 and I are working on a deal for a complete bed. This will be my first and a prototype so I doubt very much if I'll have it ready for Moab and he (71FJ40) mentioned he may be able to meet halfway while he is in Montana in a few months. And I doubt 45 kevin would move a whole bed  .
.
Any interested party should get in touch with me soon. I am working today on installing the wiring harness for my Rav4 trailer so I can tow my utility trailer with my bed on it to the sandblaster. Once blasted I will be de-constructing and replicating all the parts of the bed for production. I will make the bed sides first for those that have already ordered them, you know who you are. I will make a few extra for those who may miss this and ask for sides later. I am also experimenting with a different solution for the rib embossed in the wheel arch on the sides. It would be all sheet metal and no solid arch - never liked that solid arch anyway.

 .
.Any interested party should get in touch with me soon. I am working today on installing the wiring harness for my Rav4 trailer so I can tow my utility trailer with my bed on it to the sandblaster. Once blasted I will be de-constructing and replicating all the parts of the bed for production. I will make the bed sides first for those that have already ordered them, you know who you are. I will make a few extra for those who may miss this and ask for sides later. I am also experimenting with a different solution for the rib embossed in the wheel arch on the sides. It would be all sheet metal and no solid arch - never liked that solid arch anyway.

Well... I will be moving a whole bed as it is. What's one more strapped to the first one. You could always supply it as knock-down. Much easier to ship.
I'm about 99% sure I'll be at Cruise Moab at the end of April. I have room for a passenger if anyone is interested.
I'm about 99% sure I'll be at Cruise Moab at the end of April. I have room for a passenger if anyone is interested.
Awl_TEQ
Supporting Vendor
- Thread starter
- #48
What the heck - I can make the whole bed
I have been drawing parts and pieces of the long bed all week in my software at work. Some parts of the bed are quite simple - hat channels, z channels, c channels. Others are much more involved. The first tough one I'll nail down will be the center section of the bed floor. It's about 83" long by 39 3/4" wide and has 15 ribs. The first item to tackle is the rib. Because I don't have the tooling or tonnage to press it all at once I have to make four bends for each rib.
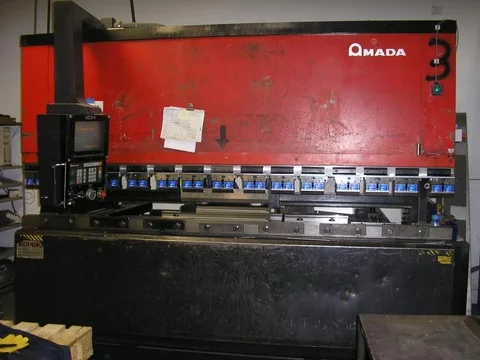
I played around with a few different die combinations until I settled on a 0.188" rad top tool and a 0.551 bottom V opening. This gives me a rib that has some radius to the corners rather than a sharp corner that standard tooling will give. The original floor has a very rounded rib - at least mine does.

I'm working with 20" long samples here to fine tune the layout of the bends.

I'll have no trouble making the complete floor. This is a 10' machine but I will have to buy another length of the top tool to get to 83". One minor issue is the controller on this machine can only hold programs with 20 or less bends. I need 60 bends to make the floor so I'll have to make a couple of programs.


I have been drawing parts and pieces of the long bed all week in my software at work. Some parts of the bed are quite simple - hat channels, z channels, c channels. Others are much more involved. The first tough one I'll nail down will be the center section of the bed floor. It's about 83" long by 39 3/4" wide and has 15 ribs. The first item to tackle is the rib. Because I don't have the tooling or tonnage to press it all at once I have to make four bends for each rib.
I played around with a few different die combinations until I settled on a 0.188" rad top tool and a 0.551 bottom V opening. This gives me a rib that has some radius to the corners rather than a sharp corner that standard tooling will give. The original floor has a very rounded rib - at least mine does.

I'm working with 20" long samples here to fine tune the layout of the bends.

I'll have no trouble making the complete floor. This is a 10' machine but I will have to buy another length of the top tool to get to 83". One minor issue is the controller on this machine can only hold programs with 20 or less bends. I need 60 bends to make the floor so I'll have to make a couple of programs.

Awl_TEQ
Supporting Vendor
- Thread starter
- #50
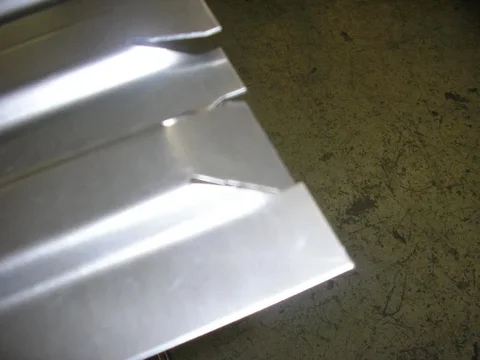
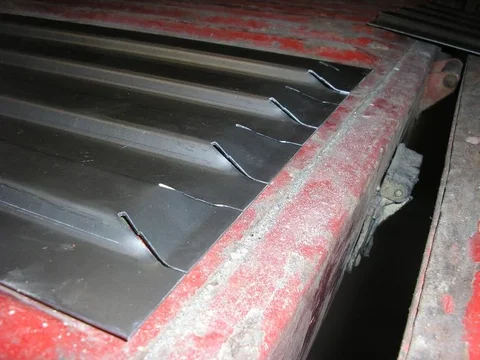
Getting pretty close. Mine is a little sharper rib and the spacing is a bit off. I might be able to go to a .236 top tool and make the rib taller. I'll have to do a few more samples and play around a little more. Also I see now that I can punch the slits a little tighter and have a smaller gap for easier welding. The gap at the top of the rib is 0.087". I can go down to 0.062" and not taper it out as much.
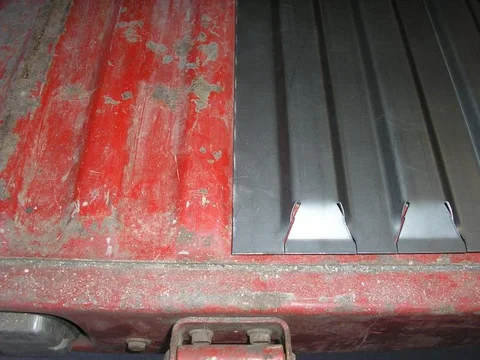
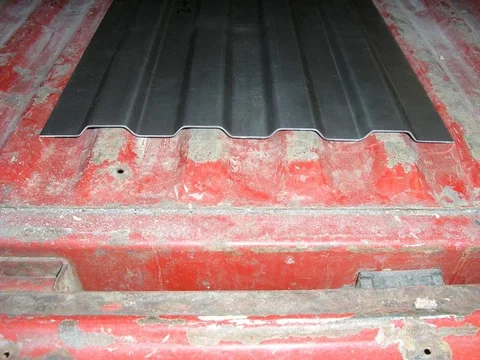


Awesome!!
Your bed doesn't look to bad in those pics
Your bed doesn't look to bad in those pics
Awl_TEQ
Supporting Vendor
- Thread starter
- #52
No it's not too bad - definitely useable if blasted and new sides put on. It would need a couple of patches and cracks welded up on the flanges that spot weld to the sides. The wheel humps are all beat up but could be hammered back close to shape. I am leaning towards making an all new one for myself and selling it as is. 
Awl_TEQ
Supporting Vendor
- Thread starter
- #53
I made the trek to work today to do some more work to nail down the floor ribs. There are actually quite a few variables involved when doing it the way I am. The width on top, the angle and length of the transition to the valley and the width of the valley blah, blah, blah
Anyway, I made several attempts to get it right, made more difficult with the bed 30 minutes away... These all look the same to you I'm sure but they are very different up close. I made my best guess and took a sample home to check my progress.
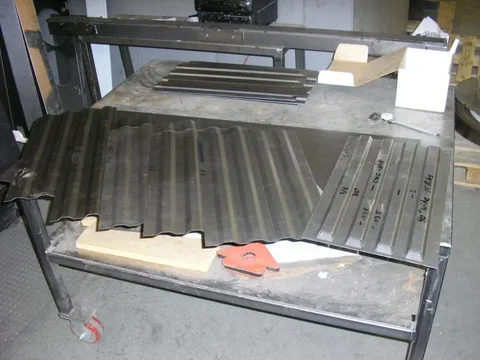
I think this will do nicely. Now to make a full size version with the slits for the tailgate end detail.
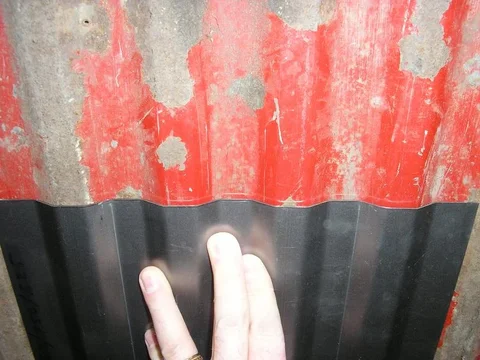


Anyway, I made several attempts to get it right, made more difficult with the bed 30 minutes away... These all look the same to you I'm sure but they are very different up close. I made my best guess and took a sample home to check my progress.

I think this will do nicely. Now to make a full size version with the slits for the tailgate end detail.

Awl_TEQ
Supporting Vendor
- Thread starter
- #54
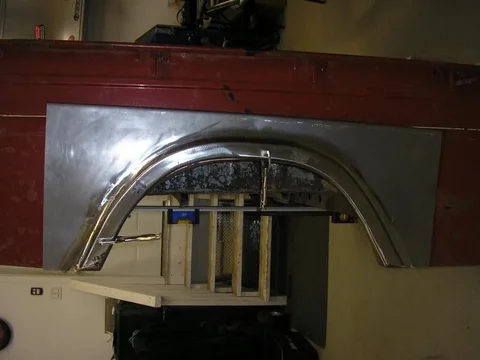
Also made a 16 ga wheel arch rib to see how well it would weld on. Keep in mind this is a proof of concept and the real thing will have smaller gaps and fit up better for easier welding. I punched out a copy of the wheel opening from the bed sides I make. It's just a flat sheet. Then I punched out a rib and formed the edges down. Nothing fancy, just slits cut to relieve the metal as it forms the arch.


I'l spare you seeing my so-called welding skills. I started TIG welding it on using standard steel filler (70S2) and was putting way too much heat into it and getting warping. So I switched to Everdure (silicon bronze) which takes less heat and is way easier to fill gaps with. I buffed off the lumps with a flapper wheel, et voila
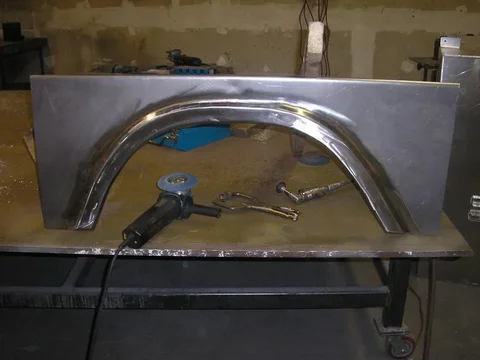


I'l spare you seeing my so-called welding skills. I started TIG welding it on using standard steel filler (70S2) and was putting way too much heat into it and getting warping. So I switched to Everdure (silicon bronze) which takes less heat and is way easier to fill gaps with. I buffed off the lumps with a flapper wheel, et voila

Awl_TEQ
Supporting Vendor
- Thread starter
- #55
I think it looks pretty good. This one has a bit of wave here and there due to my crappy welding but my guy Shawn has mad skills and will make them much better. The lesson learned is that I don't need the solid 1/2" laser cut arch if I can do it this way.

my ugly spot - couldn't sand it away

Stayed pretty flat. Should be even better with a real welder making sparks.


my ugly spot - couldn't sand it away

Stayed pretty flat. Should be even better with a real welder making sparks.

Great work there. Loved seeing the pictures. Nice technique. Good finish. Cant wait to see the finished product..
Ehsan
Ehsan
No no..Thanks ehsan. That's high praise indeed coming from you, someone with experience in this sort of thing.
Ehsan
Similar threads
Users who are viewing this thread
Total: 1 (members: 0, guests: 1)


