
Navigation
Install the app
How to install the app on iOS
Follow along with the video below to see how to install our site as a web app on your home screen.
Note: This feature may not be available in some browsers.
More options
Style variation
You are using an out of date browser. It may not display this or other websites correctly.
You should upgrade or use an alternative browser.
You should upgrade or use an alternative browser.
How-to: Tailgate light switch restore
- Thread starter Super77
- Start date
This site may earn a commission from merchant affiliate
links, including eBay, Amazon, Skimlinks, and others.
I've seen work-a-rounds posted, but never repairs.... Can't hurt to post and might make someone's day.
Super77 said:My tailgate interior light was flaky, so I finally pulled the latch/switch mechanism and did a proper repair. Works perfectly now. Anyone interested in a write up? Or, has this been covered elsewhere?
Holy coincidence! I was trying to figure out how to fix mine today and gave up after coming up empty on the forum. By all means please do a write up!!
i would like a write up with pics please. i havent been able to find my switch...
I'll post a harrumph, please put up your write-up. Mine isn't in need of repair, yet, but you never know! 
- Thread starter
- #7
The Writeup
Difficulty: 2/5
Time: 1-2 beers
The first thing you need to understand is how the tailgate light switch works. The lamp on the ceiling has one hot lead and two ground leads. When you slide the switch to "on", you use one of the two ground leads, completing a circuit. When you slide it to "door", it uses the other ground lead, which runs through the latch in the rear hatch. Your front dome lamp works similarly. Got it?
The rear hatch latch has a ground wire connected to it that runs from the lamp. Inside the latch is a little spring mechanism that completes the ground circuit when the latch is released. This is where the problem was in mine. A lot of crud and oxidation had built up inside, and the mechanism was no longer making a reliable circuit.
I troubleshot the problem by jumping the ground wire connected to the hatch latch directly to the body. The circuit was completed, and the light came on. Ergo, the problem was not with the wiring or the lamp.
The hatch latch is removable, but you cannot disassemble it. Below are the steps I took to clean mine so it works again.
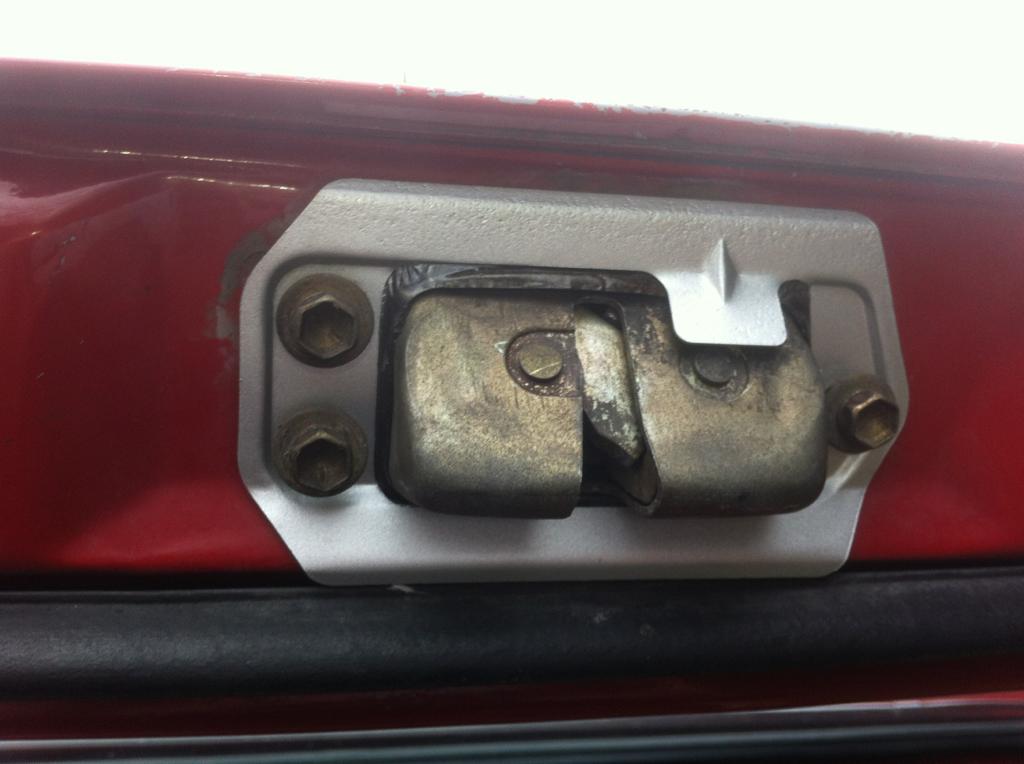
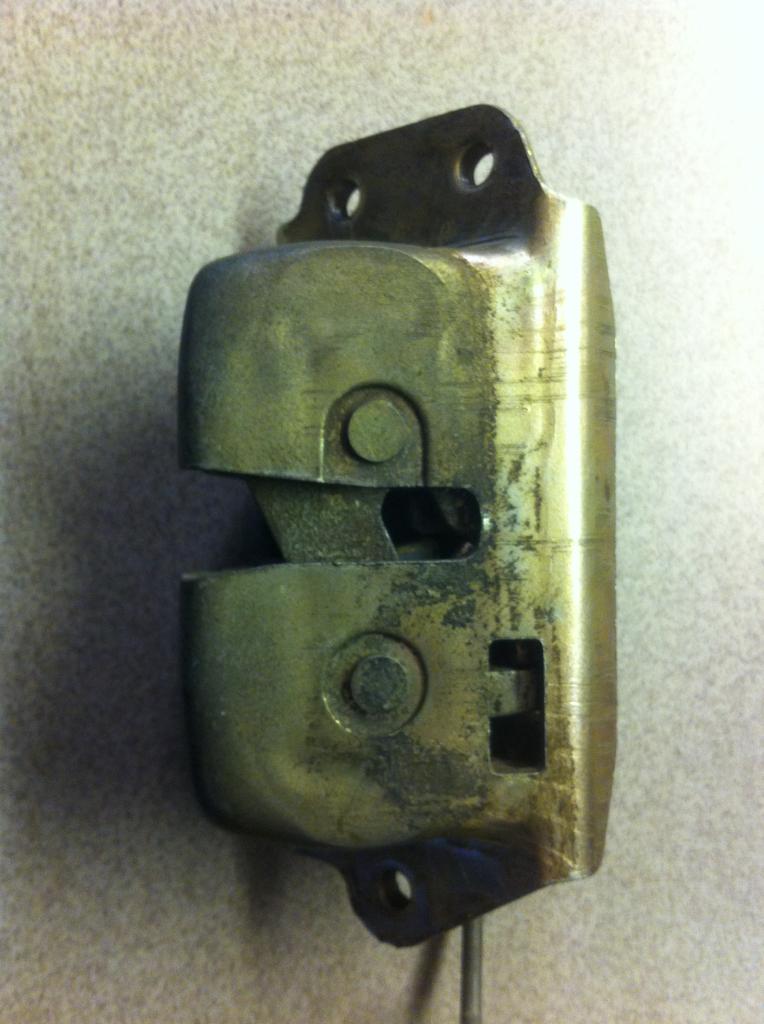
1. Remove the latch. Start by unscrewing the 3 bolts visible from the exterior. Remove the striker cover (mine is silver in this pic).
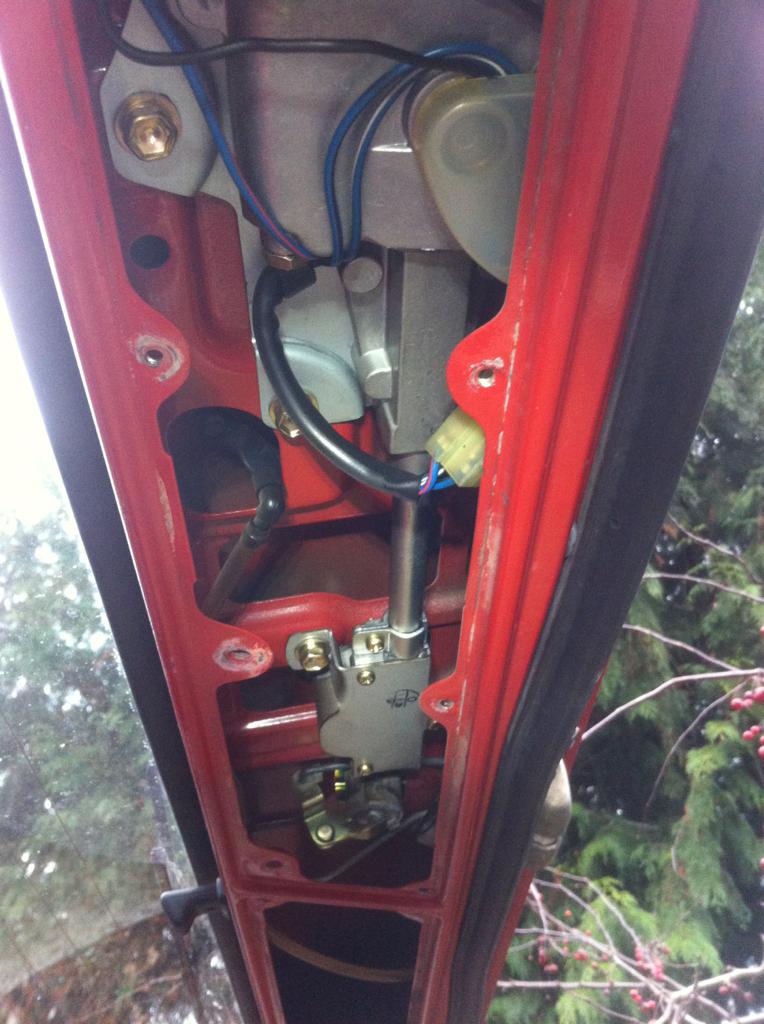
2. Remove the interior service panels for the wiper motor.
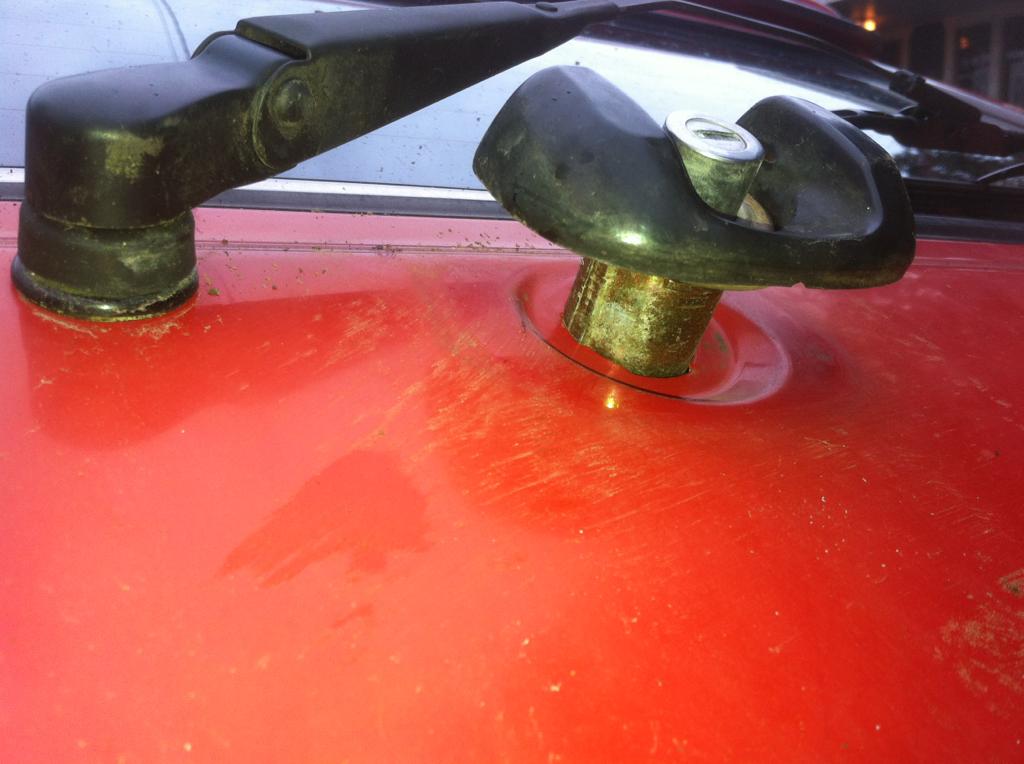
3. Withdraw the lock cylinder. It's held in on the inside with a sliding retainer. Use a screwdriver for leverage. Your fingers will thank you. No need to fully remove it - just pull it out about an inch.
4. Disconnect the two mechanical levers connected to the latch. There is a small green plastic clip that rotates on one of them, and a white plastic clip that pulls away on the other. BE CAREFUL. Break these, and your lock won't work right. Also disconnect the ground wire from the lamp.

5. Now the latch should be completely free. Wiggle it out through through the service panel. You'll need the following tools, or similar. The dental pick is key, but if you don't have one, you can make something similar with a paper clip and needlenose pliers.

6. Look at the back of the latch. There is a small window through which you can see the tail of a spring that tucks under a small metal tab. It's indicated with an arrow below. This is the switch. It needs to be making firm contact with the back of the tab to close the circuit. Over time, dirt and corrosion accumulate.

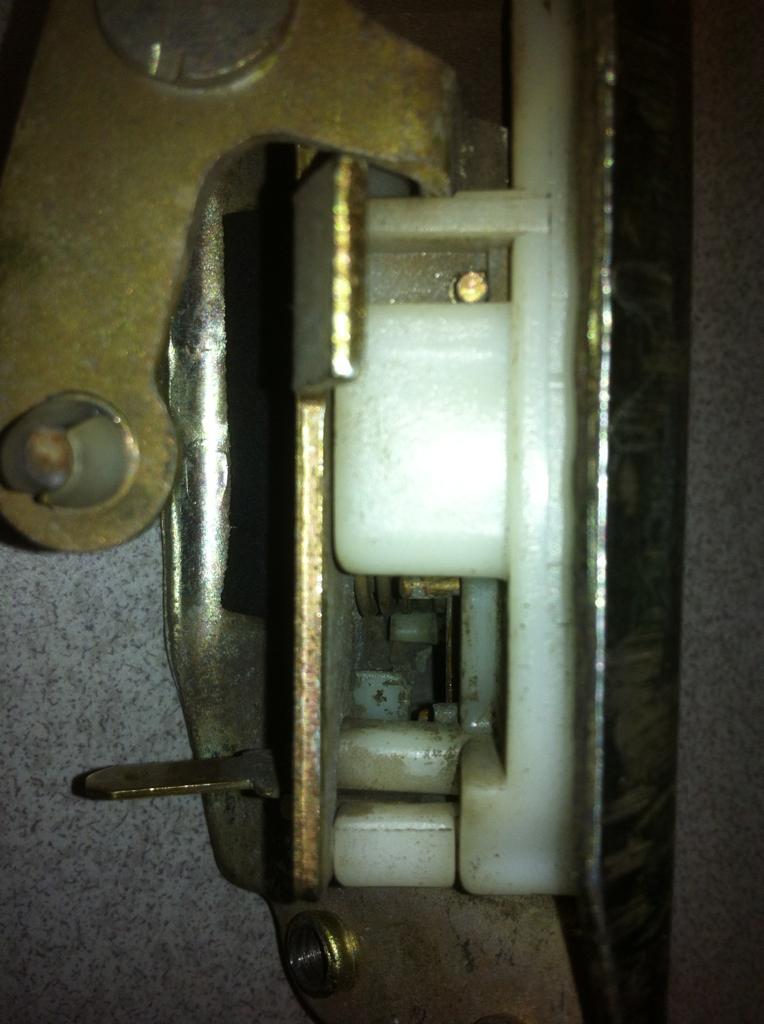
7. Turn the latch over and press the locking tongue all the way up into the striker slot, as it does when the rear hatch is closed. There should be 2 clicks and it should look like this:
8. Turn the latch around again. You should now see how the spring has retracted out from under the metal tab. Now the circuit is open (lamp off), as when the hatch is latched:
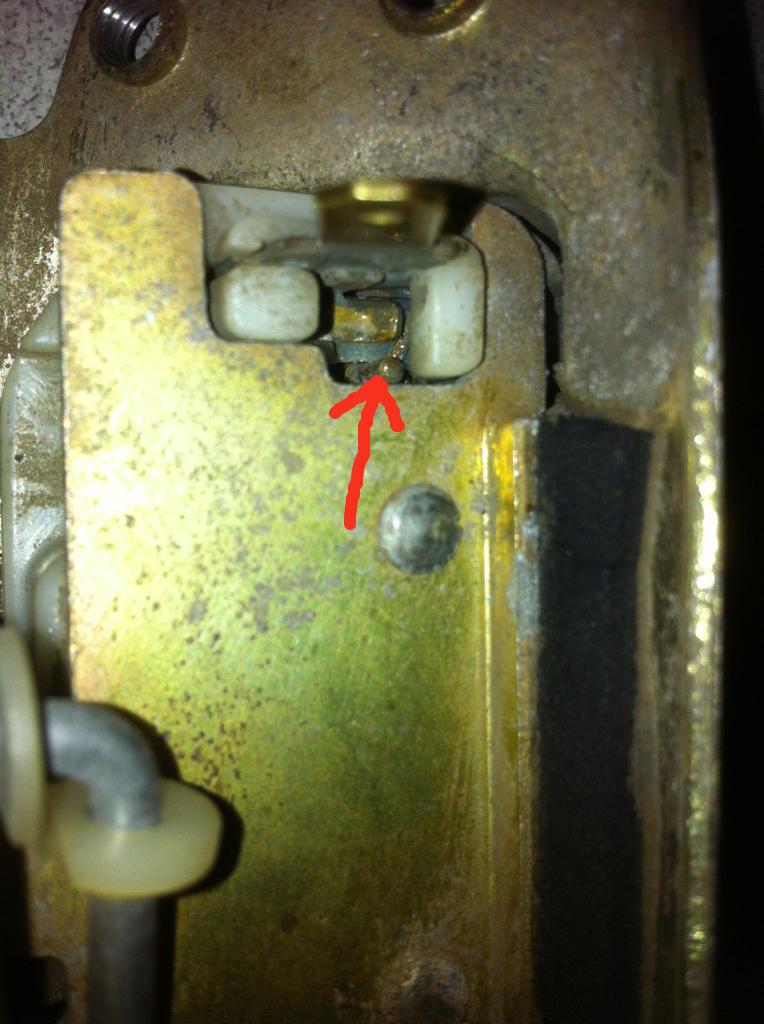
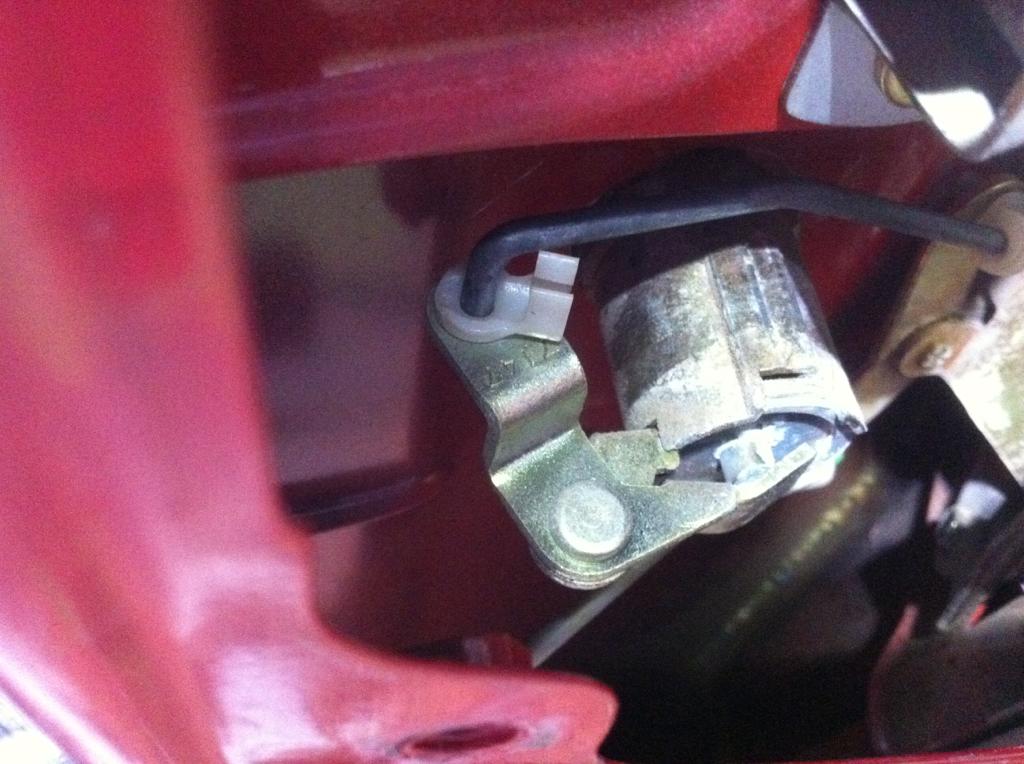
Using the brush, compressed air, and a dental pick (or bent paperclip), carefully scrape the spring rod and the back surface of the metal tab, to expose clean metal. You won't be able to see the back of the tab, so it's important to give it a good thorough scrape. Here is another point through which you can access the spring:
9. Pivot the locking mechanism release to unlock the latch and ensure that the spring is making good contact. You'll need to leave the latch in an unlocked state when you mount it back on the car. Give everything a final blow-out with compressed air. You can check your work with a multimeter by connecting probes to the ground wire spade connector and the latch body. Set the meter to continuity check. Working the latch locked and unlocked (remember the 2 clicks), you should see the continuity change.
10. Assembly is the opposite of disassembly. Don't forget to reconnect the ground wire!
As you can see, the latch mechanism is a riveted-together assembly. If your spring is broken or otherwise cannot be made to contact, you're SOL. I didn't price a new latch, but they're probably not cheap. If I had to, I'd probably consider installing a mercury switch in the hatch to override a broken latch switch. It should be simple to do, but I'll leave that writeup to someone else.
Difficulty: 2/5
Time: 1-2 beers
The first thing you need to understand is how the tailgate light switch works. The lamp on the ceiling has one hot lead and two ground leads. When you slide the switch to "on", you use one of the two ground leads, completing a circuit. When you slide it to "door", it uses the other ground lead, which runs through the latch in the rear hatch. Your front dome lamp works similarly. Got it?
The rear hatch latch has a ground wire connected to it that runs from the lamp. Inside the latch is a little spring mechanism that completes the ground circuit when the latch is released. This is where the problem was in mine. A lot of crud and oxidation had built up inside, and the mechanism was no longer making a reliable circuit.
I troubleshot the problem by jumping the ground wire connected to the hatch latch directly to the body. The circuit was completed, and the light came on. Ergo, the problem was not with the wiring or the lamp.
The hatch latch is removable, but you cannot disassemble it. Below are the steps I took to clean mine so it works again.
1. Remove the latch. Start by unscrewing the 3 bolts visible from the exterior. Remove the striker cover (mine is silver in this pic).
2. Remove the interior service panels for the wiper motor.
3. Withdraw the lock cylinder. It's held in on the inside with a sliding retainer. Use a screwdriver for leverage. Your fingers will thank you. No need to fully remove it - just pull it out about an inch.
4. Disconnect the two mechanical levers connected to the latch. There is a small green plastic clip that rotates on one of them, and a white plastic clip that pulls away on the other. BE CAREFUL. Break these, and your lock won't work right. Also disconnect the ground wire from the lamp.
5. Now the latch should be completely free. Wiggle it out through through the service panel. You'll need the following tools, or similar. The dental pick is key, but if you don't have one, you can make something similar with a paper clip and needlenose pliers.
6. Look at the back of the latch. There is a small window through which you can see the tail of a spring that tucks under a small metal tab. It's indicated with an arrow below. This is the switch. It needs to be making firm contact with the back of the tab to close the circuit. Over time, dirt and corrosion accumulate.
7. Turn the latch over and press the locking tongue all the way up into the striker slot, as it does when the rear hatch is closed. There should be 2 clicks and it should look like this:
8. Turn the latch around again. You should now see how the spring has retracted out from under the metal tab. Now the circuit is open (lamp off), as when the hatch is latched:
Using the brush, compressed air, and a dental pick (or bent paperclip), carefully scrape the spring rod and the back surface of the metal tab, to expose clean metal. You won't be able to see the back of the tab, so it's important to give it a good thorough scrape. Here is another point through which you can access the spring:
9. Pivot the locking mechanism release to unlock the latch and ensure that the spring is making good contact. You'll need to leave the latch in an unlocked state when you mount it back on the car. Give everything a final blow-out with compressed air. You can check your work with a multimeter by connecting probes to the ground wire spade connector and the latch body. Set the meter to continuity check. Working the latch locked and unlocked (remember the 2 clicks), you should see the continuity change.
10. Assembly is the opposite of disassembly. Don't forget to reconnect the ground wire!
As you can see, the latch mechanism is a riveted-together assembly. If your spring is broken or otherwise cannot be made to contact, you're SOL. I didn't price a new latch, but they're probably not cheap. If I had to, I'd probably consider installing a mercury switch in the hatch to override a broken latch switch. It should be simple to do, but I'll leave that writeup to someone else.
Last edited:
good writeup. put this in the under 50 dollar mods thread too, and can we get it stickied to the FAQ?
I"ll be doing this shortly! Thanks for the write up!!
- Thread starter
- #11
Just want to reiterate the step where you short the light circuit by grounding the light wire (the one connected to the latch mechanism) to the body. Make sure the light switch is slid to the "door" position. Do this BEFORE you disassemble everything, and if the light does not come on, you probably have a problem that lies outside the latch mechanism.
Just executed this write up because I was annoyed the light never came on when the rear gate opened up and i would always have to switch the light to 'on' for there to be light.
Anyways, this is a great solid write up that explains everything to a 'T'. The only thing i would emphasize is to THOROUGHLY scrape the back surface of the metal tab. This is nearly impossible to reach and I almost broke my metal tab but it's here, where the corrosion/dirt builds up and is the crucial part of connectivity.
Super77 - Thanks again for this little fix.
Super, great write up! Thank you for posting.
Just want to reiterate the step where you short the light circuit by grounding the light wire (the one connected to the latch mechanism) to the body. Make sure the light switch is slid to the "door" position. Do this BEFORE you disassemble everything, and if the light does not come on, you probably have a problem that lies outside the latch mechanism.
Old post but just want to stress the importance of this step as Super77 indicated. My Red with White stripe ground wire was broken inside the protective sheath up at the top left corner of the hatch. Check continuity with a OHM meter as he described.
In my case I couldn't fish the old wire out in order to reconnect it together...so I fished a new wire from the light switch and connected to the good part of the old wire. This was from the top left corner of the hatch down to the key lock on the hatch. Cleaned everything up as described and all is good.
Good write up Super77. Thanks, John
I did this and now my key lock won't work.
Really old thread but starting to look into my rear cargo light. From what I can tell it will come on when rear glass is opened however it is not reliable. Sometimes I need to wiggle the plastic lock lever on the lower tailgate when rear glass is open for it to come on. Any idea how that comes into play?
Unreliable lighting as described above is a grounding issue. The switch in the latch relies on completing the ground circuit through the hinges of the upper hatch. If they are worn, loose and rusty, then they make a poor ground. Wiggling the tailgate probably just wiggles the truck enough to make it ground. I added a small wire between the upper hatch and the body with a couple small eye ends and screws real discreet like. Now the light is perfectly reliable aside from the worn switch/latch mechanism.
I wish these latches were still available new. I have cleaned mine and worked on it, but the plastic portion of the latch is cracked, so the internal pin and spring can shift and move making the tiny copper contact spring come out of prime position. The riveted construction makes actual disassembly and internal repair pretty impractical. The tiny copper contact on mine is also almost worn in half from the return spring riding on it. Only a matter of time before it breaks off
I wish these latches were still available new. I have cleaned mine and worked on it, but the plastic portion of the latch is cracked, so the internal pin and spring can shift and move making the tiny copper contact spring come out of prime position. The riveted construction makes actual disassembly and internal repair pretty impractical. The tiny copper contact on mine is also almost worn in half from the return spring riding on it. Only a matter of time before it breaks off
Nice write up (I know, its been here a while). Good to know where to look for electrical culprits. My only critique would be to re-name the thread something like "rear interior light switch fix".
When I first saw the title I thought the discussion was about the tailgate plate lights. @Super77
When I first saw the title I thought the discussion was about the tailgate plate lights. @Super77
I found my way here looking to repair my cargo light switch - but realized mine was too far gone. I had the brilliant (pun intended) idea to replace the mechanical switch with a simple mercury tilt switch, which was easy - just position the tilt switch inside the rear hatch so it closes the circuit when the rear hatch glass is horizontal, and voila. Then, I was was driving at night and had a strong deja vu - the cargo light was flickering as bumps etc. momentarily close the mercury switch.... I remembered the same thing happening years ago with the mechanical switch when it still worked: it flickered constantly on vehicle vibrations.
I fixed this, and so I'm leaving this here for anybody else who is in the same situation. I added a small circuit at the light fixture which turns the light on after a second or so of delay when "door" mode is enabled, so momentary activation by my tilt switch (or your mechanical switch) won't flash the light, but opening the hatch will. I'm attaching the schematic and how it attaches to the light, as a pic of the small circuit before I wrapped it in tape, spliced it in, and stuffed it into the frame at the cargo light opening. Enjoy.


I fixed this, and so I'm leaving this here for anybody else who is in the same situation. I added a small circuit at the light fixture which turns the light on after a second or so of delay when "door" mode is enabled, so momentary activation by my tilt switch (or your mechanical switch) won't flash the light, but opening the hatch will. I'm attaching the schematic and how it attaches to the light, as a pic of the small circuit before I wrapped it in tape, spliced it in, and stuffed it into the frame at the cargo light opening. Enjoy.