New the forum but I thought I would share a tech article I put together. I was busy rebuilding another Hi-Lift jack and decided to do a full write up on the process of installing the Hi-Lift Fix-It-Kit. The kits run less than $20 and takes less than an hour to install. Follow along, let's do this.
How to Rebuild a Hi-Lift Trail Jack
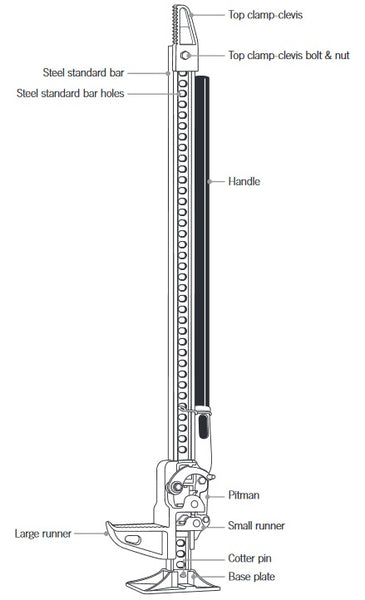
The Hi-Lift Trail Jack is one of the most versatile pieces of equipment you can carry on your offroad rig. It has the ability to lift your vehicle in order to change a tire, winch a downed tree out of the way, or can be used as a clamp to fix your wife's dining room table. The Hi-Lift is also one of the most neglected pieces of offroad gear. It sees months and years of being left outdoors, strapped to the roof or bumper of your truck. Rain, snow, and the burning sun do a number on your trail jack. It is important to take the time to inspect your equipment periodically and before every offroad trip, and the Hi-Lift jack is no exception. If you find that your Hi-Lift is not working properly or has been sitting for years, it is probably time to do a simple rebuild. We have outlined the necessary steps in order to rebuild your Hi-Lift and keep it functioning properly.
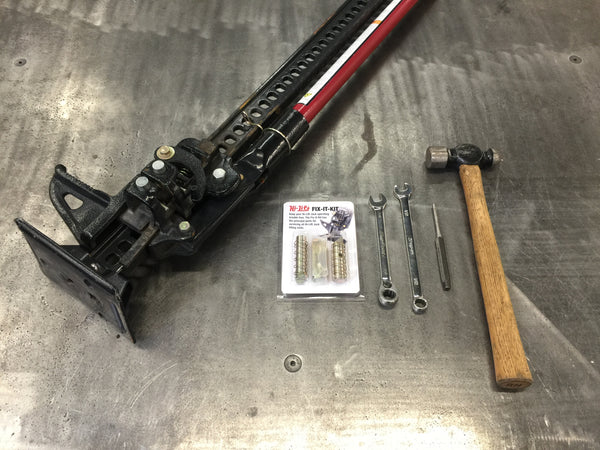
Items needed:
(1) Hi-Lift Trail Jack
(1) Hi-Lift Fix-It-Kit
(2) 1/2" wrenches
(1) Ball-peen hammer
(1) Small pin punch
(1) Safety glasses
Step 1: Clean your Hi-Lift Jack
If you have severely neglected your trail jack, now is the time to give it a thorough cleaning. Spray the whole jack down with Simple Green, or a non-corrosive degreaser, and rinse it off. This will keep you cleaner during the rebuild process, and keep any dirt or debris from sticking to the climbing pins when it comes time to assemble.
Step 2: Place Reversing Latch in UP Position
This is a simple step, but must be done in order for the rebuild to happen. Grab the Reversing Latch and pull UP, making sure to fully engage the latch.
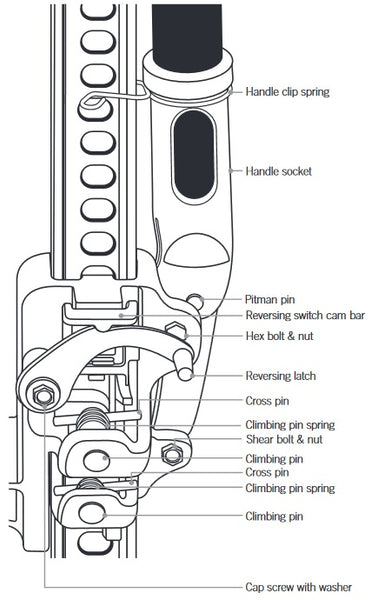
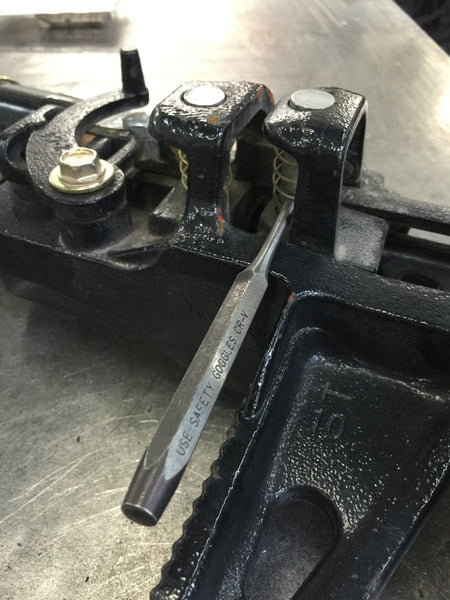
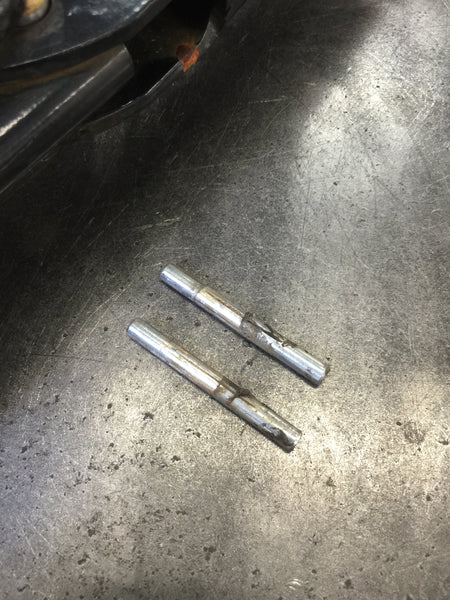
Step 3: Remove the Cross Pins
Grab your hammer and pin punch, and remove the Cross Pins. With the base of the jack facing you, it is easiest to remove the pins by hammering them out from left to right.
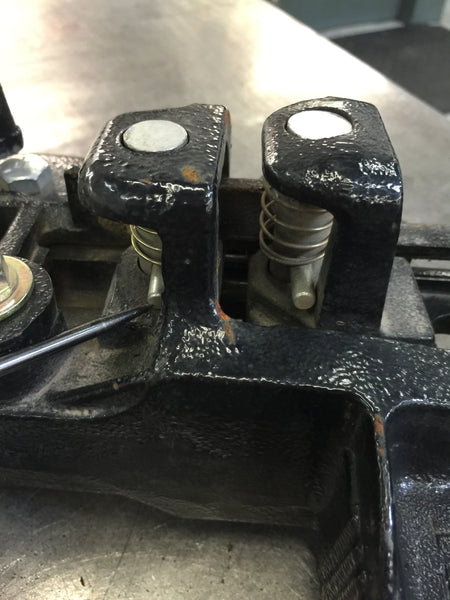
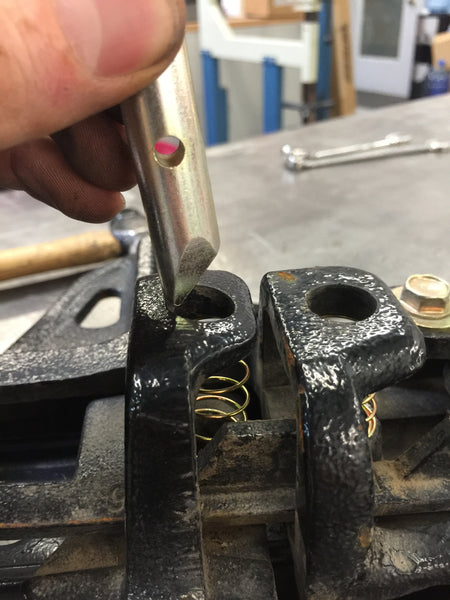
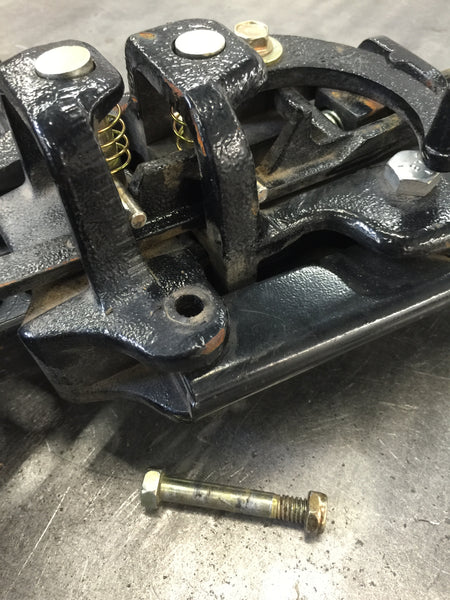
Step 4: Remove Climbing Pins and Springs
Now that we have removed the Cross Pins, we can remove the Climbing Pins and Springs. NOTE: Be sure to remember the orientation of the beveled edge on the climbing pin! The beveled edge will be facing up towards the top of the jack, if you commit it to memory now, you won't second guess yourself in the next steps.
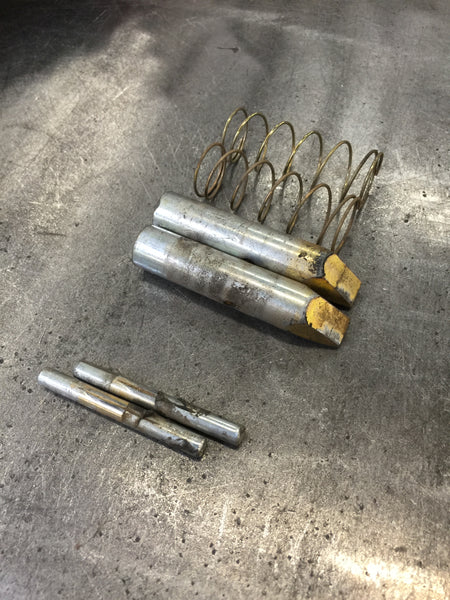
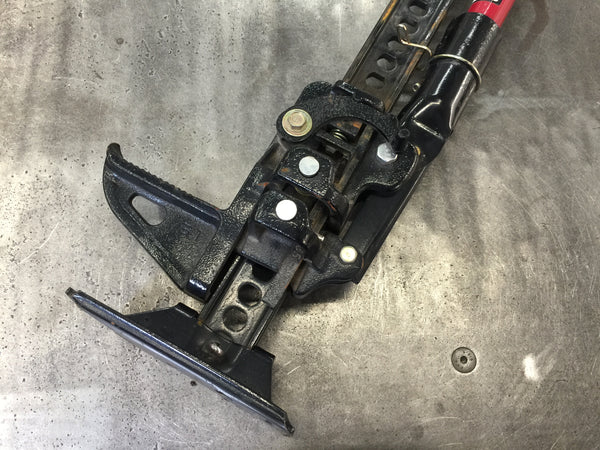
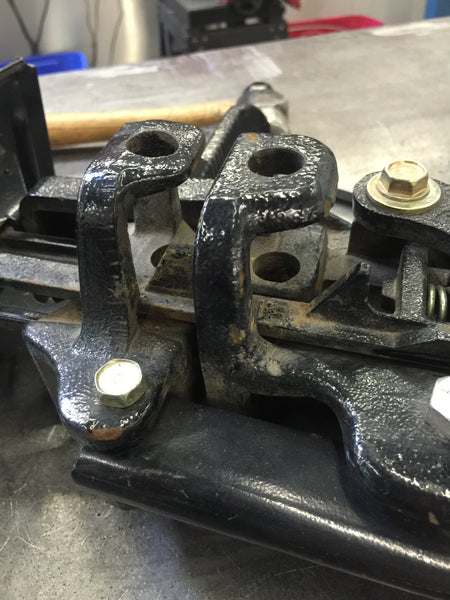
Pull the Climbing Pins out first, and then compress the Springs to remove them. Inspect your Climbing Pins for any unusual or excessive wear, as this may be a sign of further damage to your trail jack. You should now have a jack that looks quite empty. Take this time to remove any further contaminants or dirt from the Running Gear mechanism.
Step 5: Assembly
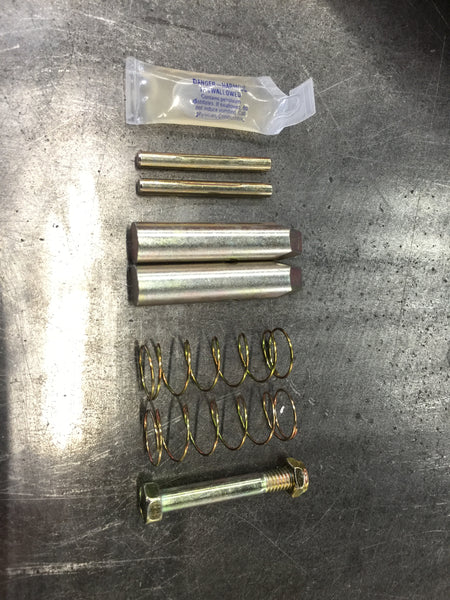
Now that you have a beautiful and clean Running Gear, it is time to reassemble your Hi-Lift. Open up your Hi-Lift Fix-It-Kit, and layout your parts. I find it easiest to do each runner assembly individually so I don't have to second guess myself on whether I oriented the Climbing Pins correctly.
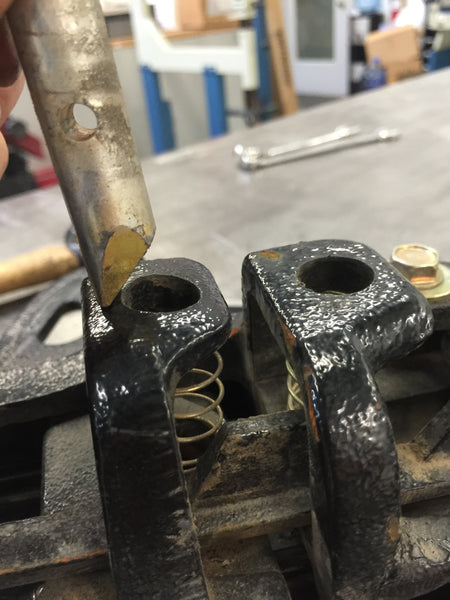
Grab one of your Climbing Pin Springs and install it in a runner location. Now install a Climbing Pin in the same runner that you placed your spring. Be sure to orient the Climbing Pins with the beveled edge facing towards the top of the jack!
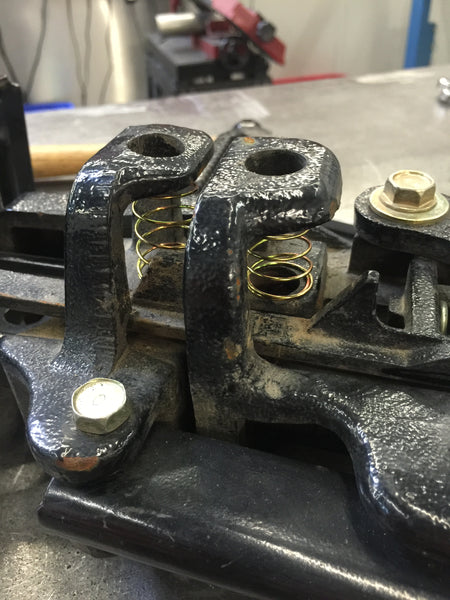
Take your new Cross Pin and install it. The Cross Pin must be installed below the spring, and not through it! You want the spring to press against the outside of runner and against the Cross Pin, which forces the Climbing Pin into the upright holes. Grab the base of the spring and compress it towards the palm of your hand. It is easiest to install the Cross Pins from right to left, the opposite of removal. Slide the smooth section of the Cross Pin into the Climbing Pin until it reaches the knurled section. Tap the Cross Pin with your punch and hammer, verifying that both sides of the spring are contained by the Cross Pin. Center the Cross Pin equally on both supports. It must be centered on the supports, which may mean it is not completely centered in the Climbing Pin, this is OK.

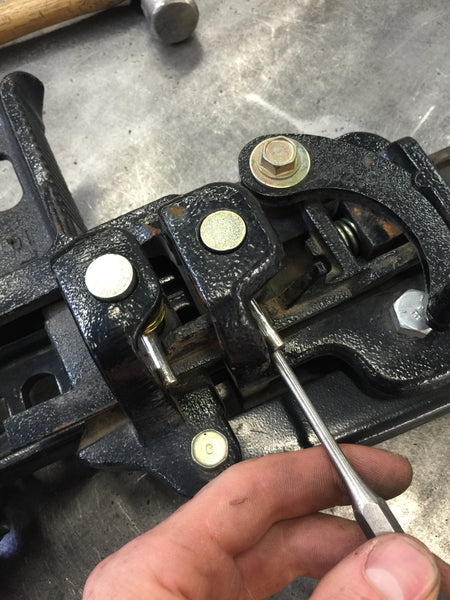
Repeat the same process on the second runner.
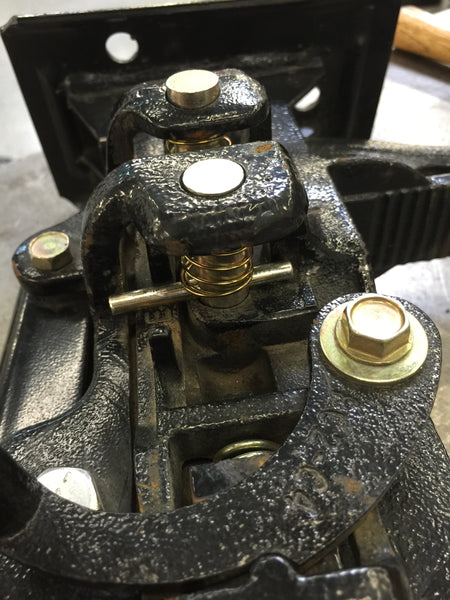
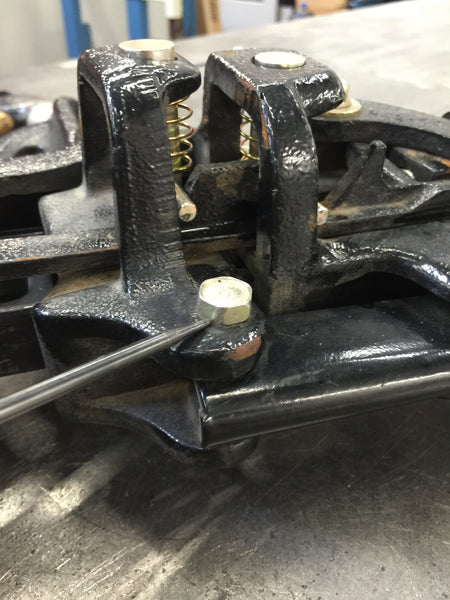
Step 6: Replace Safety Shear Pin
The safety feature built into every Hi-Lift, the Shear Pin, is designed to break if the Hi-Lift is subjected to excessive weight beyond its capacity but will not drop the load if the Climbing Pins are engaged. Grab your two 1/2" wrenches and remove the Shear Pin. If your Shear Pin is bent, you may have to use your punch and hammer to tap it out. Install the new Shear Pin included in the Hi-Lift Fix-It-Kit and tighten.
Step 7: Lubricate
Lubrication is important; it keeps everything moving freely and running like new. The following image shows the recommended lubrication spots. It is important to NOT lubricate the beveled end of the Climbing Pins nor the holes in the main upright steel standard. It is recommended to use the supplied lubricant with the Hi-Lift Fix-It-Kit as it will not attract and hold dirt and grit like a standard motor oil or grease.

Step 8: Test your Hi-Lift
Now that you have completed the rebuild, run your Hi-Lift up a few positions. Make sure both Climbing Pins are fully engaging, and that there is no binding. Lock your handle in the upright position and push the Reversing Latch down. Draw the handle out and the Runner Mechanism should drop to the base. If everything tests well, you have successfully rebuilt your Hi-Lift Trail Jack!
Keep Exploring!
How to Rebuild a Hi-Lift Jack
How to Rebuild a Hi-Lift Trail Jack
The Hi-Lift Trail Jack is one of the most versatile pieces of equipment you can carry on your offroad rig. It has the ability to lift your vehicle in order to change a tire, winch a downed tree out of the way, or can be used as a clamp to fix your wife's dining room table. The Hi-Lift is also one of the most neglected pieces of offroad gear. It sees months and years of being left outdoors, strapped to the roof or bumper of your truck. Rain, snow, and the burning sun do a number on your trail jack. It is important to take the time to inspect your equipment periodically and before every offroad trip, and the Hi-Lift jack is no exception. If you find that your Hi-Lift is not working properly or has been sitting for years, it is probably time to do a simple rebuild. We have outlined the necessary steps in order to rebuild your Hi-Lift and keep it functioning properly.
Items needed:
(1) Hi-Lift Trail Jack
(1) Hi-Lift Fix-It-Kit
(2) 1/2" wrenches
(1) Ball-peen hammer
(1) Small pin punch
(1) Safety glasses
Step 1: Clean your Hi-Lift Jack
If you have severely neglected your trail jack, now is the time to give it a thorough cleaning. Spray the whole jack down with Simple Green, or a non-corrosive degreaser, and rinse it off. This will keep you cleaner during the rebuild process, and keep any dirt or debris from sticking to the climbing pins when it comes time to assemble.
Step 2: Place Reversing Latch in UP Position
This is a simple step, but must be done in order for the rebuild to happen. Grab the Reversing Latch and pull UP, making sure to fully engage the latch.
Step 3: Remove the Cross Pins
Grab your hammer and pin punch, and remove the Cross Pins. With the base of the jack facing you, it is easiest to remove the pins by hammering them out from left to right.
Step 4: Remove Climbing Pins and Springs
Now that we have removed the Cross Pins, we can remove the Climbing Pins and Springs. NOTE: Be sure to remember the orientation of the beveled edge on the climbing pin! The beveled edge will be facing up towards the top of the jack, if you commit it to memory now, you won't second guess yourself in the next steps.
Pull the Climbing Pins out first, and then compress the Springs to remove them. Inspect your Climbing Pins for any unusual or excessive wear, as this may be a sign of further damage to your trail jack. You should now have a jack that looks quite empty. Take this time to remove any further contaminants or dirt from the Running Gear mechanism.
Step 5: Assembly
Now that you have a beautiful and clean Running Gear, it is time to reassemble your Hi-Lift. Open up your Hi-Lift Fix-It-Kit, and layout your parts. I find it easiest to do each runner assembly individually so I don't have to second guess myself on whether I oriented the Climbing Pins correctly.
Grab one of your Climbing Pin Springs and install it in a runner location. Now install a Climbing Pin in the same runner that you placed your spring. Be sure to orient the Climbing Pins with the beveled edge facing towards the top of the jack!
Take your new Cross Pin and install it. The Cross Pin must be installed below the spring, and not through it! You want the spring to press against the outside of runner and against the Cross Pin, which forces the Climbing Pin into the upright holes. Grab the base of the spring and compress it towards the palm of your hand. It is easiest to install the Cross Pins from right to left, the opposite of removal. Slide the smooth section of the Cross Pin into the Climbing Pin until it reaches the knurled section. Tap the Cross Pin with your punch and hammer, verifying that both sides of the spring are contained by the Cross Pin. Center the Cross Pin equally on both supports. It must be centered on the supports, which may mean it is not completely centered in the Climbing Pin, this is OK.
Repeat the same process on the second runner.
Step 6: Replace Safety Shear Pin
The safety feature built into every Hi-Lift, the Shear Pin, is designed to break if the Hi-Lift is subjected to excessive weight beyond its capacity but will not drop the load if the Climbing Pins are engaged. Grab your two 1/2" wrenches and remove the Shear Pin. If your Shear Pin is bent, you may have to use your punch and hammer to tap it out. Install the new Shear Pin included in the Hi-Lift Fix-It-Kit and tighten.
Step 7: Lubricate
Lubrication is important; it keeps everything moving freely and running like new. The following image shows the recommended lubrication spots. It is important to NOT lubricate the beveled end of the Climbing Pins nor the holes in the main upright steel standard. It is recommended to use the supplied lubricant with the Hi-Lift Fix-It-Kit as it will not attract and hold dirt and grit like a standard motor oil or grease.
Step 8: Test your Hi-Lift
Now that you have completed the rebuild, run your Hi-Lift up a few positions. Make sure both Climbing Pins are fully engaging, and that there is no binding. Lock your handle in the upright position and push the Reversing Latch down. Draw the handle out and the Runner Mechanism should drop to the base. If everything tests well, you have successfully rebuilt your Hi-Lift Trail Jack!
Keep Exploring!
How to Rebuild a Hi-Lift Jack
