First Timing Belt Change - 01 LX470 (1 Viewer)

This site may earn a commission from merchant affiliate
links, including eBay, Amazon, Skimlinks, and others.

Joined
Aug 13, 2013
Threads
40
Messages
370
Location
Chandler AZ
I am in the midst of timing belt and water pump change on our LX and thought I'd share my progress and get your input. Its my first time changing a timing belt and I am enjoying digging in and getting to know the truck.

2001 LX 470 104k miles. First TB change. First Water pump. AZ Mall cruiser - until me.

Disassembly has been pretty straight forward so far, but I am not done yet. I am going slow. I am also putting as many of the bolts and nuts back in their original locations as I can, rather than bag them. Works better for me than bagging and trying to remember where everything goes.

- Drained coolant with the drain valve on the bottom of the radiator.
- Removed air box and duct, no issues there. Next I went to the radiator hoses (upper and lower).
- Removed upper and lower radiator hoses. On the outlet side (DS or Toyota LH) I found some pitting and corrosion where the radiator hose clamps to the outlet port. I think this is what happens when you don't change your engine coolant every 30K like Toyota recommends. Comments?

The hoses were Napa with screw clamps, not Toyota. Also the radiator has been replaced with non-OEM at 90k miles. I am going to keep it for now. On a recent trip to MX, Ultragauge showed me a some periods where the coolant temp got to 199F when the car got up to 75+ mph. This prompted me to do the TB and Water pump now rather than later. Generally I never see the temp much above 190F. I noticed some splatter of coolant on the air intake manifold - probably from this coolant outlet interface. I don't plan to replace this outlet tube at this point unless it leaks when I reassemble.
photo (1).JPG


- Heater T's next - since the engine was drained. Sure enough the "hot side" or outlet T (I assume so anyway) broke and crumbled during removal. This is an 01 with 104k miles on it. AZ vehicle. In removing the broken side (on the engine side) I was very worried about fragments falling back into the engine. I don't want those little pieces percolating through the system. I thought about it over night and decided to to use my shop vac to suck as much coolant as I could out through that port. I got a lot of red coolant out and I hope any of those fragments out with it. Replaced with a new T and put the clamps with the ears facing up for next time.

- Fan shroud was just a pain. Broke one of the ears for the DS shroud clamp bolt (like scottm). Will use JB Weld and a washer to fix it once the shroud is back in. These AZ trucks don't have the rust, but they get brittle too with the dry heat. Several of the wire and hose plastic clamps are pretty delicate after 13 years.

- Fan and Fan clutch. I discovered when removing the radiator cooling fan assembly that one of the nuts was a 13 mm non-OEM item. So I added the correct nut to my parts list. Always disconcerting to find non-OEM parts.

- Thermostat housing and inlet pipe assembly. Two bolts and gently pried it out of its O-ring. Turned it over and discovered more corrosion. This is concerning.
photo (2).JPG
Its not terrible, but I worry about additional corrosion in areas where I can't see, that may weaken the manifold and result in a blow out type leak one day. I am contemplating changing the cross over tubes when I do the starter - in about 50K miles I expect. I am hopeful that replacing with new coolant and changing it regularly will avoid further corrosion. Also I think the corrosion only happens when there's air/steam, so it should only happen at the high points/air pockets in the system?

What do you think?

-Timing belt covers were OK. The PS side was easy and the DS a little harder. I have a hard time getting those electrical connectors to let go sometimes. Watch out for the inside clip on the lower left edge (facing the engine) on the DS cover. The DS one will take some wiggling to get out and back in, past the wires etc. Had to remove the oil filter cooler line for this one - no big deal. The middle cover was ok too.

- Fan bracket. Hardest part was the two nuts down by the AC compressor. The Land Cruiser Service Manual I have (hoping its same as the LX - or close enough) says that I should remove the AC compressor - but I didn't. I removed the two long bolts clamping the fan bracket to the AC comp bracket and followed spresso's advice to just bend the electrical connector bracket out of they way. Much easier. Thanks for that!

- Next up will be moving the Alternator out of the way.

I welcome your thoughts and input. Learning a lot about the truck and whats in there - which is the whole point.
 
- Removed upper and lower radiator hoses. On the outlet side (DS or Toyota LH) I found some pitting and corrosion where the radiator hose clamps to the outlet port. I think this is what happens when you don't change your engine coolant every 30K like Toyota recommends. Comments?

Electric drill + wire brush on the fitting.. I lube coolant hoses and fittings with NAPA Sil-Glyde silicone grease (NAPA # 765-1351)...far better than water or AF or spit. Very easy to remove the hoses if/when necessary.

The hoses were Napa with screw clamps, not Toyota.

I'm used to working on flying machines...I know it's overkill but if I have to use a worm drive clamp, I like to use 2 on each end. You could also use spring loaded toggle clamps, but IMO not cost effective save for something like turbo-charger hoses.

Also the radiator has been replaced with non-OEM at 90k miles. I am going to keep it for now. On a recent trip to MX, Ultragauge showed me a some periods where the coolant temp got to 199F when the car got up to 75+ mph. This prompted me to do the TB and Water pump now rather than later. Generally I never see the temp much above 190F. I noticed some splatter of coolant on the air intake manifold - probably from this coolant outlet interface. I don't plan to replace this outlet tube at this point unless it leaks when I reassemble.

If the radiator fluid looks crappy with sediment, I'd yank the radiator and have it cleaned/flushed before reassembly.

- Thermostat housing and inlet pipe assembly. Two bolts and gently pried it out of its O-ring. Turned it over and discovered more corrosion. This is concerning.

Gently scrape the rectangular hole with a single edge razor blade, finish with a wire brush and lacquer thinner. Toyota shop manual will show a form-in-place-gasket-material...I've used it, it works OK, but now as well as Permatex Ultra Gray silicone (#82194), IMO. Make sure you have a new o-ring for the housing, obviously. Change the thermostat. My LX runs in the 160-170F range, I've seen it get to 185F but that's in the Nevada desert at the height of Summer. As long as I were at it, I'd also address the crossovers now instead of later

I Also I think the corrosion only happens when there's air/steam, so it should only happen at the high points/air pockets in the system?

In my experience, after a couple of drive-cool down cycles, the system will self-bleed. If you fill through the radiator cap and fill the overflow tank an inch or 2 above the "FULL" mark, it will stabilize by itself. Since I'm OCD, I stick a piece of masking tape on the tank, mark the "FULL" line, and I can see the system bleed itself and then stabilize.

What do you think?

I think I'd make damn sure I'd drain the block completely...ridiculously easy with some 1/4" nylon tubing...a 10mm socket on the driver's side, and a 10mm flex socket on the passenger's. If you're seeing dirty coolant, you might fill with water only, take the system up to normal temp, and flush a time or two before you add the coolant. Coolant should be Toyota pre-mix or Zerex Asian if you can't find the Toyota stuff.

-I have a hard time getting those electrical connectors to let go sometimes.

Try spray silicone and letting them soak a while...be gentle. They're phenomenally expensive if you break one, and you'll need to make a tool to extract the contacts from the broken connector. amhik.

LX is identical to LC for what you're doing.

hth

Steve
 
Thanks for the great comments and tips Steve!
Do you use the NAPA Sil-Glyde silicone grease on the o-rings too. Seems like a good idea to me. They always seat better with a little silicon.
The Permatex Ultra Gray silicone (#82194) sounds good too, thanks for the tip. Do you use it for the water pump as well or does it come with an actual gasket? (My parts order arrives tomorrow).

Please tell me more about draining the block? Are there drain ports on the block you are referring too? I am tempted to run the hose through the engine for a bit to clean up any loose stuff. I can look for the drain ports in the FSM if I know roughly where too look on the engine.

A
A light coating of silicone grease on the o-rings is fine.

I've used the gray silicone for general coolant stuff. Started using it on :princess:'s Dodge/Cummins front and rear diff covers as that's the way it comes from the factory, i.e., no gaskets. The stuff is bulletproof. Let it set for an hour or 3 before adding coolant.
Block drains are located about 3/4 of the way toward the rear of the block...a valve that takes a 10mm socket and a 1/4" (maybe 5/16"...been a while) hose barb on the side of the valve. Stick the hose on the barb and in your drain bucket or bottle and go to it. FAR less messy than what you may be used to on American cars. Wouldn't hurt a bit to stick a hose on the engine and see what else you can loosen. You should see them on the opening page for the cooling system in the FSM. Easier to access if you remove the front wheels.

Steve
 
Looks like you're doing well so far. I'm guessing from the corrosion that whoever replaced the radiator did not use Toyota Super Long Life Coolant? There was no corrosion in my cooling system at 100,000 miles, with the original coolant.
 
When you remove the T's, remove them with all three hoses attached (as a group). Then remove the clamps and use the clamps again with new hoses and T's. Greatly reduces the risk of the T's crumbling while still attached to the system.
 
Tonight I moved the Alternator out of the way (sits in front of the idler pulley). I also made my crank pulley holder and seated it on the pulley.

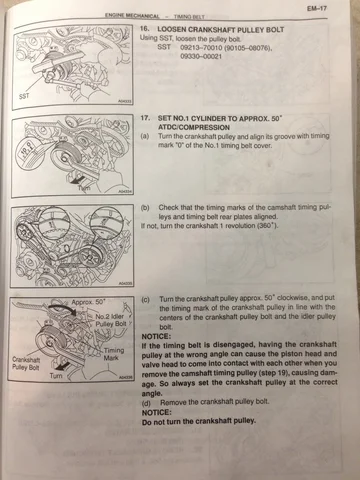
I turned the crank clockwise to get to 0 on the "#1 timing belt cover" and checked that the camshaft timing pulleys were aligned with the marks on the rear plates. Easy enough. The FSM instructs to now turn the crank to the 50 degrees clockwise so the crank pulley timing mark is aligned with the line between the center of crank pulley and the idler pulley bolt:
photo 4.JPG

While doing this I noticed the following mark - its a dimple painted white by the crank pulley. Also when the crank pulley mark is aligned with this white dimple, the lines on the crank pulley spokes are aligned with the "T" symbol on the rear plates. These appear to be in the 30 degree range from 0. I wondered what these marks are for, because they seem a lot more obvious than the 50 degree clockwise position for the TB change? My pictures below are with everything close to the 50 degree spot, but I wanted to show you and get your wisdom on the purpose of the other marks.

photo 1 (2).JPG
photo 2 (1).JPG
 
A light coating of silicone grease on the o-rings is fine.

I've used the gray silicone for general coolant stuff. Started using it on :princess:'s Dodge/Cummins front and rear diff covers as that's the way it comes from the factory, i.e., no gaskets. The stuff is bulletproof. Let it set for an hour or 3 before adding coolant.

Block drains are located about 3/4 of the way toward the rear of the block...a valve that takes a 10mm socket and a 1/4" (maybe 5/16"...been a while) hose barb on the side of the valve. Stick the hose on the barb and in your drain bucket or bottle and go to it. FAR less messy than what you may be used to on American cars. Wouldn't hurt a bit to stick a hose on the engine and see what else you can loosen. You should see them on the opening page for the cooling system in the FSM. Easier to access if you remove the front wheels.

Steve
Here's the page on the block drain plugs. Thanks for the tip Steve. Definitely going to do this. (This is from the 2004 FSM thats online - my paper 2001 FSM is in the shop...)_
upload_2014-5-6_22-52-19.png


Looks like you're doing well so far. I'm guessing from the corrosion that whoever replaced the radiator did not use Toyota Super Long Life Coolant? There was no corrosion in my cooling system at 100,000 miles, with the original coolant.

You know thats the frustrating part. When I bought the truck I checked this specifically - well as best I could. The coolant is red - and looks like the Toyota long life potion....but I am guessing either red alone does not mean its Toyota, or, there was a period where something else was in there. From the records I have it was changed at least twice in the first 100k miles. I'll clean it up and/or replace what I need to.
 
I'm gun-shy about changing coolant type after watching some aluminum nipples dissolve from the heater cores on my BMW years ago after flushing and putting in Zerex G05. The BMW came with green coolant and was doing fine on that, went downhill quickly when I switched to the "proper" coolant, despite multiple flushings and replacing most of the coolant system. One of my '97s had been strictly dealer serviced at the same dealership since new, had green coolant, and I stuck with green, and had no corrosion at 200k.
 
Last night I made it to the turn-around point and started installing new stuff.
-Crank pulley bolt came off ok but only after I got some leverage. I had to replaced the M8x1.25 bolts in my home made crank and pulley tool tool with a higher grade bolt - first time they bent. I was very glad it came off ok in the end.

-Loosened the cam bolts, again holding them with the homemade crank tool.

-Removed the tensioner etc

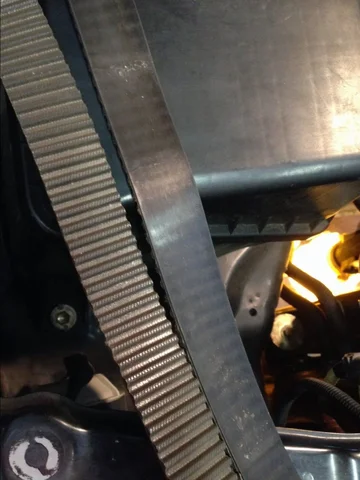
-Then I took off the timing belt. It looks fine, although there is a lot of that dark brown dust in the timing belt housing and on all the pulleys and idlers. 13 years old, 104k miles:
photo 2 (2).JPG photo 3.JPG

- Water pump came off next. There was quite a deposit of stuff in the weep hole. I think the bearings felt ok - perhaps a little freer than the new pump.
photo 1 (3).JPG

- Cam and Crank seals. It took a lot of guts for me to put a screw into those things. I went very slow, ended up drilling a pilot and then screwing a wood screw in and then levering them out against a pivot. The two cam seals were fine but the crank one was a little tougher to get out.

And then I turned the corner and started back for home.

- Water pump went in fine. Came with a fancy gasket which I used and two O-rings, one for the small bypass and one I think for the intake manifold. Cleaned up the surface on the block which was really fine. No sign of any corrosion in the block at all. The machining on the new (Toyota) pump didn't look quite as clean as the old one.

-Cam and Crank seals. I made some "SST"s from PVC pipe to help me seat them right. Tapped them in.

And thats it for the night.
 
I need to finish up my report.

I did finally finish the job, successfully too I am happy to report. New timing belt and water pump are in and working nicely. No leaks for a week (touch wood). I did also replace the front bypass coolant tube, and the inlet assembly. The inlet assembly came with a FIPG already installed in the groove, which was a bonus itself.The front bypass had no corrosion inside, just at the interface of the radiator outlet hose. To do this I had to remove the throttle body, which was kind of cool to see. Good opportunity to clean it thoroughly. I also cleaned my MAF with the MAF sensor cleaner. I also got a great view inside under the air manifold of my starter - which looks spotless. Took an opportunity to vacuum out the valley in the air. Replaced the gasket between the throttle body and manifold. Removing the manifold requires the removal of a fuel rail, and you're supposed to replace the washers that it crimps down into - which I did not do. I also replaced all three cam seals and the radiator hoses.

I ran into some difficulty installing the new timing belt at 50 degrees from TDC as the FSM directs. And my rotation test showed that I was off, so I removed it and re-installed the belt at TDC. I think my mistake may have been that I didn't rotate the crank and cams so that the marks on the cams were on the top side next to their TDC marks before advancing to 50 degrees and removing the belt. I couldn't get the cams to sit still at 50 Degs and the belt slipped a tooth a couple of times so once I got the hang of it at TDC, I actually bought another belt, so I had a fresh belt for the final install. I figured after going to all that trouble I might as well spend the extra $50 to get another new belt and be confident my install was solid. [Anyone want a Timing Belt Replacement sticker? :) ]

In between I spent a lot of time thinking and worrying about any damage I may have incurred while rotating the crank and cams, and thinking through the "math" of how many crank rotations per cam etc. I am relieved to report that there is no indication of damage or that the engine is an interference engine, because I am sure if it was I would have had a valve/piston collision.

It was such a relief when I turned the key and the engine started and ran smooth - even up to to high rpms.

Old and new (bottom) belts.
Old is brown, 104k miles and 13 years old. A lot of brown dust in the timing belt covers.
IMG_0981.JPG

Starter in the belly behind the throttle body.
photo (3).JPG

Somethings I did that really helped:
1. I remove the gas struts from the hood and propped it up securely with a long pipe I had. Gave me more room, and better lighting. Not as drastic as removing the hood, and lots of benefit.
2. Most of the bolts and screws were placed back in their spots after removing the piece they were attaching. This saved me from bagging and labeling and was more reliable. I think it takes longer but still easier in the big scheme of things.
3. Took it real slow. Helps that this is an extra car....
4. Took lots of pictures, most of which I never looked at, but sure helped when I needed them.
5. left the radiator in, but slid cardboard into the slots to keep it protected.
6. that radiator fan bracket can be a pain. I kept all the nuts on until they were all loose. I put a box spanner over one of them and pivoted against the fan body while I loosened the nut on the other side with a socket/another spanner.
7. Medium loctite on most bolts, in addition to using a torque wrench.

Total cost of parts was in the $700 range (including two TBs), engine coolant, all the pulleys, acc. belt, water pump, gaskets, cam seals, inlet housing assembly (both pieces), thermostat, front water bypass. All OEM. Very grateful for the support we get from Camelback Toyota here in PHX area. Its kind of nuts really - the TB itself is $50....but $700 later the job is done (but includes water pump of course). I am happy with this considering what I learnt.


I am very glad I attacked this myself. Enjoyed most of it and learnt a lot. Came to appreciate Toyota engineering more too.

Next up for me is to re-grease the front bearings and learn about those front drive flanges. This will be soon, but after a week off in San Carlos MX we have coming up.

Hope all this is useful to you. I have loads of pix, but there are good shots of most of all of this already around.
 
Oh and P.S. I did also do a thorough coolant flush, with the block drain plugs as recommended above - thanks Steve! Refilled again with 50/50 Toyota Red. My engine temps feel a little high to me....get up to 194 or even 199 F with high rpm for longer periods here in PHX. Dash is reading a 90 - 103 F outside temps at the hottest times. I think though that realistically the temps are fine and within range...and probably the sensor is not that accurate. I will borrow one of those laser thermometers from a buddy and cross check. Not sure what'd I do if it is too high....everythings new, or been flushed. I could make the fan clutch fluid more viscous I suppose.

I do worry about this though...cooler engines will last longer. Mind you, I only know where its at because I have an UltraGauge....the stock temperature gauge is rock solid a little below mid level....

I think I remember that normal operating range is up to 220F? Thermostat starts opening at 180 F.
 
Great job! My recently acquired LC has 88K miles on it so this is on my list to do before winter. Still deciding if I'm going to tackle it myself or bring it in. Just curious what the condition of the cam and crank seals, pulleys, and tensioner were like? I get that while you're in there, it's prudent to just replace it all, but wondering if it's truly out of necessity?
 
I debated the same thing, and made sure to have all the parts (including the tensioner on hand) so if I decided to do it, I could. In the end the age (13 years) and the dust in there, around the pulley bearing seals convinced me. Tensioner seemed just fine and so did the cam seals, however they are not expensive either. I think if I had been doing this at 7 years I probably would not have changed them. Even the pulleys themselves felt fine, but the seals looked quite dusty.

Do it, its a good experience and not that bad. Get a good cheater bar for the crank bolt, and plan ahead for how you will hold the crank still while you use your monster cheater. Get a proper cam seal puller. Don't mess around with wood screws, not worth it in my opinion. Like this.
http://www.amazon.com/dp/B000FPYW4K/?tag=ihco-20

For my cheater I borrowed a 1/2" cheater bar, and then slipped a floor jack handle over the end of that - so it was close to 4 feet! To hold the crank still I bought a 4' piece of 1/4" flat bar from Lowes, cut off a ~16" section and made one of these:
http://www.amazon.com/dp/B000Q8GVPY/?tag=ihco-20
Use M8 1.25 screws, but get good grade 8 ones otherwise they'll bend.

With this set up, removing the crank pulley bolt was smooth and controlled.
 
Oh and P.S. I did also do a thorough coolant flush, with the block drain plugs as recommended above - thanks Steve! Refilled again with 50/50 Toyota Red. My engine temps feel a little high to me....get up to 194 or even 199 F with high rpm for longer periods here in PHX. Dash is reading a 90 - 103 F outside temps at the hottest times. I think though that realistically the temps are fine and within range...and probably the sensor is not that accurate. I will borrow one of those laser thermometers from a buddy and cross check. Not sure what'd I do if it is too high....everythings new, or been flushed. I could make the fan clutch fluid more viscous I suppose.

I do worry about this though...cooler engines will last longer. Mind you, I only know where its at because I have an UltraGauge....the stock temperature gauge is rock solid a little below mid level....

I think I remember that normal operating range is up to 220F? Thermostat starts opening at 180 F.
You're welcome on the block drain thing. :)

My LX shows its temp at dead on mid-level. Torque app for Android indicates 180-185F pretty much year 'round. Around 200F fan clutch will engage...sounds like a wind tunnel, but temp drops back down to the t'stat opening temp.

Thanks for the seal puller link...it's only money. ;)

Glad everything worked for you...hub and spindle bearing lube is easy relative to the timing belt...just a bit greasier.

Steve
 
I can't add any tech, other than good for you for digging in. What I can add, non tech, is that I was in Chandler last Saturday for probably the best meal I have ever had... at Kai.

Still here in North Scottsdale... I love this weather. Hot but no humidity. Ohio summer's suck!
 
Nice job OP! Not sure if I have the cojones to tackle that myself yet, but I should have about another 50K kms before I need to think about that.

For the record, this YouTube guy made (what to me looks like) quite the detailed video about this procedure. It is in a sedan, but I'm imagining many of the details are the same once you get down to the nitty-gritties of the engine work itself:


Interested to know how this video compares to your experience.
 
Do it, its a good experience and not that bad. Get a good cheater bar for the crank bolt, and plan ahead for how you will hold the crank still while you use your monster cheater. Get a proper cam seal puller. Don't mess around with wood screws, not worth it in my opinion. Like this.
http://www.amazon.com/dp/B000FPYW4K/?tag=ihco-20

For my cheater I borrowed a 1/2" cheater bar, and then slipped a floor jack handle over the end of that - so it was close to 4 feet! To hold the crank still I bought a 4' piece of 1/4" flat bar from Lowes, cut off a ~16" section and made one of these:
http://www.amazon.com/dp/B000Q8GVPY/?tag=ihco-20
Use M8 1.25 screws, but get good grade 8 ones otherwise they'll bend.

With this set up, removing the crank pulley bolt was smooth and controlled.

I agree with all that you wrote here with the exception of that particular seal puller. It proved to be nothing but problematic when my brother and I tried using it to pull the seals. The screw method turned out to be the way to go. There is easily a 1/4" behind the seal...just carefully drive a screw in there and use a prybar with a notch opening. Screw - 3, puller - 0. Otherwise, right on!
 
In the video, the arrow marks on the belt are pointing toward the front of the car. I thought they were supposed to point toward the block. Anyone know?
 
Catching up on the thread.
I didn't use the cam seal puller I linked to on amazon either, but using wood screws to get them out made me very nervous - I think I would have preferred to use the cam seal puller, however perhaps its just as clumsy? Be very careful you do not scratch the crank how ever you do it. Any scratches on the crank may compromise the oil seal. I had a hard time getting the screw to thread in, there's actually a metal core inside the seals.

I used the video a lot when I was doing mine. I think he is doing an LS460. Its very similar, but several components are different compared to my 01. The Crank pulley is solid on mine, vs. spoked on the LS. Mine also just slid off, I didn't need to use a puller. Also, in the video I don't think he had to remove bolts holding the AC compressor to the fan bracket.

For mine, I did not remove the power steering pulley - the PS pulley prevents you from sliding the alternator out of the way to get the drive belt tensioner out. I just removed the whole PS pump because I can get to the PS pump bolts through its pulley. (04 FSM shows some slight differences to the 01 here).

The arrows on the belt point out towards the front of the car - as in the video, and as in the FSM.
You can't put it in with the RIGHT arrow facing the back, and line up the LEFT arrow and Crank mark. Remember RIGHT and LEFT are with respect to facing forward sitting behind the steering wheel.

upload_2014-5-23_8-52-22.png


Also, I posted earlier in the thread (post #7) about the other marks in the engine for alignment of the cams etc. when installing a timing belt. There are now 3 ways to do this.
1. 01 FSM says to advance to 50 degress from TDC and align pulley mark with the line between the crank pulley bolt and the #2 idler.
2. 04 FSM says to do it at TDC
3. the video says to do it at the marks I showed in the post above (the white nub a little beyond TDC, and the "T" on the Cam cover back) - I think its 30 degrees. See post 7.

For my 01 at least, I tried to do it at 50 degrees TDC as FSM directs, and that was not a stable place for the CAMS....and I actually got the belt on wrong. So I redid it at TDC and it was much easier. Thankfully I saw no evidence that this is an interference engine (at least in my 01).
 

Users who are viewing this thread

Back
Top Bottom