doing some mods to the cruiser (1 Viewer)

This site may earn a commission from merchant affiliate
links, including eBay, Amazon, Skimlinks, and others.

For the spare tire, I've seen guys integrated a hub and spindle into the assembly to hang the spare with. It's great for spare parts but if you (someone else) need parts you'll have to change it out with the bad one. Only downside would be more wrenching time on the trail.
 
well, i made it back from the Black Hills Cruiser Classic mostly intact.. the clutch is slipping pretty bad and i have a few other little things to work out but it was a very good trip over all..

i will come back with a big update if anyone is interested but for now i will just post up a vid that i made of TURBO POWER!!! yes, i was bored..


fj-rankenstein :: turbo1.mp4 video by Jayp - Photobucket
 
Well, i have been enjoying the truck all summer.. the wifey and i did a bunch of adventuring around Saskatchewan in it and i really enjoy the new turbo.. i think i have about 4500 kms on it now and it has made driving the truck more enjoyable.. i still havent played with the wastegate yet so it will peg my 15psi manifold pressure gauge if i am not careful but once i get that part of it tuned up it will be awesome..
i found a brand new rad for the truck as well.. i havent installed it yet and it is sitting with all of the other parts that i have bought for it..

so to recap.. the mods this winter are:

1) Marlin Crawler toybox.. finally.. i have had the thing forever and i finially get to install it soon!!

2) removal of the stock tank and install a fuel cell in the back under the bed. i cant wait for the extra cab space!!

3) interior rollcage from Metaltech..

3) intercooler, fuel tweaking and some rearraging of the layout of my engine bay..

4) snorkel

5) stereo.. i have never had a radio or stereo in this truck.. by stereo i mean two working speakers and a good deck.. i am not interested in the sub box and all that young kid crap.. i want to be able to hear when i am 70..

anyways, i can go on and on and like everyone else here, our cruisers are never really done..

i finally got some time to finish rebuilding my spare tranny and toybox and will have the tcase done shortly..


P1010907.jpg


P1010909.jpg


P1010908.jpg
 
i finally have time to tear the truck back apart.. after a great summer of wheeling and just enjoying the truck it is now it to get started on the upgrades..

the other bit of motiation for getting the truck together is because the wifey and I are going to attend the 25th Rubithon and this time we are going to drive the truck down to California.. the last time we were there (on our honeymoon..) we were able to trailer.. it is going to be about a 7500-8000km trek so i want the truck to be in tip top shape..

i ordered two arb lockers (rd142's), compressor, chromo rear axles, a custom diamond front diff with matching chromo inners and i am going to also pick up a couple of 80 series rear full floaters for the truck as well all next weekend in Montanna!! i am pretty excited!!

as for what i am doing right now, i have got rid of the fuel tank in the cab of my 45 and mouted a cell in the back of the truck and i am cutting the floor to get my newly rebuilt drivetrain including toybox in...

here are a few pics to catch everyone up..

P1020544.jpg


P1020553.jpg


Copyofstuffincab-1.jpg


Copyofemptycab-1.jpg


P1020557.jpg


dirty tranny on the floor.. umm, yeah..

P1020558.jpg


flywheel needing a good resurface..


P1020556.jpg


P1020560_zps1d865af2.jpg


here is what it will look like when on.. i still have to drill and tap some holes in the mounting flange..

P1020563_zpsc94812e6.jpg


and now the beginnings of my fuel fill thingy. i could have just went to a junk yard and found something that might have worked.. thats not the way I roll.. i wanted to make one being that i have never made one of these before.. it took waaaaay to long to make though..

P1020564_zpscaf46cf6.jpg


and here it is in its glory.. not quite done but a good start..

P1020566_zpscc7f421a.jpg


and the backside.. i started to tig this piece but then chickened out and used the mig for the rest.. silly tig noob i am..

P1020567_zps958d55b0.jpg


ahhh, crap.. what did i do...

P1020571_zps6fe25297.jpg


ok, not too bad now.. i still have to drill some mounting holes and get some stainless steel bolts to mount this thing.. its just hanging in the hole right now..

P1020569_zps8c2131d7.jpg


and the mess on the backside.. the fuel cell is officially too thick and if i want to keep it more or less flat with the bottom of the truck and not have it hang down like a rock magnet than this is what has to be done.. i have to make a small riser in the box because the fill tube wants to share the same space as the floor..oh well, it wont look too bad when i am done..

P1020570_zpsd8c8785e.jpg


the new saw..

P1020582_zpsc51429eb.jpg


the fuel system is getting closer...

P1020573_zpsffb37762.jpg


it doesnt fit!!

P1020576_zps7c8a3302.jpg


another view of things not fitting..

P1020578_zps03e45f66.jpg


here is what happens when things dont fit.. they get cut.. keep in mind the whole drivetrain still has to go back another few inches yet so this hole will get bigger..

P1020580_zps7dffabf5.jpg
 
here is the top shot of all the action..

P1020592_zps6eaafc9e.jpg


good side to show how much this thing will stick up in the cab.. keep in mind i still have to move my entire drivetrain back a few inches to make room for my intercooler up front but this is still more or less how it will be..

P1020585_zps7c774052.jpg


the drivetrain shouldnt hang too low..

P1020586_zps35850c0f.jpg


looks like i wont be needing this any more.. plus i gotta make room for the roll bar and it wants to share the same space as the old fuel filler...

526417_10151480992291224_46774971_n_zps8bf0dde2.jpg


look at what we see when we look through the hole..

427370_10151480992281224_357860559_n_zps977095e4.jpg
 
You can truely turn an idea into reality ! Great work !
When I drive my 45 from Ont. to Calgary we should have a coffee as I pass through !

Cheers
J Mac

thanks good sir!

by all means.. I'm always up for a chat about cruisers!
 
BAM!!!


this was a weekend of travelling for me.. when the travel advisory says "travel not recommended" they pretty much mean it.. i am a trooper in my 4runner though and ended up driving between 40-60 km/hr for well over 200 miles in four wheel drive on the highway .. it was a super long day on the road yesterday..
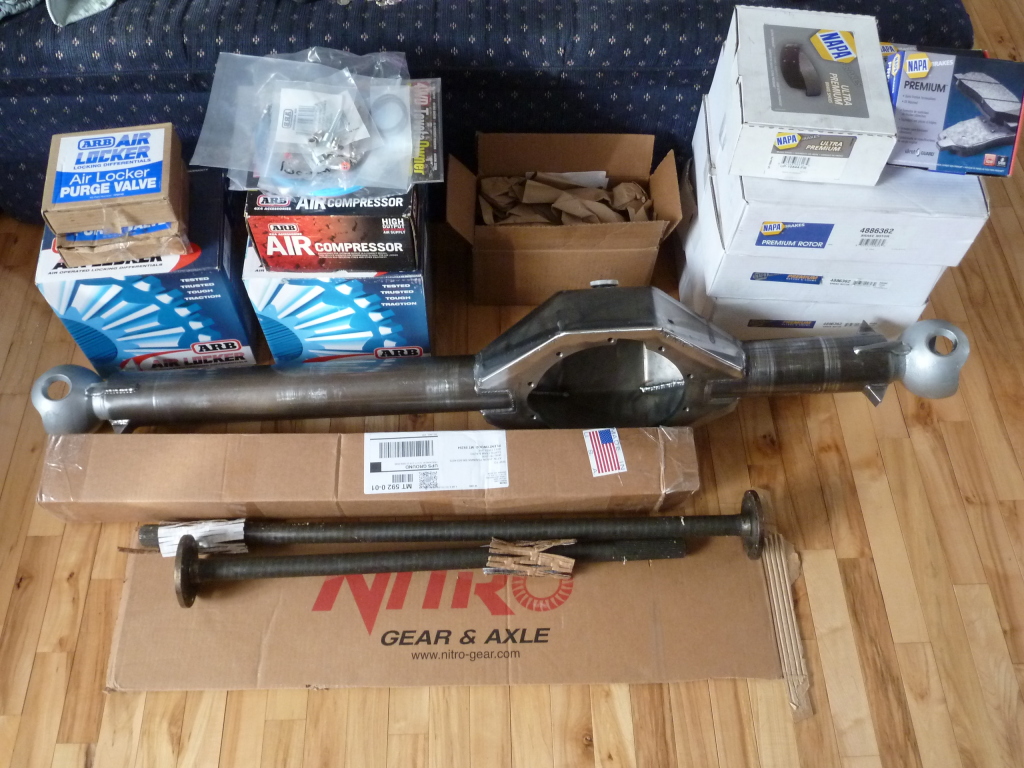
So i ended up going to the states and picked up a big big order from 4 different vendors and met one person to exchange some parts straight across.. i ended up bringing back two rear 80 series full floater axles that looks to be in excellent shape along with a pile of stuff from other vendors that include Marlin Crawler, Longfield superaxles, nitro gear and Diamond axle..
I also ended up getting some brake parts being that the parts are way cheaper in the states than they are here and they were on the shelf at the Napa store which was nice..

anyways.. by the looks of this picture, i have a lot of work to do..

P1020622_zps1caa7f37.jpg
 
Nice work. Next time bring us a 70' series on the trailer and "loose" it during the drive.
 
Really nice job man, this is one of my favorite trucks on mud
 
thanks guys...

I havent been here in a while.. time to update this thing...

got the fuel cell stuff done last week.. its nice to be in the garage full time again.. i still have to run lines to the fuel cell but i will know how that stuff will work once i get the drivetain cross members in place first..


here are even more pics of my fuel cell so you can see all of my dirty secrets on how not to build a fuel system.. :lol:

the fuel cell in place with all the goodies..
P1020652_zps1358fdbc.jpg


fuel suction pipe.. easy peezy with stainless hardware.. i am tired of all my s*** rusting so i have been buying stainless for everything lately..
P1020656_zpsd11b4f51.jpg


check out that fuel suction pipe doing its thing..
P1020657_zps05a43f17.jpg


here is another from another angle.. hubba hubba..
P1020659_zps77b80351.jpg


everything got ripped apart and time for primer and paint..
P1020668_zpsc1dc2020.jpg


P1020669_zps19b3a34a.jpg


here i am painting the fuel cell where the fuel cell cradle will be touching it for added corrosion protection sinse this will be driven on our salty saskatchewan streets.. i actually non absorbant closed cell foam with a plastic backing between the cell and cradle and hopefully not too much moisture will get caught betweent he two..
P1020672_zps40721ed1.jpg


3 coats later..
P1020674_zpscec36960.jpg


all tucked up nice and tight with the box on..
P1020676_zps4e2a13fa.jpg


P1020682_zps49c96db5.jpg


P1020683_zps2ac4f4a3.jpg


P1020684_zps6a9e8900.jpg


which brings me to where i am today.. got the entire engine bay gutted and am now ready to move the entire drivetrain back 3-4 inches..

P1020687_zps929b6e17.jpg


P1020689_zpsad7a79f9.jpg
 
Wow.... Wow.... Wow....Wow.... Wow.... Wow....Wow.... Wow.... Wow....Wow.... Wow.... Wow....Wow.... Wow.... Wow....Wow.... Wow.... Wow....Wow.... Wow.... Wow....Wow.... Wow.... Wow....Wow.... Wow.... Wow....Wow.... Wow.... Wow....Wow.... Wow.... Wow....Wow.... Wow.... Wow....Wow.... Wow.... Wow....Wow.... Wow.... Wow....Wow.... Wow.... Wow....Wow.... Wow.... Wow....Wow.... Wow.... Wow....Wow.... Wow.... Wow....Wow.... Wow.... Wow....Wow.... Wow.... Wow....Wow.... Wow.... Wow....Wow.... Wow.... Wow....Wow.... Wow.... Wow....Wow.... Wow.... Wow....Wow.... Wow.... Wow....Wow.... Wow.... Wow....Wow.... Wow.... Wow....Wow.... Wow.... Wow....Wow.... Wow.... Wow....Wow.... Wow.... Wow....Wow.... Wow.... Wow....Wow.... Wow.... Wow....Wow.... Wow.... Wow....Wow.... Wow.... Wow....Wow.... Wow.... Wow....Wow.... Wow.... Wow....Wow.... Wow.... Wow....Wow.... Wow.... Wow....Wow.... Wow.... Wow....Wow.... Wow.... Wow....Wow.... Wow.... Wow....Wow.... Wow.... Wow....Wow.... Wow.... Wow....Wow.... Wow.... Wow....Wow.... Wow.... Wow....Wow.... Wow.... Wow....Wow.... Wow.... Wow....Wow.... Wow.... Wow....Wow.... Wow.... Wow....Wow.... Wow.... Wow....Wow.... Wow.... Wow....Wow.... Wow.... Wow....
 
have you ever read the same word so many times that at some point it starts to seem like its not a real word anymore?? lol....


but anywho, it was an ok day in the garage today for the time i was there....

i didnt want to have to fight with the drivetrain so i came up with a way to at least hold the back half of the drivetrain still and not twist around while i work with making new engine mounts.. i basically took my engine stand bracket that i used to mount the tranny onto my engine stand, unbolted it from the stand and made my drivetrain mount out of that and a bunch of used steel from my old welding cart.. i also welded a tab of steel on that i could get my jack under so that i can adjust the height of the drivetrain.. i made the drivetrain brace a bit shorter on purpose so that i had more options to adjust it when it was time..

i need to cut into the cab a little more to get that whole drivetrain mounted back about another 1/2 inch but than i should be good to make my new mounts and secure the drivetrain in its new spot.. i hope to have all this done this week so for the long weekend i can work on finishing up resealing my drivetrain, install a new rear crank seal and clutch and assemble the drivetrain in its spot for the final time.. after all that than will be mounting the rad and the rest of the engine bay stuff..

here are some pics..

here is the drivetrain moved back 2.5 inches.. it looks a bit tight in the pic where the exhaust and the coolant lines are but there is still plenty of room..
P1020701_zps7568e7af.jpg


here you can see the white line i put on the frame rail from where the engine mount was originally to where it is at the moment.. still another half inch back to go..
P1020702_zps74980757.jpg


it looks tight but there is still lots of room..
P1020703_zpsb40ad9f1.jpg


here is the drivetrain brace that i made..
P1020705_zps7a427318.jpg


and perhaps a bit better view..
P1020706_zps206cea1c.jpg
 
ok.. so the drivetrain is exactly back 3 inches from where it started and down about an inch.. this should give me more than enough room to put my intercooler up front and still have room to get at all of my engine belts without cutting and scratching the crap out of my hands..

i got the engine mounts all done and mounted last night.. today is transmission mounts and then radiator..

here are some pics of the engine mounts and stuff..

here is the engine mount of the drivers side of the truck.. it has been broken for a long time although i didnt really know it.. it fell apart in two when i removed the whole mount from the frame..
P1020707_zps2752e765.jpg


here is the start of the new engine mounts..i just took an original short drivers side mount, tacked it to some 3/8" steel and made a couple of copies..
P1020709_zpsbbab833f.jpg


two of these made to order..
P1020710_zps00c16258.jpg


you can see that those plates that i made in the pic above then got a hole saw taken to them so i can weld the tube for the mounts on both sides.. also, the bushed dom and link tabs are from Ruffstuff specialties.. the tube is 1/4"wall 1 3/4" od tubing and the plates that get bolted to the block are 3/8" plate..
P1020720_zpsc3fa04aa.jpg


here is the engine mount from the backside.. also, you will see the beginning of the fishplate that the engine mount tabs will be welded to..
P1020722_zps47dd8790.jpg


everything ready to get cleaned up..
P1020723_zps7b41d925.jpg


and the right side is in and done.. time to burn them in place for good and for some paint.
P1020724_zps9a8ec8b6.jpg


and more of the same with the left side..
P1020728_zps59a3da87.jpg


and all welded up..
P1020729_zpsf0e69026.jpg


the fish plates are only tacked into place on the frame just in case i have to move anything or make any tweaks but the engine is sitting on its own...
P1020730_zps42c58a8e.jpg
 
Any new updates on this sweet Rig?
 

Users who are viewing this thread

Back
Top Bottom