Cleaning underside of instrument panel glass/plastic? (1 Viewer)

This site may earn a commission from merchant affiliate
links, including eBay, Amazon, Skimlinks, and others.

Joined
Sep 26, 2011
Threads
10
Messages
44
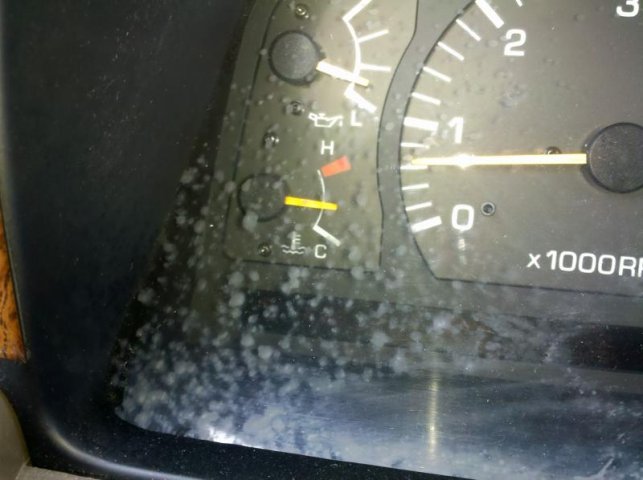
Got a weird one here for you guys. My new to me 40th anniv. is in awesome shape. Top to bottom could not be happier, previous owners really did a good job of taking care of everything inside and out.

When I purchased the truck I did notice one thing and figured "oh well, I'll just clean it when I get home." Little did I know that this dirt/mold was on the INSIDE of the plastic panel.

Here is the question: how hard would it be to access the inside of this thing? I mean you can see how bad it looks but how big would that headache be to get in there? I have the factory service manual and it looks pretty nasty. :hmm:

glass.jpg
glass.jpg
 
Not that bad, just take your time and don't force any of the plastic as you are taking it apart. Should be easy, though. Congrats on the purchase.
 
if you wont be able to clean it, just replace it...clear plastic bezel is about $20
 
It probably is on the outside. It looks like someone used a cleaner that etched the plastic.
 
I am trying to figure this one out myself. Is it just the 2 screws under the "dome" part and the rest are plastic crimps? I looked through the manual, that was all I could find. So remove screws and pull assembly out? I have the plastic trim "crow bars" if needed. Thanks
 
I pulled this apart on my 92. It's not difficult but requires patience. The main issue is that the plastic clips are dry and brittle. Make sure everything is warm. Don't try to bend the plastic clips out in the cold!
 
Does anyone have any step by step on how to do this one? I am continuing on my CBP (Crusier Beautification Program) and the dirt under the plastic is pretty bad. I have removed the 2 philips screws on top of plastic, used my interior trim removal tools, but seems like it is going to brake. The FSM shows removal of a bunch of other pieces before getting to this plastic. Is that the correct order or can you remove the cluster cover without removing steering wheel, lower panels, side panels, etc? Thanks
 
You need to remove the screws and loosen the lower panel, gas door release, and hood latch. Then lower the tilt on your steering wheel and you should have enough room to wiggle out the cluster. Once you have it out a couple inches you can reach behind and unclip the the 4 wire bundles or so that are attached.
 
Excellent, will try this tonight! Copied and pasted here:

Accessing the gauge:

For removing the cluster See the FSM it has some good pictures, here it is in my words. All directionals (left/right. foreword/aft up/down) down are trucks view. The dash can be damaged during disassembly, there are many push pull clips, if you are doing it right these only take light pressure to release, always pull the panel strait out as close as possible to the clip and never pry at the opposite end of the panel from where the clip is, if it feels like you are about to break something you probably are.

1. Remove the drivers knee panel by removing the 2 screws on either side of the hood/fuel release, one screw one the lower right side and one near where the hand throttle would be ). Gently Pull along the upper edge and release the 3 clips. Disconnect the speaker wire. You can let it hang by the fuel/hood cables and work around it or go through the trouble of removing them, to remove the releases remove the screws and pull the release all the way out then slide them forward

2. The next dash section up wraps around from the key cylinder over the steering column to the left hand buttons. Start at either end and gently pull working your way through the 8 clips, release the connectors to the locker switch, light dimmer and mirror control. Each one of the connecters releases in a different way, the dimmer is a side press, the mirror control a top press and the diff lock switch has a very small release on top of the connector. A pick is quite handy here.

3. Remove the upper half of the steering column cover by removing the two most aft screws on the bottom of the column then releasing two clips at the front of the cover. The bottom half can stay.

4. Remove the Cluster finish panel, this panel houses two vents on either side of cluster and is slightly tricky. Remove the two screws at the top center. It has two clips at either end just outside the vents but also has some interference to the dash pad, first release the clips by pulling but not too far then work the panel around the dash pad (see pic ) to not cock the panel at any time, only pull strait out. The clips that hold the vents to the panel cannot take much load

5. Now with the cluster exposed you will see 4 white legs with a screw in each, there are two above and two below the cluster. Remove these, carefully work the left side of the cluster out, you will have to pull the right side out some also, the right side interferes slightly with the upper center dash. After you get the left side out some you will be able to push the cluster outboard and the center dash inboard and work the cluster past. The first goal is to get the left side of the cluster out far enough to get you hand in (see pic) , you will release two wire bundle connectors there, with those two released you will have enough slack to be able to flip the top of the cluster aft and down to access the other two connectors and then pull the cluster out


6. Remove the gauge from the cluster. first the cluster splits in two, the gauges and a white backing are one half, the "glass" and black mask in the other. There are clips around the perimeter lift each one in turn by hand and the two halves will split, after the glass is off be careful not to set the cluster on its face, the cards and needles are kind of fragile. Try not to not touch the face cards of any of the gauges, fingerprints leave marks, there are 4 screws (see pic) back these screws out partially and then press them with moderate finger pressure. the gauge will seam stuck at first but then will pop up a little bit, if is fells wrong or partially attached stop and give it a good looking over, completely remove the screws and then work the gauge out, it had some slight interference with the tack card but it can be worked out of there. Be careful the tach needle does not receive any load.
 
This link is just what I have been looking for. I need to swap out several bulbs in the cluster.

Thanks for posting!

You bet....of course you can always do the gauge mod while you're in there as well.;)
 
... I am continuing on my CBP (Crusier Beautification Program) and the dirt under the plastic is pretty bad. ...

Kinda like this, do you want to do mine too?:hillbilly:
cluster.jpg
 
Its easy. I did this exact procedure 2 weeks ago on my 97. once you get the instrument panel out the clear plastic will unsnap and you can clean it.

You have to pull the top clam shell off the steering column. You will also need to pull the panel what houses the diff lock switch.

Its a :banana: job. Dont be scared!
 
Hard to explain why, I just have the need to do it. 31 years later and I can hear that DI yelling that the bolt on my Springfield rifle had microscopic dirt. "Sanchez, shut the foook up and pooohlice them cots!!!,"

Anyway, did it this evening, scary a times as I had no idea I was going to reassemble it all back, but the instructions above were just dead on.

And I was wrong ( first time in my life too), the dirt looked like it was in the glass, it was oxidation on the plastic. Used Mother headlight restorer, and now looks like new. Added the LEDs, and it's incredible looking, I would say as good as a new rover or German sedan.

Mess of wires and connectors, I will admit at being a little scared here. And hey, found the alarm!
ImageUploadedByIH8MUD Forum1418873118.158273.jpg


Using the Mothers restorer, applied by hand with small towel, 3 applications
ImageUploadedByIH8MUD Forum1418873186.521370.jpg


And the result, looks incredible compared to how it was.
ImageUploadedByIH8MUD Forum1418873266.837963.jpg
 

Users who are viewing this thread

Back
Top Bottom