
Correct, engine number F205197 would have been 1965 compared to other cruisers.
Navigation
Install the app
How to install the app on iOS
Follow along with the video below to see how to install our site as a web app on your home screen.
Note: This feature may not be available in some browsers.
More options
Style variation
You are using an out of date browser. It may not display this or other websites correctly.
You should upgrade or use an alternative browser.
You should upgrade or use an alternative browser.
“Buddy,” my FJ45lpb, the backstory, trip, getting the rig going
- Thread starter chacoetaco
- Start date
This site may earn a commission from merchant affiliate
links, including eBay, Amazon, Skimlinks, and others.
- Thread starter
- #42
Ok. Thx. Did not know they came original with numbers that differ between the block and chassis. I would be surprised, to say the least, if my Uncle had removed the engine for another, given that it had not been used in over 25 years. Given my research, since I do not have the purchase receipt or any other documentation, the originality of the motor can not be proven. Interesting.
- Thread starter
- #43
G'day Dave, I loved the back story. Keep the pics coming mate. It looks like you have the basis for what could be a really lovely old truck. Cheers, Ben
Hey Ben,
Thx. Happy to pass it on. I've had the incredible pleasure to visit your country a few times. Been all over, from the East Coast to the West Coast on the boss's dime. Can't say enough for how warm and friendly Aussies were to a stranger the likes of me. Then there are the Land Cruisers you can own in your Country. Man, it's like hitting the LC jackpot.
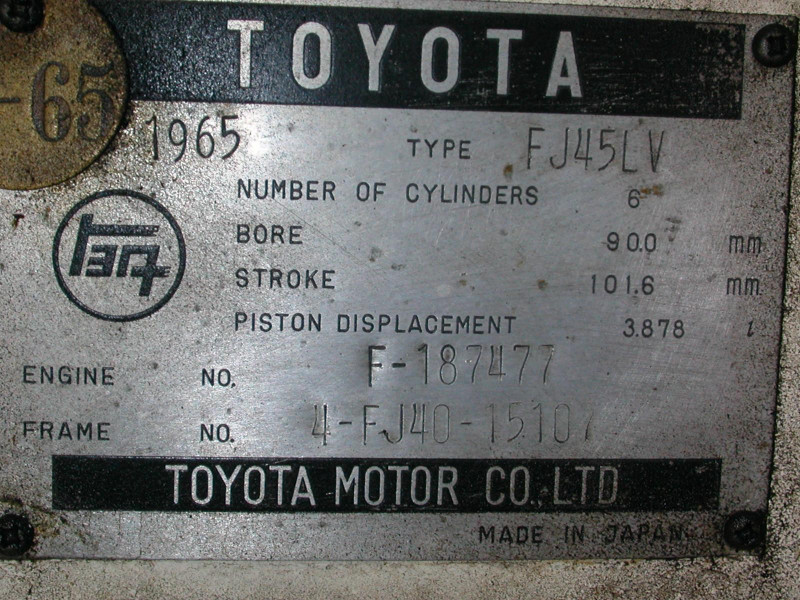
not sure about 45 trucks, but my 64/65 fj45lv has the engine # on the vin tag....which matches the motor, maybe that ended in 64, MY 65 FJ40 does not have engine # on it.
64-5 45lv VIN
yes, its a rather odd match of years on the VIN.........Gifu
64-5 45lv VIN
yes, its a rather odd match of years on the VIN.........Gifu
Pimp,
So Gifu Body stamped the VIN plate frame number incorrectly as an FJ40 instead of FJ45, and this not agreeing with the actual stamped frame number has never been challenged by any registering authorities over the years? Interesting.
So Gifu Body stamped the VIN plate frame number incorrectly as an FJ40 instead of FJ45, and this not agreeing with the actual stamped frame number has never been challenged by any registering authorities over the years? Interesting.
I can't recall if the frame is fj40 or fj45....
But yeah....it's one odd VIN plate and no its never been an issue. But then again NO ONE at the DMV has ever looked for a vin or frame # on ANY of my cruisers, they seem fine with whatever the title and reg says
If I remember, my F motor is closer to late 63 or early 64 and not near a 65.. But that is expained in how GIFU got them from Toyota....a rolling frame with motor and stuff attached......they didn't build them in the order toyota sent them, I bet they built them from a higher # down....think it depends on how they got parked on the lot.....gifu took the closest frame/drive train thst was handy.and built it. At least that my theory
Now I need to go look at the frame.....
Be really curious if 40 or 45 trucks had the engine # on the plate in 64 or before.
Pimp,
So Gifu Body stamped the VIN plate frame number incorrectly as an FJ40 instead of FJ45, and this not agreeing with the actual stamped frame number has never been challenged by any registering authorities over the years? Interesting.
Thanks. Likewise, no Calif DMV clerk has ever left their cage to venture outside to see any vehicle I've ever registered--a lazier lot I have never met. I just periodically read about other folks having problems when registering their stuff. I guess you could buy one of the repro VIN plates, and if you have a steady hand, stamp yourself a new "correct" VIN plate.
- Thread starter
- #49
Been away having fun recovering from knee surgery. Luv getting older. Some pics I took just before going under the knife ...
top side of tank

Underside of tank

Some minor surface crud

filler neck

Fuel level indicator

top side of tank
Underside of tank
Some minor surface crud
filler neck
Fuel level indicator
- Thread starter
- #50
The only part of the rig that I have found to be toast is the passenger seat. The entire seat was filled with shells, twigs, and crud I guess from a zillion mice over the past 20 years who called it home. I'm guessing rain must have leaked through the compromised window seals, to be soaked up by the seat cushion?
Some of the crud is yet to be cleaned away in the photo below. Every cubic inch of space around the springs was filled with junk.

All the crap removed. Mighty toasty.

Underside of passenger seat

Oxidation is all its glory

Up close

Some of the crud is yet to be cleaned away in the photo below. Every cubic inch of space around the springs was filled with junk.
All the crap removed. Mighty toasty.
Underside of passenger seat
Oxidation is all its glory
Up close
Last edited:
- Thread starter
- #51
What's that saying, "a journey of a thousand miles begins with the first step."
And so the restoration begins ... with the steering wheel.
First step. Pulling the wheel. It takes two 8x1.25x100mm length bolts, a puller, and some elbow grease. You could go a little shorter on the length of the bolts, depending on your puller.

Tried this puller but no go. Couldn't center the big bolt to the steering wheel shaft to pull the steering wheel.

Tried a reg. ratchet but needed more force so I brought out big brother. With less than half a turn the wheel broke free after some 52 years.


Free at last. Free at last!

And so the restoration begins ... with the steering wheel.
First step. Pulling the wheel. It takes two 8x1.25x100mm length bolts, a puller, and some elbow grease. You could go a little shorter on the length of the bolts, depending on your puller.
Tried this puller but no go. Couldn't center the big bolt to the steering wheel shaft to pull the steering wheel.
Tried a reg. ratchet but needed more force so I brought out big brother. With less than half a turn the wheel broke free after some 52 years.
Free at last. Free at last!
- Thread starter
- #52
I am amazed at how much damage can be caused by temp fluctuations, the Sun, and time. I am sending the wheel for refurbishment to IH8MUD member "Birdhead." A thread with more info can be found here: Early fj steering wheel restoration
Looking forward to getting the wheel back and looking new. It's a small step in the restoration but a step nonetheless.

Backside.

Looking forward to getting the wheel back and looking new. It's a small step in the restoration but a step nonetheless.
Backside.
following along.
small steps is the key. It is very easy to get overwhelmed by the big picture.
small steps is the key. It is very easy to get overwhelmed by the big picture.
- Thread starter
- #54
following along.
small steps is the key. It is very easy to get overwhelmed by the big picture.
Amen! So true. When I got the rig home, I felt overwhelmed. "What have I got myself into," I muttered to myself. "Just about everything needs to be addressed."
Like any major obstacle, I guess, break it down into manageable parts. That's what I am trying to do. One bite of the Elephant at a time. What really helps to keep me from freaking out is knowing I have this community and the greater on-line community of Cruiser guys to lean on and learn from.
- Thread starter
- #55
Well ... after many days of ice and rehab, my repaired knee is finally getting to a place where I feel I can work on the rig. My goal for this Summer is to bead blast the frame. This weekend I removed the headache rack and bed.
With regard to the headache rack, I was kind of surprised that the bolts and nuts that attach the rack gussets to the bed varied between SAE, Metric, and one bolt a machine screw (pic below). The high west desert has been kind with minimal oxidation.


With regard to the headache rack, I was kind of surprised that the bolts and nuts that attach the rack gussets to the bed varied between SAE, Metric, and one bolt a machine screw (pic below). The high west desert has been kind with minimal oxidation.
Last edited:
- Thread starter
- #56
Next: the bed. First, we removed the tail light lenses, disconnected the wires, and removed the tailgate without too much fuss; no broken bolts. 
The bed. I guess 3 or 4 bolts snapped while other nuts (two nuts per bolt) were already loose and required minimal elbow grease to loosen. My brother in law assisted and, more or less, laughed at what I thought was considerable rust of the nuts and bolts, now 52 years old. He grew up and still lives in Michigan with many a day spent wrenching on old John Deere Tractors. 'Nuff said.


Casualties of resistance! Snapped bed bolts.

My brother in law and I slide the bed backwards to tilt it up, tailgate end down. Brother in law is checking clearances between the bed and frame. He was a huge help.


The bed. I guess 3 or 4 bolts snapped while other nuts (two nuts per bolt) were already loose and required minimal elbow grease to loosen. My brother in law assisted and, more or less, laughed at what I thought was considerable rust of the nuts and bolts, now 52 years old. He grew up and still lives in Michigan with many a day spent wrenching on old John Deere Tractors. 'Nuff said.
Casualties of resistance! Snapped bed bolts.
My brother in law and I slide the bed backwards to tilt it up, tailgate end down. Brother in law is checking clearances between the bed and frame. He was a huge help.
- Thread starter
- #57
The bed removed and outta the way. Looking at the exposed frame, I find an interesting bit of field engineering for a long gone (normally mounted to the axle) bump stop. What can't you do with bailing wire?


It should look like this ...

It should look like this ...
- Thread starter
- #58
Moving along, I find anything but welding 101 where the rear bumper attaches to the frame. Notice the bolt? I guess my Uncle was pulling something so hard it broke loose the bumper mount on the right side, so he, or someone he knew, welded the steel plates back together (and to the frame). Good to go. 


Laying it on thick!

Laying it on thick!
- Thread starter
- #60
I am trying to remember now. Why are you taking this apart instead of just making it drivable?
Hey Old Red,
For a few reasons. It's a 52 year old rig and hasn't been on the road in 30 years. I like to know what I'm dealing with by tearing it all the way down. Not surprisingly, more than a few bolts thus far removed were in a compromised condition. The plan is to go through everything, to include the replacement of nearly every nut and bolt, leaving just the paint job as is when I get 'er back on the road.
Did I mention that I like turning a
 ?
?
Last edited: