Navigation
Install the app
How to install the app on iOS
Follow along with the video below to see how to install our site as a web app on your home screen.
Note: This feature may not be available in some browsers.
More options
Style variation
You are using an out of date browser. It may not display this or other websites correctly.
You should upgrade or use an alternative browser.
You should upgrade or use an alternative browser.
Ball joint & ABS unit replacement plus stuff.. on 98LC W/151K
- Thread starter 2001LC
- Start date
This site may earn a commission from merchant affiliate
links, including eBay, Amazon, Skimlinks, and others.
More options
Who Replied?2001LC
SILVER Star
- Thread starter
- #23
Some of the old parts.
This hub flange had been beaten up the recondition by someone then beaten again, so we replace it. Cone washer were scored so replaced them as well, which is nice to match with new flange.
I do a pre check of snap ring gap just to get idea of what I'll need. Got a 0.38mm here about 2K miles after last wheel bearing service. That .18mm over limited. Shame on this Toyota Dealer, they know this damages axle teeth, hub flange and axle bushing. This would certainly cause more expense work to be needed in 20K or 40K miles.
Last edited:
2001LC
SILVER Star
- Thread starter
- #24
Thanks, I came up with that on the fly, didn't even give second thought. Really, my mind was spot on the job. Not bad for my first ball joint job.looks like it was a busy weekend for someone, nice trick with the c-clip thats way better than the two screwdriver method
Yeah was busy weekend. I working on tearing down a 08 4Runner 2UZ-fe VVt-i with transmission and all wiring harness attached. When this rush job came up. I line up my tools and parts, then dove in as soon as the sun hit the driveway. Was wearing a ski-parker and gloves for first hour or two. I only had until sundown, so I moved at a lightning pace. Not my usually slow motion. Job went well with very few hiccups or wasted time. Probably first time I figured time to complete right near right on. Having all tools and parts at hand was key.
Now temp have drop to the teens, so work has stop. Darn, I do need more garage space and climate control.
2001LC
SILVER Star
- Thread starter
- #25
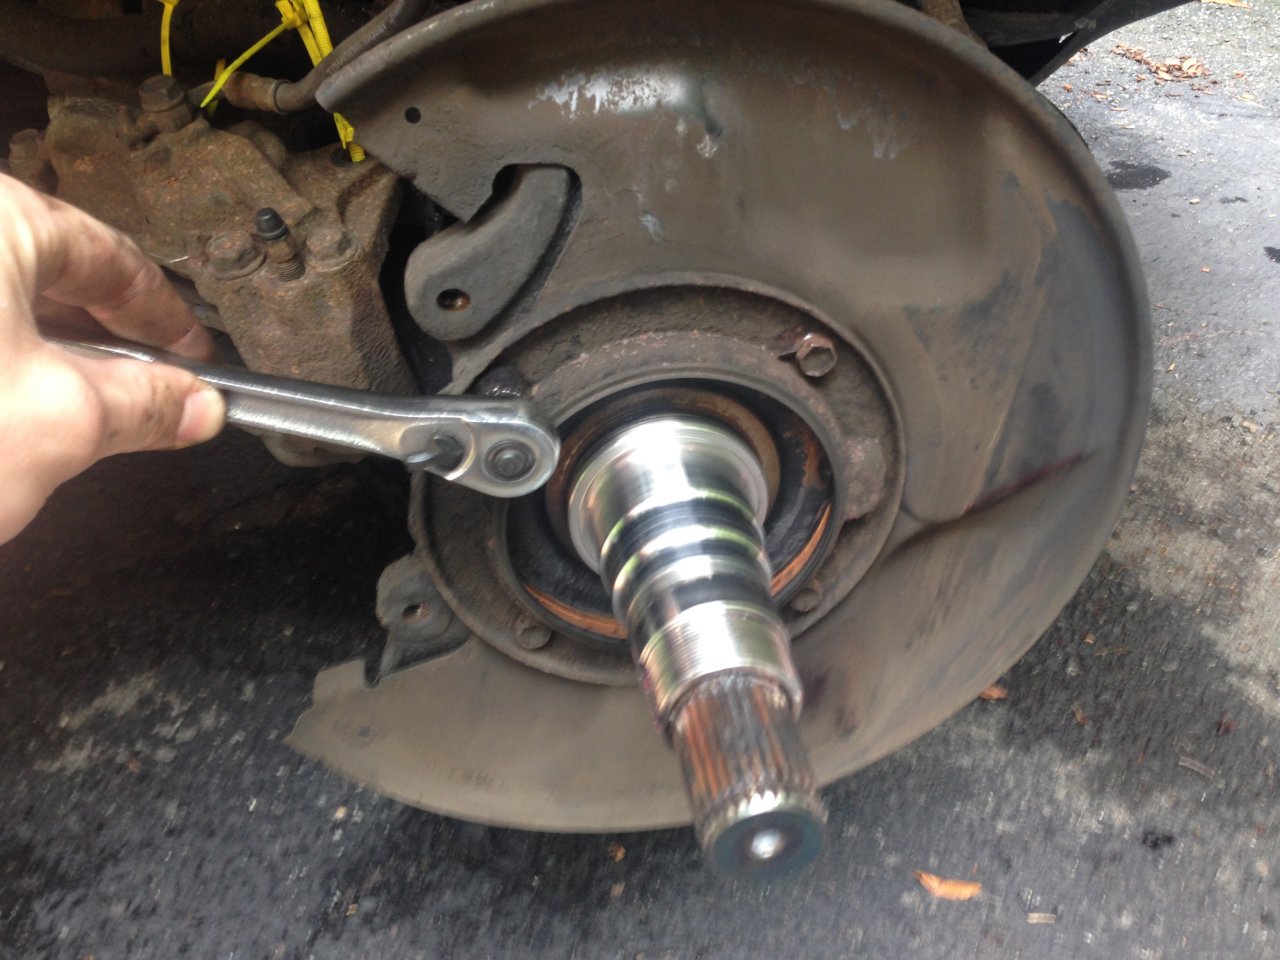
Oh here is the PS Dealer service wheel bearings not long ago. This is right after I pulled the hub flange exposing the lock nut and locking ring. Notice no tabs bent! it happen. I see about 2 out of 10 rigs where some forget to lock/bend tabs. On another rig, I found had all tabs bent in, locking nothing (both side). Now that was pure incompetence.

Here's the PS relatively new (<6 months) rebuilt FDS. See the cracks in the boot folds. If you buy CVJ pay the extra for OEM boots. Better yet buy OEM FDS, they are best and last.

Here's the PS relatively new (<6 months) rebuilt FDS. See the cracks in the boot folds. If you buy CVJ pay the extra for OEM boots. Better yet buy OEM FDS, they are best and last.
Last edited:
Great work as always.In UAE we can't buy the upper ball joints or boots any more only ,have to buy the whole hub flange.Cracking or teared boots what issues in ball joints it causes ?.
2001LC
SILVER Star
- Thread starter
- #28
Thanks.Great work as always.In UAE we can't buy the upper ball joints or boots any more only ,have to buy the whole hub flange.Cracking or teared boots what issues in ball joints it causes ?.
Dealers here sell boots for upper and lower, but not TRE ball joint boot. The ball joints themselves are aftermarket 555's, as Dealer only sells with control arm here as well.
This Is A Great Thread
THANKS
Questions
1. While replacing the lower arm ball joint, should I remove the flange of the wheel?
Or it is enough to pull the Grease cap and the snap ring?
.JPG.jpg")
2. Do I need assistance while reinstalling the whole knuckle?
THANKS
Questions
1. While replacing the lower arm ball joint, should I remove the flange of the wheel?
Or it is enough to pull the Grease cap and the snap ring?
2. Do I need assistance while reinstalling the whole knuckle?
2001LC
SILVER Star
- Thread starter
- #30
Loaded question.
Short answer is yes, pull the hub flange, wheel hub then backing plate. Unless you've a puller that can get into and hold on the lower steering knuckle, a thin one, to release lower ball joint from it. Otherwise, you'll need to pull wheel hub, then backing plate to get puller on.
Some will just remove grease cap and snap ring. Then beat on lower steering knuckle near ball joint with BFH, until it releases.
One man can handle the Steering knuckle with wheel hub, during removing and installing.
Last edited:
I got jammed up on this pretty quickly. How do you remove the speed sensor? I cracked the bracket a bit trying to wiggle it out.Remove hub/rotor/knuckle as one assemble.
OK, degreased enough to do a better search and found this thread: Need Real-Time Help: How to Remove ABS Sensor? - https://forum.ih8mud.com/threads/need-real-time-help-how-to-remove-abs-sensor.877163/
I'm in the same boat as that poster: cracked the plastic housing where the bolt attaches the sensor to the back of the hub. Sensor wouldn't budge.
I reattached the sensor bolt and sprayed it good with Fluid Film.
- Is this an inevitable failure due to water seepage? Would marine grease globbed around it serve me better?
- Can I stick a vice grip on the rubber casing and work it harder to try and get the sensor out?
- Should I order the replacement sensor now?

Last edited:
2001LC
SILVER Star
- Thread starter
- #33
First never pry on wheel speed sensor. If it stuck, that will break the housing ever time.
I pull the wheel hub and brake dust shield first, if sensor doesn't wiggle out by hand. Then I tap out sensor with a soft wooden dowel, form inside / out. Another way is to disconnect wire from above, and leave senor in knuckle.
I do a lot of knuckle services. Where I pull the knuckle de-rust. Hone out wheel speed senor, if needed. Pound and flat file mating surfaces, where ball joint boot mats/seal. Clean or replace needle bearing and brass bushing. Replace rear seal. Pack beings with Mobil 1. Then on assemble, I use marine grease, on non bearing surface that are bare metal. Which includes wheel speed senor mounting area & hole.
On restore jobs, I do replace cracked wheel speed sensor. But on your own vehicle. You can clean up and glue (JB wield), let glue sit and then mount in knuckle. If later it fails, replace it.
Thanks so much.First never pry on wheel speed sensor. If it stuck, that will break the housing ever time.
I pull the wheel hub and brake dust shield first, if sensor doesn't wiggle out by hand. Then I tap out sensor with a soft wooden dowel, form inside / out. Another way is to disconnect wire from above, and leave senor in knuckle.
I do a lot of knuckle services. Where I pull the knuckle de-rust. Hone out wheel speed senor, if needed. Pound and flat file mating surfaces, where ball joint boot mats/seal. Clean or replace needle bearing and brass bushing. Replace rear seal. Pack beings with Mobil 1. Then on assemble, I use marine grease, on non bearing surface that are bare metal. Which includes wheel speed senor mounting area & hole.
On restore jobs, I do replace cracked wheel speed sensor. But on your own vehicle. You can clean up and glue (JB wield), let glue sit and then mount in knuckle. If later it fails, replace it.
View attachment 2972196
View attachment 2972197
View attachment 2972198
View attachment 2972200
View attachment 2972201
I’m always shocked at the obvious stuff that never occurs to me, like “disconnect wire from above, and leave sensor in knuckle.”
I’ve got to try and tap this out and glue it up at this point, though.
2001LC
SILVER Star
- Thread starter
- #35
I've for years de-rusted using an array of brushes and pads. Which is fine for doing once in awhile. But anymore I do a lot of them!
So my newest method. I first try placing 1 knuckle in 5 gallon bucket with EvapoRust. Worked well!
Today, I placing 2 clean rusty knuckles in a large sink, with 10 gallons of EvapoRust, with a bucket heater and cover/insulator.


Takes a day or two. Buy works very well.
So my newest method. I first try placing 1 knuckle in 5 gallon bucket with EvapoRust. Worked well!
Today, I placing 2 clean rusty knuckles in a large sink, with 10 gallons of EvapoRust, with a bucket heater and cover/insulator.
Takes a day or two. Buy works very well.
Last edited:
If anyone happens into this thread while searching for ABS sensor or Speed sensor, here's a thread about it with some good pictures and detailed accounts of removing rusted sensors:
 forum.ih8mud.com
How To: Wheel Speed Sensor Replacement
I just had to do this procedure on my 2006 after the VSC, ABS, and TRAC lights went off. I had my mechanic check the codes and the right front sensor registered an error. You can check the Ohm's for the sensor, apparently they should read around 1.0, in my case, nothing, so new sensor it was...
forum.ih8mud.com
2001LC
SILVER Star
- Thread starter
- #37
The rubber mallet may be a bit to hard, or so it would seem in above link. Also you really do not want to smack hard on the sensor, when trying to drive out.If anyone happens into this thread while searching for ABS sensor or Speed sensor, here's a thread about it with some good pictures and detailed accounts of removing rusted sensors:
How To: Wheel Speed Sensor Replacement
I just had to do this procedure on my 2006 after the VSC, ABS, and TRAC lights went off. I had my mechanic check the codes and the right front sensor registered an error. You can check the Ohm's for the sensor, apparently they should read around 1.0, in my case, nothing, so new sensor it was...
A soft wooden dowel like pine. With some penetrating oil, added hours/days before. Tapping on gently and taking all the time necessary (not rushing), works well! I've used this method often, and have never busted one (knock on wood). But in the end, it depends on how badly rusted in it is. Which is a function of time, as rust grows like a cancer over time. So the sooner one works, to remove the wheel speed sensor. The better the chances it comes out without busting.
Last edited:
Similar threads
Users who are viewing this thread
Total: 1 (members: 0, guests: 1)