B head saga- Not a good weekend

This site may earn a commission from merchant affiliate
links, including eBay, Amazon, Skimlinks, and others.

You really don't want my 2c George. I don't even know how to apply a "36 + 90 + 90 torque" right now. (What does that mean?)

And it actually surprises me that you expect each and every coolant passageway in my old 1979 B to line up with those in your 1994 B (which you must if you expect to use my head gasket).

:D
 
Any idea of what TTY stand for???

TTY = Torque To Yield... i.e. you torque the bolt until they yield aka "stretch"

I don't even know how to apply a "36 + 90 + 90 torque" right now. (What does that mean?)

It means you torque the bolts to 36 ft lbs, then turn them an additional 90 deg, followed by 90 more deg.

Its a sequence designed to ensure that the bolts actually exceed their yield stress.
 
Gee Greg
the MLS story does not leave me with a warm fuzzy feeling.

Smooth I can understand, but how do they deal on the liner protrusion and the pre cup protusion, which can, in some cases be positive ( standing proud of the head).

George
 
Tom, your opinions and knowledge are worth a lot more that 2 cents

I see AM enlightened you on the TTY story, as for passage way alignment, not much has changed in these engines except for leaving out the liners, but having said that, all I have to go on is overlaying the respective gaskets and checking that everything matches up, which it does . (Don’t forget I had an "old" gasket in there because of the liners.)

George
 
Torque to yield bolts also tighten down more evenly when using angle torquing. This is due to differences in friction between bolts affecting the torque wrench. Eg tightening one bolt down to 87ftlb might be different to another if there is crap on the threads or underneath the head of the bolt.
From memory the Isuzu truck motors have angle torquing for the head bolts. These also have cast iron heads and use MLS gaskets
 
OK then
do I

1. Get normal head bolts and torque up the same way as the early manuals suggest (87Ft-lb ????? )

2. Get another set of stretch bolts and torque up according to the label on my tappit cover (36Ft.lbs +90+90)

George

Hi George

The big difference in these torques you quoted has been playing on my mind (like so many god-damned things tend to do these days) :D.

So I've just checked the 1977 98260FSM and the 1988 RM132E FSM (both for B-engine data).

Sure enough ...my old B has 18 head bolts to be torqued to 84-87 ft-lb (115 to 120 N-m) while your Aug 88 onwards B has the same number of bolts requiring just 36 ft-lb (49 N-m) +90 +90.

So your figures are well-researched!

But I doubt an extra 180o (90 + 90) of torquing-movement would raise the torque from 36 to 87 ft-lb. Do you think it would?

And if I'm right (that the final torques are so different) then I wonder why the new engines require so much less head-bolt torque?

Your new head and my old head are both cast iron .. so different metals there can't be the reason...

(Or do you think the 180 degrees extra-movement would actually bring their torques to roughly the same level despite the "yielding"?)

:beer:

PS. To be truthful, "torque to yeild" gives me the heeby jeebies just as if someone were to tell me to "torque each bolt till you feel the thread begin to tear away and then back off a 1/4 turn".

I fail to see any advantage in getting bolts to exceed their yield strength (by presumably making them deliberately of weaker/softer steel) ... except from Toyota's point of view in obtaining more sales from their head-bolt stock. :frown:

If precision-torquing is your aim then surely clean-threads and gradual torque-increases with old-school hex-head bolts would be preferable?

- Thank heavens I'm still with an old-school engine that doesn't use the hairbrained ideas these new-age engineers come up with. :D
 
Don't get too freaked out. I think its a me thing. Things usually are up hill for some reason when I work on stuff. I personally wouldn't use TTY bolts. They cant be reused. If you want to spend money on some nice bolts, get ARP studs. They are amazing. I suspect the trouble I had sealing my HG wasn't the gasket at all, but a crack in the head itself. Its sealed up now and not causing issues.

The nitrile or vitron or what ever the coating is thats on the MLS gasket is there to seal up machining grooves on the head and block. The stainless will not conform whatsoever to the surfaces, thus it is hard to seal. Some people have had coolant leaks right out the side of the gasket onto the ground... according to the intraweb that is.

Talking with a machinist, he said that most shops can produce a fairly smooth enough surface if they slow down their machining so that it just takes longer to cross over the head. The extra clamp at the liner is a common technique use for many decades. It is widely used with MLS and copper gaskets.
My precups were machined in situ, so it all was the same thickness.
 
Last edited:
TTY definitely tightens bolt as much as a single torque setting. The last Isuzu head I helped torque down had an initial torque then something like 60* then another 60* or something along those lines. I can tell you, tightening that last sequence is a struggle, even with a two foot bar.
 
Ok then
I get the block back today ( friday lunch time), so guess what I will be doing this weekend???

I can't source new hex ( non tty) bolts, so, i am going with a new set of TTY's and the MLS gasket.
I'm going with the:
clean and check all threads in the block
run the new bolts into block to check
lightly oil bolt threads and washer
clean up paint and crud on head "lands"
Spray new gasket with permatex copper spray ( i researched but i'm waiting for the comments)
fit head and torque up to 36 ft-lb
Do the 90 +90 dance ( I feel you cringe Tom)


I probally wasted my money on a new set, because they are exctly the same length as the ones that helped do all the damage, but these were attempting to reseat my liners , so i don't know exactly how much stress they were under. Unfortunately, I chucked out the 10 year old re-used bolts, that would have been interesting.
So, my post on Sunday evening should be interesting reading.

George

Why mess with the copper spray, as long as surfaces have been machined to tolerance there simply is no need for copper...

Also, on the matter of TTY bolts, degrees and torques... It simply is the most effective way to get RIGHT torque on those bolts, since 99% of torque wrenches in garages havent been calibrated and therefore are unreliable. That procedure also provides really even tension on the head (as long as proper pattern is used)...
 
The copper spray is good insurance I reckon. Some of the old guys I work with have used it for ages and say its a good idea. It can't hurt it can it? I agree with tty bolts being more accurate and even across the head
 
Oiling them is a good idea, but I would highly recomend a ludbe specifically designed for torqing bolts as it will have moly and other high pressure additives for less scatter. It would also hold the torque longer.
\Buying new bolts is rarely a waste. Old bolts can have nics on the threads, be deformed, bent, out of round etc. Sounds like your on the right track.
That copper spray is to "fill" maching grooves slightly. If your maching is good and you still wish to use it, use it sparingly as it is not intended to withstand combustion presures by itself. Its really only for oil and coolant leaks.
 
Just fitted a new toyota mulit layer all metal head gasket on my 1989 13B-T at 118N-M torque for head bolts. The sticker on my rocker cover has the torque settings for the rocker retaining bolts, 10 bolts that fix the rockers to head.
 
All good I have to report back.

I did the whole TTY am MLS story and over 100 odd kays of test driving, all seems good.

Thank you all, but especially to Greg and Tom for the help.

Now, one more just before signing this thread off.

My old manuals, ( B,3B,11B,13B,13B-T) and (B, 2B), the timing is listed as 14 BTD for the B engine., NOW, my little problem child of a new B engine has an advance of 0 BTD on a tappet cover sticker.

0 deg at what RPM? idle, static-- No further info on the sticker


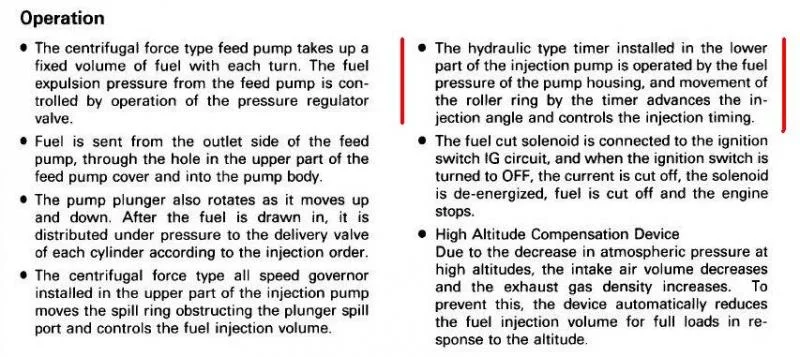
The only difference between the young and the old B engine which could affect timing would be the IP and I see some models have an advance mechanism built into the IP drive gear (called an Automatic Timer).
Mine has a rotary IP and a solid drive gear

Can I assume that the rotary pump has some sort of advance built in and would this 0 BTC advance therefore be a static setting.
All these questions:

Does anyone have a procedure for setting and or checking the timing on a post 1990 B series engine?

Perhaps mine should have the centrifugal timing gear for the IP. It's a long shot, but this was a bastardised engine !! ???


Is there a downloadable manual avail for this model??

George
 
Last edited:
All good I have to report back.

I did the whole TTY am MLS story and over 100 odd kays of test driving, all seems good.

Thank you all, but especially to Greg and Tom for the help.

Now, one more just before signing this thread off.

My old manuals, ( B,3B,11B,13B,13B-T) and (B, 2B), the timing is listed as 14 BTD for the B engine., NOW, my little problem child of a new B engine has an advance of 0 BTD on a tappet cover sticker.

0 deg at what RPM? idle, static-- No further info on the sticker


The only difference between the young and the old B engine which could affect timing would be the IP and I see some models have an advance mechanism built into the IP drive gear (called an Automatic Timer).
Mine has a rotary IP and a solid drive gear

Can I assume that the rotary pump has some sort of advance built in and would this 0 BTC advance therefore be a static setting.
All these questions:

Does anyone have a procedure for setting and or checking the timing on a post 1990 B series engine?

Perhaps mine should have the centrifugal timing gear for the IP. It's a long shot, but this was a bastardised engine !! ???


Is there a downloadable manual avail for this model??

George

Hi George

My B-engine (1B) in my 1979 has always had a sticker on the valve cover saying the injection timing is 10 deg BTC and the 1977 B/2B FSM (publication 98260) agrees so I'm not sure why you say that publication lists 14 deg BTC.

However the August 1980 B-series FSM (publication 36047) lists the 1B as having 14 deg BTC injection timing so I believe this change occurred in Aug 1980 and was done to meet more strict emmission control regulations.

The March 1986 B, 3B,11B, 13B, 13BT FSM (Publication RM035E) still lists the 1B timing as 14 deg BTC.

But the August 1988 B, 3B, 11B, 14B FSM (Publication RM132E) lists the 1B injection timing as 0 deg BTC.

Unless there is a subsequent FSM between Aug 1988 and your engine's production (1994?) then I think FSM 132E covers your engine.

And here's what it says re injection timing:

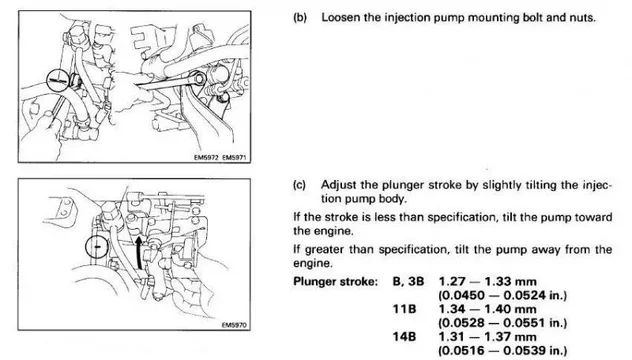
InjTiming1.webp

InjTiming2.webp

InjTiming3.webp
InjTiming1.webp
InjTiming2.webp
InjTiming3.webp
 
Thanks Tom

Again my problem child does not have a cold start facility, but that should not change anything.


I guess this tool is needed because of its specific length??
Anyone else set the timing without the special tool.

Also, tom, do you have this information on a PDF file, I would like to zoom in

Regards
 
Last edited:
...Again my problem child does not have a cold start facility, but that should not change anything.

Hi George

I believ you ignore step 3 altogether if you are without ACSD (without "automatic cold start device").

I suspect the ASCD simply uses a thermowax device to idle-up in cold weather.


...I guess this tool is needed because of its specific length?? ..

Looks to me like the tool is needed simply because you can't get a DTI in there directly.

SST09275-54010.webp

Why not try measuring the movement with something else instead like vernier calipers?

:cheers:

BTW- You asked about how it performs advance and retard before:

TimingAdvanceRetard.webp
SST09275-54010.webp
TimingAdvanceRetard.webp
 
Last edited:
Thank you again Tom

I wacked the part number into google AND,,,, FOUND....

a PBF with the repair manual for my model B series engine,,
Probally the same one you extracted your data from.

So now after much searching and asking I have the correct manual
http://www.rooney.org/hughheifer/Manuals/1988B, 3B,11B,14B Engine RM132E .pdf


Now to try and find the little bugger locally here in South Africa.

Thanks again

The tail end of vernier callipers can be used as a depth gauge.

Can't you use that to measure the movement of the plunger (and thus do away with the SST and dial gauge)?

3 here:
DepthGauge_NEW.webp

Or would it be impossible to get some callipers in there?
DepthGauge_NEW.webp
 

Users who are viewing this thread

Back
Top Bottom