Arts and Crafts Project: The Homebrew Rear Bumper

This site may earn a commission from merchant affiliate
links, including eBay, Amazon, Skimlinks, and others.

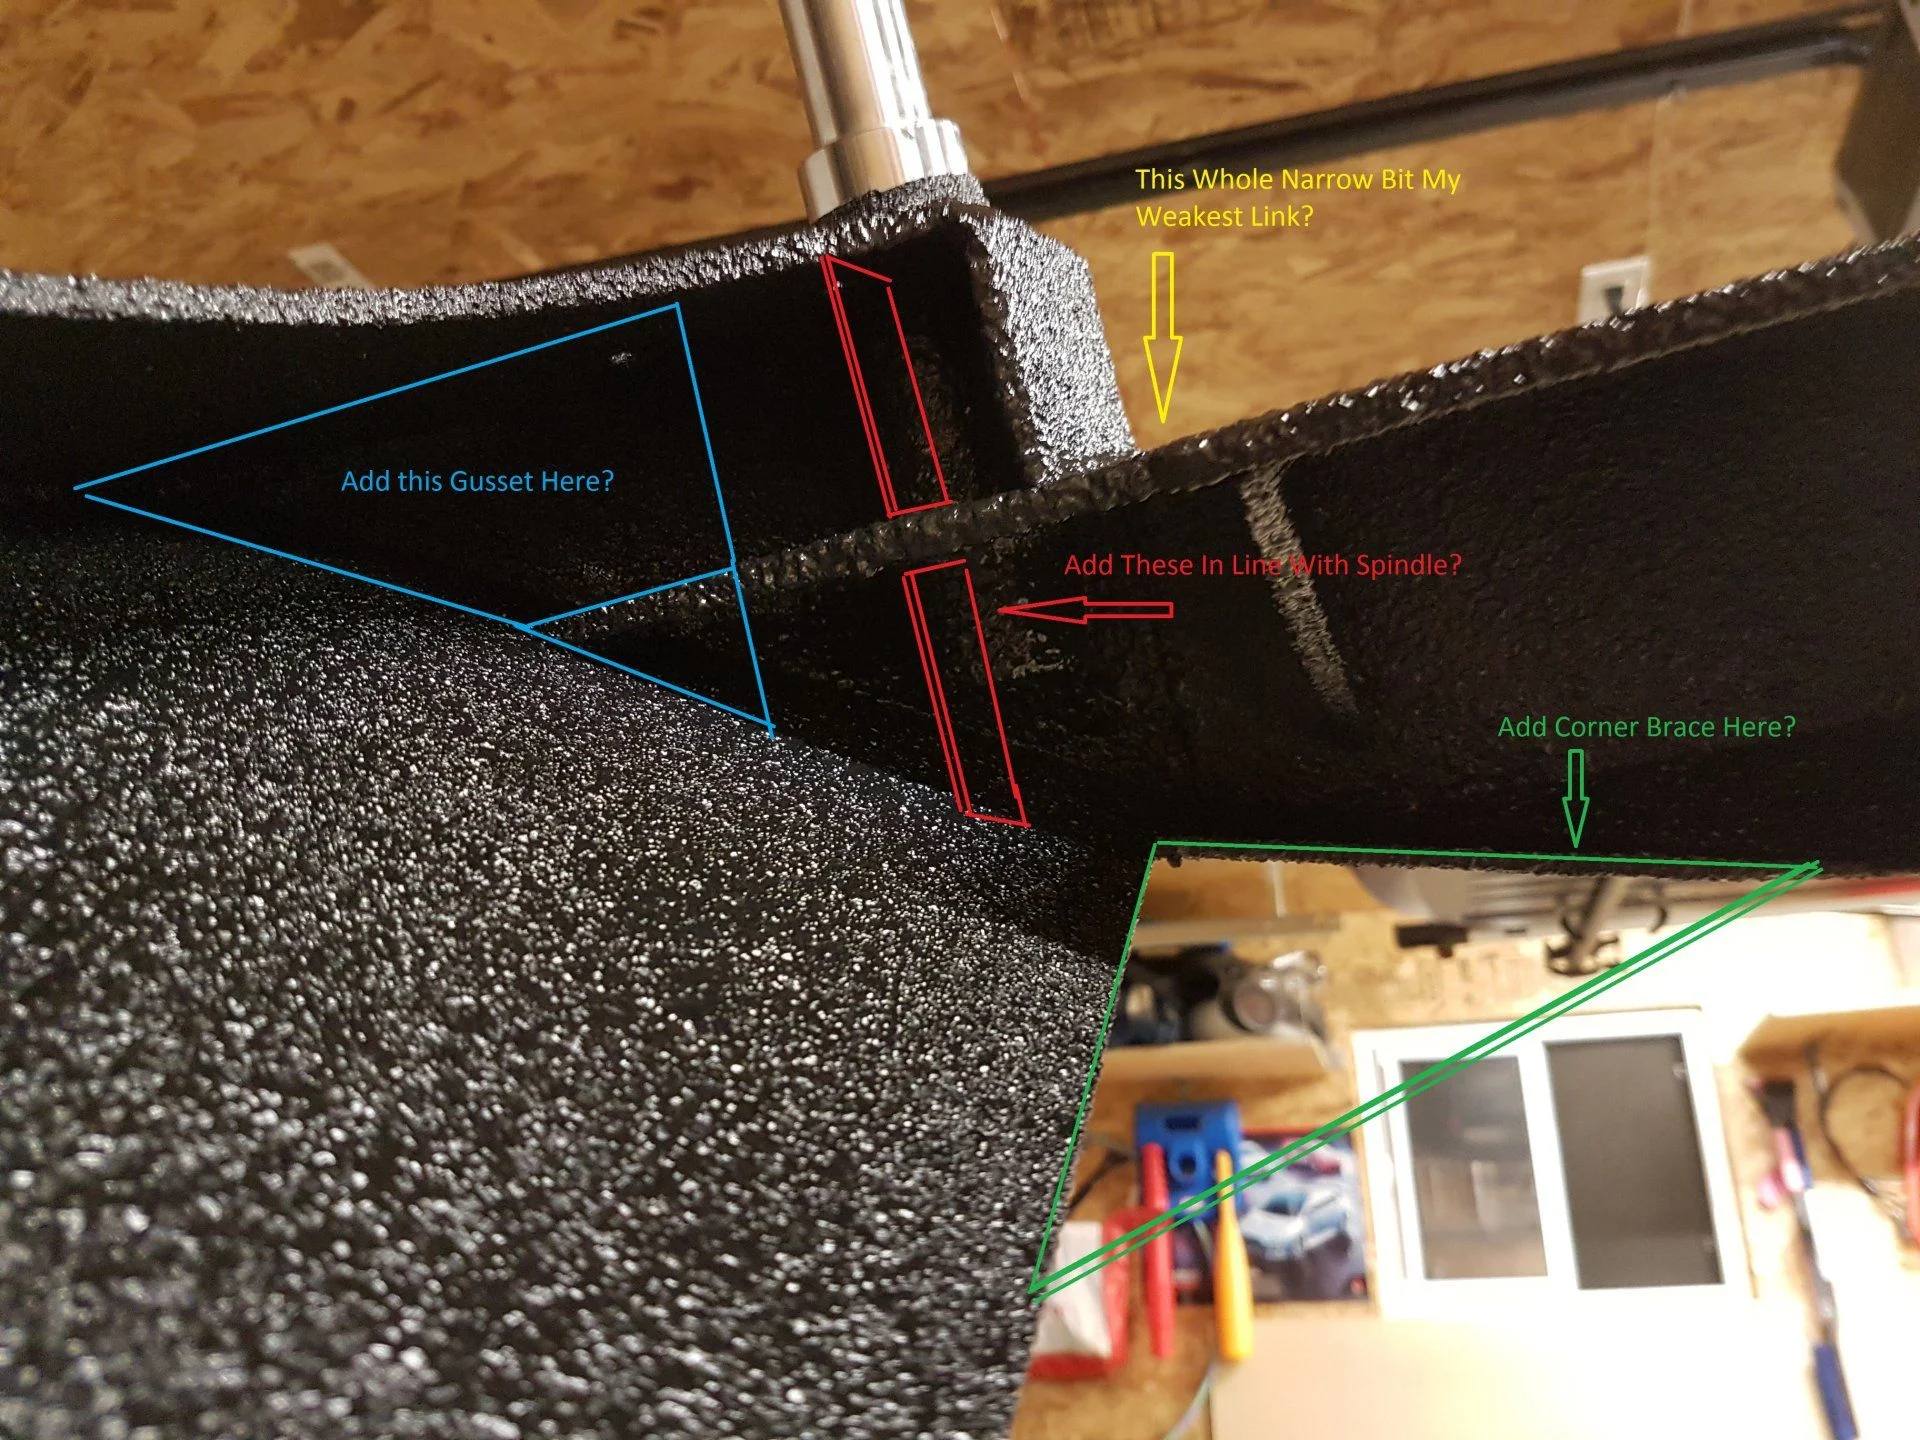
I'll touch on my tire movement concerns in the next post, but for now, here's the results of my getting impatient and just finishing things up over the weekend.

It meant I also finally got a full night's sleep, which was freaking fantastic.

full


full


full


full


full


full


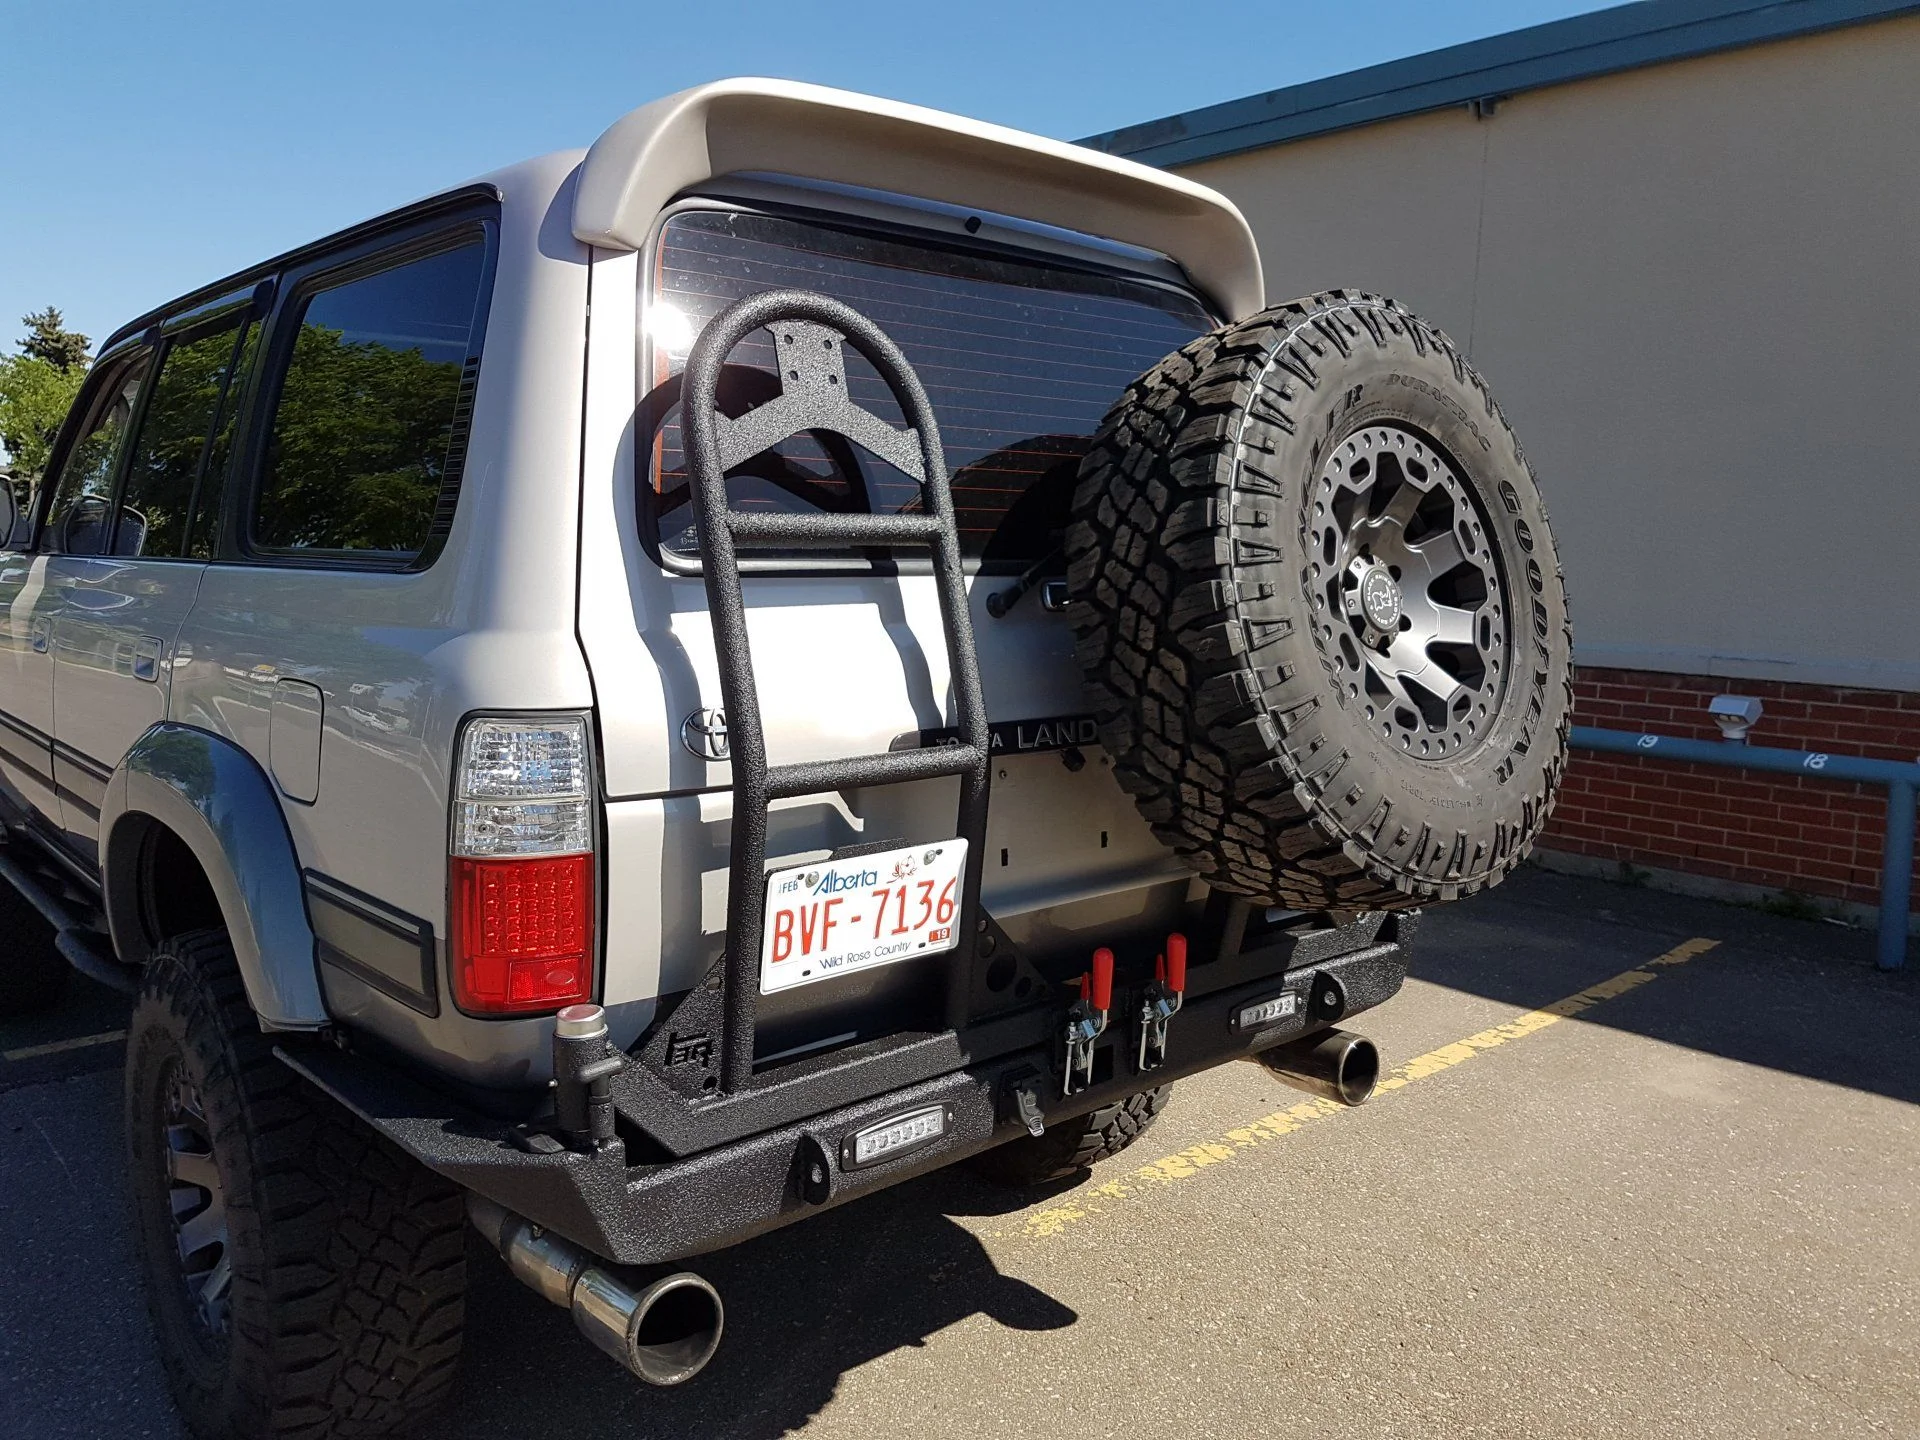
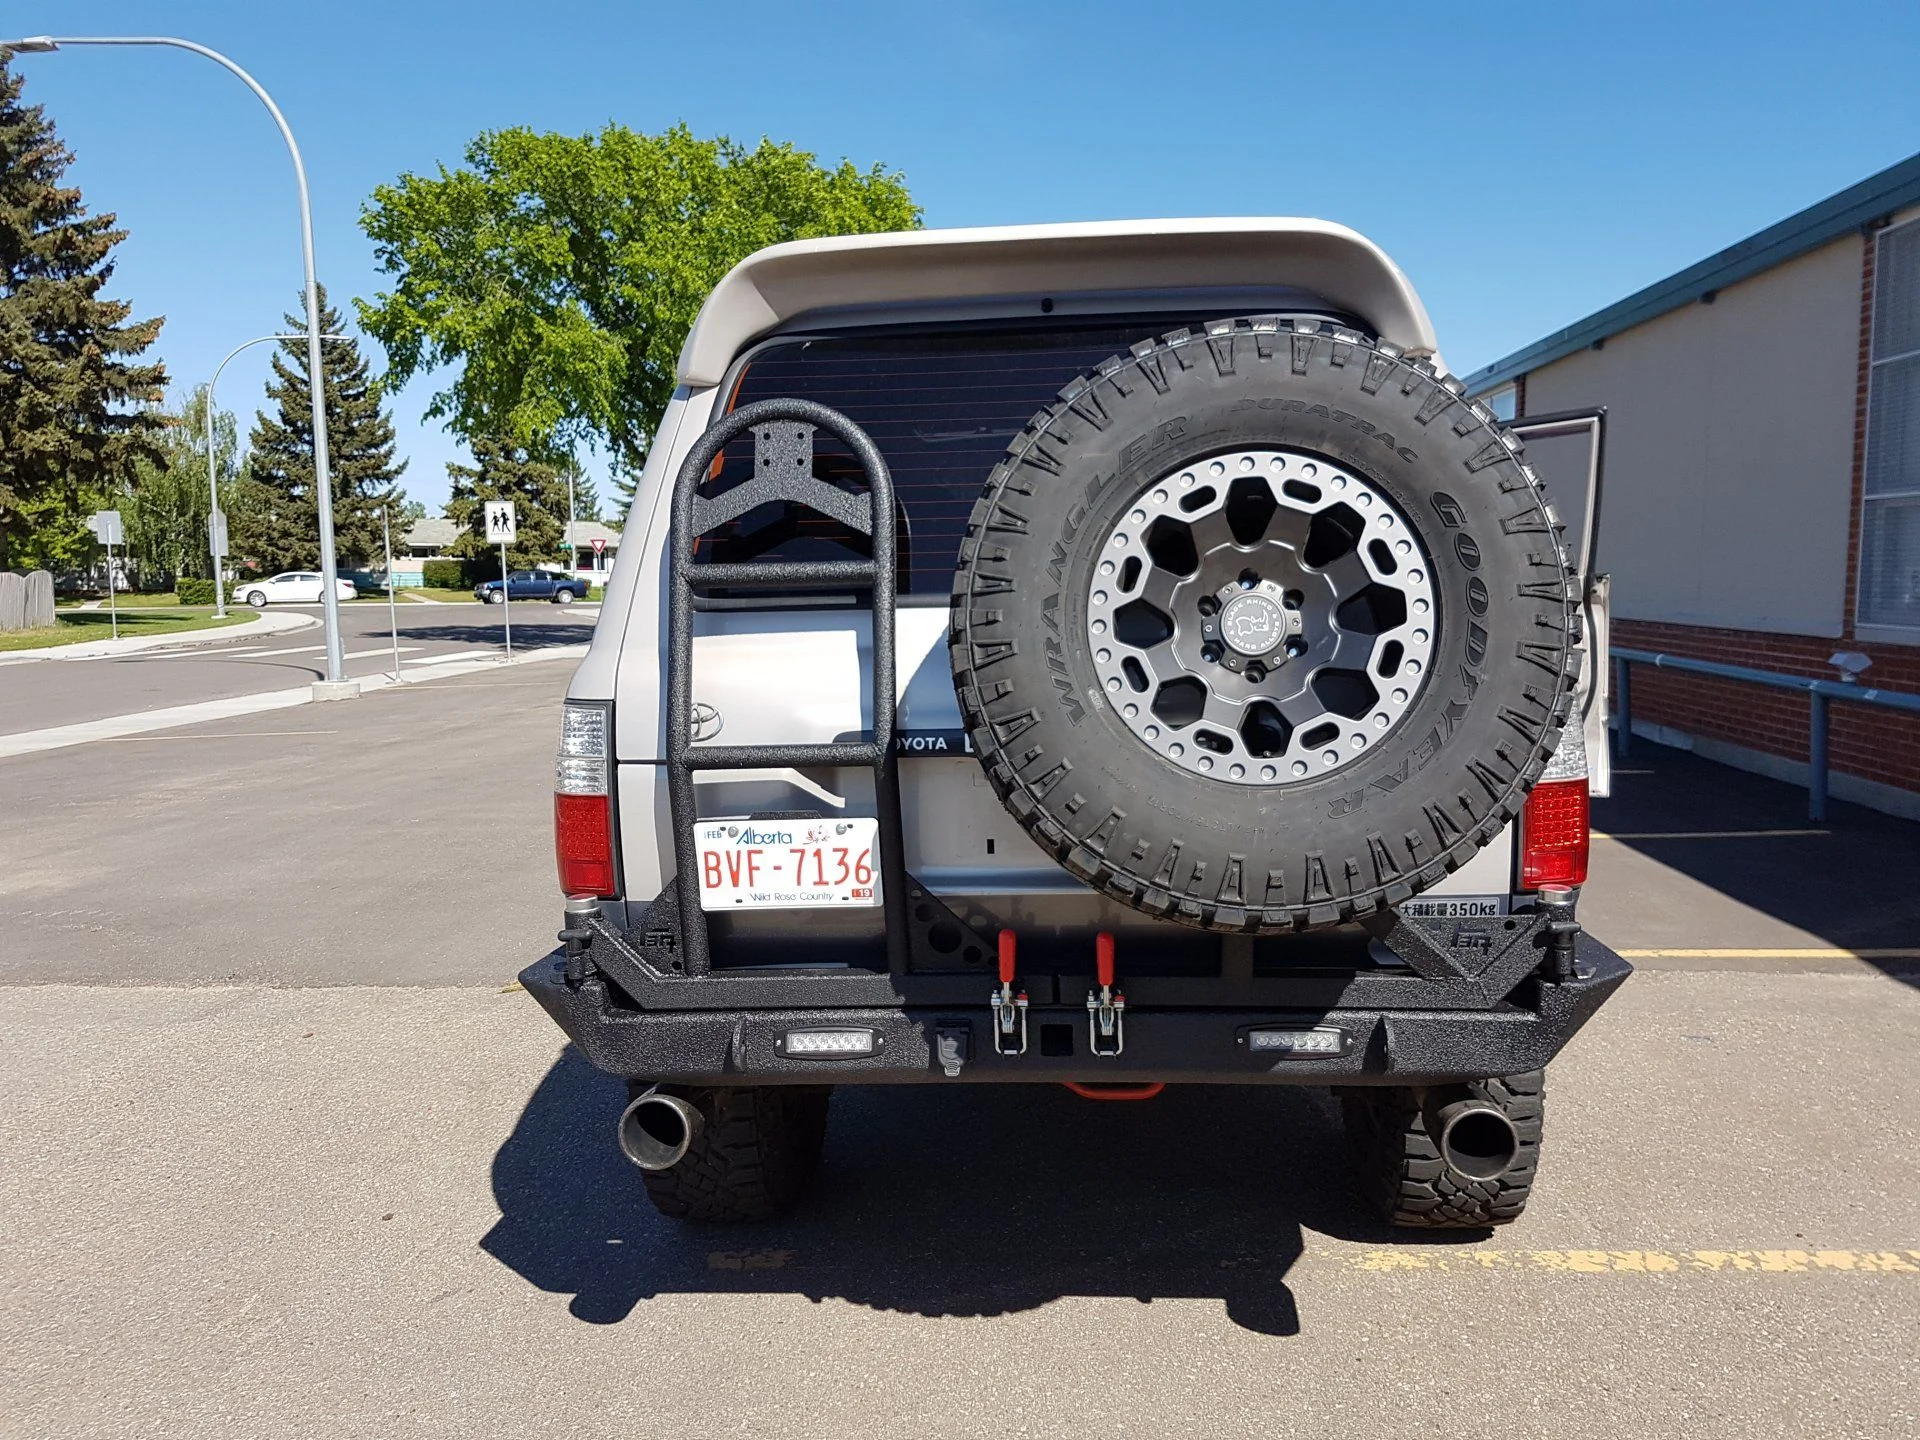
I think it looks pretty badass. The lights aren't wired up yet, neither is the trailer plug, and I have a set of LED license plate bolts that are coming in the mail sometime this week, but it's basically done for all intents and purposes.

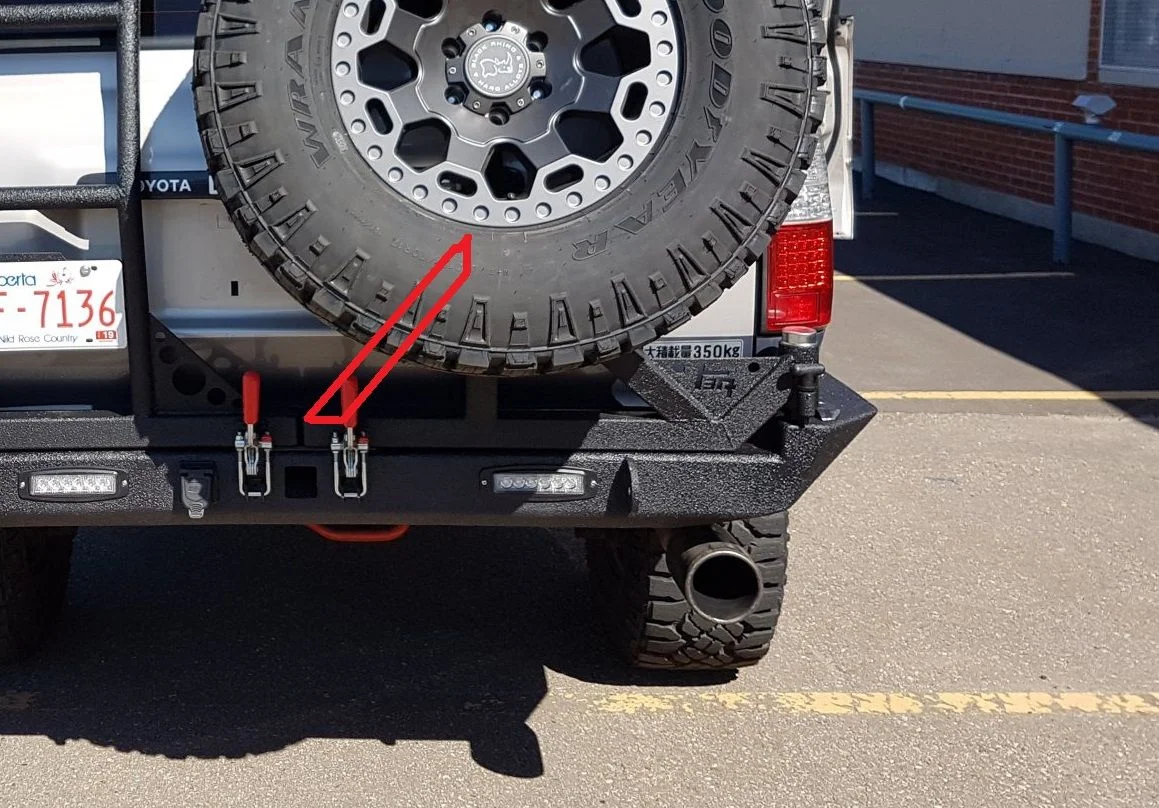
The bracket at the top of the ladder is in place so I can bolt on a vertical hang bike carrier that I'm planning on building later, but it still living only in my head right now. It could also serve as a mounting point for other goodies in the future.

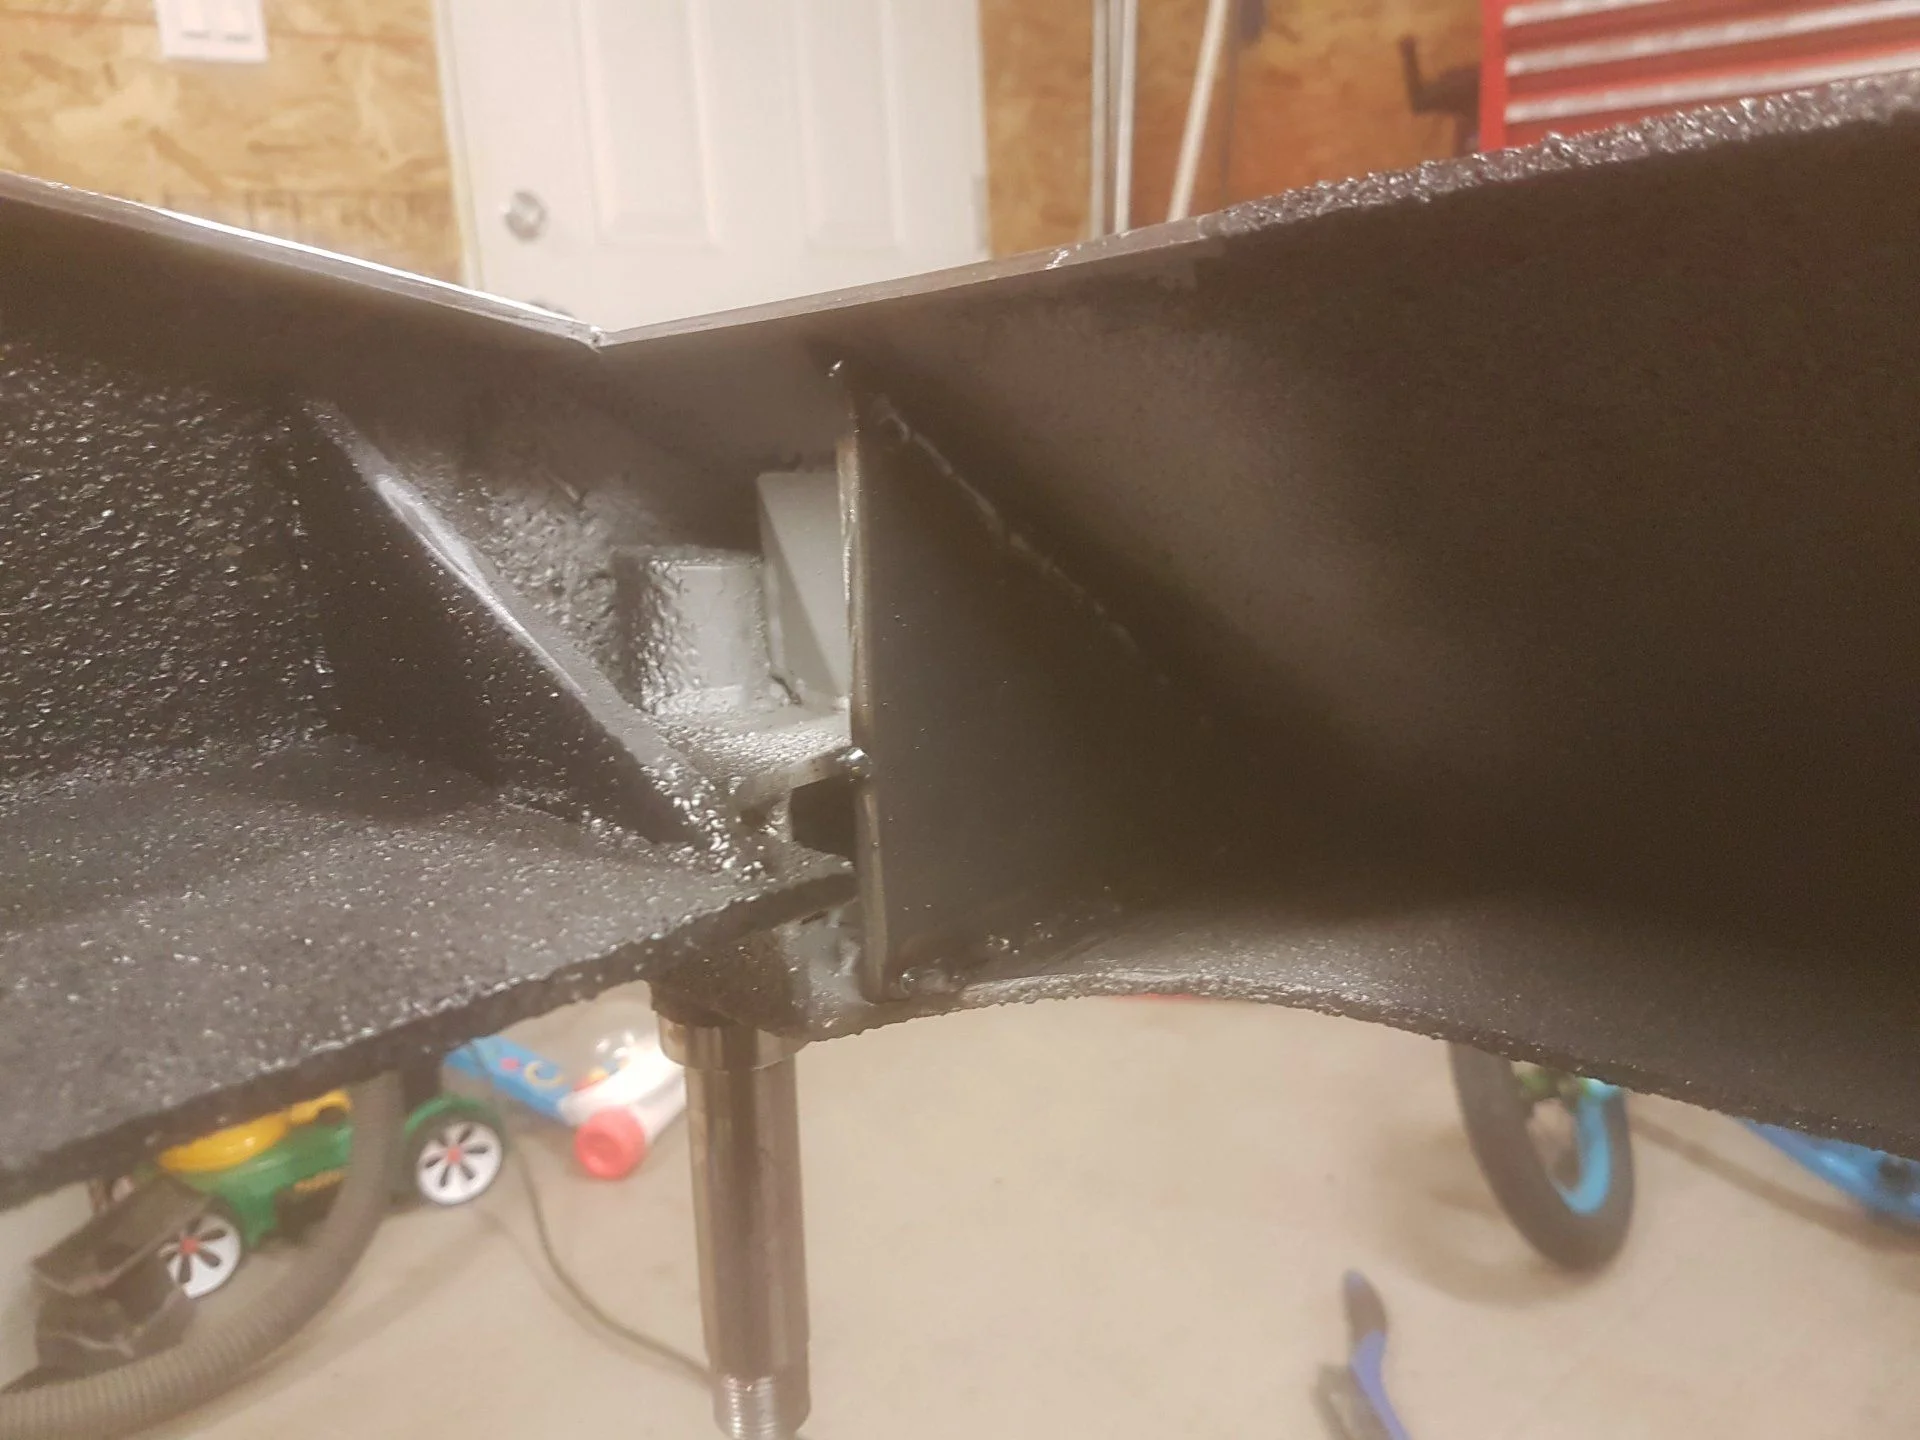
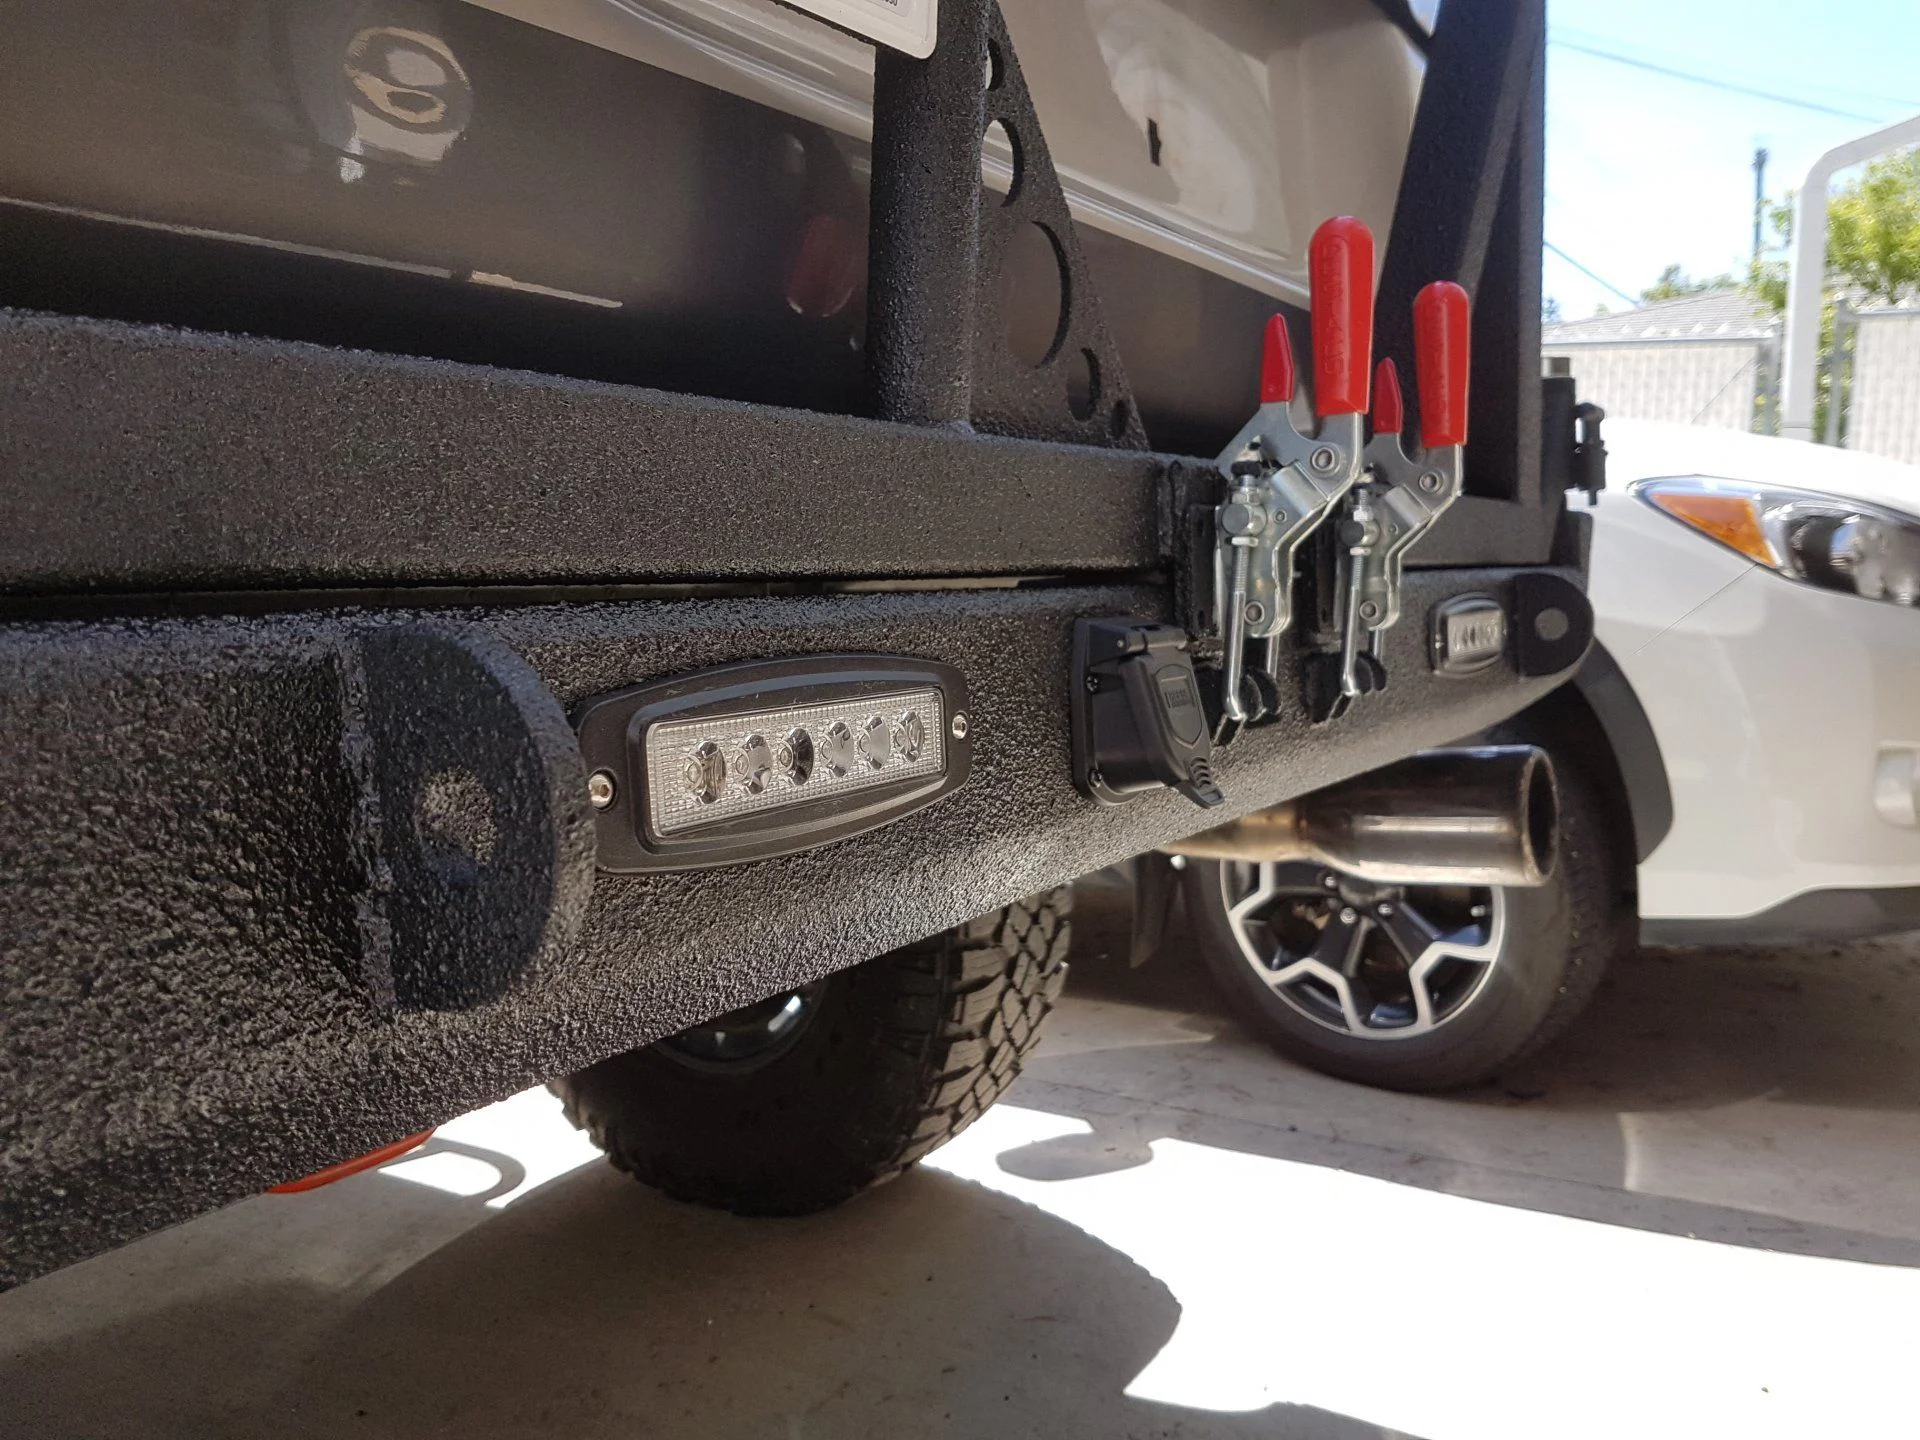
The 10-32 studs on the ladder arm are welded on and kept clear for wire routing. The intention is to use a small nut to hold on some straps for the cabling, and then cut the remaining off.

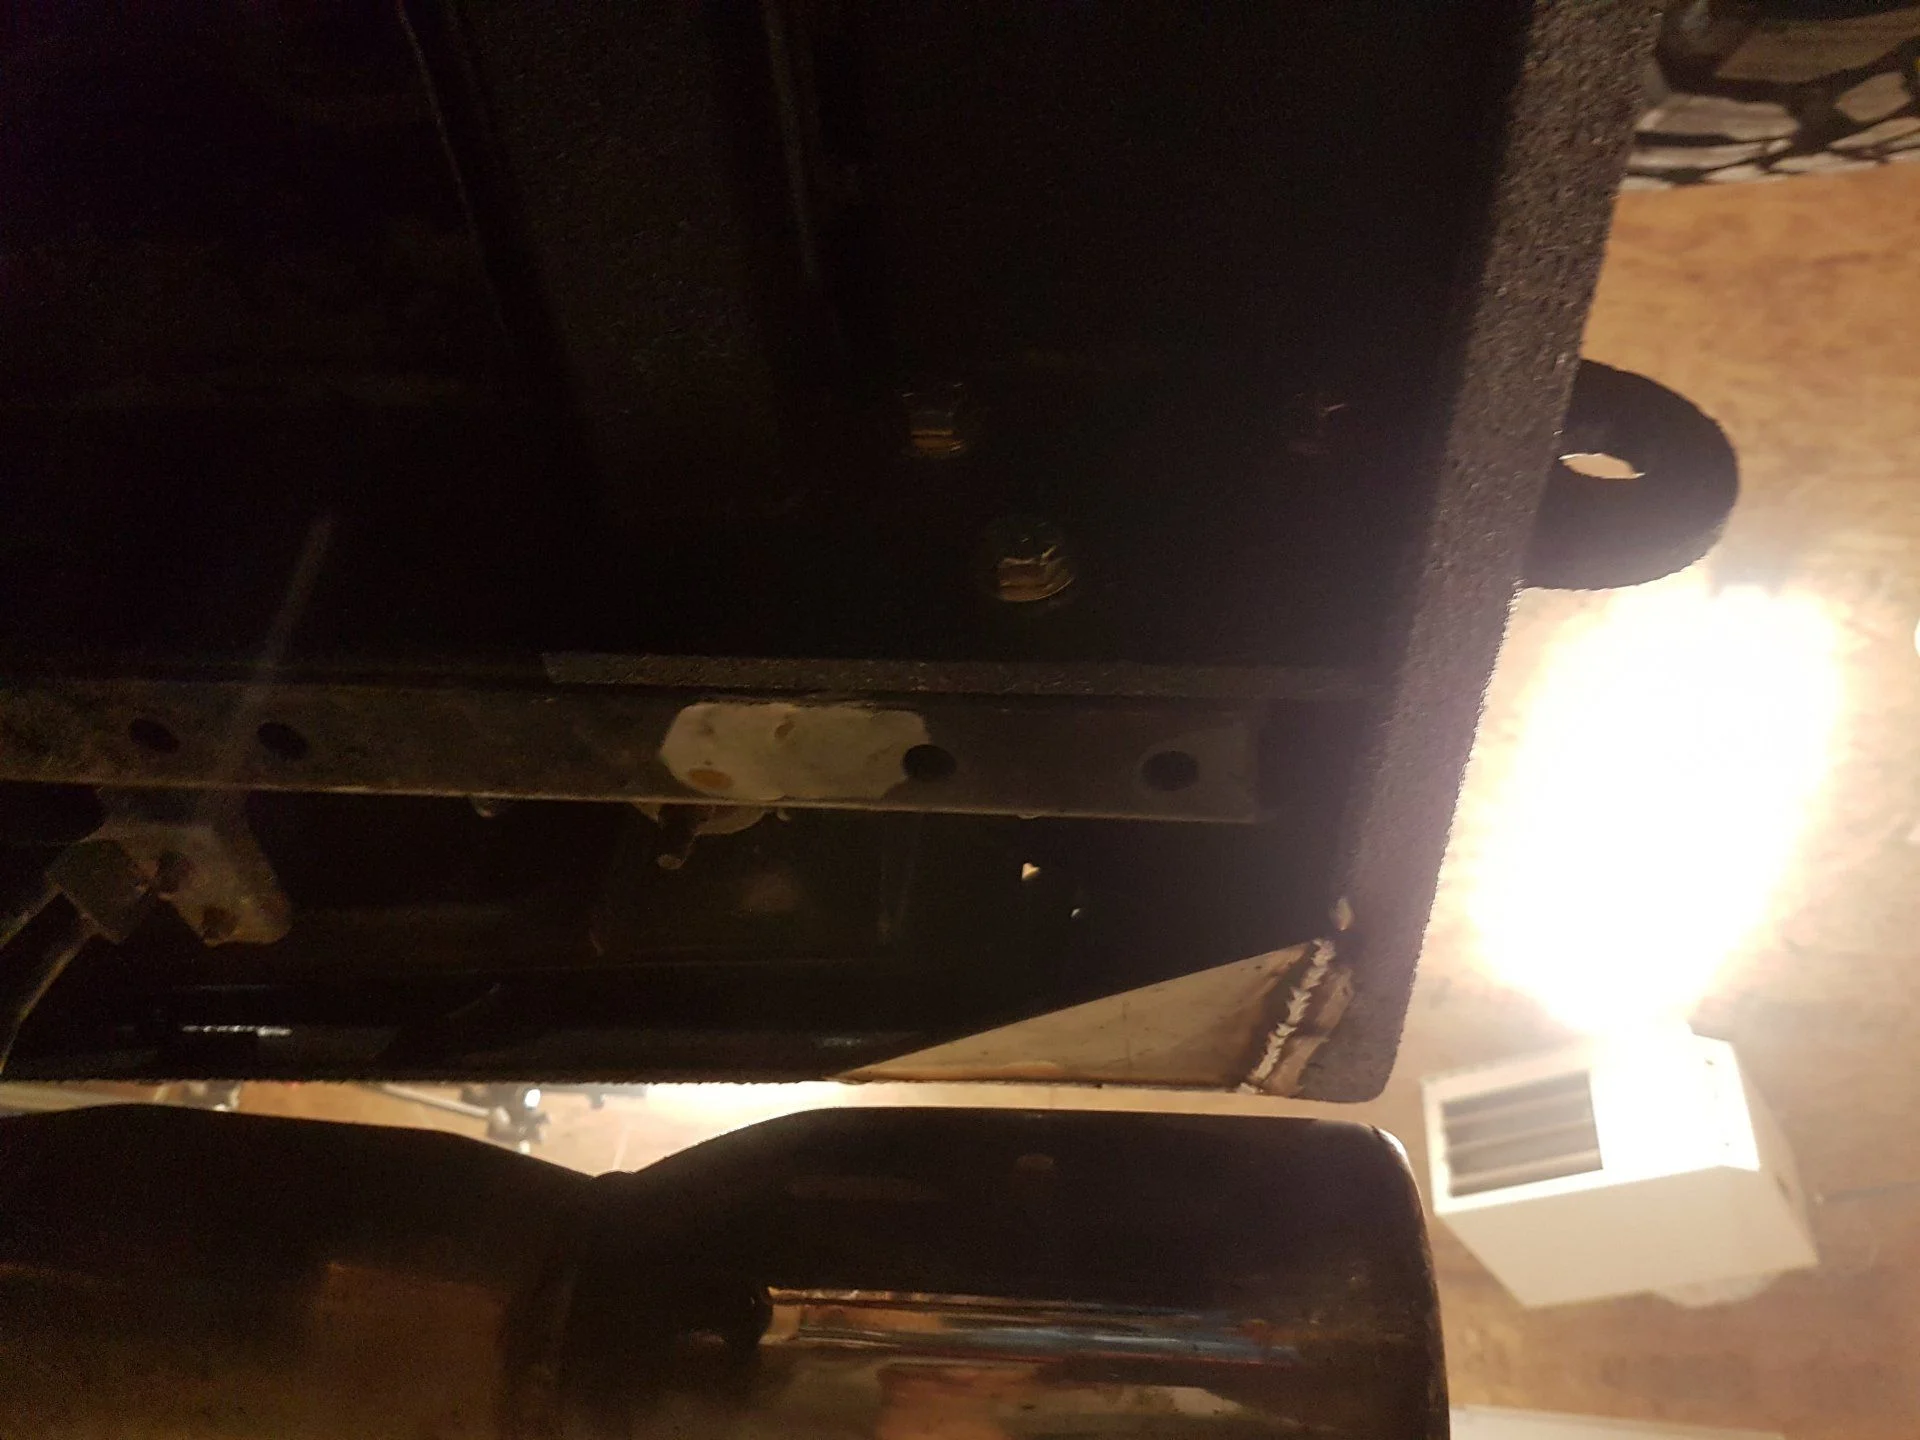
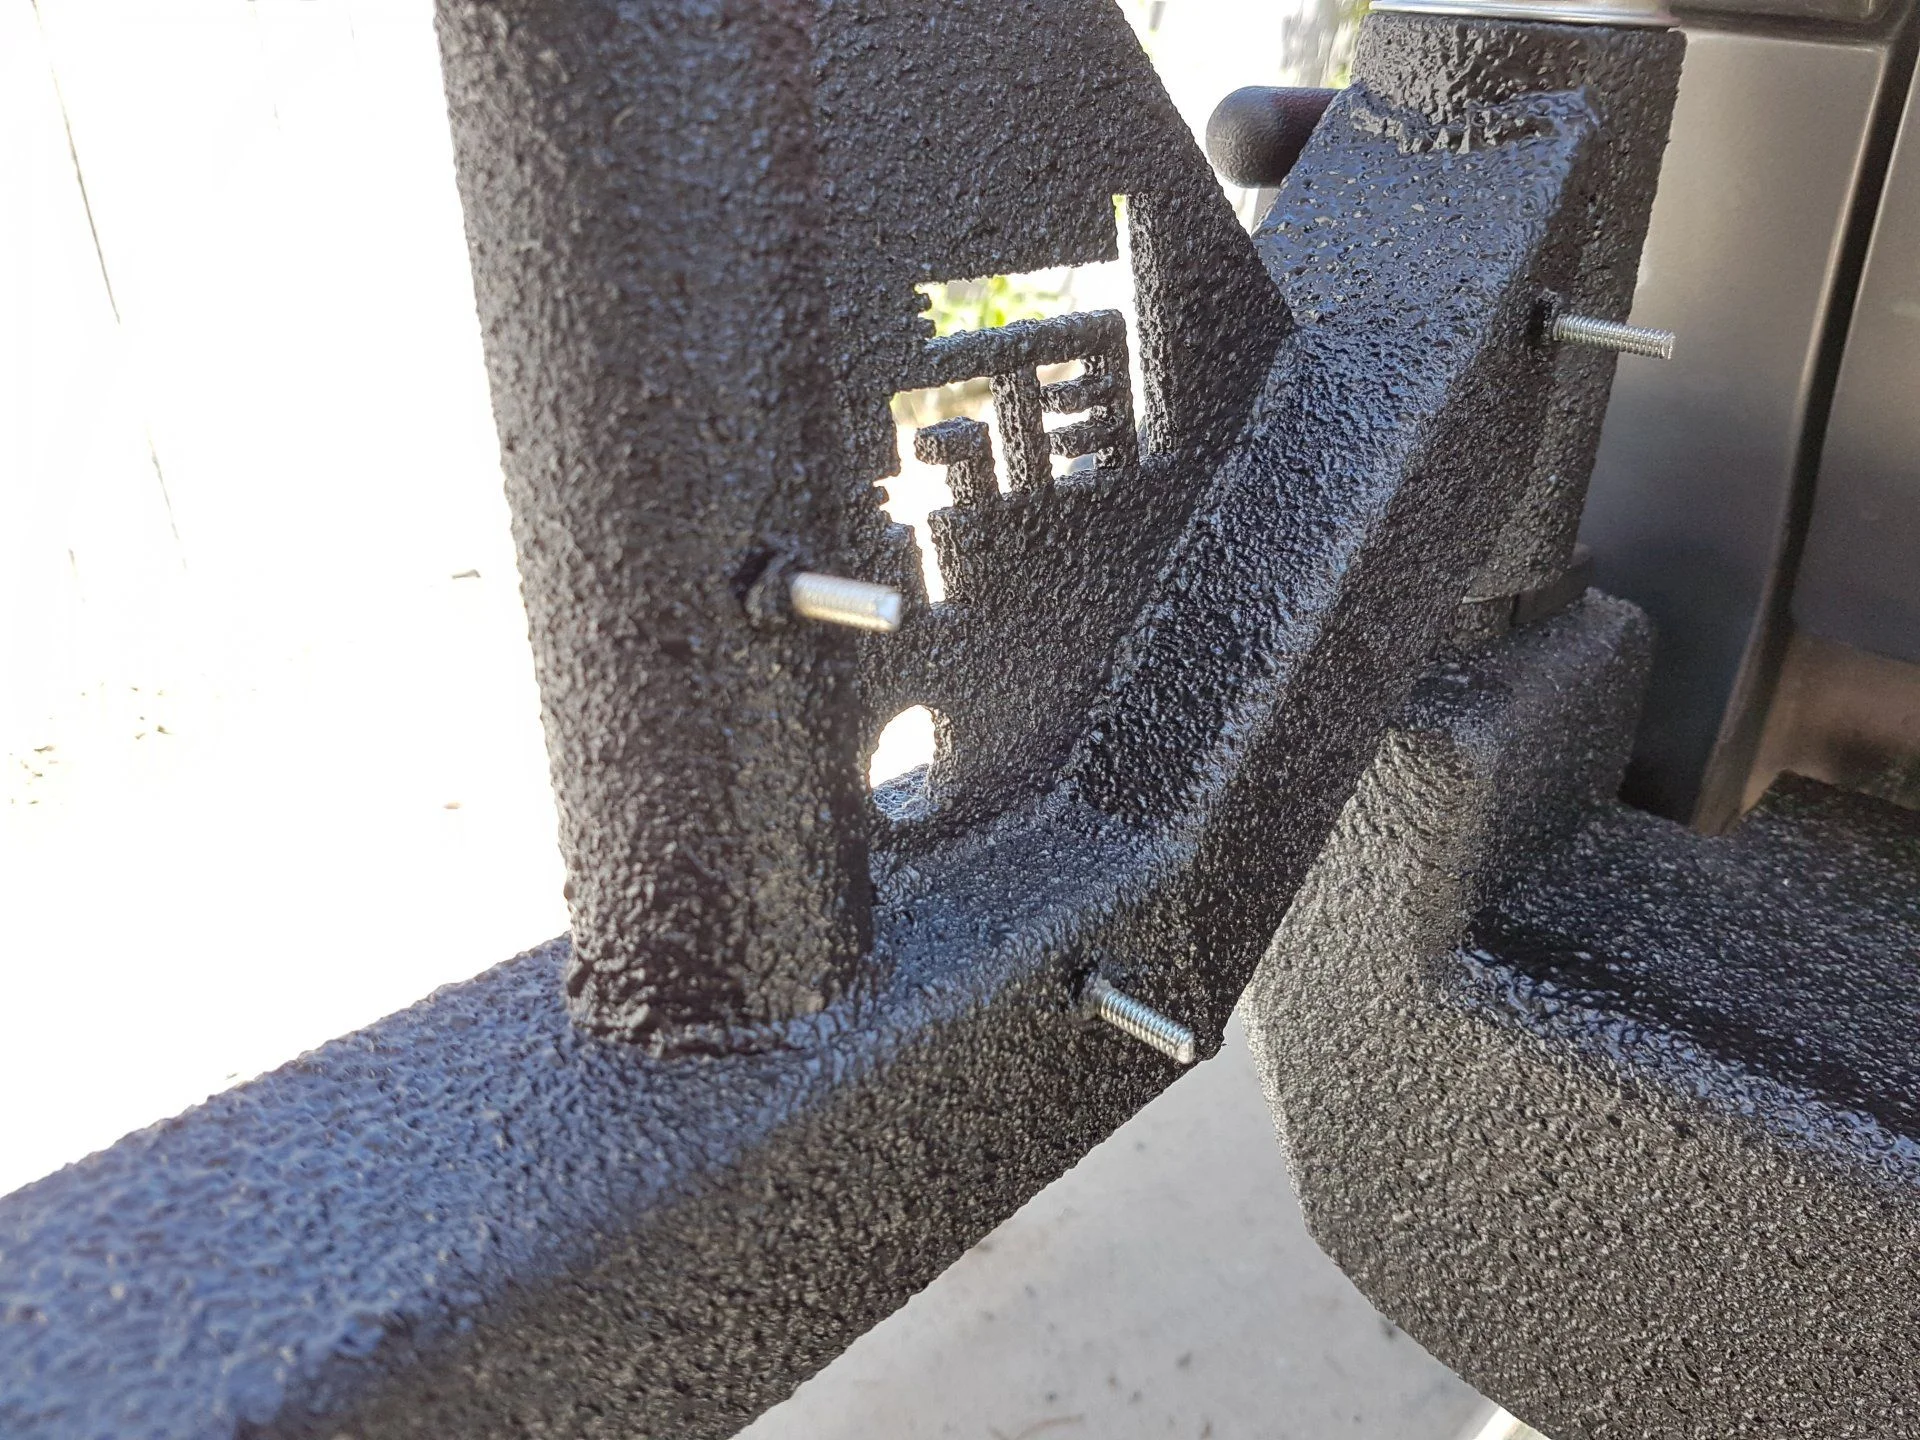
The Synergy Mfg. spring pull pin to hold it open glides up on that piece of 1/2" plastic bolted to the top, that way the pin isn't riding on the metal surface, which would eventually wear through and cause a rusting issue. I really like how these look and work so far. I got the plastic as some scrap leftovers from an extruding shop at work, countersunk a hole in it, and then bolted them down with 1/4" stainless hardware.

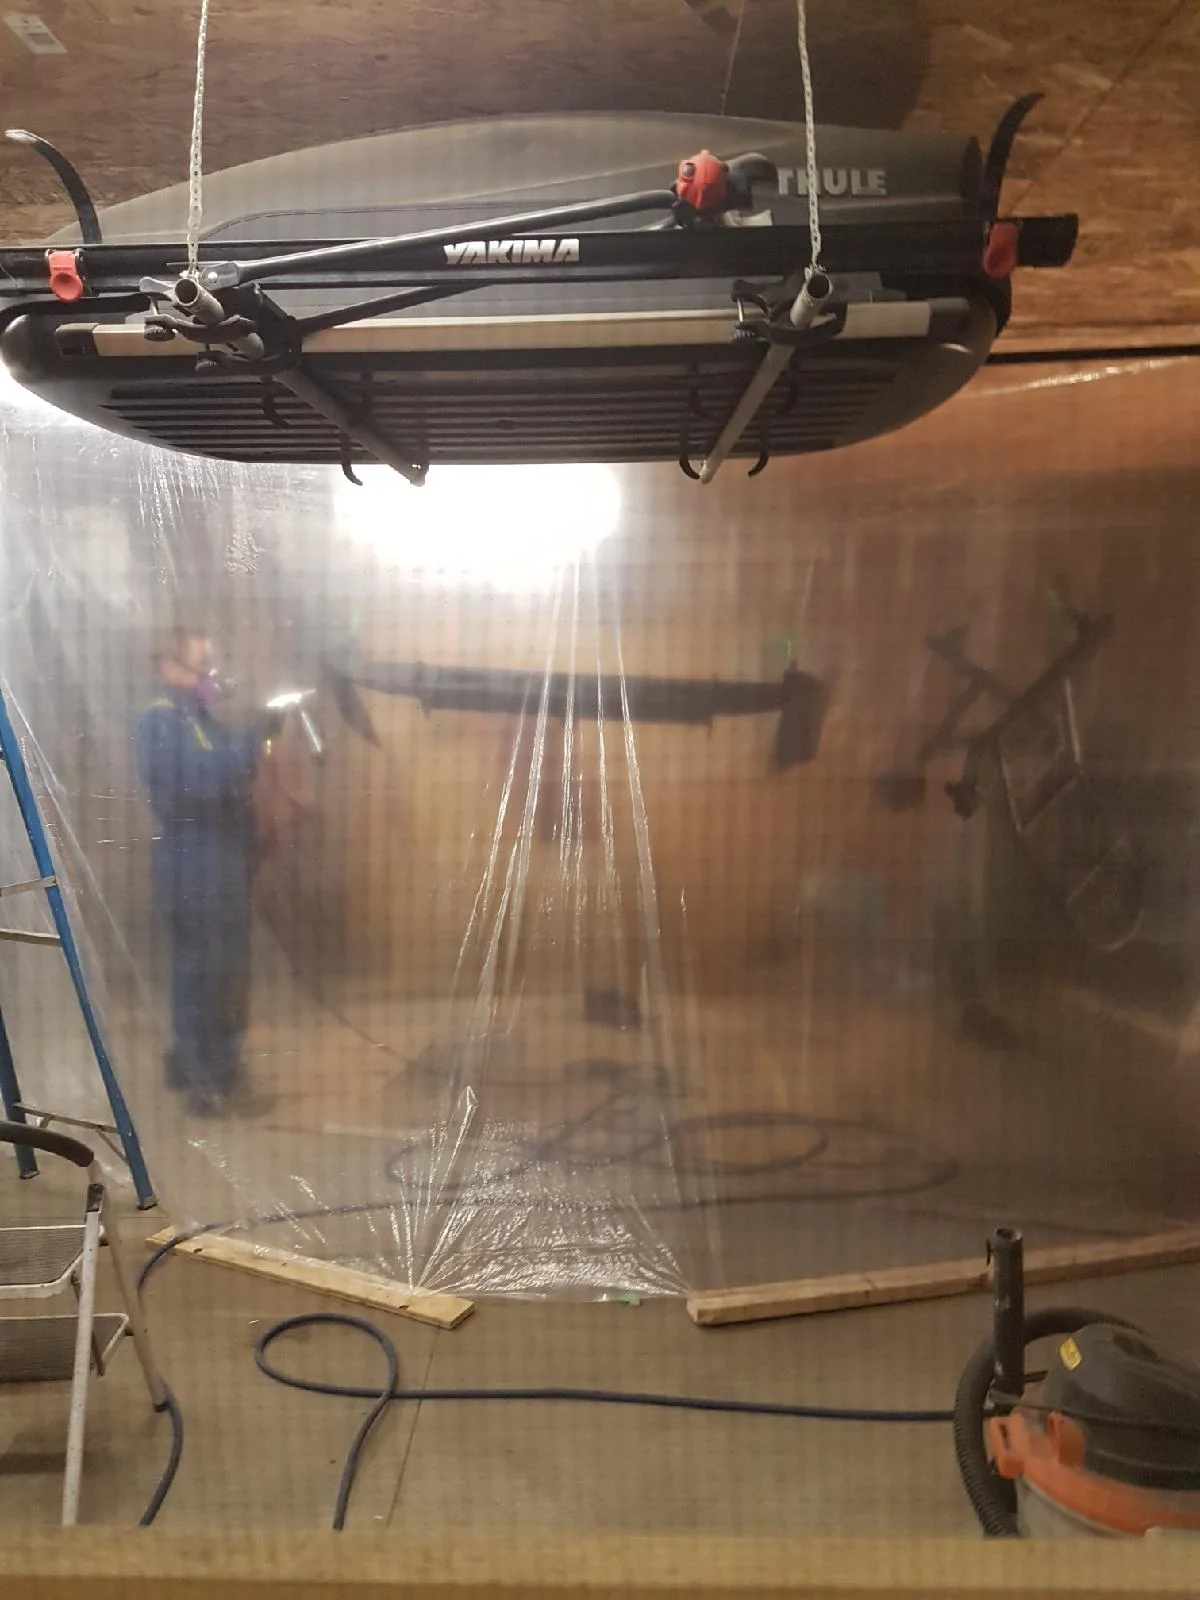
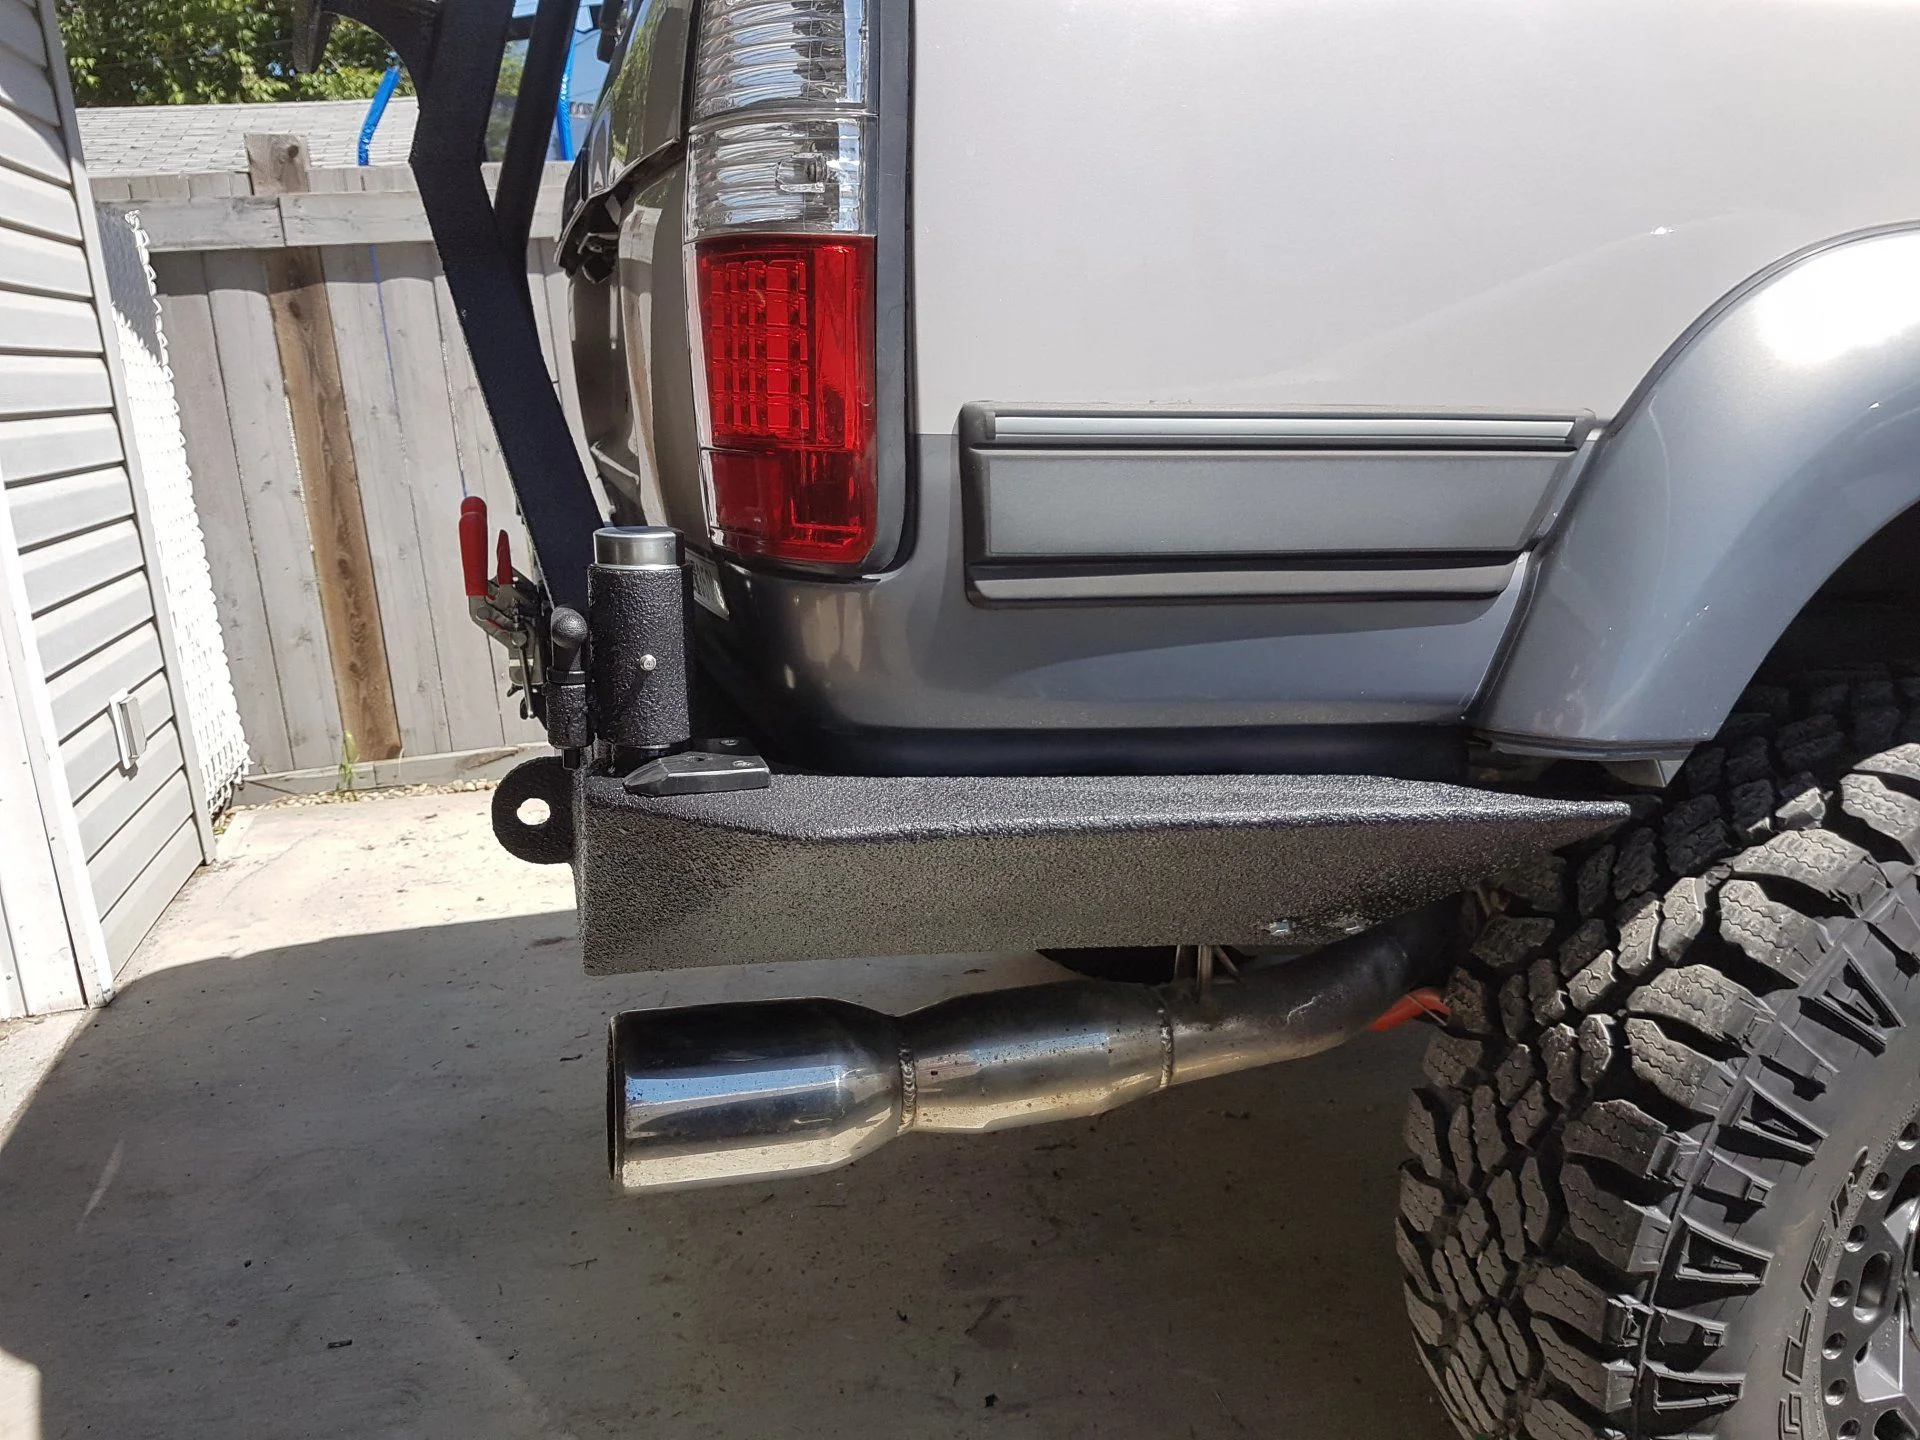
The backup lights are just $18 ebay LEDs, but they will be fine for my needs. They look EXACTLY like Rigids, but without the extra $130. Good enough for me.

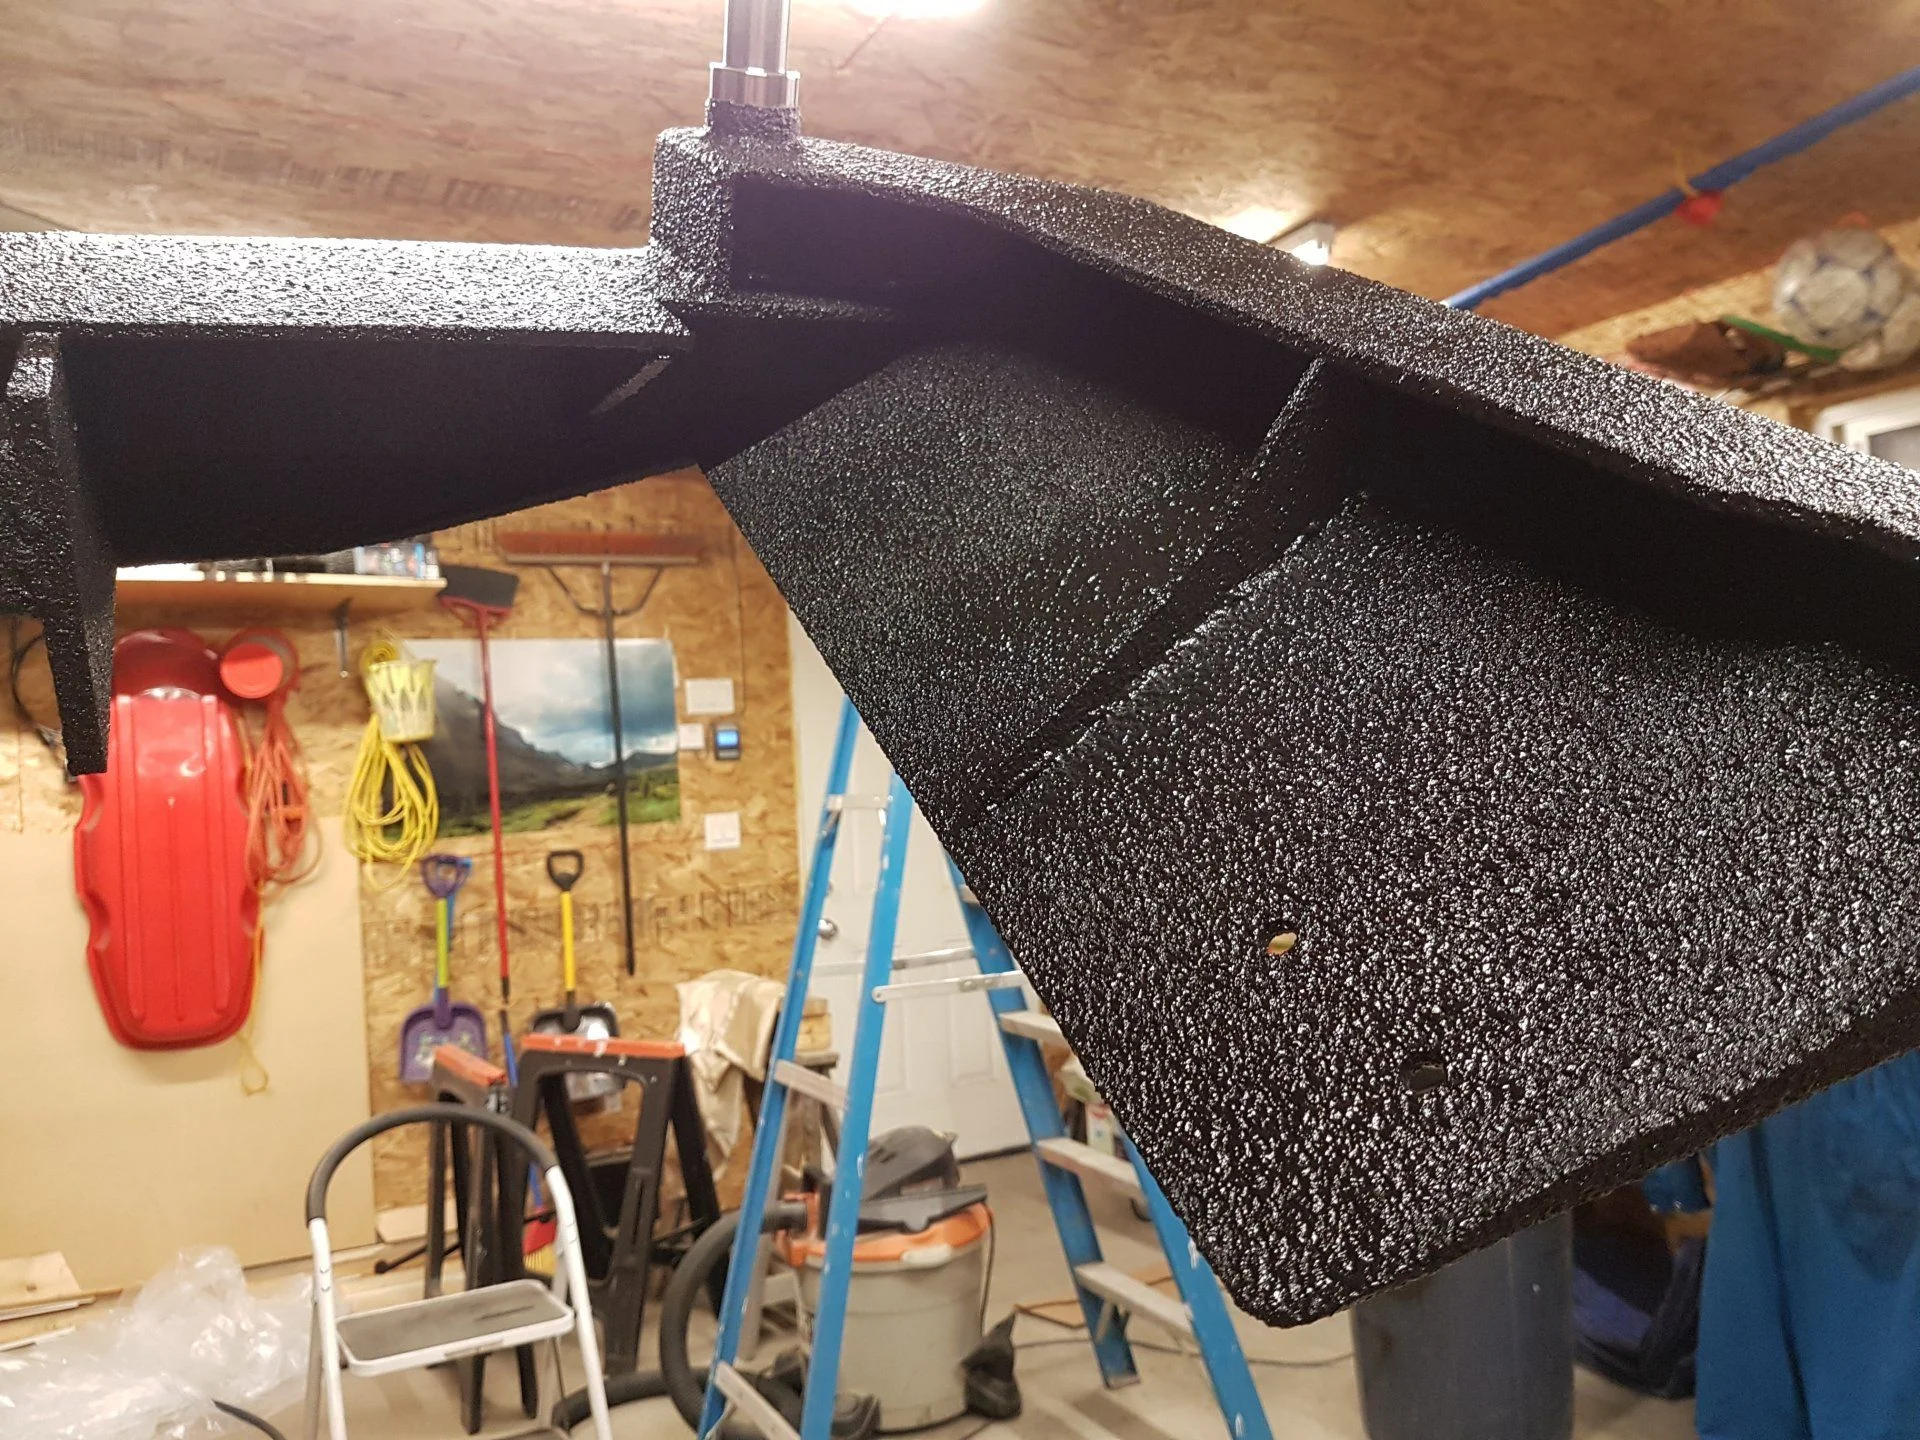
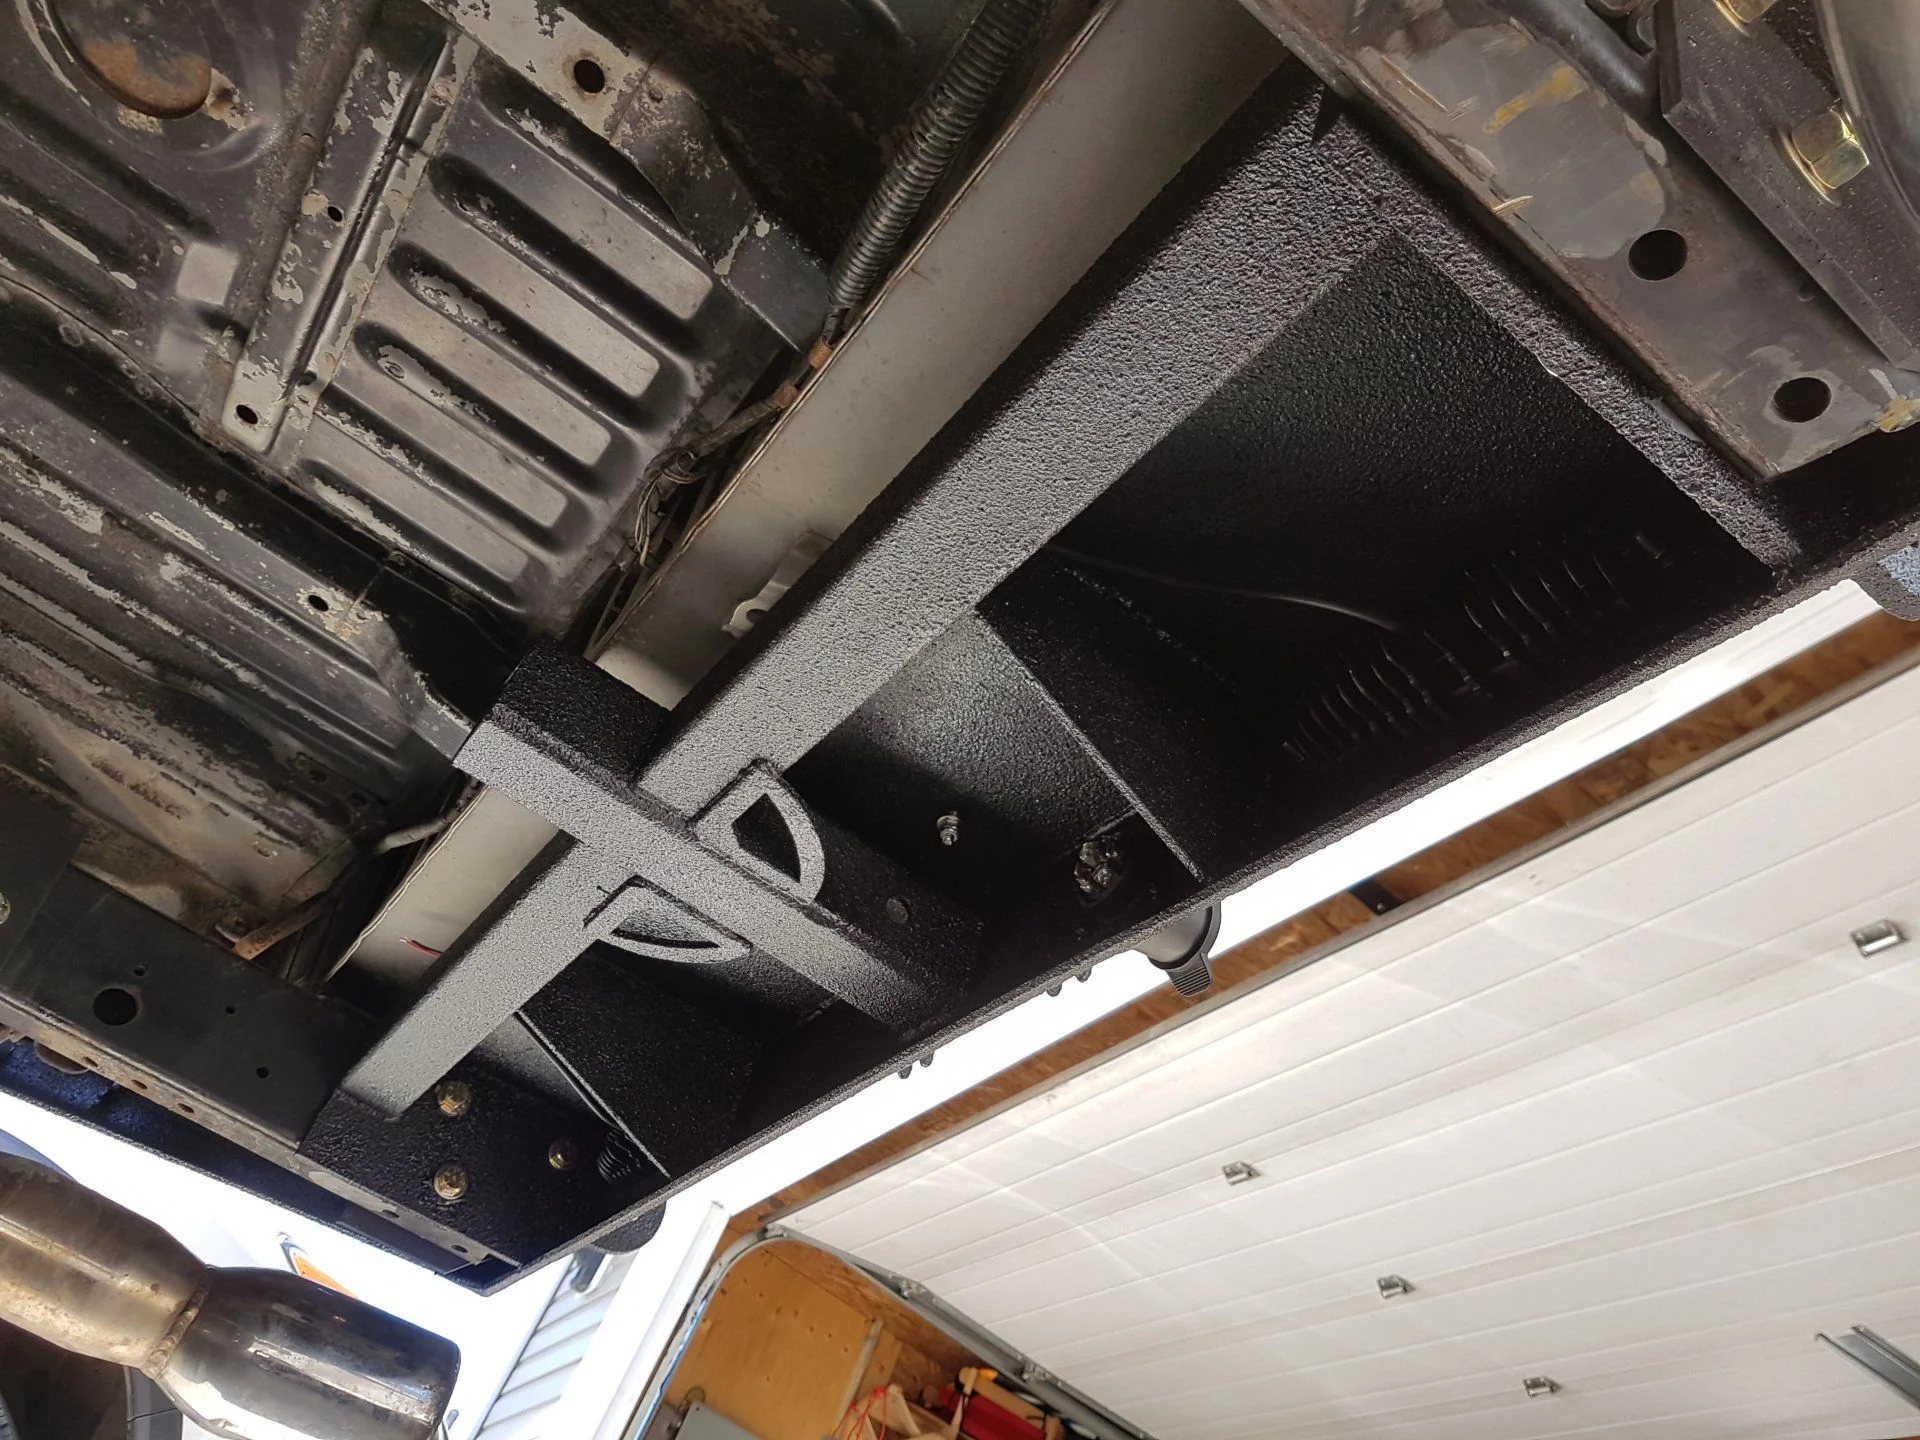
I wire wheeled the crap out of everything, degreased it, sprayed with a self-etching primer, then a light scuffing with the 80 grit, then finally a few coats of Raptor Liner at about 50PSI.

With the weight of the bumper and tire back there, it caused the rear of the truck to drop by about 3/4", but that still leaves me with around 25 1/2" from hub center to fender flare. I have no idea what type of springs are on the truck, but I'm perfectly happy with how it's sitting right now.

And yeah, re-doing the exhaust has been a plan for a while now. At the moment, it still moves combustion gasses to the rear of the vehicle, so no rush.
 
Movement. And the realization that in hindsight I probably should have driven around with the unfinished bumper mounted up for a while before spraying it. It really is remarkable how something that feels incredibly sturdy can change so much once the right amount of weight is put in the right position with the right amount of leverage.

I'll start with the ladder side. Feels decently solid to me. I can grab the top of the ladder, and pulling on it it moves a little bit, in the the 3/4" to 1" range. I was expecting that, and that's also while pulling my whole 200lbs up onto the bumper.

The tire side is the same story, similar bit of motion, but it does it all the time because there happens to be 80lbs or so of tire sitting on it.

It is a forward to back rotating motion, there is no up and down travel whatsoever thanks to how tightly the arm is held down against the plastic base at the center of the bumper. If I give the tire a good solid thwack, it will wobble back and forth for a couple of seconds afterward.

The motion looks like it's coming through from the rest of the wing area. I was hoping that the extra support at the front end of the wing would take care of it, but I think the 3/16" metal still has too much flex to it to be reliably counted on. Maybe if the whole thing was 1/4" it would be a different story, but then there would also be no way I'd be lifting it.

This is the best photo I have as to how the spindle is supported. I tired to leave it somewhat open so that I could spray inside there, and be able to clean it out somewhat, but I may have to rethink that. I would have had it connected to the bottom piece as well, but I made a boo-boo.

No matter how many times I cut it, it was still too short, right?

On my last truck there was some similar motion of the swingarm, but since the little Blazers had the factory swing arms attached to the tailgate, I was able to give the tire enough positive force against the tailgate that all vibration went away. And that was just built entirely from some 1 1/2" round tube. I would like to avoid pressing this one to the tailgate, however.

In hindsight, looking at the picture, it's definitely a case of the narrowest portion of the bumper being right where the most forces will be generated, and that was definitely an oversight on my part. So, I'm tossing a couple of ideas around. One idea is to come up with something on the latch side to try to give it some positive support, like another backstop on the top side of the bumper. I can't build on the the topside very high though, thanks to the tailgate dropping down.

The idea I'm leaning toward right now, even though it's more work, is that if I got a piece of plate, cut a big triangle and fill in that open space on the bottom to really beef up the corner, that should help with the stiffness of it all. Then, with that piece in there, I could add something vertically to help box it in even more, tying it into the new corner brace. I know this means scraping some liner off and respraying or rolling on some new coating, but that's preferable to losing a tire on the highway.

I'm going to spend a few days thinking and getting ideas though, because I don't want to do it again.

full
 
I can't tell with the liner applied - you have at least 1 side of all the metal continuously welded around the spindle / corner area?

If so, the only spindle gusset left to add (and a real Hail Mary, your design if seam welded at least 1x side looks right) - would be a vertical plate added on spindle centerline about like your stepdown & beam gusset for orientation.

And even that I doubt will do much, as it looks like your design addresses the flex esp as close & the way the metal is shaped around that spindle.

That was all 3/16" plate used, yes? - just to confirm.

On the upside, that spray job looks good - was that a paid vendor or did you DIY? (Not familiar w/ Raptor)
 
OK, so the spindle has one full bead around it on the top surface of the top plate. On the lower plate that it passes through, there is a ~90% full bead around the lower surface of that plate as well, I couldn't get in to the extreme backside of it. Most in that image is 3/16", but the little extra vertical gusset is made out of some 1/4" that was laying around and added as an afterthought.

I've been thinking about this today at work, and whipped together a little drawing.

full


The red is what I think you are talking about @LINUS . In line with the center of the spindle, same orientation as the others. I could add two pieces of 1/4" in there that tie all the way down through the thing.

The green corner is something I was thinking of now that would probably beef the entire corner up immensely. The existing piece that goes into that corner doesn't extend very far, just the same 1.5" width of the little angled bit along the bottom back edge of the bumper.

I'm seeing a lot of deflection in the top plate above where my blue gusset is drawn in, so I think adding the blue chunk will help things out quite a bit as well.

Honestly, if the whole thing ends up looking like a dog's breakfast of steel, I don't really care, as it's all on the inside, just as long as it makes it tough enough to put my mind at ease.

And all DIY sprayed at home. The wife snuck a photo of me hard at work in my home made paint booth.

full
 
You nailed it - just to get the gun in, I'd add the red plates first (exactly what I was thinking), then the blue (maybe expand it to be a full box tied to red plate, just spitballing), then I REALLY like the green gusset just for the fact the way the 80's butt gets slapped coming down a drop, that will be a nice mini-slider.

Cool to see that's a home spray - may need to look into that as a changeup for some of my proposed Tundra toys to come (pretty much the normal 'boy band toys', bumpers & a winch to add to my sliders).
 
On my 4x4Labs bumper (Luke's base kit with my own swing-outs), the tire moves a little as well, but it isn't the bumper or swing arm that's moving, it's the entire rear portion of the stock frame. Nothing can be done (easily) about that, so I just live with it. I have seen several others that do the same thing. I'm certain the bumper is solid, and the frame is as solid as it can be, so I don't worry about it. There is NO realistic way to make it 100% solid.
 
Just went out and checked my bumper. I have the lower portion of the blue gusset but mine runs all the way to the bottom of the wing. I also have the green gusset. My carrier moves maybe 1/8" when I push hard on it. The back of the tire mount is 3/4" from my tailgate and it's never hit (I drive fast on bumpy roads too). Can get an idea of how I gusseted my wing in the attached pic.

I assume the spindle is welded to both plates it passes through? If yes I can't see the red plate helping much but it would not hurt anything to have it either. The lower portion may help more than the top as it would tie the two together (same function the tube I put my spindle in serves).

20151018_085418 (800x450).webp


Also think about adding a gusset or two between the rear and the front where your wing mounts back to the frame. That big flat piece of steel will flex a bunch, may even dent if you land on it hard.

Dig the raptor liner. What spray gun kit do you use? I just painted mine originally and it didn't make it through the winter, was thinking about a liner product like you did.
 
Last edited:
Just went out and checked my bumper. I have the lower portion of the blue gusset but mine runs all the way to the bottom of the wing. I also have the green gusset. My carrier moves maybe 1/8" when I push hard on it. The back of the tire mount is 3/4" from my tailgate and it's never hit (I drive fast on bumpy roads too). Can get an idea of how I gusseted my wing in the attached pic.

I assume the spindle is welded to both plates it passes through? If yes I can't see the red plate helping much but it would not hurt anything to have it either. The lower portion may help more than the top as it would tie the two together (same function the tube I put my spindle in serves).

View attachment 1469181

Also think about adding a gusset or two between the rear and the front where your wing mounts back to the frame. That big flat piece of steel will flex a bunch, may even dent if you land on it hard.

Dig the raptor liner. What spray gun kit do you use? I just painted mine originally and it didn't make it through the winter, was thinking about a liner product like you did.

I'm definitely going to add the green corner piece, I think that's a big one. The others can't hurt, right? I can definitely see movement in the wing itself more so than anywhere else, so that corner needs to be beefed up.

As @bryson mentioned, there is probably going to be some movement from the frame itself, but not as much as I'm getting right now.

On the wing I got one middle gusset in there, and another at the end by the tire, barely visible but the best picture i got of it so far.

full


As for the Raptor Liner: I used the 4L kit that comes with their own supplied Shutz gun. The regular Shutz gun you can get in normal hardware stores has a different size thread that doesn't fit their bottles directly.

It held up decent with very few rust spots over 25,000km on my last vehicle. My cousins bumper we did at the same time got blasted way more by road sand over the winters, so his didn't fare as well. That having been said, he's got 4 years of Alberta highways on it, and most is still covered.

No matter what you do, it won't last forever i think. When i see rust spots showing through I'm thinking I'm going to touch those up with a rust converter as they appear since the raptor can be painted over.
 
Last edited:
I pulled it off last night and did some reinforcing of the tire carrier side.

Getting the liner off sucks.

I found what worked best was a wood chisel to chip it off, then used an assortment of wire wheels, rotary files on the drill, flap discs, etc in order to clean the areas up that I needed to weld in. I added pretty much everything I could in the area, and it looks ugly, but it should be pretty strong. All the pieces I added were 1/4" thickness. I put in the "red" verticals attached to the spindle first, then filled the whole corner up with weld-through primer/coating, then added the "blue" angled gusset. Finally, I added the big "green" corner section. Threw it on the truck as is to test it out again.

I was actually quite surprised that the Raptor Liner that was on the opposite sides of the welds wasn't affected, i was expecting it to bubble up or melt or something but the stuff held up remarkably well.

full


full


There is still movement of the tire, but definitely less on the wing. On the ladder side I'm just going to add the "green" corner and save myself some headache.

I decided to record a bit of this for inspection, so you can see what kind of movement I'm talking about here:


Those strikes against the tire are pretty hard, with a couple points where I just lean against it super hard. The strikes are like, palm bruisingly hard. It looks like the remaining problems I have is mainly in the tire arm itself. I guess 2x2 isn't quite robust enough, especially with the tire mounted so high.

I had the swing arm in the "out" position, and I sat on the end of it. With my extra 200+lbs hanging on the end of it, yeah, the bumper does move the frame from the body a bit, but it's bloody strong in my mind. It just seems to be affected mostly by the sharp impacts; the kind that you see on the road all the time via potholes, bumps, rocks, etc.

So, my plan for tonight is this: I'm going to add another brace to the swing arm. The bottom end of the brace will connect right behind the latch, so hopefully with that held nice and tight against the plastic along the bottom of the bumper I will get a bit more security there. I may also go in and cut down the height of the tire, but I'm going to do some measuring and see how I feel. If I move it down even 2 or 3 inches, it should still not affect my departure angle, and I'm hoping that helps reduce the amount of fulcrum weight working against the arm. I just don't want to go down so far that it makes the latch a pain in the ass to operate. Maybe I'll add the other brace first, and then see if I feel the need to lower it still. Lastly, I want to investigate if putting a slab of plastic the full width of the bumper helps, so that the bottom tube is resting firmly for it's entire length to help stop the twisting motion.

Extra brace in place like so:
full


After this, I'm running out of ideas...
 
Last edited:
That's not too bad movement. Doubt you'll break anything. You'll be surprised that even on a bumpy road the impacts at the tire carrier are no where near what you are doing to it in the video. The suspension absorbs most of the hits. I never notice mine moving around at all.

The second brace will probably help. Lowering the tire will also help, though it doesn't look like you can come down much without getting in the way of your clamp. I don't think the plastic slab will do much. You'd have to secure the tube along its length which isn't doable.

Was looking back through the thread. Never mentioned specifically but are your swing out arms 3/16" thick tube? The only pic I can see the inside on it looks like they may be thinner (like 1/8") but hard to tell from the angle.
 
No, the 2x2s are only .125 wall, so that might be the cause of a lot of twisting. I just got all that done yesterday, and while definitely better, there is still movement in the swing arm.

Maybe in a couple years i'll redo the arms, but right now i want to enjoy some summer :cool:
 
Looks good.... don't sweat the details....go enjoy being a dad!
 
Mine moves at least as much as yours does. I used 2x3 tube for the arms and 2x2 for the carrier. I tried all kinds of things to get the movement out. I added an additional latch. Replaced the gussets with 1/4'' plate. I even built additional gussets for the inside of the wings and re welded the spindles. The verdict, it still moves. But, in two years its never shown any signs of fatigue or failure. I'm convinced some movement is just normal as all the ones I've seen do this. What would worry me is the deflection I'm seeing in your tire when you whack it. Did you have it bolted firmly to the carrier or just hand tight ? It almost looks like its trying to roll up on top of the carrier plate.
 
Mine moves at least as much as yours does. I used 2x3 tube for the arms and 2x2 for the carrier. I tried all kinds of things to get the movement out. I added an additional latch. Replaced the gussets with 1/4'' plate. I even built additional gussets for the inside of the wings and re welded the spindles. The verdict, it still moves. But, in two years its never shown any signs of fatigue or failure. I'm convinced some movement is just normal as all the ones I've seen do this. What would worry me is the deflection I'm seeing in your tire when you whack it. Did you have it bolted firmly to the carrier or just hand tight ? It almost looks like its trying to roll up on top of the carrier plate.


Good eye on the tire movement, at that time i did in fact only put one lug nut on, and loose at that, so it was moving.

Thanks for the reassurance guys, ill run it as is and see how it goes. It will be pulling a tent trailer for 1000km this upcoming weekend, as well as opening and closing all weekend long so it should be a good real world test.
 
It's been a few years, so I figure you've learned a thing or two from your build. What would you do differently and what would you repeat?
 
Yeah, holy crap its been 3 years now.

It's done its job just fine really, so I don't hate it, but I still want to do it over again.

The hinge pins work well, but I probably wouldn't use them again. I think they are strong enough to handle the loads, but the amount of leverage and weight the swing arms have it twists the rest of the bumper anyway. My s***ty non-professional design of that corner doesn't help with its strength. When I redo, it will be something in double shear, be it a bearing or big bolt in bushings

The original plastic pin stoppers failed almost immediately because they were nowhere near hard enough of material. That caused them to jam, get stuck all the time, captive nuts broke off, being used without them there for a while, wrecking the liner, rusting the area, etc. I made new ones out of uhmwpe and put them in with some rivnuts and they've been doing great.

One of my crappier welds holding the tire-side latch in place cracked on the top and while it still held, it made the tire super wobbly. I boogered it up some more and it's been working, but I am not proud. On the subject of latches, I would try to make the latch pull in and down to the bumper at an angle instead of vertically as I had done. I think this way the clamping force is at the outside of the steel tube and wants to twist the arm out and away from the truck, so your tire and stuff is being unweighted up close and ends up way more bouncy, if that makes sense.

I like the lights for how cheap they are: plenty bright enough to pitch a tent by.

I like the recessed receiver and reaching underneath to unlock hitch pins or connect chains hasn't been an issue. I actually reach under with a wrench to tighten a threaded pin in a bike rack 2 or 3 times a week in the summer, and it's bearable. I think the slight hassle is worth the look. If the truck was lower, or I towed a lot more I'd probably feel different, but it's not so I don't.

I've been meaning to incorporate a mud flap hangar into the front of it, but never seem to get around to it. At the same time I intend to make them for the front of my sliders too and that doesn't help the procrastination push it away.

I'd make sure to buy all the crap I want to carry on it before building, and just hit with a quick paint job for the first couple years. I've found that adding anything to it is now such a chore and looks awful that I never want to do it. I felt too rushed last time.

That mostly covers the big points, I'll come up with smaller points and get some long term pictures up later.
 
Back
Top Bottom