Builds 86 Xtra Cab Build (4Wheelunderground 3 link front, 4 link rear and 3.4 swap) (17 Viewers)

This site may earn a commission from merchant affiliate
links, including eBay, Amazon, Skimlinks, and others.

So.....the locating screws to get the rotor centered "should" be ok for that purpose?

UPDATE:

THIS IDEA DIDN'T WORK. The two bolt circles are slightly different.
 
Last edited:
there is much less fade even vs fj60 vented.
the real advantage, imo, is the ease of teardown and replacement. its frigging irritating having to pull down the bearings for a rotor service.

@toyotaboy80, The 13WL calipers used from the Tundra or Tacoma? (I don't know all the applications) have 45mm pistons. 12.5" x 1" rotor

I was already using an upgraded brake setup from a 1995 T100 with S13WB calipers with 45mm pistons and 11.5" dia x 1" thick rotor so the Tundra brakes weren't really much of an upgrade. I could maybe use IFS hubs and a slip on rotor for that benefit??

These 14WA calipers have 48mm pistons and a rotor 13 1/4" x 1 1/4" thick so more cow bell I'm hoping. Ha ha,

My ORIGINAL 1988 stock calipers were S12+8. There was a large and a small piston. 34mm and 43mm. The rotors were 11.3 dia x .787" thick. The stock brakes sucked and were scary even when I had 31" tires on it.

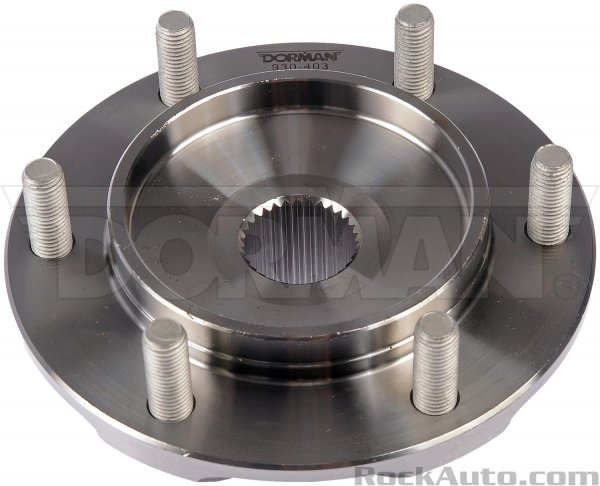
I'll have to consider it before my next brake service. Im currently all brand new front brakes IFS/fj60 rotors... havent ever had an issue, but I do like overkill. The other benefit I suppose is being able to ditch the wheel spacer on the factory SA hubs?

I did a quick google and came up with 106mm hub and 108mm for the rotor.... .078" difference. Being that the hub needs to be turned anyways, I'd go with a bushing as @ntsqd is describing.

The inner hat unless designed for a e-brake isnt guaranteed on center. Id like to imagine though in the manufacturing process when they do clean up the inside hat that it is on proper center.

Finding some DOM tube at a driveline shop that is in the size range should be pretty easy. Bore it out to .006" smaller than the hub. Heat it up cherry red hot with a torch and it'll drop right on. Might need a couple love taps with a hammer if it gets cocked sideways. Let it cool then turn it to final o.d.
 
Depends on the wheel I suppose. I'd back cut the bushing so it is as wide as the rotor flange that way it doesnt matter if you run hub or lug centric wheels. @gnob said hes on OE wheels... which I think are hub centric with a shanked nut? Or are they lug centric in that era?

The rotor doesnt look like it leaves much left of the stock hub o.d for a hub centric wheel... .100" kinda looks like. Which theoretically should still be enough for a hub center to locate on... depending how heavy the chamfer is on the wheel bore. Nothing 2 sleeves with a stepped cut wouldnt fix if necessary.

Lug centric I dont think youd want any interference with the hub to wheel bore so the lugs can take the wheel where it needs to go.

In any event you'd just have to cut the bush appropriately to not interfere.
 
If the sleeve or shim is the same width as the thickness of the rotor's flange then it won't interfere with the wheels. Looking at a 2018 Taco wheel hub on RA, there is a small step on the register. The wheel does not pilot on the same diameter, it locates on a slightly smaller diameter. So the shim/sleeve needs to be only as wide as the thickness of the rotor's flange and no wider.
930-403-001__ra_p.jpg


Does this matter? I think that it does. Toyota doesn't have the rep they do because of shoddy design and engineering. It this over the top? I don't think so. Doing it right (defined as being the way that Toyota did it) means that you won't have odd/strange/unsolvable problems down the road. And it means that off the shelf replacement parts, sourced in East BFE, fit on and work like they're supposed to. I've no problem with modifying the snot out of something, but I want wear parts to work as they come out of the box.
 
you guys are seriously overthinking this.
IMO it's more along the lines of fit and finish and attention to detail.

Id rather have my rotor register in a few thow window so everytime the wheel and or rotor gets re&i'd the pads are running in the same spot.
 
Happy New Year everyone.

I got out and tinkered a bit. Pretty sure I got my hydro assist figured out. I have limited space but I think this will work.

I didn't finish the cylinder end mount yet. I have another two inches of space to move toward center IF needed. This spot gives me better access for the hose connections though. I'll put it under the truck and cycle it before I weld it in.

IMG_20230101_141425187.jpg


IMG_20230101_141537372.jpg


IMG_20230101_141617452.jpg
 
I had to cut 3/4" off both rod ends to maximize space. I still have full thread engagement.

I just bought a generic 1 1/4" tubing clamp, made a bracket and welded it on.

IMG_20230101_141901200.jpg
 
I made more progress on the axle armor and hydro assist cylinder mount and was planning on getting the axle back under the truck for one last test fit/cycle but I found this and brought it home.

I now have a spare Xtra Cab. An extra Xtra Cab I guess in case I crunch mine after all my work.

It has all the plastic trim inside that I was missing in mine and the glass I was missing.

I got it super cheap and I'm selling the 2WD front sheet metal and I have a guy that builds baggers that wants the front suspension. Anybody need 22RE parts or the auto trans?

It's nice to find a good deal once in a while.

IMG_20230106_105847643_HDR.jpg
 
Last edited:
I made more progress on the axle armor and hydro assist cylinder mount and was planning on getting the axle back under the truck for one last test fit/cycle but I found this and brought it home.

I now have a spare Xtra Cab. An extra Xtra Cab I guess in case I crunch mine after all my work.

It has all the plastic trim inside that I was missing in mine and the glass I was missing.

I got it super cheap and I'm selling the 2WD front sheet metal and I have a guy that builds baggers that wants the front suspension. Anybody need 22RE parts or the auto trans?

It's nice to find a good deal once in a while.

View attachment 3212303

Any plans for the hood?
 
I'm keeping the cab and glass, doors with mirrors and interior parts. All the rest is available. I'm trying to get this sucker apart and gone before the HOA gets me.

It's an 86 2WD that was run out of oil. The back was cut off to make a trailer. 22R and auto trans. Has column shift. Bad white paint job over original blue.

This kind of thing should probably be posted in the swap section or PM me. I'm in AZ so a hood to Florida?
PM sent.
 
Alright, back to the build. I put the axle back under the truck, rechecked measurements and reset the steering stops since I flipped the knuckles side to side. Cycled the suspension and steering. Clearance is tight. Here's full stuff and full left turn.

IMG_20230111_163129944.jpg


IMG_20230111_163052938.jpg
 
I machined a spacer to limit cylinder stroke a few years ago. I need to cut it down because travel stops about 3/8" short of the steering stop. I want all the steering I can get.

I have room to shift the cylinder slightly more to center so I'm going to just to give me a little more clearance. So that's what's next. Then get the axle assembled and painted.
 
Thoughts on the paint you're going to use? Something fancy, or just some rattle-bomb?
 
Originally I was just going to rattle can them satin black. But then I saw some axles painted with different colors and hammer tone type paint and now I'm going to have to think about it. Probably still rattle can though.

I still haven't found my axle alignment bar so I'm not even sure what I'm going to do about that yet.
 
I got the axle back up on the bench. I pulled the spacer out of the cylinder and stuck it in the lathe. I took off .300" to get it where it needs to be. It's at .325" if anyone wants to know. Just a bit over 5/16". So now the cylinder stops at the same time as steering stops are hit.

IMG_20230112_153447518_HDR.jpg


IMG_20230112_153404863_HDR.jpg
 

Users who are viewing this thread

Back
Top Bottom