Navigation
Install the app
How to install the app on iOS
Follow along with the video below to see how to install our site as a web app on your home screen.
Note: This feature may not be available in some browsers.
More options
Style variation
You are using an out of date browser. It may not display this or other websites correctly.
You should upgrade or use an alternative browser.
You should upgrade or use an alternative browser.
Front Bumper Project
- Thread starter wengejor
- Start date
This site may earn a commission from merchant affiliate
links, including eBay, Amazon, Skimlinks, and others.
More options
Who Replied?nice!
ntsqd
technerd
How much length are you losing with the notch?
From a strength point of view it would be better if it were not there.
From a strength point of view it would be better if it were not there.
- Thread starter
- #7
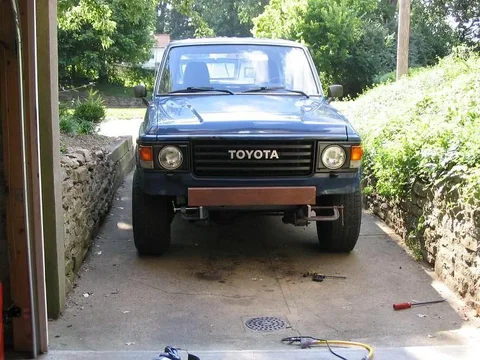
I think the notch is only going to save a few inches, but I need every inch to get it into the garage! We'll see what happens.
How much length are you losing with the notch?
From a strength point of view it would be better if it were not there.
- Thread starter
- #8
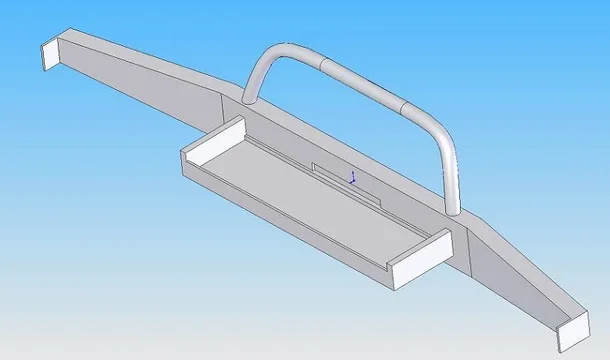
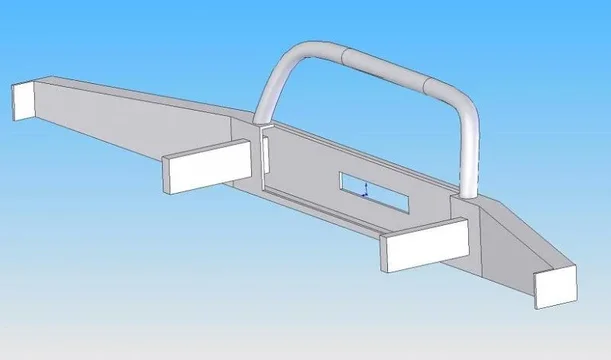
I need some better pics of that and I can do up a cad model pretty quickly...for a few  's!
's!
 's!
's!How much length are you losing with the notch?
From a strength point of view it would be better if it were not there.
How much length are you losing with the notch?
From a strength point of view it would be better if it were not there.
I think the notch is only going to save a few inches, but I need every inch to get it into the garage! We'll see what happens.
I had the same constraint when I designed mine (lwb truck, swb garage). I'm not sure how wengejor will be mounting his winch, but I mounted mine on a separate plate that bolted between the frame rails. The D-ring mounts also bolt directly to the frame rails. So in a recovery situation all the force is going directly to the frame and the bumper isn't really getting much applied force (except perhaps some lateral forces). Of course, a collision situation is different.
Last edited:
I smell solidworks. Lets see some dimensioned drawings to finish it off...
Wile E Coyote
Out in the streets, they call it murder!
Good looking model, now get to buildin, hehe. I too, will copy 2mbb's design soon, and will also need to consider tucking it to the body as tightly as I can. I'm undecided whether I'll copy his seperate winch plate idea or not. I have no qualms in cutting some valance to achieve decent tuckage.
- Joined
- Apr 4, 2006
- Threads
- 162
- Messages
- 4,044
- Location
- Hillsboro, OR
- Website
- www.cascadecruisers.com
if you have enough smarts to design that I have a feeling you have enough skill and patience to weld that thing up.... looks great man.
ntsqd
technerd
For some reason I was thinking 8742, but even still it would be stronger w/o the notch. Just a question of if that's necessary or not.
- Thread starter
- #17
Well,
I made some progress today, but the camera is on the fritz...this may be the last of the pics for a while.
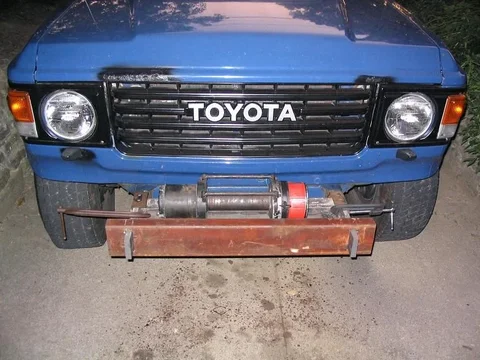
I got the base plate for the winch welded up and fitted well into the frame rails. Also, I decided not to notch out the bumper tube (at least for now) and I think it's going to work out fine. It will be a little long in the garage, but it's all good.


Updated the drawing to reflect whats going on.


I made some progress today, but the camera is on the fritz...this may be the last of the pics for a while.
I got the base plate for the winch welded up and fitted well into the frame rails. Also, I decided not to notch out the bumper tube (at least for now) and I think it's going to work out fine. It will be a little long in the garage, but it's all good.


Updated the drawing to reflect whats going on.

Last edited:
are you stick welding this?
I see what looks like a stick welder in one picture, and the welds look like a stick too,,,
if you are using a 110v you might want to preheat, and stitch weld it to avoid some warpage
it looks good so far, and your designs/cad skills are great!, hell I can barely type, but I can weld pretty good
I see what looks like a stick welder in one picture, and the welds look like a stick too,,,
if you are using a 110v you might want to preheat, and stitch weld it to avoid some warpage
it looks good so far, and your designs/cad skills are great!, hell I can barely type, but I can weld pretty good
Setting for Stick Welding
The setting might be different from box to box, but on my cracker box, I'd have to be running about 80 on stuff that's kinda heavy like that. You know if you've got 1/4 plate, you can run it pretty hot. On thin stuff you'll have to dial it back a lot. But take some scrape and run test weld. Get a big ass hammer and see if you can beat it apart. If it pops apart, then its way too cold. Where your winch mounts, that box might need a tack weld all around to get everything in place and prevent warping. Then you might need to make a couple complete passes, especially on 1/4 plate and angle iron, because this part is gonna carry all the stress of a pull. The rest of it is basically cosmetics compared to the stresses the plate where the winch sits.
Are you using pre-existing holes in the frame. Use as many of those as you can find and big washers on both sides and pull them down really tight. It may sound like over-kill, but a big winch, a heavy truck, and kinda a sideways pull, can put a HUGE stress load on that thing. I've seen some stuff people put on and they'd just have a nut and a lock washer inside the frame. That's fine for basically straight forces, like pulling a trailer, but any sideways stress can pull a nut through the hole without blinking an eye.
You think I'm kidding. I saw a HUGE wrecker truck. Brand new, trying to pull a log truck back up from a deep ditch beside an interstate. I don't know who installed the winch and all that gear, factory or what, but that winch had enough power to pull the whole back of that wrecker truck off with one big pop, and he never even moved the log truck.
Similar threads
Users who are viewing this thread
Total: 1 (members: 0, guests: 1)


