VidereStudios
SILVER Star
OEM Manual Hand Throttle Modification
A couple of forum links for reference for this modification:
Akella’s Vendor Thread – This thread will give you an overview of the modification and give you directions on ordering from Yan (Akella).
Shane’s Installation Thread – This thread is Shane’s (AATLAS1X) write-up of his installation utilizing a lower bezel from a 2003+ 105 series LandCruiser.
This modification is a pretty simple mod to do to your 1998-2002 100 series LandCruiser / LX470 with throttle cable. It is probably best utilized by people who do a lot of winching or who need to keep their rig running at a certain RPM (i.e. for hot water heaters, running big air compressors, welder, etc.). This modification is also useful for those running rough trails where the rig bounces around a lot, sometimes causing surging as the vehicle dives towards and away from the driver’s foot. Think of it as extreme off-road cruise control. In a price / reward scenario, I think this mod is a solid 3 to 4 out of 5, depending on your use. However, if you don’t use your rig in the above ways, then this modification is much less useful. Note that this modification is also less useful for rigs that have multiple participants (driver, winch operator / rigger, etc.) if utilized solely for winching. That being said, this is a great mod for solo adventurers.
Job difficulty:
Job Length: 30 minutes to 1 hour
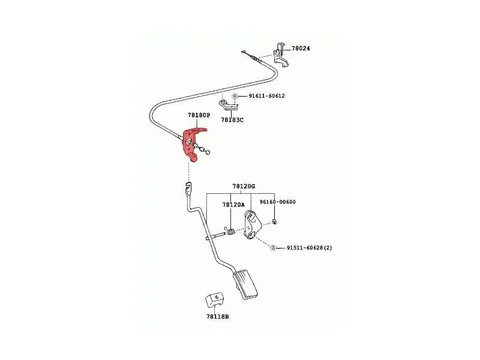
You will be replacing the red part in this schematic (everything else will be re-used):
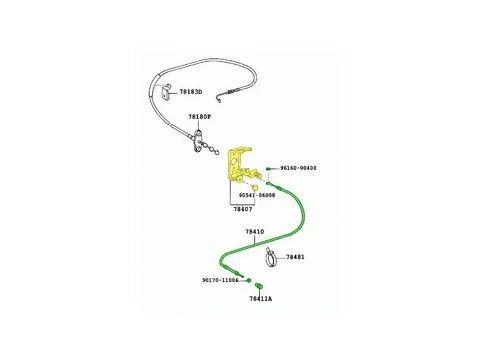
…with the yellow parts in this one, and adding the green parts:
New parts needed (see Akella’s vendor page):
Throttle Control Bracket and Arm Subassembly (group number 78407; p/n 78407-60020)
Rubber Cushion (p/n 90541-06008; already came installed on 78407)
Bolt (unknown part number; came loose and I installed on 78407)
Spring (unknown part number; came loose and I installed on 78407)
Throttle Control Cable Assembly (group number 78410; p/n 78410-60120)
E Ring (p/n 90082-61004 replaces original p/n 96160-00400)
Hex Nut (p/n 90170-11006)
Throttle Cable Control Knob (group number 78411A; p/n 78411-22010)
My kit did not include the adjustable clamp (group number 78481), but I think it is easy to add a clamp depending on where you install the knob. The way I routed my cable to the factory location didn’t necessitate the use of a clamp.
Tools needed:
#1 Phillips head screwdriver
#2 Phillips head screwdriver
Flat head screwdriver (not needed if you have trim removal tools)
Ratchet (a small, flex head ratchet is extremely helpful)
10mm socket
14mm long socket or wrench
Socket extensions (one 3” and one 9” proved extremely helpful)
Pliers
Pen or Sharpie
Dremel (or grinder) with metal cut-off tool and universal plunge cutter
Drill with a 1/8” and 7/16” drill bit (if you don’t have a Dremel)
Trim removal tools (nice to have, but not absolutely needed)
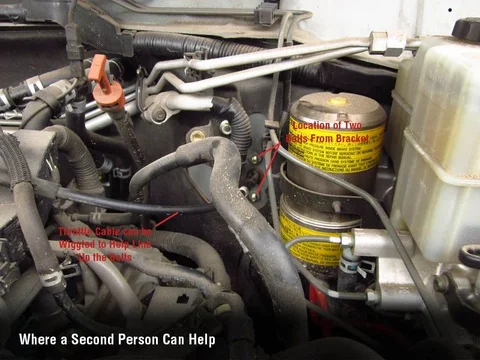
There are several things to note before tackling this modification. You will be cutting / drilling your factory lower bezel, so if you want to be able to take your rig back to 100% original, try to source a lower bezel from a Siberian pre-2003 LandCruiser. Unfortunately, Yan has not been able to source this lower bezel. See Shane’s great thread (linked above) for his installation thread using a post-2003 lower bezel. Also note that while this mod can be accomplished by a single person pretty easily, there is one operation where a second person would be of great help. It will be noted below. Finally, if you are an extremely tall person (over 6’-2”), you will have to get creative with the knob location. I am 6’-1” and have inadvertently brushed the knob a couple of times with my shin or knee. I will show you potential locations further below where this can be avoided.
Let’s get started!


A couple of forum links for reference for this modification:
Akella’s Vendor Thread – This thread will give you an overview of the modification and give you directions on ordering from Yan (Akella).
Shane’s Installation Thread – This thread is Shane’s (AATLAS1X) write-up of his installation utilizing a lower bezel from a 2003+ 105 series LandCruiser.
This modification is a pretty simple mod to do to your 1998-2002 100 series LandCruiser / LX470 with throttle cable. It is probably best utilized by people who do a lot of winching or who need to keep their rig running at a certain RPM (i.e. for hot water heaters, running big air compressors, welder, etc.). This modification is also useful for those running rough trails where the rig bounces around a lot, sometimes causing surging as the vehicle dives towards and away from the driver’s foot. Think of it as extreme off-road cruise control. In a price / reward scenario, I think this mod is a solid 3 to 4 out of 5, depending on your use. However, if you don’t use your rig in the above ways, then this modification is much less useful. Note that this modification is also less useful for rigs that have multiple participants (driver, winch operator / rigger, etc.) if utilized solely for winching. That being said, this is a great mod for solo adventurers.
Job difficulty:

Job Length: 30 minutes to 1 hour
You will be replacing the red part in this schematic (everything else will be re-used):

…with the yellow parts in this one, and adding the green parts:

New parts needed (see Akella’s vendor page):
Throttle Control Bracket and Arm Subassembly (group number 78407; p/n 78407-60020)
Rubber Cushion (p/n 90541-06008; already came installed on 78407)
Bolt (unknown part number; came loose and I installed on 78407)
Spring (unknown part number; came loose and I installed on 78407)
Throttle Control Cable Assembly (group number 78410; p/n 78410-60120)
E Ring (p/n 90082-61004 replaces original p/n 96160-00400)
Hex Nut (p/n 90170-11006)
Throttle Cable Control Knob (group number 78411A; p/n 78411-22010)
My kit did not include the adjustable clamp (group number 78481), but I think it is easy to add a clamp depending on where you install the knob. The way I routed my cable to the factory location didn’t necessitate the use of a clamp.
Tools needed:
#1 Phillips head screwdriver
#2 Phillips head screwdriver
Flat head screwdriver (not needed if you have trim removal tools)
Ratchet (a small, flex head ratchet is extremely helpful)
10mm socket
14mm long socket or wrench
Socket extensions (one 3” and one 9” proved extremely helpful)
Pliers
Pen or Sharpie
Dremel (or grinder) with metal cut-off tool and universal plunge cutter
Drill with a 1/8” and 7/16” drill bit (if you don’t have a Dremel)
Trim removal tools (nice to have, but not absolutely needed)
There are several things to note before tackling this modification. You will be cutting / drilling your factory lower bezel, so if you want to be able to take your rig back to 100% original, try to source a lower bezel from a Siberian pre-2003 LandCruiser. Unfortunately, Yan has not been able to source this lower bezel. See Shane’s great thread (linked above) for his installation thread using a post-2003 lower bezel. Also note that while this mod can be accomplished by a single person pretty easily, there is one operation where a second person would be of great help. It will be noted below. Finally, if you are an extremely tall person (over 6’-2”), you will have to get creative with the knob location. I am 6’-1” and have inadvertently brushed the knob a couple of times with my shin or knee. I will show you potential locations further below where this can be avoided.
Let’s get started!
Last edited:

