Wire Harness Refurb - 78 FJ40

This site may earn a commission from merchant affiliate
links, including eBay, Amazon, Skimlinks, and others.

Joined
Oct 6, 2010
Threads
19
Messages
394
Location
Sevierville, TN
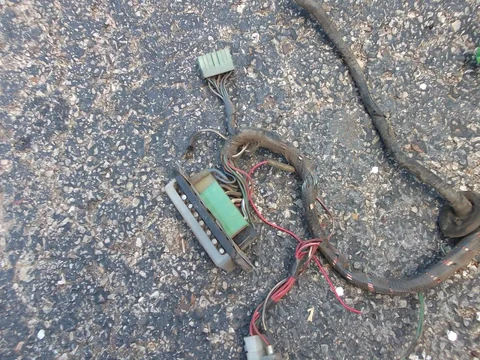
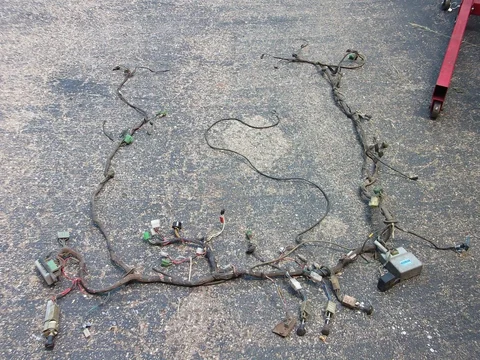
The tub is back on the frame and empty. It's time to refurb the harness. I searched the FAQ and threads and didn't see a general suggested steps to refurb so I thought I would ask for suggestions or help finding good threads on the topic.

Here's what I got.
DSCF0802.webp


When I removed the harness I tried to leave as much as possible connected--switches, etc. I think the main harness that was under the dash was in good shape. It looked unmolested for the most part (wrapped from the factory). The rear harness might be non existent. The engine compartment section likely needs a lot of work.

I figured I'd e-mail Coolerman but figured he's a busy dude so I would ask the group for suggestions as well.

I'm not sure it makes sense to unwrap the main harness if it's in good shape. What's the best way to determine that? I figured I would check for brittle wires, clean up the fuse box good, check for loose connections, but does anyone have good tips or suggestions to avoid pitfalls? Should I check ohms for wires? Should I remove each connection, clean (how?) and add dialectric grease? Stuff like that.

Are there things I should check for like a fusible link?

I figured I'd likely replace most of the harness in the engine compartment and the rear harness. Figured I'd ask Coolerman price on wire for each and do my own. I guess I'd wire what I can up and replace engine compartment wires a couple at a time.

Here are a couple more pics:
DSCF0802.webp DSCF0806.webp DSCF0807.webp DSCF0808.webp DSCF0809.webp
 
Last edited:
Watching with interest as I am going to do the same with my 71 model.
 
I think I'll start by putting the harness on a 4'x8' piece of plywood so I can stretch it out even and work on it. (I think I saw someone do that somewhere.) That way if I have to unwrap it, it can stay in relatively the same position and I can run the new wires and maintain the length. That would be better I think than installing it and then trying to run wires back through. That way I can stand it up in the corner when I'm not working on it too.
 
Last edited:
I've come across some good resources I'm using. I'll link the threads here or attach if I can't find the thread or resource online.

Collerman site has some good resources, diagrams, materials...

If you don't have the Chasis And Body manual you might find it here, schematics are at the end:
This thread speaks specifically to the 78 harness:
Note: the 78 schematic has two labels and colors that need to be swapped. ST BW and ACC LR should be swapped. The accessory wire ACC should be up top and be Blue with Red stripe LR. The Starter wire ST should go to the starter and is Black with White stripe BW.

WIRING DIAGRAM CORRECTION.webp


Cleaning A Wiring Harness

Tools
  • Shrink tubing
  • Heat gun
  • Contact Cleaner
  • Harness Cleaner
  • Brushes
  • Power Probe

Materials
  • almagamation tape - coolerman
 
Last edited:
Here is how I set mine out when I pulled it out. One board is for Dash and Front and the other board is the rear section. Once laid out all I did was drill some holes in the ply and zip tie it to the board.
IMG_1136.webp
 
SliderJack,
Putting it on a board is the first step. Get a roll of double sided Velcro (sticks to itself). As you un-tape the harmess, cut the Velcro into strips big enough to wrap around the harness and overlap so it it will hold. Use the Velcro to hold the harness in shape. Start at the drivers side headlight socket and work your way to the other headlight socket looking for brittle, cracked wires, missing or damaged connector housings, melted wires and such. Make a list of all the things you find with wire color, length needed, connector type (male, female and # of terminals) Once you have a list place an order with me for what you need. You will also need 2-3 rolls of harness tape.

For you rear harness. I can build you a new rear harness. Just PM me with the month, year of you truck and I will get you a quote.

Mark aka Coolerman
 
mark, do you / are you a good source for toyota spec electrical plugs, I dont care if they are aftermarket?

I got a quote from toyota and suffered a series of small heart attacks!
 
Cool thanks mate, I have heard your name a few times but never seen the site.
 
Thanks Mark.

I went through my harness last night just getting familiar with what's there and where the connectors go. Turns out the rear is there and I was able to find the original tail lights, what is left of them, and the connectors were there as well. Even the alternator connector and boots were there. The harness image and corresponding spreadsheet from the following thread was very helpful in determining what connects to what.
https://forum.ih8mud.com/threads/fj40-wire-harness-reference-december-1978.475291/#post-6540805
 
Got the harness tied down to the board. Used a little of a $2 roll of electric fence wire from Tractor Supply. Pegboard and twist ties might work good, but I just use what I have at hand. Not sure if I'm doing it right. Got all harnesses on the board. Put mounting points at branches.
20141111_214514.webp

need to work on my panoramic skills. :)

Started unwrapping a bit. Interesting to see how they did it. Some small sections. Overlapping, etc
20141111_220400.webp
 
Spent another hour or so (3 times through new Foo CD) unwrapping the harness. A little apprehensive, wondering if I'm undoing something I wont be able to do as good as the original. But good to see how it's done and will try to redo the same.

20141112_074951.webp


A little concerned with some sections or areas that have more than one layer of tape. If I undo both, will I get the wires that were prewrapped done the same, does it matter, was it done for a reason other than things done in sections and then combined. These are wires wrapped under the normal wrap. The other instance where the washer fluid tube was wrapped seperate but over the top of the regular harness isn't a concern, but worth noting.

20141112_075017.webp


Noticed several sections had hard split tubing under the wrap. One section on the main near where the rear harness attaches, and then several setions on the rear harness itself. I assume this was done to add extra protection to the wires where they might rub or encounter heat? I'll try to replace per original. The end of the rear harness also had different gray tape, not sure that mattered but didn't seem it worked/bonded as well as the black.

20141112_073226.webp


Finding the edge of the tape can be time consuming. I got lazy and used an exacto knife just to score the tape enough in a spot to be able to tear the tape and start to unwrap

I think my plan is as follows:
  1. Mount to board
  2. Unwrap
  3. Clean
  4. Inspect
  5. Replace Bad
  6. Clean terminals
  7. Dialectric Grease
  8. Modifications/Additions
  9. Test
  10. Rewrap
Modifications/Additions: Since I'm unwrapping it makes sense to add a few wires for additions and possible future expansion
  1. Electric Fuel Pump
  2. Spot Lights
  3. Speakers
  4. Headlights? Using new H4 type lights, do they draw more?
  5. Mechanical Oil Pressure Gauge
  6. Mechanical Water Temperature Gauge
  7. Ammeter swapped out in favor of Voltmeter
  8. Seat Heaters (yeah, you read that right. This is the one thing my wife requested. :) )
  9. Underhood light
  10. Map light?
  11. Trailer lights
  12. Winch
Other good additions to plan for?

20141112_081610.webp
 
Last edited:
I inspected the wires in the harness last night and didn't find any that were brittle, melted, bare, burnt. The pigtails that go to turn signals and the rear lights are in bad shape, but I have new wires with the new tail lights and turn signals. The wires close to the headlight socket are a little stiff, but I'm not sure they warrant being replaced. I still need to compare the current draw from standard lights and what I think are H4-bulb based lights.

I need to source new wires for additional circuits. I need to determine whether those circuits will use relays.

I need to figure out the best way to clean all the connectors.

I need to figure out the best way to test the wires.
 
I have H4 based Roundeyes headlights. They are direct swap-outs for the sealed beam headlights. They come with 60/55 watt H4 bulbs. The assemblies are suppose to be able to handle up to 130 watt bulbs. I don't anticipate using brighter than the stock 60/55 watt bulbs, but some people seem to think the stock harness and switch impact the headllight current. It seems if I'm going to use the existing wiring that I could use it to switch a relay that uses higher gauge wiring and could safely supply more current. My headlight connectors could be replaced as well, maybe with ceramic.

I was seeing what was out there for relays and came across these:\
http://www.tpi4x4.com/online-store?...page=flypage.tpl&product_id=66&category_id=28

https://forum.ih8mud.com/threads/headlight-wire-harness-fj60-and-fj62.354712/

Since I have the harness apart, I should be able to roll my own. One relay per headlight to prevent single point of failure, but two other relays, one for potential bumper-mounted spot-lights and the other for potential fog lights. At least I could run wires for the switches in the harness and worry about the relays if I end up getting the lights.

I'm learning about all this stuff, so please chime in if I'm way off base or missing something. Thanks.
 
Another in the garage until 3am day. A lot of my ordered parts are in. Wire and connectors came in.

While I waited for parts I worked on my gauge cluster. I installed mechanical gauges using the kit which is likely no longer available.

20141201_234454.webp


I painted the needles and test fitted.

20141207_010622.webp


The change meant removing the ammeter from the circuit.

I also purchased a long length of oil pressure line from Autometer. The gauge came with 6 feet which I was afraid might have been a little short since I ran the hose along the harness where the oil pressure wire would have run.
 
The biggest change I'm making to the harnes is to wire the electric fuel pump. The pump takes 2 amps, so it's not a huge draw. I decided to use the engine circut and fuse. The fuse box has an extra port, not sure what it's for, but it's easy enough to add a switched line with a push on connector. You can see my new wire black with yellow stripe and heat shrink over the end.
20141214_005017.webp


I wanted to add a safety feature to turn off the fuel pump if the engine stops, so I added a oil pressure switch. The switch takes the feed current from the switched ignition wire, along with a feed from the starter circuit so the pump can work while started is activated (black/white wire) and then feeds the fuel pump.


20141217_030425.webp


I made a short pigtail for the switch and connected it to the harness with a 3 pole connector from Coolerman. I added a two pole connector for the fuel pump along with a return wire to the dash portion of the harness to fill one of the empty holes in the dash with a oil pressure warning light.

Looking at the harness I saw occasional clumps where the must have butt connected wires at the factory with a metal clamp and then covered with electrical tape. I got ground for the light from one of these connections.

20141214_222554.webp
 
Last edited:
I've ordered two voltage regulators in the past, both came with the incorrect connectors. The 78 had a large connector, the 77 was closer but still different. My truck is a Dec 77 build.
20141214_152229.webp


The connector is close, but does not fit with the female connector on the harness. I initially thought the connectors were filled with plastic and solid, but after looking more closely I realized they are just plugged. I used a smell hook and some WD40 to slide the plug down and then swapped connector housings with the old and new regulators.

I used a dike/cutters to cut the plug cleanly so I could slide the new wires in. Not as good as original, but should be a good fit.

20141214_154735.webp


20141214_153906.webp
 

Users who are viewing this thread

Back
Top Bottom