Windshield replacement instructions (1 Viewer)

This site may earn a commission from merchant affiliate
links, including eBay, Amazon, Skimlinks, and others.

Joined
Jun 18, 2004
Threads
258
Messages
1,503
Location
Pacific Northwest
I ordered a new windshield and it has arrived. I don't have a ton of confidence in the shop so if I could get a pdf of the Instructions that would be great.

My thinking is to see what the rivet size is and supply the shop with a pop rivet gun, and the correct size rivets.

By the way I searched "windshield" in the 100 series and got all sorts of crap but no solid instructions.
 
I've yet to see any laid out instructions posted here. Instead simply the advice to find a glass shop that has done Land Cruisers specifically in the past. I know it's a unique and particular process, one that if done wrong can lead to wind noise and water leaks.

If you find the info, please let us all know.

Edit: What about the factory service manual? I don't have mine handy, but could check tomorrow.
 
Two KEY things here.
No. 1 The size of the drill used to remove the old rivits. If the drill bit is too big then the panel is enlarged and nothing can be done to reduce the hole. Bigger rivits won't work. Why, OEM rivits are special, the rivits have a plastic sleeve around them. I doubt you will find them anywhere else. So you need to buy the OEM rivits, measure with a vernier, go for a smaller drill bit, drill the rivits out yourself.
No. 2. If you have a look at you windscreen, you will see very little room to get a rivit gun to touch the top of the existing rivits. (When you find one let me know). I need a new screen now, the shop I took the car to said the use black screws, not rivits, I said I would get the rivits, they said they wouldn't use them because the break the glass when using the rivit gun. (Obviously a fat head rivit gun)
So I have to find somewhere to get it done properly that has the correct rivit gun, or get one myself.
 
My trim was done with screws by the shop the previous owner used.

When it was time to have my windshield replaced I just had them install the glass.

I riveted the trim on myself. Just got a selection of rivets and used the ones that match the hole size the best. Coated each with a bit of silicone for good measure. No issues in the year it's been on. Seals well and the trim is solid.

The rivet gun I used has a flat profile and just fit in the window trim. Just needed to put a towel on the windshield while I did it.

When I head out to the garage today I'll see if I can find a Part # on the gun.

Don't get too caught up in all the techno babble on here about the windshield replacement. It's not a big deal. There are thousands of 100's out there with replacement windshields in them probably with screws in the trim too that are just fine.

If your LC is a virgin and has never had a new windshield b4 then by all means buy the factory rivets and do it right but I wouldn't lose any sleep over it if you have to use something else.
 
Mine has had two new windshields over the years, both times thanks to the $100 glass replacement insurance clause - no questions asked. First time I took it into the shop [Safelite] they apologized profusely because, 'Our Landcruiser expert is out today'. When it was being done, the tech showed me his stash of LC 'special tools' including a very nice small rivet setup. Nice job both times - no leaks and no wind noise.

This is the type of rivet gun that works. Needs compressed air, but its a great tool!

15761_2_lg.jpg


FWIW, the two windshields that failed developed a stress crack during some heavy freeze conditions [well, heavy for the Mid-Atlantic region]. The cracks soon migrated right across the windshield.
 
Thanks for the PDF Rob ;)

I am going to loan the windshield guys a rivet gun as pictured above... I have a couple in my shop....
 
I riveted the trim on myself. Just got a selection of rivets and used the ones that match the hole size the best. Coated each with a bit of silicone for good measure. No issues in the year it's been on. Seals well and the trim is solid.

The rivet gun I used has a flat profile and just fit in the window trim. Just needed to put a towel on the windshield while I did it.
...
...
Don't get too caught up in all the techno babble on here about the windshield replacement. It's not a big deal.

x2

My PS carpet was soaking wet because of windshield leak.

A quick inspection revealed that when the previous owner had the glass replaced the topmost rivet had been forgotten so there was only a hole. In addition, the rubber strip that is covering the rivets was not well in place and it was like a funnel guiding all water from the roof to my PS footwell... :-(

Trims on the both sides were also loose and wind noise was terrible. Anyway, it was an easy fix:

1. Remove the rubber strip which covers the rivets with screwdriver tip

2. Take the rivets out with 3,5mm drill

3. Remove the trims & clean them. (They are glued/taped to the roof.)

4. Put them back in place (double sided tape or adhesive to the part that extends to the roof)

5. Put new rivets. I used normal 4mm aluminum rivets. Originals were probably smaller but the holes were bigger now...

6. Snap the rubber strip back in place.


Riveting included two tricks:

1. Protect the glass with cardboard
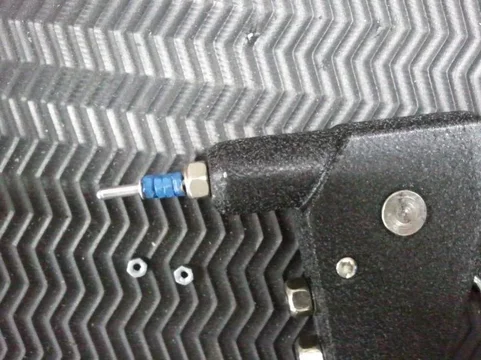
2. Use small hexnuts as spacers for the riveting tool.

The nose of my riveting tool was too thick to fit inside the U-shape trim so the rivets would not become straight & tight. I took 4 pcs of M3 or M4 hex nuts and taped them together. Then I put the mandrel of the rivet through the nuts and inserted the rest of the rivet mandrel to the nose piece of the tool. This way the rivet stayed about 10mm away from the nose piece. That was just long enough to reach the bottom of the U-shape trim.

I tried to use 5 nuts first but then the rivet tool did not get enough grip from the mandrel anymore.

I used also a little silicone in the rivet holes, because the thin rubber layer covering the steel trim was damaged around the rivet holes and I wanted to be sure it won't leak.

Now it's tight. No more leaks and the wind noise is gone.

After all, very simple job after discovering the spacer trick for the riveting tool.

I try to post a pic of the spacer later.

peeaa
 
The pics.

First the rivet gun & rivet with no spacer, then with spacer.

Tape the nuts together, otherwise they will fly around when the rivet snaps.

And dont't ask how do I know...

peeaa

ForumRunner_20120830_190629.jpg


ForumRunner_20120830_190640.jpg
ForumRunner_20120830_190629.jpg
ForumRunner_20120830_190640.jpg
 
I need a new shield on my 04 and its amazing how even the biggest window guys dont know what I am talking about when mentioning the need for rivets. Will need to find someone out of town. Price of a small town living.
 
Next time when I need a new windshield I will remove the trims myself, then let the glass guys to replace the glass (they have the experience on glueing it, I don't) and finally I will put the trims back myself.

Then I know for sure it's correctly done.

peeaa
 
Just had a recommended local shop replace my windshield on the 03 LC. The windshield had been replaced by previous owner, and wasn't the best of work quality, so was looking forward to the rock that finally cracked this one. After tech removed side trims, I helped by cleaning these molding pieces to like new condition (I hate Landcruiser OCD). I bought OEM top molding piece # 75531-60030 and had this installed as well.

When windshield was off, found a weak seal on bottom side of windshield that likely caused some wind noise that has been bugging me. Of course, screws were used on previous job, used screws again to fasten trim. Will test for wind noise in a few hours! Pilkington glass, quality looks to be very good, no glass warp-I wanted OEM, but not at $1100. In NC, you pay your deductible, and no OEM glass for vehicles older than two years, job was $320 including my trim purchase.

PS, the mounting screw for the rearview mirror was stripped(probably by me when I tightened a few years ago), so may want to check this before day of removal-I have mirror ziptied up right now, til part is in tomorrow( 60 cent screw).
 

Users who are viewing this thread

Back
Top Bottom