West Coast Australia FJ45 cruiser build

This site may earn a commission from merchant affiliate
links, including eBay, Amazon, Skimlinks, and others.

Nice Job so far mate.
What rear diff are you using? 60 series? (apologies if you've mentioned it already, I only skimmed through the thread)

I'm interested in getting discs on the rear of mine too, can you organise another set of brackets?

I'm from Perth too. Good to see another West Aussie getting stuck into a 40!

Cheers

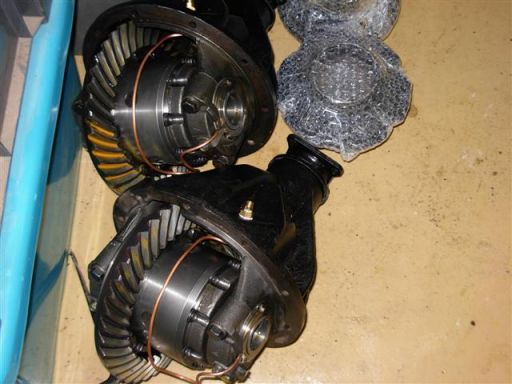
It was eating me up, I had to do a rear disc brake conversion. It took two attempts to get the mounting bracket correct (CNC Lazer cut) and three attempts to get the hubs correct in terms of getting the rotors to sit flush on the hubs. The rotors are 60 series fronts and the calipers are front commodores. I had to get the studs machined down to suit the rear hubs which are normally used for drum brake configurations. So yes this did take several weekends, probably 4-6 weeks. SHould be worth it in the end. I forgot, I did FEA on the bracket to ensure its suitable for the duty, see the pic below.

bracket_stressdistribution.jpg


26072009001.jpg


15082009.jpg


16052009.jpg


16052009001.jpg
 
Response to Cuh8er

The diff is a 45 series diff housing. The diff center is 60 series which is identical to the 45 series center.

On the subject of making up the brackets. The setup hasn't yet been proven. It involves a bit of time, brackets to be lazer cut which will cut around $100-120, welding the plates together and match drilling to the caliper and diff housing flange bolts and cut threads. Further you will need commodore calipers, rotor and new wheel studs need to be machined.
 
installing the engine

:pFollowing completion of the rear disc brake conversion, I was able to begin the engine install and fabricate the engine mounts. This process involved several mock fit-ups. In the end I was able to use the original transfer case mounting assembly, just had to trim the vertical section of the side mounting brackets and lengthen the middle section.
10042009004.jpg


23052009.jpg


24052009002.jpg


18072009003.jpg


18072009002.jpg
 
Cab reconstruction

10 months of hard labour ended in June 2010. I expended almost every weekend and xmas holiday's plus the odd day off work. I think I was mad especially as most of the fab work was done during summer. You maybe thinking, what would take 10 months, well this took 10 months and several visits to the steel merchants and welding gas retailer:
  • fitting mounting brackets to suit the SS seats
  • Cutting the rush out of the floor pan and lower side panels
  • replacing the firewall
  • constructing brackets for new steering column, accelerator and brake pedal
  • roll cage and mounting brackets
  • new dash and templates
  • repositioning hand brake
  • fitting new A/C and heating under dash
  • flanged opening for running wiring harness
Not to forget the crisis of the cab dropping and the doors not closing, almost and project breaker. This problem set me back some 4-5 weeks.

06092009.jpg

Seat mounting brackets

27092009001.jpg

New seats fitted

28092009002.jpg


The brackets under the seats had to be modified to suit the mating plates welded (see first pic) into the cab.
 
Great work mate would love to see the rig in person one day
 
Cab space- not a extra cab

1tontoy, yeah it is tight in the cab. These cars were built for small framed people. Not perfect, but the three imprvements I have made are:
  • seats on rail, position adjustable
  • steering column telescopic and can be tilted
  • footwelled extended by approximately 200mm
I was very concerned about the room in the cab, I eventually made the decision to ignore this feature and proceed with the project.

Further with pushing out the footwell the brake & accelerator levers were moved forward. Restricted space is unfortanuately a fact of life with these types of vehicles. But I have made it more comfortable.
 
Dealing with more rust

The drivers side floor was terribly rusty and right in the spot I wanted to bolt down the front roll cage hoop. There begun replacement of the floor, side panels and so on. I had to buy a plasma cutter to do this work, nearly killed me with the fumes (rubber embedded in the side panel), brought a fan the following week.

07112009001.jpg


07112009.jpg


23112009001.jpg


23112009002.jpg


23112009.jpg
 
https://forum.ih8mud.com/40-55-series-tech/281587-riggers-disc-brake-conversion-2.html

Nice, always love looking at the oz rigs as there is always something a little different

God I wish I was there and could pick up a 12H-T, this is the eng I am dreaming of for my 40!:doh:

Anyone looking for pre made disc conversion stuff might want to check in with Poser here on the site, here is what he sells in the pics ----price is right too
cool_story_bro_vintage_retro_poster-p228744622139066811tdad_525.webp
Friday 025.webp
Friday 024.webp
 

I dont know if you know this;
Originally ARB replaced the RD33 locker with the RD142. (the main difference being the position of the air actuator fitting)
They susequently stopped selling the RD142 locker because of the difficulty in routing the copper air pipe.
As a result of "some" field problems they went back to the RD33 model. (The RD33 air fitting is fitted on the other side of the carrier)

evident by just how close the copper pipe is to your crown wheel

The position of the air actuator and copper pipe on the ARB RD33 Land Cruiser locker

dscn0416_1.jpg
 
Hey mate great work. I am in NSW and naerly finished building my 5.0 litre injected Turbo 400 auto 45 series comp/street truck. I am having trouble locating the cab seals under the roof and under the rear window panel. Have you had any luck with these seals. This is my first post and I would like to do a full build up thread of my rig, but I have no idea how this is done. Any help would be much appreciated. Cheers Mick.
 
Response to tlc_4play

Thks for the info tlc_4play, great to get feedback like that on thing like this even though its probably bad news for me.

I was actually quiet concerned about the copper air line during installation being so close to the crown wheel. ;)

Unfortunately the only thing I could do after spending approx. $1100 per locker was hope the lines wouldn't come into contact with the crown wheel whilst driving. I had to resort to the belief ARB engineers thought about this issue and confirmed during trials that the issue would arise. However by the sounds of what your saying the problem has occurred and cause grief.

Oh well I will have to rely on my carefull installation manner (what a mission to install, so heavy) and wait and see. :cool:

I purchased these locker in late 2008 and had to wait for them to be shipped from Melbourne, presumably direct from the factory. I will contact ARB and see what they have to say, maybe they can supply just the bearing assembles.
 
Response to Mickhi40

Mickhi40

On you query of the panel rubber, I'm like you. I also need to source new rubbers. My backup plan is to contact Toyota and see if the geniune rubbers are still avialable. I haven't seen these advertised anywherton the ner:confused:. So if there is anyone out there who knows where to get them let us know.

PS; Rarespares has window rubbers for the doors the front window.

ABout setting up a post, best to refer to the frequently asked questions (faqs) on the main home page.
 
Response to bsmith123

Bsmith123
Thks for the great comments on my post and the pic.

Great to advertise available products out there on the net, but readers need to be cautious as the kit might not be as complete and you are leading them to be believe.

Your pictures of the kit show a mounting bracket with fasteners and rotors, however more modified components are needed for the FJ45 drum brake rear diff. If you refer to my post on the rear brakes you will see the other associated parts that are needed for the modification. (Wish I had a lathe)

Three missing things I see with your kit you posted, is capliers (is it toyota 4 spot and does it suit the rotors) wheel stud and the wheel hub. These component in my situation had to be machined. Note the rear hubs are thinner than the front disc brake hub thereby making the flats on the studs protrude through and limited the wheel nut thread length.
I was thinking of making a complete kit, but need hubs which are around $400ea then need to be machined. So more economical approach would be to use existing hubs and get them machined by local machinists.
 
good to see another West australian build on here

what are you doing regards bull bar going with a winch bar or fabbing something im looking at different options

regards glenn
 
response to ducky81

I plan to design a alloy roo bar suitable for mounting spot lights, winch and get it cnc lazer cut and welded up by others. Not sure when I will do this but, hopefully in the final stages of the build.

I seen what 'Twisty' did with his bar work and decided thats a great approach, see Aussie 1978 FJ40 Buildup for more detail.
 
more fab work

These pictures are from around 1 year ago now, amazing how time fly's.
06122009001.jpg


06122009004.jpg


12122009002.jpg


24122009.jpg


Finally back to working on my cruiser after 6 weeks recovering from a broken forearm.
 
Light at the end of the tunnel

Late December last year and I was well on my way with the fabrication of the fire wall and all the assoicated features, steering, accelerator, brake booster, roll cage mounting pads and a/c mounts under the dash

31122009002.jpg


31122009004.jpg


Boys look pleased with their uncle efforts

31122009.jpg
 
Back
Top Bottom