GTSSportCoupe
2LTE abuser
Gave my LJ78 a present this holiday season. A job I'd been putting off for a while, but had to be done. My family and I had been planning a 1200km trip, and I was adamant this work be done before leaving.
I rebuilt all of the brake calipers (piston seals, boots etc.), sand blasted and painted them at the same time, installed new PBR Metal pads and springs/pins, new premium rotors, and bled the entire system clean. The rear calipers needed new pistons, which I could not get in time, so a machinist friend of mine made me a new set out of stainless.
I also rebuilt the swivel hubs. I bought a full high pinion 70 series rebuild kit (all bearings, oil seals, gaskets, grease etc) from RADD cruisers. Only thing it was missing was the e-hub specific outer oil seal which I bought from Rocky Mountain Imports.
This was all a pretty big job. The old wiper felts and seals were totally worn. The inside axle oil seals were worn too so that diff oil was mixing with the knuckle grease. The last person to do the rebuild had not set the preload right for the wheel bearings, so they had spun on the spindle and done damage. 3 out of the 4 e-hub brushes were totally missing. Wheel bearing grease had mixed into the e-hubs. Some of the wheel studs had been cross threaded at one point. Grit in the oil seals had worn into the spindle and hub. The kingpin bearings were severly rusted and worn, etc. etc.
I really took my time and cleaned everything very well, sandblasted and painted certain parts, and had my machinist friend correct damage to the spindle and hub. We also milled new OEM size e-hub brushes from brush stock (size is noted in the Toyota manual). Everything was very carefully re-assembled. I used a very special grease (Dow Corning 44 MolyKote LIght in the e-hub assembly). I soaked the swivel hub felts in oil before re-assembling (recommended by someone on here). I also put a tiny bit of silicone above the upper kingpin bearing to try to keep water out of that area in the future (not enough to mess with the shimming etc of the kingpin bearings). I also put some silicone around where the e-hub wire goes into the spindle/knuckle.
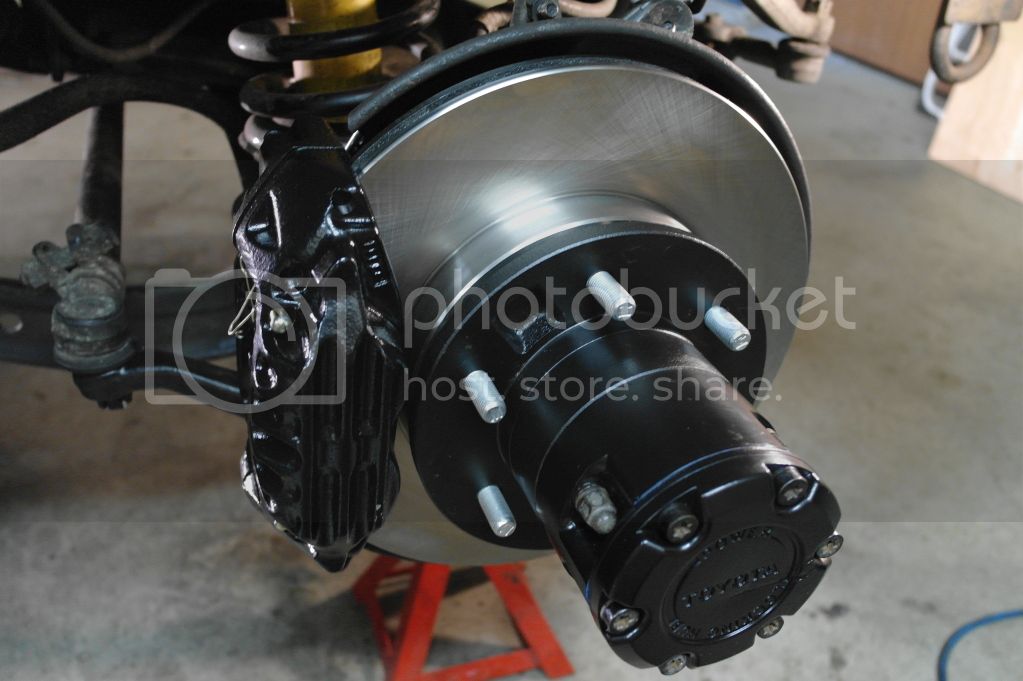
Unfortunetely I did not take any pictures while doing the work, but I do have some pictures after the job was done.
You'll noticed in the pictures the front caliper pins are a little long. They are for a slightly bigger caliper (all I could get at the time); I'll put the proper pins in when I get a chance.
After the job the steering is so much lighter and better with the new kingpin bearings. Everything feels good and tight. The brakes work incredibly well now. I can lock up my heavy e-rated 32" tires easily. Also, I think my e-hubs were not dis-engaging before, and were causing me to get bad fuel economy, as my economy has really improved now. This could also have to do with the rear brakes being siezed/sticky. The 1200km trip went very well, and I achieved 12l/100km with a mix of city driving, mountain passes, 120km/h freeway driving, and some idling (all with winter diesel). I'm sure 10l/100km could be achieved under more ideal conditions.
Next jobs are air/water intercooler and custom front bumper and winch.


I rebuilt all of the brake calipers (piston seals, boots etc.), sand blasted and painted them at the same time, installed new PBR Metal pads and springs/pins, new premium rotors, and bled the entire system clean. The rear calipers needed new pistons, which I could not get in time, so a machinist friend of mine made me a new set out of stainless.
I also rebuilt the swivel hubs. I bought a full high pinion 70 series rebuild kit (all bearings, oil seals, gaskets, grease etc) from RADD cruisers. Only thing it was missing was the e-hub specific outer oil seal which I bought from Rocky Mountain Imports.
This was all a pretty big job. The old wiper felts and seals were totally worn. The inside axle oil seals were worn too so that diff oil was mixing with the knuckle grease. The last person to do the rebuild had not set the preload right for the wheel bearings, so they had spun on the spindle and done damage. 3 out of the 4 e-hub brushes were totally missing. Wheel bearing grease had mixed into the e-hubs. Some of the wheel studs had been cross threaded at one point. Grit in the oil seals had worn into the spindle and hub. The kingpin bearings were severly rusted and worn, etc. etc.
I really took my time and cleaned everything very well, sandblasted and painted certain parts, and had my machinist friend correct damage to the spindle and hub. We also milled new OEM size e-hub brushes from brush stock (size is noted in the Toyota manual). Everything was very carefully re-assembled. I used a very special grease (Dow Corning 44 MolyKote LIght in the e-hub assembly). I soaked the swivel hub felts in oil before re-assembling (recommended by someone on here). I also put a tiny bit of silicone above the upper kingpin bearing to try to keep water out of that area in the future (not enough to mess with the shimming etc of the kingpin bearings). I also put some silicone around where the e-hub wire goes into the spindle/knuckle.
Unfortunetely I did not take any pictures while doing the work, but I do have some pictures after the job was done.
You'll noticed in the pictures the front caliper pins are a little long. They are for a slightly bigger caliper (all I could get at the time); I'll put the proper pins in when I get a chance.
After the job the steering is so much lighter and better with the new kingpin bearings. Everything feels good and tight. The brakes work incredibly well now. I can lock up my heavy e-rated 32" tires easily. Also, I think my e-hubs were not dis-engaging before, and were causing me to get bad fuel economy, as my economy has really improved now. This could also have to do with the rear brakes being siezed/sticky. The 1200km trip went very well, and I achieved 12l/100km with a mix of city driving, mountain passes, 120km/h freeway driving, and some idling (all with winter diesel). I'm sure 10l/100km could be achieved under more ideal conditions.
Next jobs are air/water intercooler and custom front bumper and winch.
Last edited:


