
Navigation
Install the app
How to install the app on iOS
Follow along with the video below to see how to install our site as a web app on your home screen.
Note: This feature may not be available in some browsers.
More options
Style variation
You are using an out of date browser. It may not display this or other websites correctly.
You should upgrade or use an alternative browser.
You should upgrade or use an alternative browser.
I sprung over my HJ61
- Thread starter The Dude
- Start date
This site may earn a commission from merchant affiliate
links, including eBay, Amazon, Skimlinks, and others.
- Thread starter
- #42
As I understand it (and according to the 4x4 labs website) not all "regular" hi-steer has the correct ackerman angles. I have no idea if this is correct.
But for me it was getting that tie rod behind the axle. Just a little added protection in my books.......
")
But for me it was getting that tie rod behind the axle. Just a little added protection in my books.......
- Thread starter
- #44
this is what happens in an almost 7000lbs rig with out proper bump stops and a SOA

- Thread starter
- #45
before anyone mentions it, I got all new u-bolts and plates today ")
I am also going to be flipping the front springs to gain clearance for the tie rod. It is just to close for my comfort. I nailed it once in testing, and am not completely satisfied that it won't happen again. I thought it would be OK, but the springs have flattened out enough that it is going to be a concern with the 12H-T oil pan.
I am going to be a little longer in the whellbase then I would have liked, but with the 61's big ass hanging out, I don't think the extra coouple inches is my biggest problem.
- Thread starter
- #47
HZJ60 Guy said:Is that a compressin shot? Or is that now the normal spring shape?
TB
LOL Compresion!!!
I would be in a world of hurt if that was at rest!!
woooooooooooowwwwwwww
The Dude said:LOL Compresion!!!
I would be in a world of hurt if that was at rest!!
That's what I was worried about.
Whew.
I bet my lifted OME's cant do that.
Yo Dude, what do those tires measure for TRUE height?
TB
- Thread starter
- #50
HZJ60 Guy said:That's what I was worried about.
Whew.
I bet my lifted OME's cant do that.
Yo Dude, what do those tires measure for TRUE height?
TB
That's a good thing!!
The tires are a hair over 35" at 40 psi
Where did you find those Michedlin XL's? I don't get many results from online search for them. Thanks!
- Thread starter
- #52
offroadkid said:Where did you find those Michedlin XL's? I don't get many results from online search for them. Thanks!
I bought them off of a fellow wheeler. I tried finding new and was told numerous times that none will be available until the army stops taking them. I would like a new set of 325/85R16 XML, they are wider and just as tough.
and the XL has been replaced as well
Hi Brad.
Did you do a cut and turn with the front axle, and if not what have you done to reconcile driveline angle needs, and steering wander? Did you make the rear axle pinion angle on the same plane as the rear output, or did you point straight and double carden it?
Any word on those tires? I have not been by since I heard about them. I am hoping for the wheels out on Friday. If not then next week for sure!
Looking good!
gb
- Thread starter
- #55
No word on the tires yet....
I did not cut and turn.....yet. And I might not. I set the castor to 3* and wanted to make sure that there was no steering wander. It tracks straight and true. I had planned on then cutting and turning the axle. To my surprise, and this may be because of the length of the auto, I have ZERO binding issues on the front driveshaft . If you look at some of the early pics of the stearing set up you can see (or at least I can) that I have increased castor. This actually turned my pinion down. It is very tight, but acceptable.
I am going to flip my front springs for the added clearance needed for the tie rod and oil pan. This should make my angles even better. I may add a double cardan to the front shaft, but I am going to wait and see.
As for the rear, I tilted it up but kept it within about 5* of the transfer case. So far no vibrations and no problems with binding.
Both driveshafts have steeper angles then I would like but in the short term they seem to be working.
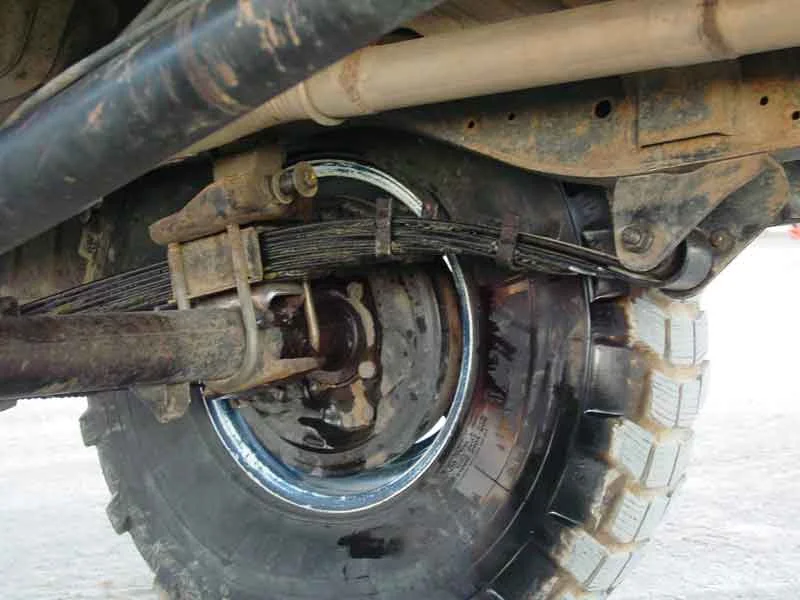
here's a pick of the rear

I did not cut and turn.....yet. And I might not. I set the castor to 3* and wanted to make sure that there was no steering wander. It tracks straight and true. I had planned on then cutting and turning the axle. To my surprise, and this may be because of the length of the auto, I have ZERO binding issues on the front driveshaft . If you look at some of the early pics of the stearing set up you can see (or at least I can) that I have increased castor. This actually turned my pinion down. It is very tight, but acceptable.
I am going to flip my front springs for the added clearance needed for the tie rod and oil pan. This should make my angles even better. I may add a double cardan to the front shaft, but I am going to wait and see.
As for the rear, I tilted it up but kept it within about 5* of the transfer case. So far no vibrations and no problems with binding.
Both driveshafts have steeper angles then I would like but in the short term they seem to be working.
here's a pick of the rear
- Thread starter
- #57
I will take some more pics of the rear bumper for you this weeken. My welding sux and I haven't finished it, but it looks god from a far.
My biggest problem was keeping the thing straight. I think i cut and welded the angles three times. It always wanted to pinch in at the front and rub the body. I ended up using a spacer across the front to keep the proper width while I welded it.
As for the cut and turn mentioned above......It has been moved up on my priority list. It is going to have to be done. I thought I could get away without it. I was just fooling myself because I didn't want to pull that damn front end apart again....
theferg said:Looks sweet!Can't wait to see some wheelin'/safari'in pics of it!

As to the shock mounts: So how much room behind your shock mount cross member to the gas tank? Seems like on my 60 there is about 8 inches or so... I have the same issue with the shock mounts though with my e-lcoker, the actuator is in the way. I put the lower mount out behind the axle. I am having to relocate the brake line slightly right where it attaches to the axle breather tube. I am workin' on it right now, I have two ideas, either a whole new cross-member that is back as close to the gas tank as possible, or a custom mount stemming back from the stock cross-member. Haven't officially figured out which yet...
As the the cables for your locker... Seems like an extension of some sort could do it, but might be pretty tricky. Might have to go with new custom cables. IIRC, you're not the first one to SOA an HJ61 with cable locks though--and you're rig doesn't look as tall as some of them I've seen--so somebody should have some info on both of these topics... I know there's one guy who frequents this board that has an SOA 62 and an SOA HJ61. I forget his name/username though... Hopefully he'll come along and chime in on what they did to accomodate these two items on his HJ61.
Sorry I can't be more help at this time. Good luck.
-Ferg-
The guys username is waggoner5 on Pirate, not sure if it's the same over here.
Hey guys Gary here.
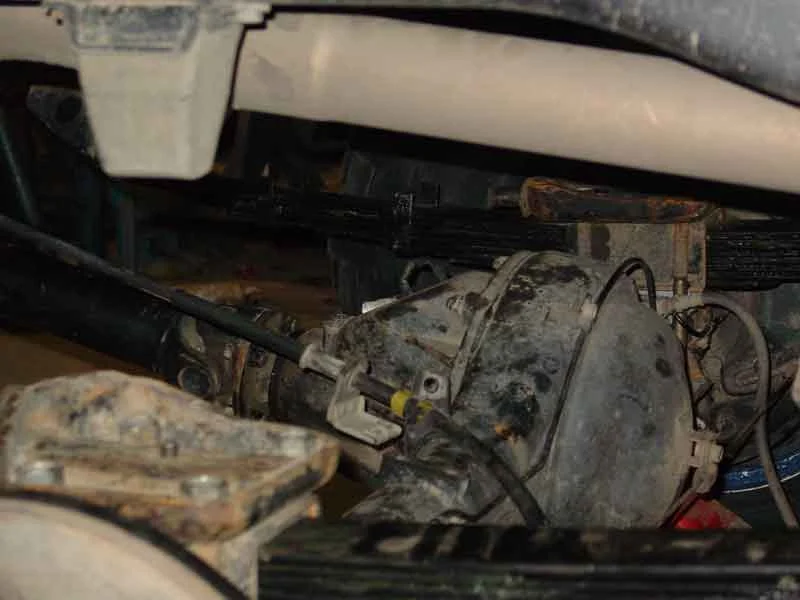
The shock mounts on my 61 were pretty much staight forward custom but the right rear took a little more work. I welded a piece of tubing to the axle tubing from between the ubolts at a 45 dgree angle towrds the center, then came in with a shock mount attatched to that. The uppers are very close together attached to the original crossmember but moved inwards about 3" apart.
The cable for the rear locker had to be extended about 5". I used a control cable shop in Dallas that had to redue it 3 times to get it right. They kept rying to use a series 33 cable against my wishes. I wanted a much larger cable similar to stock and after 2 times thats what ended up with. The rear attaching point for the cable was easy and all the stock mounting points and hardware were used. Beacuse the Toyota cable was unique in its mounting and more unique in its limited travel I had to fab up a simple bracket that attaches to the stock shifter bracket assembly to accommodate the longer travel cable. Hers a couple of pics that might clear up my ramblings.
- Thread starter
- #60
Thanks for the pics Gary.
That is similiar to what I figured I would have to do for the rear shocks.
Hopefully I will get a cable made this week for the lockers.
That is similiar to what I figured I would have to do for the rear shocks.
Hopefully I will get a cable made this week for the lockers.