
Man was that fun to read through....
Navigation
Install the app
How to install the app on iOS
Follow along with the video below to see how to install our site as a web app on your home screen.
Note: This feature may not be available in some browsers.
More options
Style variation
You are using an out of date browser. It may not display this or other websites correctly.
You should upgrade or use an alternative browser.
You should upgrade or use an alternative browser.
Front Window Woes
- Thread starter speedracer
- Start date
This site may earn a commission from merchant affiliate
links, including eBay, Amazon, Skimlinks, and others.
Bridge-rectifier motor surge clamp...
So here is a copy of the Toyota wiring diagram of the power window circuits on the FJ80:

And here is a section showing just one motor and switch with the bridge-rectifier spike clamp installed:
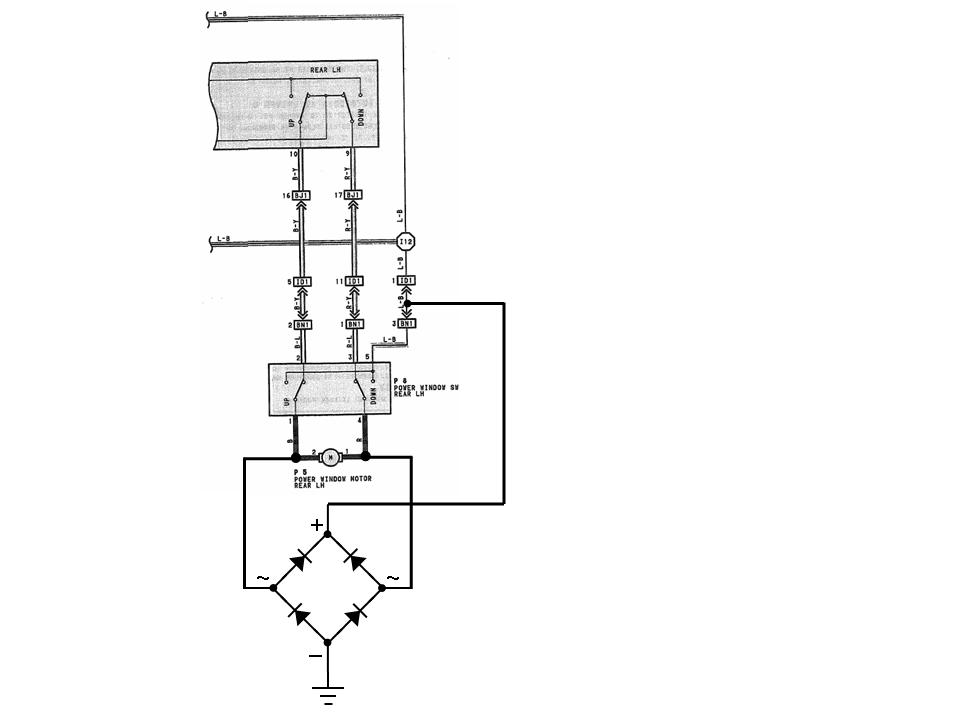
The ring of four diodes connected in this fashion is known as a "bridge rectifier," or a "full-wave bridge rectifier." These are available in small four wire packages which are very easy to use for this application. You don't need an great amount of current handling, because it is a very brief spike, so a small package should be adequate. These will normally be capable of handling a couple hundred volts without damage. Available at any good electronic component shop, or mail order from somebody like digikey. Should be cheap.
To expand on the earlier description, now that I've got an illustration: If the motor generates a positive spike that is higher voltage than the 12V battery voltage plus 0.7V to turn on the diode, then one of the upper diodes will conduct the current to the battery, if the motor generates a negative going spike more negative than ground by 0.7V, one of the lower diodes will conduct the current to chassis ground (effectively back into the negative terminal of the battery). The bridge rectifier has no effect on any voltage across the motor that is battery voltage or less, meaning it has no effect on the normal powering of the motor. It will only cut in for a few milliseconds during a high voltage inductive spike generated by the collapsing magnetic field in the motor when the window switch is opened, but that is the spike that causes the arcing on the window switches.
I guess one other comment is in order. For this to be fully effective, it is important that the door chassis is well grounded back to the battery negative terminal. I haven't measured that on my rig yet, but will be doing so. If you get more than an ohm or so, you probably ought to add a bonding wire that ties a ring terminal to a screw in the door back to one of the grounding points in the main chassis. This isn't needed by the motor drive because both wires for the motor go all the way back to the main control panel in the driver's door, but the ground is necessary for the spike clamp bonding to work.
I've got one door motor done, but as I do the next installation, I will take some pictures to show the installation.
So here is a copy of the Toyota wiring diagram of the power window circuits on the FJ80:
And here is a section showing just one motor and switch with the bridge-rectifier spike clamp installed:
The ring of four diodes connected in this fashion is known as a "bridge rectifier," or a "full-wave bridge rectifier." These are available in small four wire packages which are very easy to use for this application. You don't need an great amount of current handling, because it is a very brief spike, so a small package should be adequate. These will normally be capable of handling a couple hundred volts without damage. Available at any good electronic component shop, or mail order from somebody like digikey. Should be cheap.
To expand on the earlier description, now that I've got an illustration: If the motor generates a positive spike that is higher voltage than the 12V battery voltage plus 0.7V to turn on the diode, then one of the upper diodes will conduct the current to the battery, if the motor generates a negative going spike more negative than ground by 0.7V, one of the lower diodes will conduct the current to chassis ground (effectively back into the negative terminal of the battery). The bridge rectifier has no effect on any voltage across the motor that is battery voltage or less, meaning it has no effect on the normal powering of the motor. It will only cut in for a few milliseconds during a high voltage inductive spike generated by the collapsing magnetic field in the motor when the window switch is opened, but that is the spike that causes the arcing on the window switches.
I guess one other comment is in order. For this to be fully effective, it is important that the door chassis is well grounded back to the battery negative terminal. I haven't measured that on my rig yet, but will be doing so. If you get more than an ohm or so, you probably ought to add a bonding wire that ties a ring terminal to a screw in the door back to one of the grounding points in the main chassis. This isn't needed by the motor drive because both wires for the motor go all the way back to the main control panel in the driver's door, but the ground is necessary for the spike clamp bonding to work.
I've got one door motor done, but as I do the next installation, I will take some pictures to show the installation.
Motors issues...
One other thing I noticed tonight while I was working on my window motor. On closer examination, I noticed that there are some switch contacts, almost like relay contacts adjacent to the brushes inside the motor end bell. I didn't dig into it far enough to confirm this, but I suspect this is some sort of mechanism so that if the motor stalls, at the end of the window travel, somehow the stalled motor pulls these contacts open preventing burnout of the motor. I don't know whether this works on a thermal principle, using a bi-metallic thermostat strip to open the contacts, or if it operates on some sort of magnetic field or stalled torque effect. This could easily be a failure point of the motor if these contacts are not clean, or if the mechanism is triggering when it should not. I would like to dig into that some more and convince myself that it is working correctly. For instance, if it is a thermal effect and trips too quickly these contacts might open with the window only half way up or down, just due to normal motor heating. Perhaps I can put an ohm meter across these while applying a heat gun to the outside of the motor and see how quickly it opens. I could even put a temperature probe down inside the motor and measure the inside temperature at the contacts that trips it.
The motor that was working perfectly yesterday, suddenly was stalling again this evening. I opened it up and cleaned it up a bit more, mostly just repeating what I did yesterday, and lo and behold it began working perfectly again. One thing that I noticed is that when you are inserting the armature into the gear head, past the brushes, it is real easy to get some grease from the worm gear on the commutator brushes as you slide it together. I am sure that would not be helpful. So this time I used a Q-tip in some solvent to clean off the face of the brushes and the commutator and then inserted the armature being very careful to keep the worm gear grease from coming in contact with the commutator brushes.
The motor runs strongly when it runs, but this intermittent thing is obviously a problem. Inspecting the windings, the commutator, the brushes, the bearings, and the magnets, everything looks perfect, so those switch contacts in the motor are suspect.
Hummmm....
Last edited:
need clarification on this stuff as its a bit confusing, my DS window is slower than all of the other windows, with the recent storms the bay area of CA has had i'm noticing that its way slower now, also as it goes up it seems to shudder or small jerks, besides that now the door lock is getting stiff. is it a failed seal that should be replaced or should i just pull the door panel, clean everything out and relube with some multi purpose grease? if its the seal whats the PN#? I'm dreading pulling the door panel and finding out that there is a rust monster lurking.
need clarification on this stuff as its a bit confusing, my DS window is slower than all of the other windows, with the recent storms the bay area of CA has had i'm noticing that its way slower now, also as it goes up it seems to shudder or small jerks, besides that now the door lock is getting stiff. is it a failed seal that should be replaced or should i just pull the door panel, clean everything out and relube with some multi purpose grease? if its the seal whats the PN#? I'm dreading pulling the door panel and finding out that there is a rust monster lurking.
Probably the first thing to try is to spray silicone spray into the window tracks and then try to run it up and down a couple times.
If that doesn't do the trick, then the next things to try would be cleaning the switch contacts, cleaning and re-lubing the window regulating mechanism, and maybe cleaning the motor armature if you think you're up to taking it apart without damaging the brushes.


