
Love the matching spare, and the new front bumper looks great! Nice truck!
Navigation
Install the app
How to install the app on iOS
Follow along with the video below to see how to install our site as a web app on your home screen.
Note: This feature may not be available in some browsers.
More options
Style variation
You are using an out of date browser. It may not display this or other websites correctly.
You should upgrade or use an alternative browser.
You should upgrade or use an alternative browser.
Fightman's 98 4Runner
- Thread starter fightman
- Start date
This site may earn a commission from merchant affiliate
links, including eBay, Amazon, Skimlinks, and others.
Thanks for the compliment man! Nice Surf man! You have that here in Canada??
Ya, I've had it for just over a month now, LOVE it!


- Thread starter
- #28
So, had some time to kill today, and decided to get working on the Skidplate that Bandit Runner sold me. First thing I did was wire the skid plate in place, so that I can kinda hold it while I mock up where my brackets were gonna be.

Once that was done, I found some Curtain Rod brackets that I had lying around in the garage (I like to recycle junk!), and decided to cut the hook part off and use them to make "L" brackets.
Before:

After:

Once they were cut, I used Duct Tape to mock them onto the skid plate and figure out where the holes would be drilled on both the Stock Skid plate and the Sport Edition Skid.

The next thing I did was drill the holes for the "L" brackets I made, and temporarily bolt them up. I did this, so I can line up the new skid onto the old, and locate the holes I was going to drill to mount the new skid.

Once I lined up the skid, I drilled out 2 holes on each side of the stock skid, in order to bolt the brackets onto it.

Once all that was done, I temporarily mounted the skid, in order to see how it would look.

The next thing I did, was remove the skid again, and strip the old paint with some Furniture paint Stripper:

Once it was all cleaned up, I polished it with some WD40 and steel whool:

After polishing the skid, it was time to mount it on the truck permanently!


After seeing alot of other Sport Edition Skid Plates hanging down really low, I realized I didn't like them that low, and decided to tuck it in tight. This also helps me keep more of my approach angle for when I do go off-roading....which is not very often.
Once that was done, I found some Curtain Rod brackets that I had lying around in the garage (I like to recycle junk!), and decided to cut the hook part off and use them to make "L" brackets.
Before:
After:
Once they were cut, I used Duct Tape to mock them onto the skid plate and figure out where the holes would be drilled on both the Stock Skid plate and the Sport Edition Skid.
The next thing I did was drill the holes for the "L" brackets I made, and temporarily bolt them up. I did this, so I can line up the new skid onto the old, and locate the holes I was going to drill to mount the new skid.
Once I lined up the skid, I drilled out 2 holes on each side of the stock skid, in order to bolt the brackets onto it.
Once all that was done, I temporarily mounted the skid, in order to see how it would look.
The next thing I did, was remove the skid again, and strip the old paint with some Furniture paint Stripper:
Once it was all cleaned up, I polished it with some WD40 and steel whool:
After polishing the skid, it was time to mount it on the truck permanently!
After seeing alot of other Sport Edition Skid Plates hanging down really low, I realized I didn't like them that low, and decided to tuck it in tight. This also helps me keep more of my approach angle for when I do go off-roading....which is not very often.


- Thread starter
- #30
It's been a few months since I've updated my build thread, so I thought I'd share some of the work I had done, and also share some Glamour shots I took too.....
I went to my parent's for Mother's Day, and it gave me a chance to go spend time with my Mom and Dad at our family farm. Decided, since 3/4 of the group went for a walk, I'd take the opportunity to have a little photo session! (I know...I'm a picture !)


My Nephew is a fan of my truck, and wanted to take a pic next to it.....ha ha!


That's about it. I wanted to take some pics of it by the old barn, but the ground is pretty soggy....and didn't want to chance tearing up my dad's field...ha ha ha! He would kill me!
Well, found a leaky rear axle seal on the truck and ended up recruiting Lee to help me change the seal:


The old seal:


The man is happiest when his hands are dirty!
Lee did the whole job with me as his sidekick..... we had more trouble changing out the brake shoes than doing the seal, but got it all together!
Well, after 3 years, my muffler rotted out! I had the stock one on til 2008, but then replaced it with a Lifetime warranty muffler at a local shop here.
The muffler he installed then, cost me just over $400.00, and this one would have cost me around $375.00! Thankfully, I still had my original receipt, and the new one cost me only $50.00!

I was thinking about upgrading, but couldn't find anything I liked, and with New Winter Rubber in the near future, I didn't want to spend any more money than I had to.
Let's just hope this one lasts another 3 years????
I also recently had my alternator crap out, which almost left the wife stranded with the truck. Luckily, she limped the truck home, and I was able to replace the darn thing!

Oh! I got my winter rubber purchased! Well, at least some of it.....2 out of 4 are worn pretty bad, as the guy was running them without a proper alignment on his Cherokee...so...looks like I might search around for another 2, and see what I can get before the snow fly's!


They are Procomp Mud Tires in the 265/75/16 flavour. I decided to run slightly smaller rubber in the winter, this way I can still run my mudflaps without any clearance issues
I went to my parent's for Mother's Day, and it gave me a chance to go spend time with my Mom and Dad at our family farm. Decided, since 3/4 of the group went for a walk, I'd take the opportunity to have a little photo session! (I know...I'm a picture !)
My Nephew is a fan of my truck, and wanted to take a pic next to it.....ha ha!
That's about it. I wanted to take some pics of it by the old barn, but the ground is pretty soggy....and didn't want to chance tearing up my dad's field...ha ha ha! He would kill me!
Well, found a leaky rear axle seal on the truck and ended up recruiting Lee to help me change the seal:
The old seal:
The man is happiest when his hands are dirty!
Lee did the whole job with me as his sidekick..... we had more trouble changing out the brake shoes than doing the seal, but got it all together!
Well, after 3 years, my muffler rotted out! I had the stock one on til 2008, but then replaced it with a Lifetime warranty muffler at a local shop here.
The muffler he installed then, cost me just over $400.00, and this one would have cost me around $375.00! Thankfully, I still had my original receipt, and the new one cost me only $50.00!
I was thinking about upgrading, but couldn't find anything I liked, and with New Winter Rubber in the near future, I didn't want to spend any more money than I had to.
Let's just hope this one lasts another 3 years????
I also recently had my alternator crap out, which almost left the wife stranded with the truck. Luckily, she limped the truck home, and I was able to replace the darn thing!
Oh! I got my winter rubber purchased! Well, at least some of it.....2 out of 4 are worn pretty bad, as the guy was running them without a proper alignment on his Cherokee...so...looks like I might search around for another 2, and see what I can get before the snow fly's!
They are Procomp Mud Tires in the 265/75/16 flavour. I decided to run slightly smaller rubber in the winter, this way I can still run my mudflaps without any clearance issues
Not running the bighorns for snow? I love mine in the winter weather.
helping the government read my mind on a daily basis
helping the government read my mind on a daily basis
- Thread starter
- #33
Wheel Painting
I decided to mount my New (to me) tires on my stock rims today, He does it the "Old fashioned" way, using a couple of steel bars, some dish soap and a little muscle to mount the rubber on the rims......no tire mounting machines! I don't have any pics of him doing this....as he's not much for taking pics when he's working.....Since he was coming over to do that, I figured it would be a good opportunity to strip all the old coating off my rims, so that I could just paint them once the rubber was installed.
Here's a shot of one of my rims in their pited and corroded state:

Here's a shot of it after I wire-wheeled it:

And here's a pic of all 4 tires mounted on the rims:

Then it was time to do some recon, and look at some painted wheel pics and see what I could come up with on my own!
I went to my local Canadian Tire Corp. Store, and did some shopping!
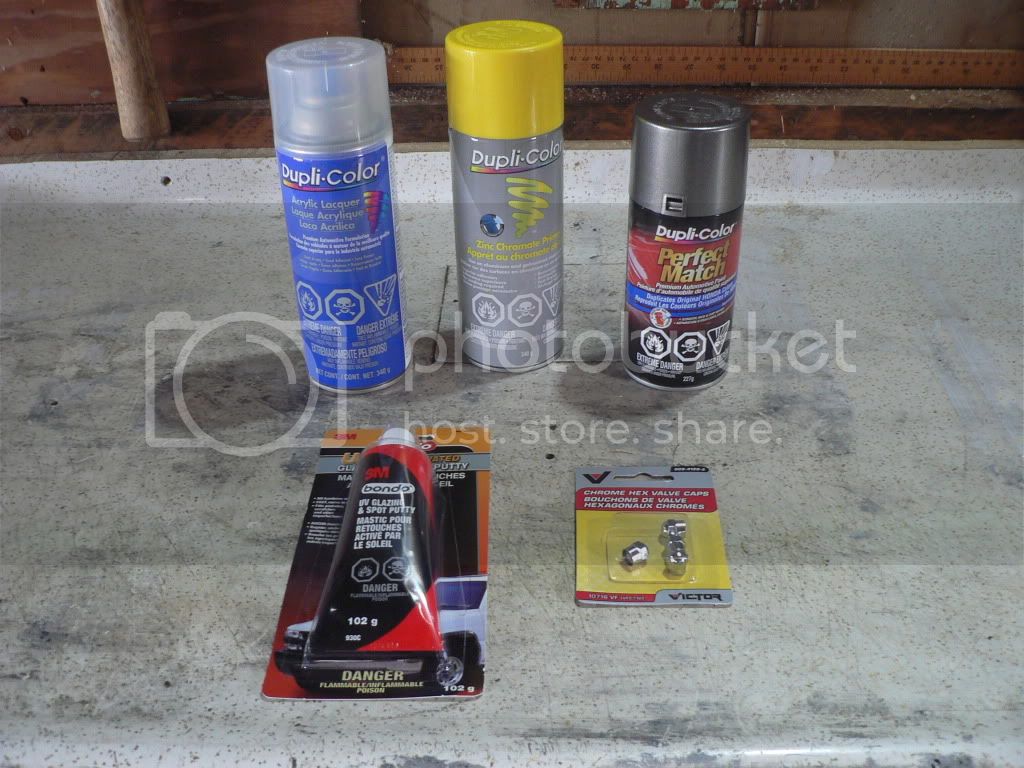
Using the buyers points I had on my Canadian Tire Mastercard, I bought some Zinc Primer, Duplicolor Metallic Grey Base coat, some Duplicolor Clear Coat, a tube of pre-mixed Bondo, and some new Valve caps!
Next, I took all my wheels, and spread them around the garage floor, and started masking them all off:


Under the watchful eye of my 3 year old.....when she wasn't taking pictures of my poster board of Rocky Balboa:

I then coated them all with the Zinc Primer. (The can says it's recommended for Aluminum or Galvanized Steel, so I think it was a good choice!)

After alot of patience, and hard work....I'm almost finished these darn wheels! The problem is....I ran out of paint.....twice! HA HA! The first time, I ran out of Base Coat....the second time.....Clear!
Anyway, gonna have to wait till tomorrow morning to get some more, and maybe finish them up before I go to work. In the mean time...here are some teaser pics:
Here's a shot of one of the wheels....look closely at the "TOYOTA" lettering, I did that in a Metallic Red paint:

After base coating them, I also decided to sand off the outer lip of the wheel, leaving the bar aluminum exposed, and then clear over it all.
The wheels were almost done, but one got fudged up just after clearing it! The darn newspaper I used to mask the wheels, ended up blowing over in the wind and landed on my newly clear coated wheel!! So the next day I planned on , wet sanding it, re-basecoating a section, and then re-clearing it all.
The next pic...is one of the Center Caps:

Alright, so first thing the next morning, was drive over to Canadian Tire to find more clear coat and some more of the base coat grey. When I got there, I found that the original Duplicolor Clear coat I bought was OUT OF STOCK. So I looked at some of the others, and found some Duplicolor High Performance Wheel Coating. I picked it up, and headed home.

Once there, I wet sanded my fudged up wheel, and then used the base coat to blend in the repair. After that, I clear over top, and then continued to do the rest of the wheels and center caps.
Here's a pic of the finished product....I took the time to shine up the tire too...just to give you guys the full effect! lol!

You can't even see the repair I did......
What do you guys think??? Here's a quick before and after:
Before:
After:
After it was all said and done, 3 coats of Zinc Primer, about 6 coats of Basecoat, and 5 coats of Clear Coat!
I'm happy with the result! Almost want to take off my Procomp's and Bighorns and Run these Now instead of the Winter!!!
I decided to mount my New (to me) tires on my stock rims today, He does it the "Old fashioned" way, using a couple of steel bars, some dish soap and a little muscle to mount the rubber on the rims......no tire mounting machines! I don't have any pics of him doing this....as he's not much for taking pics when he's working.....Since he was coming over to do that, I figured it would be a good opportunity to strip all the old coating off my rims, so that I could just paint them once the rubber was installed.
Here's a shot of one of my rims in their pited and corroded state:
Here's a shot of it after I wire-wheeled it:
And here's a pic of all 4 tires mounted on the rims:
Then it was time to do some recon, and look at some painted wheel pics and see what I could come up with on my own!
I went to my local Canadian Tire Corp. Store, and did some shopping!
Using the buyers points I had on my Canadian Tire Mastercard, I bought some Zinc Primer, Duplicolor Metallic Grey Base coat, some Duplicolor Clear Coat, a tube of pre-mixed Bondo, and some new Valve caps!
Next, I took all my wheels, and spread them around the garage floor, and started masking them all off:
Under the watchful eye of my 3 year old.....when she wasn't taking pictures of my poster board of Rocky Balboa:
I then coated them all with the Zinc Primer. (The can says it's recommended for Aluminum or Galvanized Steel, so I think it was a good choice!)
After alot of patience, and hard work....I'm almost finished these darn wheels! The problem is....I ran out of paint.....twice! HA HA! The first time, I ran out of Base Coat....the second time.....Clear!
Anyway, gonna have to wait till tomorrow morning to get some more, and maybe finish them up before I go to work. In the mean time...here are some teaser pics:
Here's a shot of one of the wheels....look closely at the "TOYOTA" lettering, I did that in a Metallic Red paint:
After base coating them, I also decided to sand off the outer lip of the wheel, leaving the bar aluminum exposed, and then clear over it all.
The wheels were almost done, but one got fudged up just after clearing it! The darn newspaper I used to mask the wheels, ended up blowing over in the wind and landed on my newly clear coated wheel!! So the next day I planned on , wet sanding it, re-basecoating a section, and then re-clearing it all.
The next pic...is one of the Center Caps:
Alright, so first thing the next morning, was drive over to Canadian Tire to find more clear coat and some more of the base coat grey. When I got there, I found that the original Duplicolor Clear coat I bought was OUT OF STOCK. So I looked at some of the others, and found some Duplicolor High Performance Wheel Coating. I picked it up, and headed home.
Once there, I wet sanded my fudged up wheel, and then used the base coat to blend in the repair. After that, I clear over top, and then continued to do the rest of the wheels and center caps.
Here's a pic of the finished product....I took the time to shine up the tire too...just to give you guys the full effect! lol!
You can't even see the repair I did......
What do you guys think??? Here's a quick before and after:
Before:
After:
After it was all said and done, 3 coats of Zinc Primer, about 6 coats of Basecoat, and 5 coats of Clear Coat!
I'm happy with the result! Almost want to take off my Procomp's and Bighorns and Run these Now instead of the Winter!!!