Fergytoy"s 1978 FJ40 frame off resto.

This site may earn a commission from merchant affiliate
links, including eBay, Amazon, Skimlinks, and others.

Sprayed everything tonite with the K36 sealer. Came out nice but with a small run on the hood that will get sanded out tomorrow. Still planning on shooting the top coat tomorrow afternoon.

FJ40 Restoration 545.webp


FJ40 Restoration 548.webp


FJ40 Restoration 552.webp


FJ40 Restoration 549.webp
 
Took the day off of work to make sure all the body panels were prepped and ready for the topcoat today. Wet sanded a couple of runs and scotch- brite pad sanded everything. Cleaned it all with wax and grrease remover and then rigged up some scrap wood and deck screws to hold the hood in its normal position for topcoating to minimize any runs when Rocky lays on the multiple coats. Rocky came over about 5pm and we got started shortly thereafter. Rocky sprayed about 4 coats on the smaller pieces first and I moved them outside the paint booth to avoid overspray and to allow Rocky more room to move around. A little while later only the fenders and hood remained in the booth. Rocky alternated between the fenders and hood with about 6 coats layed down. The Dune Beige smoothed out like glass. Rocky does a great job!

FJ40 Restoration 556.webp


FJ40 Restoration 560.webp


FJ40 Restoration 563.webp


FJ40 Restoration 568.webp
 
The boys and I started to put together the front end body panels to include the fenders, aprons, bib and hood. Tapped/died all the threads prior to reassembly using as much stainless hardware as possible. New stainless steel hood latches were used as one of the original latches broke last fall.

FJ40 Restoration 590.webp


FJ40 Restoration 591.webp


FJ40 Restoration 593.webp


FJ40 Restoration 580.webp
 
Been working steadily on getting everything back together. The tranny hump seals/gasket is no longer available from Toyota. Could not find anything aftermarket so I decided to use some seal tape that is commonly used to seal pick-up camper tops to pick-up beds. Got the gas tank back in as well. I was able to source a new wiper motor cover gasket from Cruiser Corps or CCOT.

FJ40 Restoration 602.webp


FJ40 Restoration 605.webp


FJ40 Restoration 609.webp


FJ40 Restoration 610.webp


FJ40 Restoration 614.webp
 
Ordered in new wiper pivot seals, washers and new grommets for the windshield frame. Cleaned up the VIN and data plates before reattaching them to the tub.
FJ40 Restoration 620.webp FJ40 Restoration 622.webp FJ40 Restoration 624.webp FJ40 Restoration 625.webp

FJ40 Restoration 620.webp
 
John, it was great to see the finished product at the show. Obviously a lot of TLC in your rig.
 
As @riderjgs said, way back in post #51, "Damn, John!" - you do great work and really work fast! :clap:

Thanks for pointing me to your restore - but, Damn, John! Where are the finished pictures?!? :confused:

:cheers:
 
I actually finished the restoration around the 1st of May and took a bunch of photos. However, that was around the time Woody did all the updates to IH8MUD and it appears it has become harder for me to attach photos to my build thread than it was before. I am of the generation that just "missed" all the computer education in school/college and consequently, I am not the best at this. I asked my oldest son last week to help me attach photos to my build thread and he said I needed to go to an Image Sharer to place my photos before I can post them here again. He tried to help me but we could not get it figured out. Sorry, my FJ40 is done but until I figure out how to do it, I won't be able to post them.
 
John,

If you 'reply' to your thread, you should be able to click the 'Attach File' button (to the right of 'Post Reply'),
  • it will/should bring up a Windows Explorer window (assuming you are using Windows)
  • you drill to the folder that contains your photos
  • pick the photo you want to attach
  • click 'open'
  • scroll down on your screen and you will see that photo
  • click on either 'Thumbnail' or 'Full Image'
  • the 'Thumbnail' or 'Full Image should appear at your current cursor position.
Note: iPad procedures are similar, you should be able to figure it out from the Windows steps, above. Please let me know if you need more.

HTH
 
A few more pics as it nears the end of the resto. Had a new green tinted windshield cut and installed with the original windshield seal which was still in good shape. Also, this is the first time the 40 has been out of the garage since having it all apart.

John's I-Phone 2014 1113.webp John's I-Phone 2014 1112.webp FJ40 Restoration 611.webp FJ40 Restoration 647.webp
 
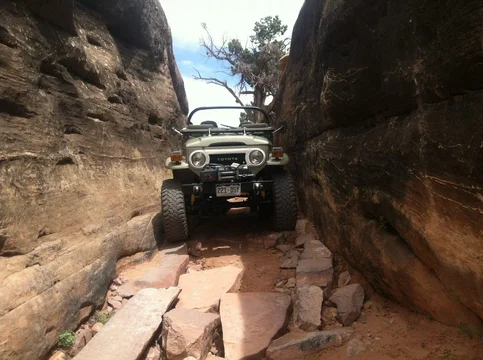
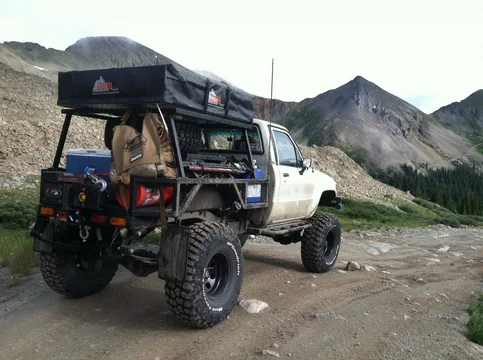
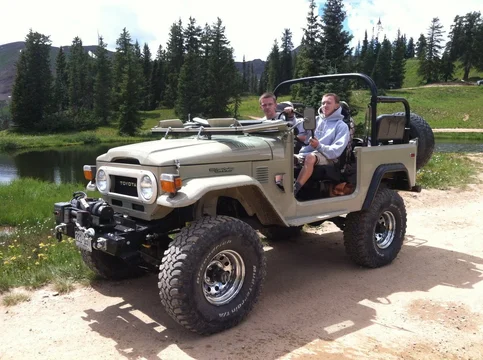
First pic is on the "launching pad" at the start of the Elephant Hill Trailhead in the south Canyonlands National Park in southern Utah. Second is in the "Squeeze" deeper into the Canyonlands. Rockcrawler/Expedition rig now equipped with the new Tepui RTT. Last pic, the boys and I on Paradise Divide above Crested Butte.

Johns phone pics 2014 113.webp Johns phone pics 2014 090.webp Johns phone pics 2014 217.webp Johns phone pics 2014 257.webp
 

Users who are viewing this thread

Back
Top Bottom