Drill holes?

This site may earn a commission from merchant affiliate
links, including eBay, Amazon, Skimlinks, and others.

Joined
Jan 18, 2006
Threads
434
Messages
9,610
Location
Reno, Nevada
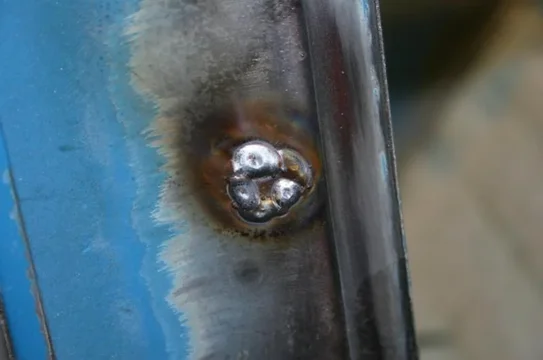
What would be the best way to fill these holes in?
I was thinking about using some squares (3/8x 3/8) behind em, plug welding, then going back and grinding the excess off...
Theyre drill holes, so theyre not really small enough to just fill with weld with out it being a pain in the ASS!
007.webp
009.webp
 
Y E P
 
Or, you could flatten the end of a piece of copper pipe and hold it against the back side of the hole and weld. The weld won't stick to the copper, but it will back it up so the weld metal won't sag. Less to grind on the back than the previous method, perhaps more on the front.

Rhetorical question: Why are there so many useless holes in our Cruisers?
 
On mine, the PO had some crappy diamond plate on there. The ones on the rear near the tail gate pillar were from the factory barn door swings.
There does seem to be a LOT of those holes for sure.
Im gonna give the copper a try. I posted this in my build thread as well, and that had come up there too.
Think Im gonna get a 1 in copper cap, with a 6 in piece of 1 in copper pipe to use it as a handle while welding in the holes.

I appreciate the input!

Chicago
 
I fill holes like that by taking a scrap of steel with some snips and cutting it to fit roughly in the hole. Once that's done, I back it up with the copper and weld it in. I do this to minimize heat build up and warping.

With the plug welded in...
hole 1.webp

Minimal grinding and tada!!!
hole 2.webp

Takes a few minutes to cut out the plug. I don't normally cut it to be too tight of a fit, just so that it fits in the hole flush.

Dan
hole 1.webp
hole 2.webp
 
I fill holes like that by taking a scrap of steel with some snips and cutting it to fit roughly in the hole. Once that's done, I back it up with the copper and weld it in. I do this to minimize heat build up and warping.

With the plug welded in...
View attachment 375179

Minimal grinding and tada!!!
View attachment 375180

Takes a few minutes to cut out the plug. I don't normally cut it to be too tight of a fit, just so that it fits in the hole flush.

Dan

NICE!
I started cutting out some material, but wanted to see if there were other options!
Yours came out GREAT!
Nice job!
 

Users who are viewing this thread

Back
Top Bottom