
- Joined
- Mar 24, 2010
- Threads
- 23
- Messages
- 452
- Location
- Sydney, Australia
- Website
- www.gorillaindustries.com.au
Hi All,
I've come to realise that I dont have a build thread on this forum which I frequent daily! I only usually update the "What have you done to your 80 this weekend" thread, so thought id create a thread. Alot of t will be cut & paste from a local forum but unfortunately ive lost alot of pics due to Photobucket
Bit of background:
I upgraded from my very reliable and fun 1996 1FZFE GXL I had for about 5 years to this 1996 Multivalve HDJ80 GXL in November 2015. Credit to the previous owner who was the second owner.
It lived in a country town all its life and had 418,000kms on the clock, but it was in excellent condition!
Specs:
1997 GXL 1HDFT (5 Speed Manual)
Engine:
G Turbo
3" Red Back Exhaust
Front Mount Intercooler
Safari Snorkel
Suspension/Brakes:
2" Old Man Emu Lift (Feels awesome too!)
OME Steering Damper
DBA F&R Slotted rotors and 100 series pads
Driveline:
Front and Rear ARB Air Lockers
Wheels/Tyres:
5 x 16 x 10 -38 Eplison Elite Max Alloy Wheels (Japanese made)
5 x Toyo Open Country M/T 35" Tyres
Interior:
Recaro Seats
Waeco CFX550 Fridge
Titan Drawer system
GME Radio
Nardi Classic steering wheel
20L Water Bladder
Android HU and Kicker door speakers
JDM Cup Holder
Exterior:
Modified TJM Winch Bar
JDM Tyre Carrier
JDM Number Plate relocator
Rock Armor Sliders/Steps
Rhino Rack Platform
MHM HighLift Jack
Shovel
88House 30mm Flares
BullEye Light Bar mount
52" Curved Light Bar
9" Spot Lights
Rear Camp lights
GME Aerial
Air Tank
JDM Style Weather Strips
I-Max 12000lbs Winch
As you can see by the pic below, i started off with an Ironman Bar, Bradley V Alloys and Federal 35s

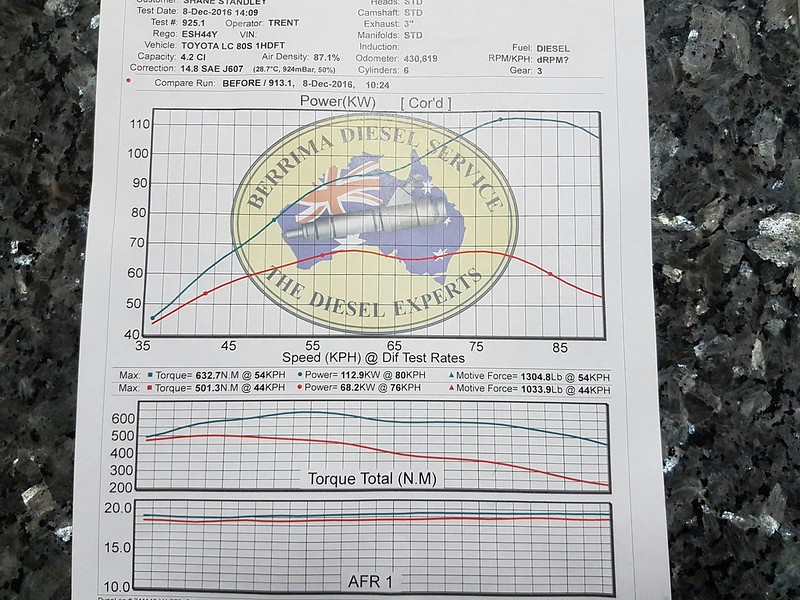
Got her Tuned by Berrimal Diesel
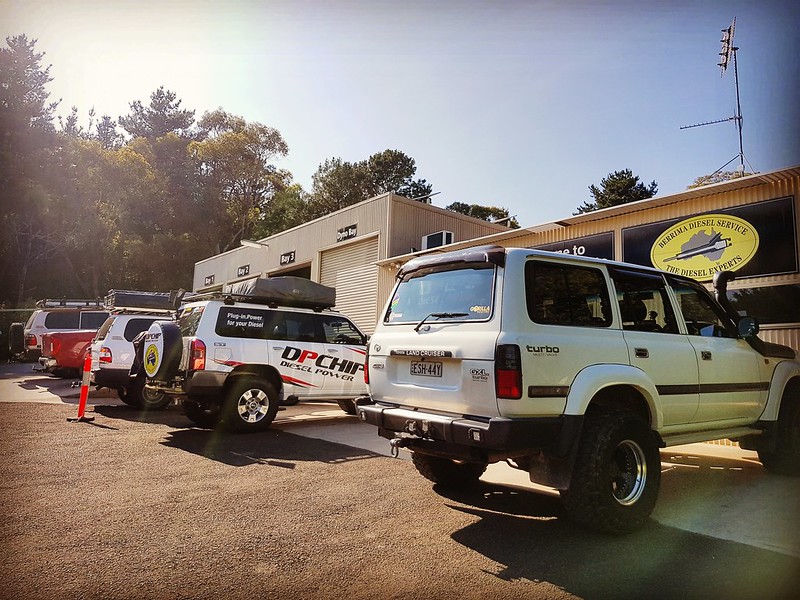
Pulled a measly 68rwkw and came out with 113rwkw. Turbo is very loud now, probably a bit too loud for my liking...cruising back home on the freeway, it was louder than the 35" Muddies!
Some fresh rubber
 IMG_20161222_071230_907 by Shane, on Flickr
 IMG_20161223_172533_788 by Shane, on Flickr
 IMG_20161223_193115_852 by Shane, on Flickr
I've come to realise that I dont have a build thread on this forum which I frequent daily! I only usually update the "What have you done to your 80 this weekend" thread, so thought id create a thread. Alot of t will be cut & paste from a local forum but unfortunately ive lost alot of pics due to Photobucket
Bit of background:
I upgraded from my very reliable and fun 1996 1FZFE GXL I had for about 5 years to this 1996 Multivalve HDJ80 GXL in November 2015. Credit to the previous owner who was the second owner.
It lived in a country town all its life and had 418,000kms on the clock, but it was in excellent condition!
Specs:
1997 GXL 1HDFT (5 Speed Manual)
Engine:
G Turbo
3" Red Back Exhaust
Front Mount Intercooler
Safari Snorkel
Suspension/Brakes:
2" Old Man Emu Lift (Feels awesome too!)
OME Steering Damper
DBA F&R Slotted rotors and 100 series pads
Driveline:
Front and Rear ARB Air Lockers
Wheels/Tyres:
5 x 16 x 10 -38 Eplison Elite Max Alloy Wheels (Japanese made)
5 x Toyo Open Country M/T 35" Tyres
Interior:
Recaro Seats
Waeco CFX550 Fridge
Titan Drawer system
GME Radio
Nardi Classic steering wheel
20L Water Bladder
Android HU and Kicker door speakers
JDM Cup Holder
Exterior:
Modified TJM Winch Bar
JDM Tyre Carrier
JDM Number Plate relocator
Rock Armor Sliders/Steps
Rhino Rack Platform
MHM HighLift Jack
Shovel
88House 30mm Flares
BullEye Light Bar mount
52" Curved Light Bar
9" Spot Lights
Rear Camp lights
GME Aerial
Air Tank
JDM Style Weather Strips
I-Max 12000lbs Winch
As you can see by the pic below, i started off with an Ironman Bar, Bradley V Alloys and Federal 35s
Got her Tuned by Berrimal Diesel
Pulled a measly 68rwkw and came out with 113rwkw. Turbo is very loud now, probably a bit too loud for my liking...cruising back home on the freeway, it was louder than the 35" Muddies!
Some fresh rubber
IMG_20161222_071230_907 by Shane, on FlickrIMG_20161223_172533_788 by Shane, on FlickrIMG_20161223_193115_852 by Shane, on Flickr Boxing Day (12 of 13)
 Boxing Day (10 of 13)
 Speakers (1 of 10)
 Speakers (4 of 10)
 Speakers (5 of 10)
 Speakers (8 of 10)
 Speakers (9 of 10)
 Speakers (10 of 10)
 Speakers (1 of 3)
 Speakers (2 of 3)
 Speakers (3 of 3)
 NardiClassic
 Map
Map HackingRiver (2 of 30)
 HackingRiver (1 of 30)
 HackingRiver (9 of 30)
 HackingRiver (14 of 30)
 HackingRiver (15 of 30)
 HackingRiver (18 of 30)
 HackingRiver (22 of 30)
 20170225_085823
 Flare-0664
 Flare-0665
 Flare-0666
 Flare-0668
 20170311_174014
 20170311_174019
 20170311_174024
 20170318_150644
 20170318_162834
 20170322_194317
 20170323_065202
 Meryla-
 Meryla--7
 Meryla--6
 Meryla--8
 Sound Proofing--3
 Sound Proofing--4
 Sound Proofing--2
 Sound Proofing-
 Sound Proofing--5
 Wipers-0949
 Engine Bay-0940
 Engine Bay-0943
 Titan Drawers-0969
 Titan Drawers-0970
 Titan Drawers-0971
 Titan Drawers-0974
 Titan Drawers-0973
 Titan Drawers-0972
 Titan Drawers-0976
 Titan Drawers-0978
 Titan Drawers-0979
 Titan Drawers-0980
 Titan Drawers-0975
 20170603_123924
 20170603_123917
 20170603_125045
 20170603_102801-01
 20170601_225911-01
 20170601_225846-01
 Menai2017-1191
 Menai2017-1186
 Menai2017-1164
 Menai2017-1163
 Menai2017-1152
 20170805_152040
 20170805_152050(0)
 20170724_170110
 20170724_170103
 20170805_152210
 20170805_152427
 2017-08-06_09-53-33
 Garage-1197
 20170729_163149
 Snows-1216
 Snows-1218
 Snows-1335
 Snows-1363
 Snows-1365
 Lake Lyall-1487
 Lake Lyall-1488
 Lake Lyall-1498
 Lake Lyall-1501
 Lake Lyall-1507
 Lake Lyall-1517
 Lake Lyall-1548
 Lake Lyall-1526
 Lake Lyall-1551
 Lake Lyall-1557
 Lake Lyall-1553
 Lake Lyall-1561
 Lake Lyall-1566
 Lake Lyall-1569
 cup holder-1592
 cup holder-1594
 cup holder-1597
 cup holder-1598
 cup holder-1601
 Wheel Carrier-1826
 Wheel Carrier-1828
 Wheel Carrier-1840
 Wheel Carrier-1835
 Wheel Carrier-1836
 Wheel Carrier-1838
 Wheel Carrier-1839
 Wheel Carrier-1844
 Wheel Carrier-1837
 Wheel Carrier-1855
 Wheel Carrier-1856
 Wheel Carrier-1841
 Wheel Carrier-1866
 Wheel Carrier-1858
 Wheel Carrier-1860
 Wheel Carrier-1863
 Wheel Carrier-1865
 Wheel Carrier-1871
 Shipment17-1930
 Recaros-1983
 Recaros-1984
 20171021_142347
 20171021_142353
 20171021_142533
 20171022_112739
 20171022_112746
 20171022_124711
 20171022_130748
 20171022_130935
 Flares-2015
 Flares-2013
 Factor 55-2020
 Factor 55-2021
 Factor 55-2023
 Factor 55-2024
 Factor 55-2025
 Factor 55-2027
 Factor 55-2028
 Factor 55-2031
 Factor 55-2032