
All true. If my garage door is adjust correctly (fully open) I can still get in, handy when the hail comes.
Navigation
Install the app
How to install the app on iOS
Follow along with the video below to see how to install our site as a web app on your home screen.
Note: This feature may not be available in some browsers.
More options
Style variation
You are using an out of date browser. It may not display this or other websites correctly.
You should upgrade or use an alternative browser.
You should upgrade or use an alternative browser.
An intro, and looking for input
- Thread starter JeepinPete
- Start date
This site may earn a commission from merchant affiliate
links, including eBay, Amazon, Skimlinks, and others.
- Thread starter
- #22
OK, here are a set of pictures of the mods I made to the wheel wells. The rears were strictly trimming of the plastic flares. The fronts involved removal of the lower inner wheel wells.
Back of front wheel well #1:

Back of front wheel well #2:

Back of rear wheel well:

Front of rear wheel well:

Clearance to the exhaust pipe, obviously wired out of the way:

Back of front wheel well #1:
Back of front wheel well #2:
Back of rear wheel well:
Front of rear wheel well:
Clearance to the exhaust pipe, obviously wired out of the way:
- Thread starter
- #23
And here are a few of the LC on my test rock:


And one of the inside of the rear wheel well. The paint/undercoat is already showing wear. I expect it will be polished by the end of the weekend.

Took it out for a spin tonight, had it up to 70mph. Drives nice, no vibes, a slight tire shimmy at 50mph.
And one of the inside of the rear wheel well. The paint/undercoat is already showing wear. I expect it will be polished by the end of the weekend.
Took it out for a spin tonight, had it up to 70mph. Drives nice, no vibes, a slight tire shimmy at 50mph.
- Thread starter
- #24
Since the last post, I've had it out to Rausch Creek and the Pine Barrens. It works well.
Steering has been a pleasant surprise. I have had no issues turning the wheel on or off road. Plenty of power to turn the tires. Using the stock wheels probably has a lot to do with that. Since the additional tire width has been equally divided, the scrub radius has not been changed at all. I get little kickback in the wheel, even when I am expecting to from a pothole or rock. I've lost the last quarter turn of steering in each direction due to rubbing on the control arms. I have not found that to be a hindrance yet.
I've got tire rubbing in the right front wheel well on occasion. I have not identified where exactly it is touching. It has only happened when twisted up a certain way while jouncing the suspension. No damage to the tires, and no signs of contact on the body of the truck.
Brakes are adequate. I replaced all four calipers and added new pads beforehand which was prudent. Strongly considering pulling the LSPV and ABS unit as it has been reported here to improve things with larger tires.
This thing goes where it is pointed. I've walked up a hill that had a decent built TJ stuck for 30 minutes. Ran through mud holes that was getting everyone else stuck. I am very happy with where this is heading.
Next step is to build a rear bumper. Even with the lift from the tires, the Cruiser is still draggin it butt all the time.
Here is a picture I took this morning from last weekends's trip to Wharton State Forest. I had fun")

Steering has been a pleasant surprise. I have had no issues turning the wheel on or off road. Plenty of power to turn the tires. Using the stock wheels probably has a lot to do with that. Since the additional tire width has been equally divided, the scrub radius has not been changed at all. I get little kickback in the wheel, even when I am expecting to from a pothole or rock. I've lost the last quarter turn of steering in each direction due to rubbing on the control arms. I have not found that to be a hindrance yet.
I've got tire rubbing in the right front wheel well on occasion. I have not identified where exactly it is touching. It has only happened when twisted up a certain way while jouncing the suspension. No damage to the tires, and no signs of contact on the body of the truck.
Brakes are adequate. I replaced all four calipers and added new pads beforehand which was prudent. Strongly considering pulling the LSPV and ABS unit as it has been reported here to improve things with larger tires.
This thing goes where it is pointed. I've walked up a hill that had a decent built TJ stuck for 30 minutes. Ran through mud holes that was getting everyone else stuck. I am very happy with where this is heading.
Next step is to build a rear bumper. Even with the lift from the tires, the Cruiser is still draggin it butt all the time.
Here is a picture I took this morning from last weekends's trip to Wharton State Forest. I had fun
Looks like you've baptized that thing pretty well in the unholy MUD
I'm surprised there's so little rubbing. I think upgrading that exhaust hanger would be a good investment. If the stock metal parts are still there, the rubber thingee that helps it all go together and flex is under $5 from the dealer IIRC...about the cheapest exhaust part you'll ever see on a 80
If there's no need for the draft gear of the receiver hitch, losing it would gain several degrees of rear departure angle. Normally I don't need anything but a pintle for our 1/4 ton, but I bought the combo still with a hitch ball which works well enough when needed to tow something else, so that takes care of us.
- Thread starter
- #26
The exhaust is a work in process. As it sits, it is dang tight to the body mount behind the front tire. And I still want to move the exhaust over the frame. Then the stock muffler sits below the frame, so it needs to be moved up. And obviously some mods are needed behind the rear tire. I want to keep the stock muffler and resonator as I have no desire for a loud exhaust. My guess is I will get to it when I smash the pipe that is under the frame 
- Thread starter
- #27
One hole from the weekend.
- Thread starter
- #28
Time for an update. In the past year or so, I've done very little to the LC, other than drive it. Been out to Rausch Creek a couple times and had a great time as always. The last trip was around the end of Feb, and there was quite a bit of snow. Slip sliding the whole day...
Anyway, I've added a set of Firestone bags in the rear springs. I tow a 5500 lbs load three or four times a year, and that wasn't happening with the larger tires. The bags work great at leveling out the truck, but an unexpected side effect was a noticeable reduction in braking power. If the rear suspension isn't sagging, the LSPV isn't increasing the rear brake force. I disconnected the LSPV linkage from the axle and strapped it to the frame. That applies max pressure to the rear brakes. Definitely helped matters, but I still am not happy with the brakes.
The latest project is currently happening. I am build a set of step/sliders. These will look quite a bit different than most. For one, the 3" body lift gives me a lot more clearance for the struts. Two, the wife and kids have a hard time getting in, so real steps were a necessity. The step is 2" x 8" x 3/16" tube, the struts are 2" x 2" x 1/4" wall. Anyway, a picture is worth a thousand words:


I started painting them this morning, hope to weld them to the frame tomorrow evening.
Anyway, I've added a set of Firestone bags in the rear springs. I tow a 5500 lbs load three or four times a year, and that wasn't happening with the larger tires. The bags work great at leveling out the truck, but an unexpected side effect was a noticeable reduction in braking power. If the rear suspension isn't sagging, the LSPV isn't increasing the rear brake force. I disconnected the LSPV linkage from the axle and strapped it to the frame. That applies max pressure to the rear brakes. Definitely helped matters, but I still am not happy with the brakes.
The latest project is currently happening. I am build a set of step/sliders. These will look quite a bit different than most. For one, the 3" body lift gives me a lot more clearance for the struts. Two, the wife and kids have a hard time getting in, so real steps were a necessity. The step is 2" x 8" x 3/16" tube, the struts are 2" x 2" x 1/4" wall. Anyway, a picture is worth a thousand words:
I started painting them this morning, hope to weld them to the frame tomorrow evening.
- Thread starter
- #29
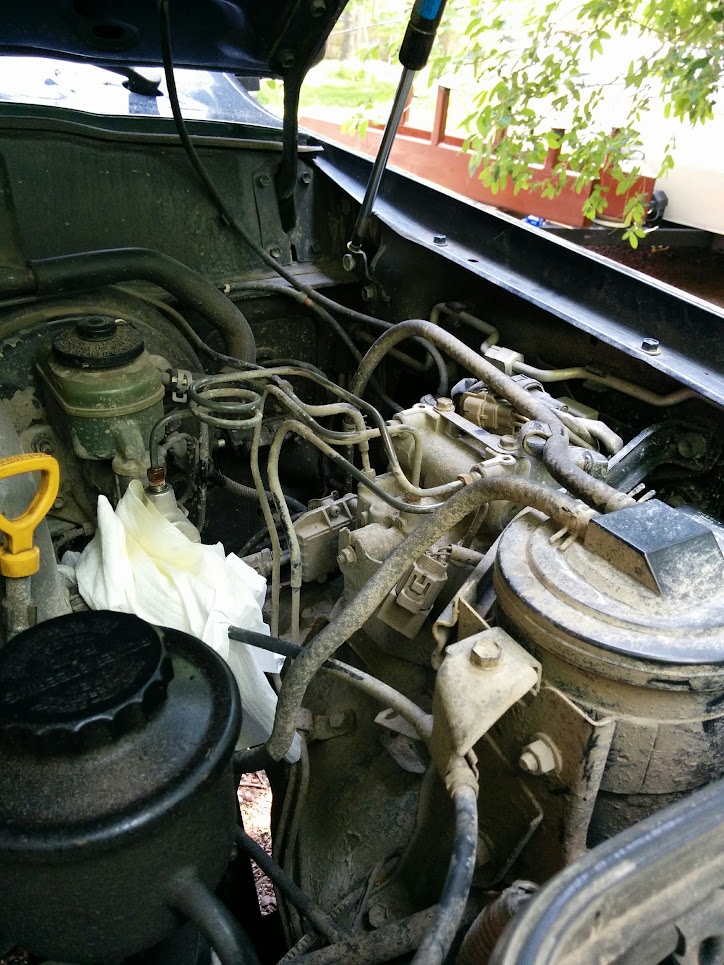
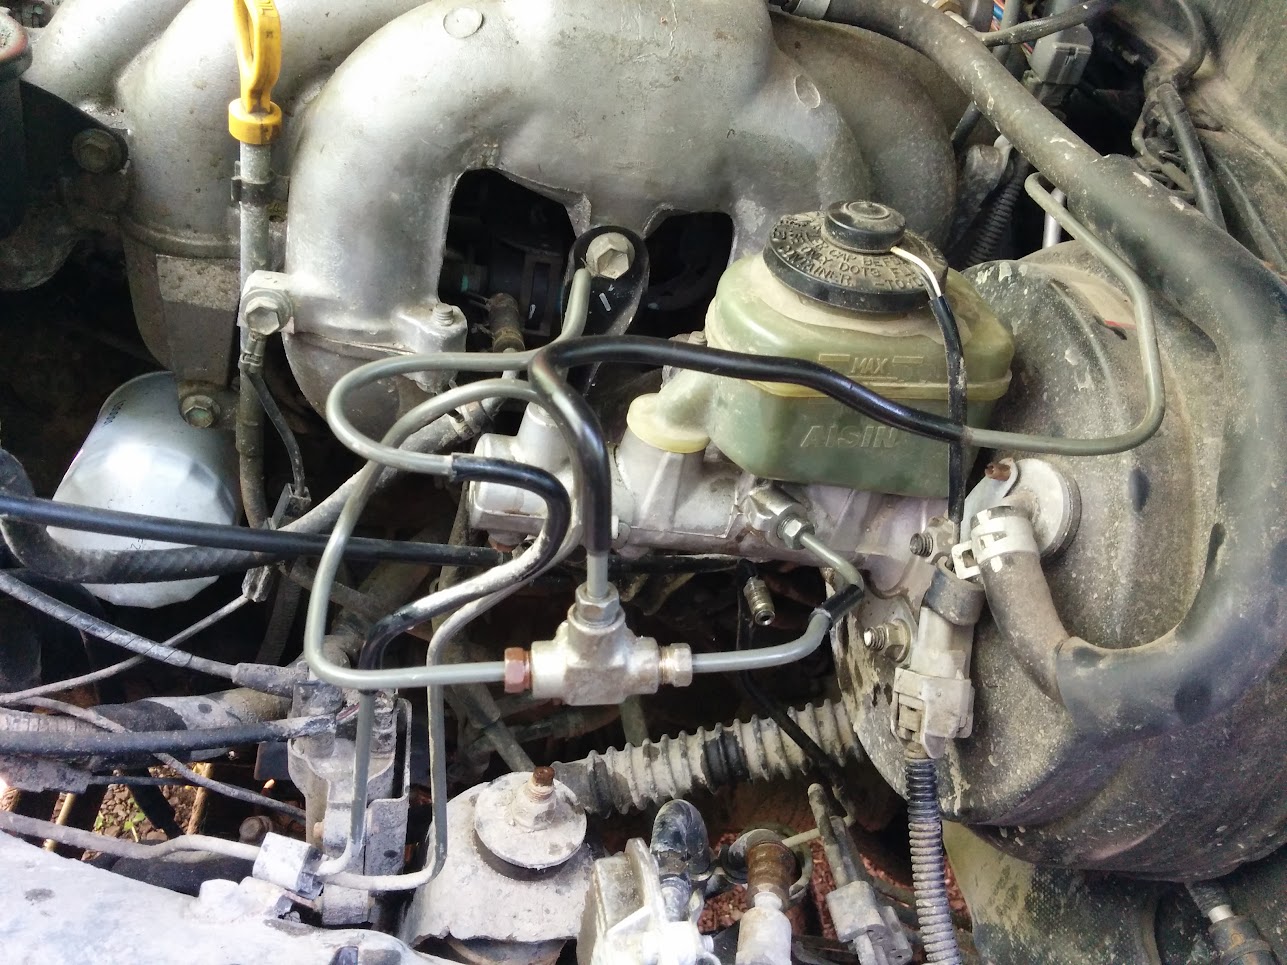
Decided to tackle the ABS/LSPV delete today. Here is how I went about it. First picture is how it will look when you open the hood:
Step one is remove the front line from the master cylinder to the ABS unit. This line is for your rear brakes. Notice the open port in the ABS unit in the picture below.
Then undo the front line from the ABS unit:
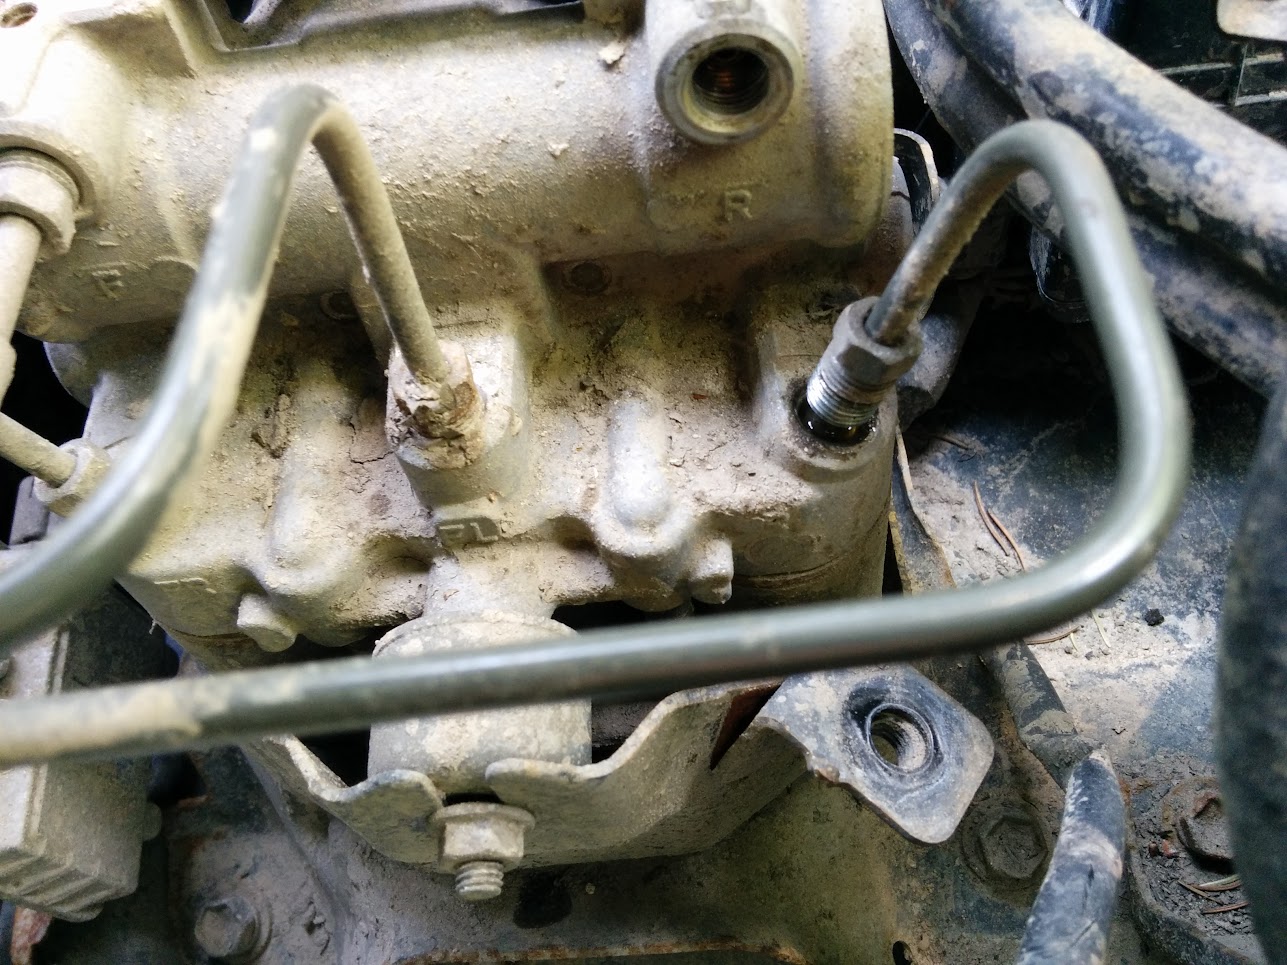
Also note that every line is labeled on the ABS unit itself. The top two line are from the master cylinder, the bottom three go out to the wheels.
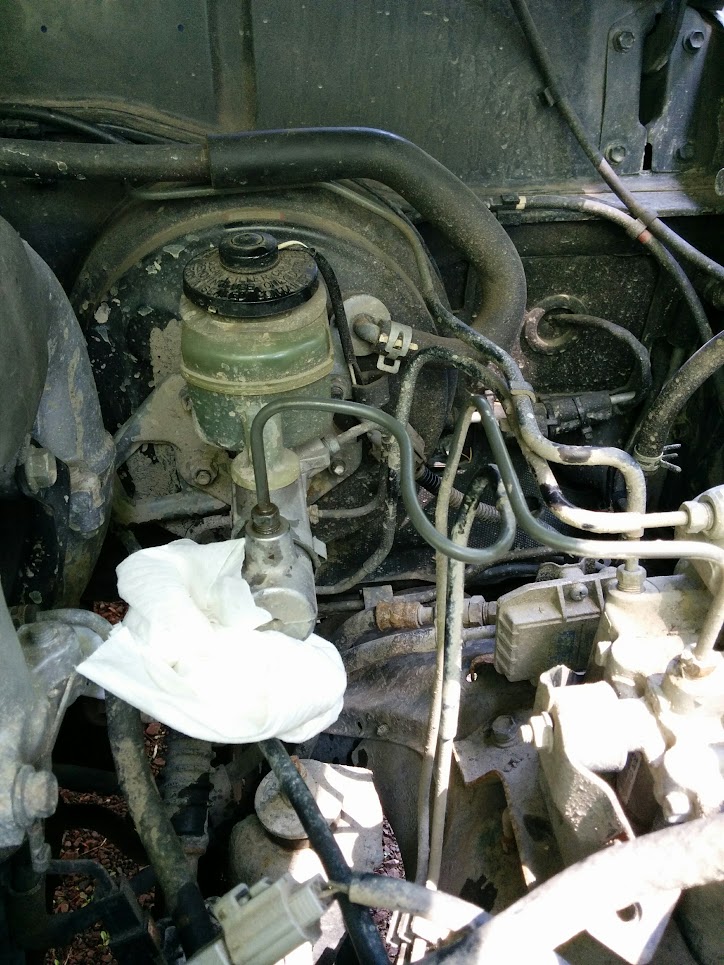
The next step is to bend the rear brake line. It needs a simple 180* bend. Then it will screw right into the master cylinder:
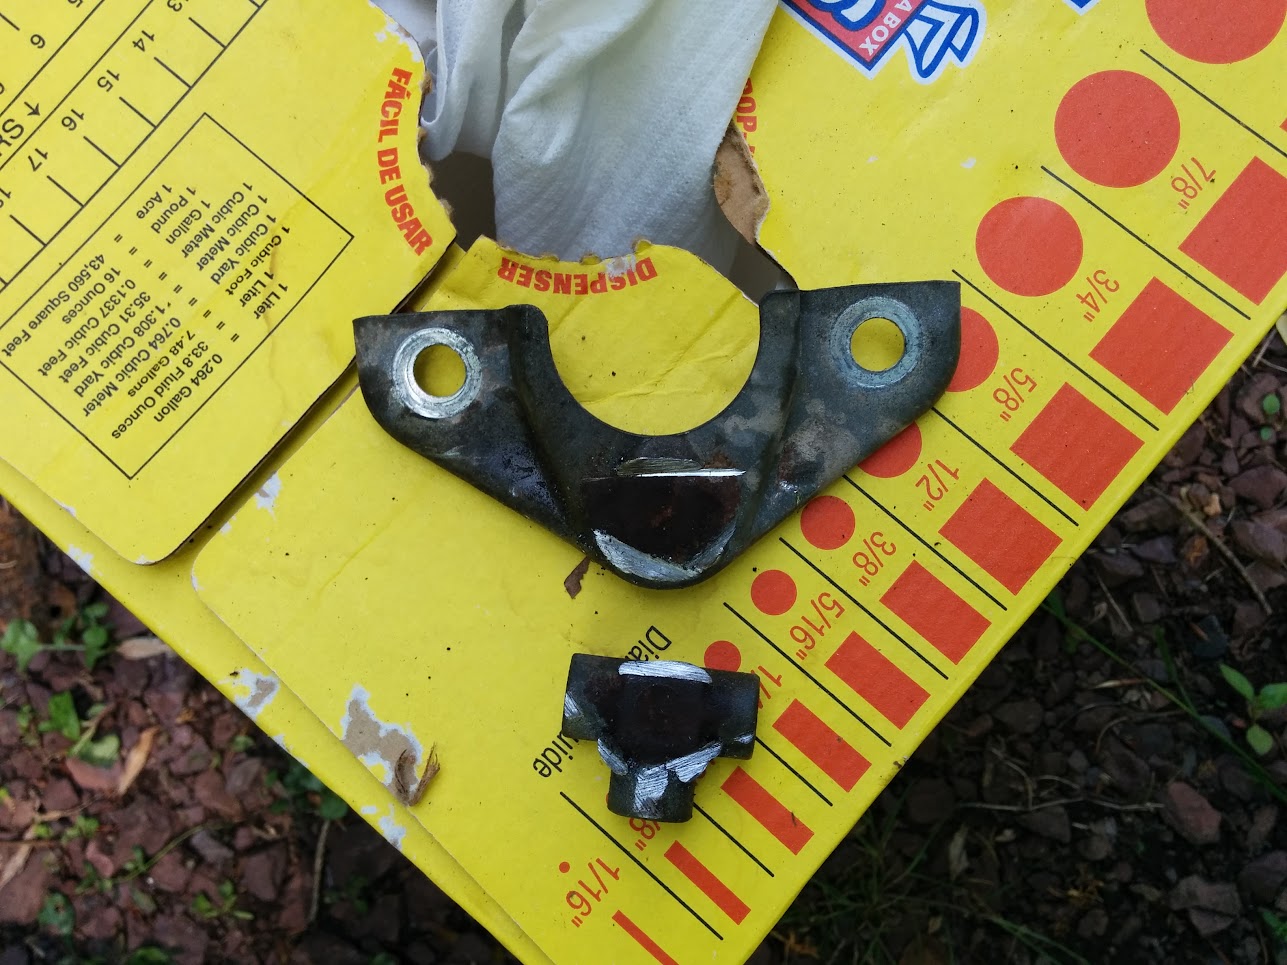
Next we will remove the ABS unit. Remove the three remaining brake lines. Then unbolt the this ??? from the ABS bracket:
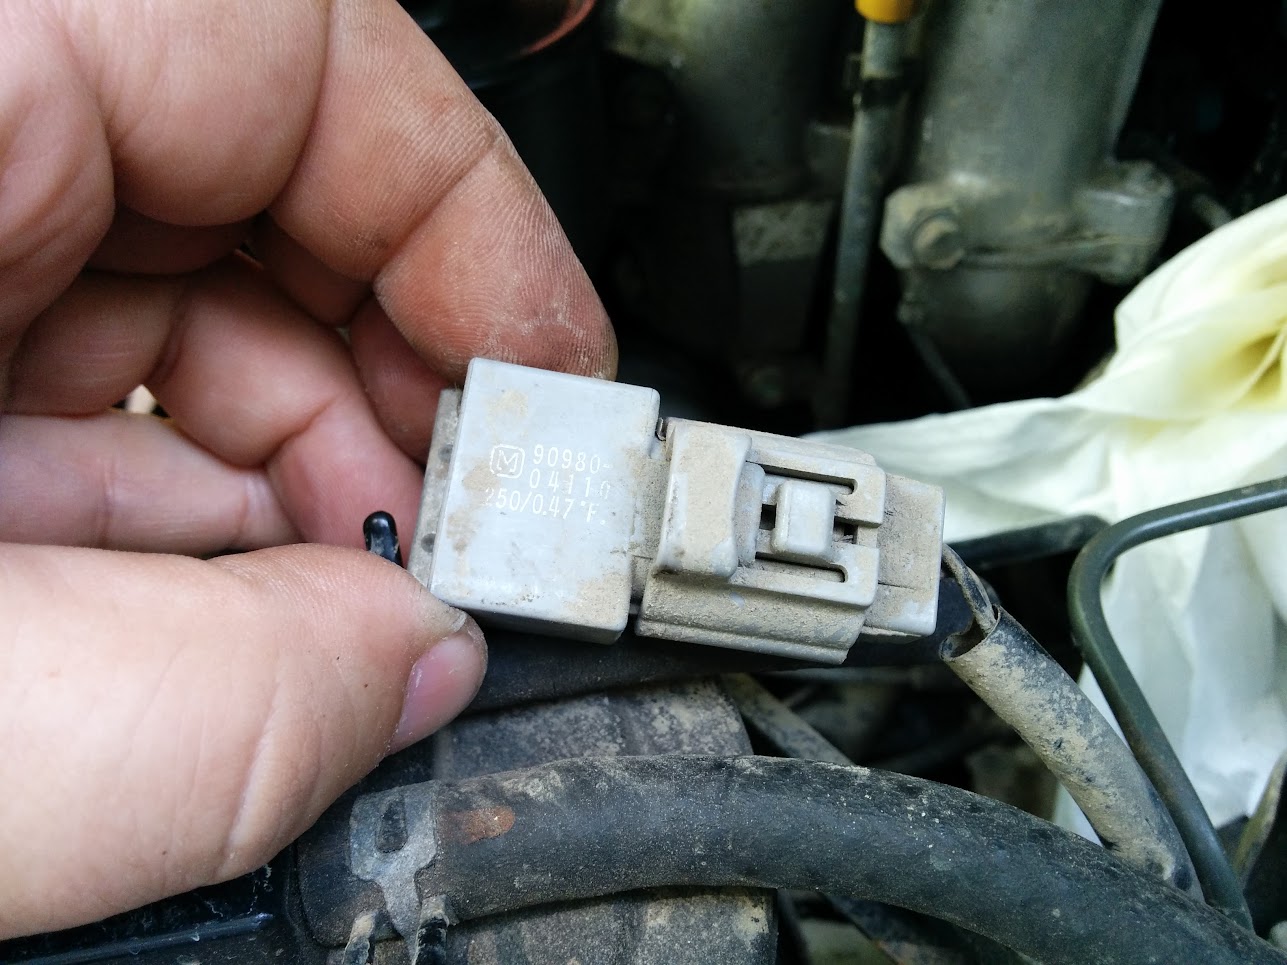
There are four bolts holding the ABS unit to the truck. Two tucked up under the flange of the fender, two on the inner fender. There is another black box bolted to the ABS unit which you can see hanging in the picture below. I could not disconnect the ABS wires easily, so I removed the two screws than hold a bracket that the plugs mount to. Once that was done, it was easy to disconnect the plugs.

Next step is to extract the tee under the master cylinder. There is a short U shaped line going from the master cylinder to the tee, a second line going from the tee to the ABS unit, and a third line which went to the LSPV. The tee is held to the brake booster / master cylinder by the two lower master cylinder bolts. You only need to disconnect the U shaped line at the master cylinder and the line going to the LSPV. The other two connections can be disassembled outside of the truck. This is what you will end up with:

I used a hacksaw to cut the welds that attach the tee to the bracket. Took two minutes:
At this point you will have three "extra" lines:
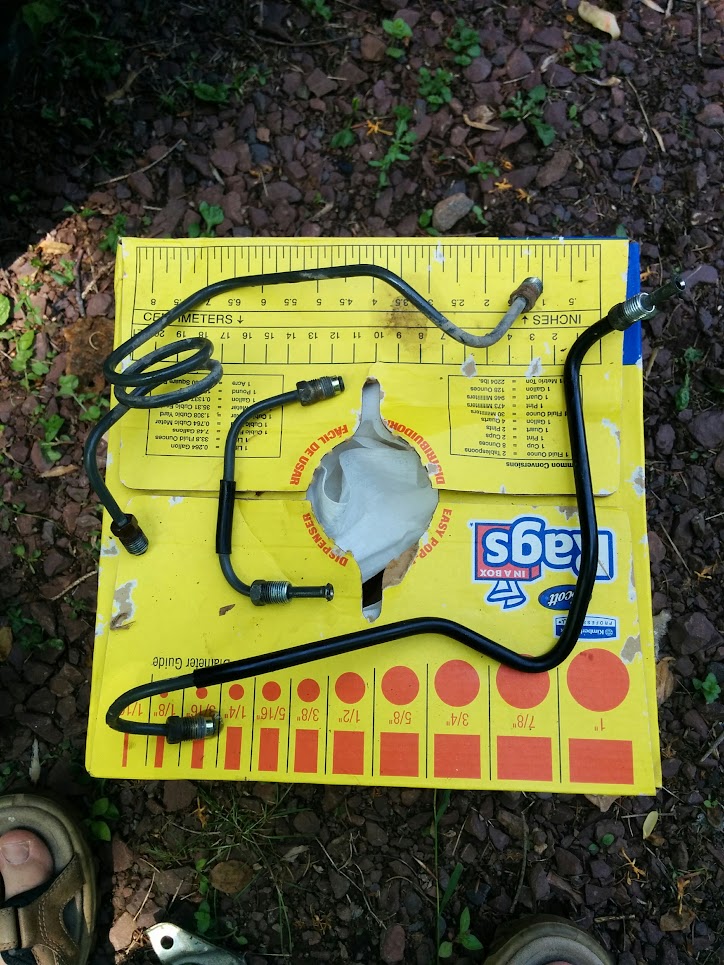
I chose to reuse the U shaped line to connect the tee to the master cylinder. The two remaining lines that go to each front wheel need some reshaping. The brake line is soft and easily bent. The right front line took very little tweaking. The left front line required a 90* bend to get it in the proper direction to mate to the tee. All in all it came out pretty clean:

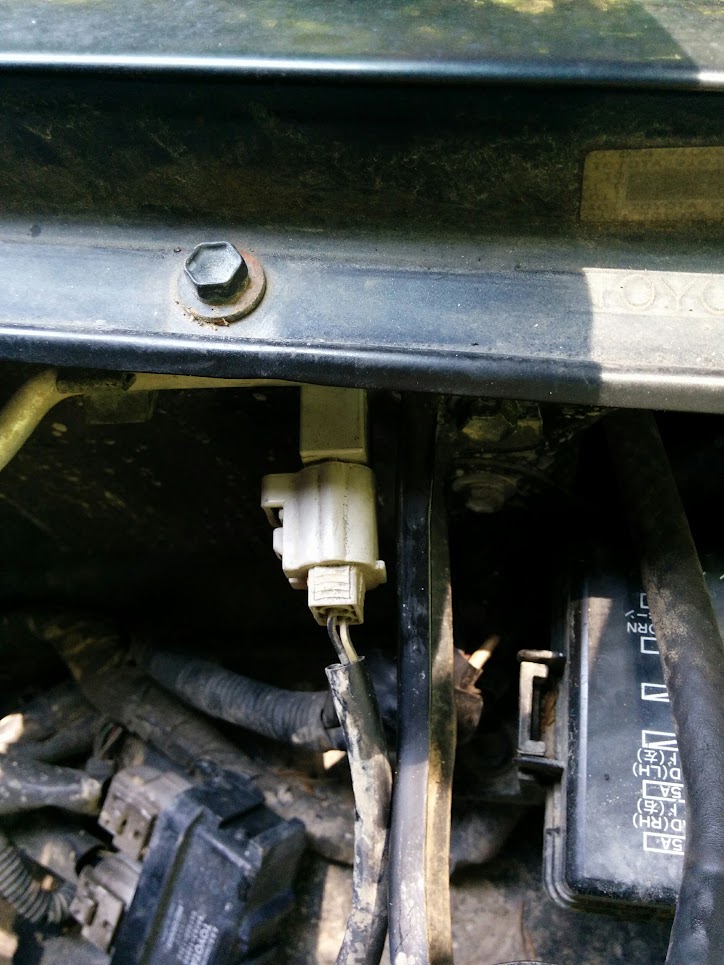
One of the bolts that held the ABS unit in place also holds a support bracket for the charcoal canister. Remember the grey box shown earlier? I sandwiched its mounting bracket between the canister bracket and the inner fender:
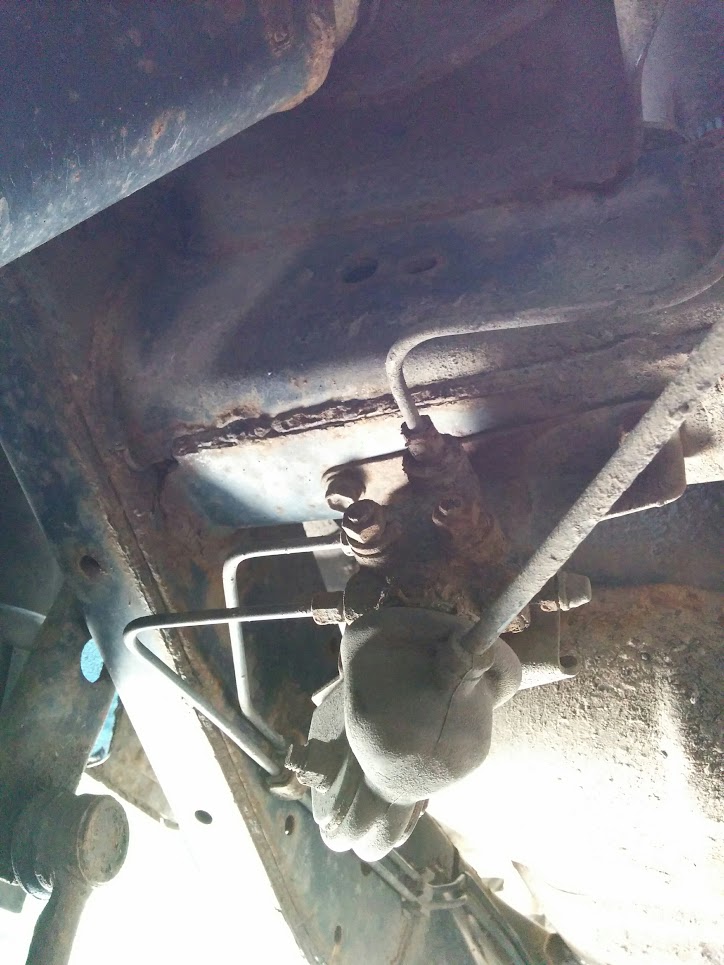
At this point we are done in the engine bay. Time to move into the right front wheel well. Pull back the rear splash guard and you will see this:
This is the elbow you will need to bypass the LSPV. One bolt in the frame, two brake line connections. You only need to remove the horizontal line at this point. The vertical line will come out with the elbow. You can then disconnect it at the bench.
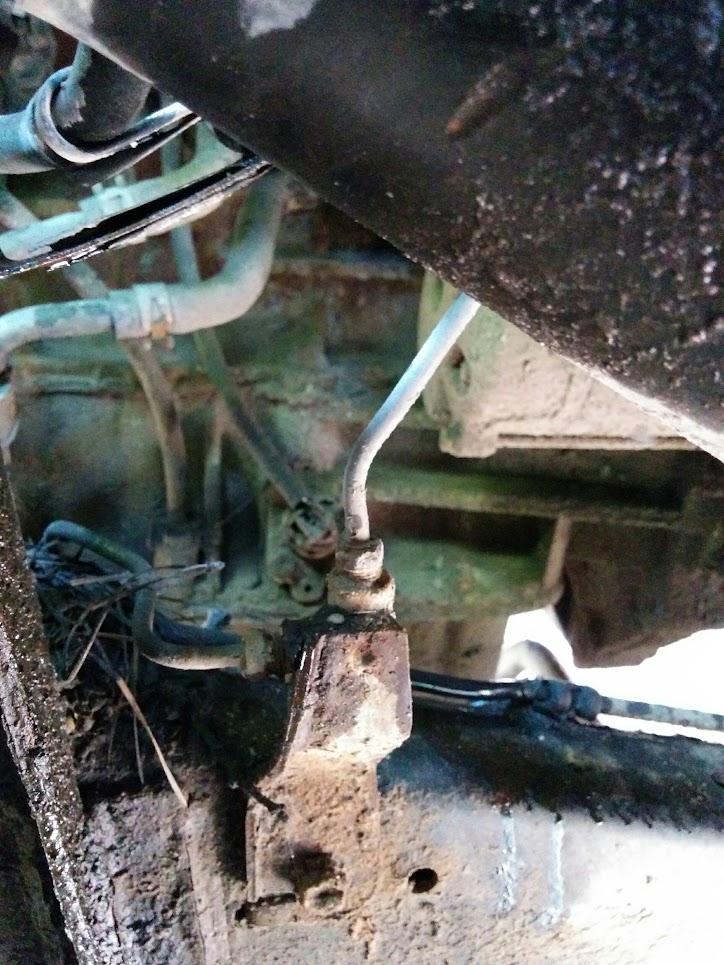
Moving back to the LSPV. Climb on under and this is what you are going to see:
Note there are three lines there. The lower line on the left of this picture is no longer used. The elbow will tie the upper left line to the rear line like so:

I haven't removed the LSPV yet. Broke one mounting bolt in the frame. It just so happens that you can reuse the bracket on the elbow if you add a short piece of pipe as a spacer, and a longer bolt. The bolt I broke, unfortunately for me, is the hole you would need to use.
That's it! Bleed the brakes, check for leaks. Enjoy you much more effective brakes.
Step one is remove the front line from the master cylinder to the ABS unit. This line is for your rear brakes. Notice the open port in the ABS unit in the picture below.
Then undo the front line from the ABS unit:
Also note that every line is labeled on the ABS unit itself. The top two line are from the master cylinder, the bottom three go out to the wheels.
The next step is to bend the rear brake line. It needs a simple 180* bend. Then it will screw right into the master cylinder:
Next we will remove the ABS unit. Remove the three remaining brake lines. Then unbolt the this ??? from the ABS bracket:
There are four bolts holding the ABS unit to the truck. Two tucked up under the flange of the fender, two on the inner fender. There is another black box bolted to the ABS unit which you can see hanging in the picture below. I could not disconnect the ABS wires easily, so I removed the two screws than hold a bracket that the plugs mount to. Once that was done, it was easy to disconnect the plugs.
Next step is to extract the tee under the master cylinder. There is a short U shaped line going from the master cylinder to the tee, a second line going from the tee to the ABS unit, and a third line which went to the LSPV. The tee is held to the brake booster / master cylinder by the two lower master cylinder bolts. You only need to disconnect the U shaped line at the master cylinder and the line going to the LSPV. The other two connections can be disassembled outside of the truck. This is what you will end up with:
I used a hacksaw to cut the welds that attach the tee to the bracket. Took two minutes:
At this point you will have three "extra" lines:
I chose to reuse the U shaped line to connect the tee to the master cylinder. The two remaining lines that go to each front wheel need some reshaping. The brake line is soft and easily bent. The right front line took very little tweaking. The left front line required a 90* bend to get it in the proper direction to mate to the tee. All in all it came out pretty clean:
One of the bolts that held the ABS unit in place also holds a support bracket for the charcoal canister. Remember the grey box shown earlier? I sandwiched its mounting bracket between the canister bracket and the inner fender:
At this point we are done in the engine bay. Time to move into the right front wheel well. Pull back the rear splash guard and you will see this:
This is the elbow you will need to bypass the LSPV. One bolt in the frame, two brake line connections. You only need to remove the horizontal line at this point. The vertical line will come out with the elbow. You can then disconnect it at the bench.
Moving back to the LSPV. Climb on under and this is what you are going to see:
Note there are three lines there. The lower line on the left of this picture is no longer used. The elbow will tie the upper left line to the rear line like so:
I haven't removed the LSPV yet. Broke one mounting bolt in the frame. It just so happens that you can reuse the bracket on the elbow if you add a short piece of pipe as a spacer, and a longer bolt. The bolt I broke, unfortunately for me, is the hole you would need to use.
That's it! Bleed the brakes, check for leaks. Enjoy you much more effective brakes.
- Thread starter
- #30
Also tackled my non functioning parking brake. The truck is getting inspected on Friday, otherwise I wouldn't have bothered 
As it turned out, the bellcrank was frozen solid:

Shockingly enough, I managed to free up with the generous application of heat and a BFH. The parking brake still doesn't do much, but at least it works!
As it turned out, the bellcrank was frozen solid:
Shockingly enough, I managed to free up with the generous application of heat and a BFH. The parking brake still doesn't do much, but at least it works!
- Thread starter
- #31
Steps are done and welded to the frame:


- Thread starter
- #32
Spent the weekend installing a CB and trailer brake controller. Went smooth, other than tracing down some wires the PO had installed.


Two auto reset breakers, one for the trailer brakes, the other for a 12V feed to charge the camper battery.

Finished product.

Two auto reset breakers, one for the trailer brakes, the other for a 12V feed to charge the camper battery.
Finished product.
- Thread starter
- #33
Removed the receiver hitch today. Wanted to improve departure angles. Problem is I have several trailers I tow with the LC. So I picked up a hitch tube and got to work.
Used a left over from the steps to make a reinforcement plate. Cut a square hole through the rear cross member using a combination of a grinder with cutoff wheel and a sawzall with a carbide blade. Make short work of that. Used a metal cutting circular saw to cut the reinforcement plate out of the 2" x 8" tube. Drilled two 1/2" holes for the eyebolts (forged in USA). Here is the end result:

Used a left over from the steps to make a reinforcement plate. Cut a square hole through the rear cross member using a combination of a grinder with cutoff wheel and a sawzall with a carbide blade. Make short work of that. Used a metal cutting circular saw to cut the reinforcement plate out of the 2" x 8" tube. Drilled two 1/2" holes for the eyebolts (forged in USA). Here is the end result: