
Navigation
Install the app
How to install the app on iOS
Follow along with the video below to see how to install our site as a web app on your home screen.
Note: This feature may not be available in some browsers.
More options
Style variation
You are using an out of date browser. It may not display this or other websites correctly.
You should upgrade or use an alternative browser.
You should upgrade or use an alternative browser.
LSPV with 2.5" OME
- Thread starter Hayes
- Start date
This site may earn a commission from merchant affiliate
links, including eBay, Amazon, Skimlinks, and others.
Move the bracket .25" where it mounts to the vehicle frame.
Use care and plenty of light back there. If you get in a hurry and do it in the dark, you will find that your reference mark was on the bracket itself and not on the frame. Then you'll have to guess. My first attempt resulted in wearing out a set of rear pads in ~ 10k miles. Something was obviously wrong.
Rich posted a link to a SST for doing the adjustment properly. It involves accurately measuring the brake pressure.
-B-
Move bracket DOWN.
From the Newbie guide on the Slee Offroad site:
5.8 Adjusting the brake proportioning valve after installing a lift kit
"Spent some time under the truck last night trying to figure out if there is an easy way to know how much you could lower the LSPV body to adjust the braking pressure after a lift. Basically, moving the end of the rod (the normal point) moves a rod 600 mm long. The point on the rod where the LSPV actually contacts is only 38 mm from the pivot. End result is that the movement at the end of the rod is 1/15.75 of the movement at the body.
So, if you've lifted your truck 75mm (after allowing for settling, etc.), you'd need to lower the LSPV body by 4.8mm to be in the right
ballpark. You can adjust the end of the rod roughly +/- 6mm, so you'd need to get the LSPV body within +/- 0.38mm to be able to make the final adjustment with the end of the rod.
I hope that helps someone who's going to do the lift. I wish I had thought about it before I moved everything around and lost a starting reference point."
The above is a bit to precise for me. Most will follow the following guide:
Ratio is 1:16 (easier to do than 1:15.75)
Lift is 2.5" (this is 40/16")
1/16 of 40/16" is .25"
I hope the above math is correct but it's been a long time since I was in 8th grade.
-B-
Last edited:
Beowulf said:The above is a bit to precise for me. Most will follow the following guide:
Ratio is 1:16 (easier to do than 1:15.75)
Lift is 2.5" (this is 40/16")
1/16 of 40/16" is .25"
I hope the above math is correct but it's been a long time since I was in 8th grade.
-B-
Whoops... 1/16th of 2.5" is 0.15625". 0.25" would be 1/10th of 2.5".
Rookie2 said:Whoops... 1/16th of 2.5" is 0.15625". 0.25" would be 1/10th of 2.5".
OK, move it down 0.15625"

-B-
Beowulf said:OK, move it down 0.15625"
-B-
Sorry to be the geeky correcting type, but I'd hate to see ole' boy out there fish tailing everytime he comes to a red light...
Last edited:
I just bought some 1/2" tubing at HomeDepot. It was easily threaded to fit the assembly at the axle and acted like an extension. You could also adjust the ampount of braking by how much was threaded into the pipe.
") .
.landtank said:I just bought some 1/2" tubing at HomeDepot. It was easily threaded to fit the assembly at the axle and acted like an extension. You could also adjust the ampount of braking by how much was threaded into the pipe.
Rick - You got a pic of this? I was looking @ mine today and its mounted on the axle, not on the frame like others have posted, thanks!
I'll get a pic up later.
There seems to be a lot of conflicting posts the LSPV because there are two possible ways of doing the adjustment.
In most of the posts, it seems that people want to adjust the "shackle" side of the LSPV. This is the side that's connected to the axle.
In the Toyota FSM, they tell you to adjust the "valve" side of the LSPV. This is the side that's connected to the frame.
If you adjust the shackle side, you'd send it up after a lift. If you adjust the frame side, you'd send it down after a lift.
I'm planning on doing the FSM recommended adjustment, and am going to weigh my rig and test the brake pressure. The way I see it, Toyota's recommended method sets a reasonable distribution of pressure for a moderately loaded vehicle. It appears to be a very sensitive adjustment, and screwing up by a few milimeters likely reduces braking effectiveness.
I am going to make one small modification to the recommended process.
The best numbers I've found indicate a stock 94 (the best landcruiser ever)") weighs 5300 lbs, with 2756 of it in the front and 2544 of it in the back. The LSPV adjustment is done with about 388 lbs of additional weight in the back.
weighs 5300 lbs, with 2756 of it in the front and 2544 of it in the back. The LSPV adjustment is done with about 388 lbs of additional weight in the back.
The problem with adjusting after a lift is that the springs are stiffer, so there is going to be less movement per pound. If you do the adjustment exactly as recommended by toyota, your back brakes will be over utilized when you're empty and under utilized when you're loaded, i.e. the valve is under-compensating. If you're running with exactly 388, then you'd still be perfectly balanced, since that's where you took the measurement.
Since I'm more concerned with braking when I'm loaded, I'm going to do the adjustment with a bit less weight on the back axle. This means that I'll be over-utilizing my back brakes when I'm light, but will be using them more effectivley when I'm over 388 lbs and really need them.
I'm going to determine the amount of weight by comparing the stock suspension movement when adding another 200 lbs to the 388 lbs vs. the OME suspension movement when adding another 200 lbs to the 388 lbs.
If it's pretty close, I'll stay close to 388 lbs for the adjustment.
If it's around half, then I'll do the adjustment with about 188 lbs. If I do that, the LSPV will compensation will be 1/2x(load) + 200. The 1/2 compensates for the 1/2 movement per pound, the 200 compensates for the imaginary 200 lbs i added by calibrating with 200 lbs less weight.
This means the braking sweet spot where everything is balanced will be at 588 extra lbs over the rear axle.
Instead of doing this with 1/2, I'll use the actual ratio of suspension movement between OEM and OME.
I'll measure anyway and see how close it comes to the rules of thumb that are out there.
OK.. time to go find another beer.
Tom
In most of the posts, it seems that people want to adjust the "shackle" side of the LSPV. This is the side that's connected to the axle.
In the Toyota FSM, they tell you to adjust the "valve" side of the LSPV. This is the side that's connected to the frame.
If you adjust the shackle side, you'd send it up after a lift. If you adjust the frame side, you'd send it down after a lift.
I'm planning on doing the FSM recommended adjustment, and am going to weigh my rig and test the brake pressure. The way I see it, Toyota's recommended method sets a reasonable distribution of pressure for a moderately loaded vehicle. It appears to be a very sensitive adjustment, and screwing up by a few milimeters likely reduces braking effectiveness.
I am going to make one small modification to the recommended process.
The best numbers I've found indicate a stock 94 (the best landcruiser ever)
weighs 5300 lbs, with 2756 of it in the front and 2544 of it in the back. The LSPV adjustment is done with about 388 lbs of additional weight in the back.The problem with adjusting after a lift is that the springs are stiffer, so there is going to be less movement per pound. If you do the adjustment exactly as recommended by toyota, your back brakes will be over utilized when you're empty and under utilized when you're loaded, i.e. the valve is under-compensating. If you're running with exactly 388, then you'd still be perfectly balanced, since that's where you took the measurement.
Since I'm more concerned with braking when I'm loaded, I'm going to do the adjustment with a bit less weight on the back axle. This means that I'll be over-utilizing my back brakes when I'm light, but will be using them more effectivley when I'm over 388 lbs and really need them.
I'm going to determine the amount of weight by comparing the stock suspension movement when adding another 200 lbs to the 388 lbs vs. the OME suspension movement when adding another 200 lbs to the 388 lbs.
If it's pretty close, I'll stay close to 388 lbs for the adjustment.
If it's around half, then I'll do the adjustment with about 188 lbs. If I do that, the LSPV will compensation will be 1/2x(load) + 200. The 1/2 compensates for the 1/2 movement per pound, the 200 compensates for the imaginary 200 lbs i added by calibrating with 200 lbs less weight.
This means the braking sweet spot where everything is balanced will be at 588 extra lbs over the rear axle.
Instead of doing this with 1/2, I'll use the actual ratio of suspension movement between OEM and OME.
I'll measure anyway and see how close it comes to the rules of thumb that are out there.
OK.. time to go find another beer.
Tom
- Joined
- Nov 8, 2004
- Threads
- 30
- Messages
- 985
2.5 = 3
2.5 = 4
This the kind of math I like.
I seem to be itching to do the 850/860 route so I will be spinning the bottom up to set the LSVP. From what I gather it sounds like 3 turns will do? Does this sound right?
2.5 = 4
This the kind of math I like.
I seem to be itching to do the 850/860 route so I will be spinning the bottom up to set the LSVP. From what I gather it sounds like 3 turns will do? Does this sound right?
For what it's worth, I made a reference measurement on my stock 97 LX450 before OME, and then after.
Here's what I got:
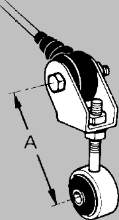
From the center of the horizontal pivot bolt on the axle end of the rod, i.e. the upper end of the "A" line in your illustration, up to the floorpan of the body. The floorpan is kind of corregated, so I went to the lowest point (shortest measurement) straight above the bolt threads.
- Stock: 6 1/2 inches.
- OME Medium Load 860 springs: 9 3/4 inches.
So, lift was 3 1/4 inches at the rear axle.
Conditions:
- 5/8 tank of gas.
- 64 pound load in cargo area.
- 285/75-16 spare tire in stock location.
- no other load.
I figure a simple flat strap bracket extension at the axle end, moving the pivot point back up to 6 1/2 inches will be fine.
Here's what I got:
From the center of the horizontal pivot bolt on the axle end of the rod, i.e. the upper end of the "A" line in your illustration, up to the floorpan of the body. The floorpan is kind of corregated, so I went to the lowest point (shortest measurement) straight above the bolt threads.
- Stock: 6 1/2 inches.
- OME Medium Load 860 springs: 9 3/4 inches.
So, lift was 3 1/4 inches at the rear axle.
Conditions:
- 5/8 tank of gas.
- 64 pound load in cargo area.
- 285/75-16 spare tire in stock location.
- no other load.
I figure a simple flat strap bracket extension at the axle end, moving the pivot point back up to 6 1/2 inches will be fine.
So... is this something I can read about in the manual? This seems over complicated. None of the OME retailers really mention the proper process of readjusting this, but merely mention it. Hummmm seems kinda wierd that they would not provide directions to do so, if it's necessary for the lift install.
Eh.. beating a dead horse.... I'll search and filter through the some odd 20 threads about this.. I just thought there was a simple adjustment.
Eh.. beating a dead horse.... I'll search and filter through the some odd 20 threads about this.. I just thought there was a simple adjustment.
Last edited:
some info in this thread - https://forum.ih8mud.com/showthread.php?p=979424#post979424