A/C Clutch replacement (1 Viewer)

This site may earn a commission from merchant affiliate
links, including eBay, Amazon, Skimlinks, and others.

Joined
May 15, 2009
Threads
10
Messages
92
Location
SLC, UT
My A/C went warm yesterday while driving down the freeway:doh:, and upon inspection at home, when I turn on the a/c, the outer ring of the clutch engages, but the inner ring does not. If I recall correctly, when engaged, everything should spin. I'm hoping it is just the clutch, so I'm going to just replace that.

Any advice, special tools, tricks to getting this done?
In all my searches, most of y'all just breeze over this process or just mention that you replaced your clutch. Is it that easy?

My compressor was kind of noisy, and I suspect the bearings were going out as the clutch assembly wobbled a lot when it was working.

Lastly, would I be ill advised in getting a new clutch from Pep Boys or somewhere similar?

This is on "The Beast" a blue 95 cruiser.
 
Replacing the clutch isn't particularly difficult. You may want to loosen or remove the compressor mounting bolts to better access the front of the compressor. First remove the bolt holding the front hub on, and remove the hub. There will be one or more small shims behind the hub. Make sure not to lose them as you may need them to adjust the gap on the new clutch. When you look inside the front pulley, you'll see a snap ring holding the pulley on. Remove that snap ring and then the pulley. What's left is the coil. It may be held in place by a snap ring or a few small screws. The coil wire is usually held in place by a phillips head screw. Check the condition of the snout of the compressor. If it's worn, it's time for a new compressor. When you re-install the new clutch, be sure to check the clutch gap, it should be between .014-.026". A re-man clutch is $97, a new Denso compressor is $259.
 
Thanks 1972FJ55, I was just reading up on some of your other a/c posts. You sound like an a/c guru! I will examine the compressor snout as you suggest. Are they any other ways to tell if the my compressor is going out too? If I do have to replace my compressor, is this the correct process? Evacuate system, pull compressor, install new compressor, flush system, pull and replace drier, vacuum for 30 min, fill with oil and r134.
Are there other parts that need to be replaced at the same time?
 
You have the procedure correct, just add the oil to the system before you vacuum it. Gauge readings will give some idea as to how well the compressor is pumping. You could try adding an oz or two of PAG46 oil, and see if it helps quiet it.
If the air is humid, I'd bump the evac time to an hour.
I would probably take the time to replace all the accessible o-rings (fittings at the condenser, the liquid line/suction hose at the firewall) and the schrader valves in the service ports. That way you'll minimize the possibility of future leaks.
Good luck,
Rex
 
Alrighty, last night I pulled off the belt, unbolted the compressor to get some working room, and for the life of me cannot get that 10mm bolt off the end of the clutch. I even put the belt back on and jumpered the clutch, but it is definitely broken as the outside is stationary but the inside still spins freely. Which is why it stopped working in the first place. There is a lot of black burnt rubbery gunk between the outside and inside of the clutch. Is my only recourse now to replace the whole compressor? I'll throw some pics up in a little bit...
 
Usually an impact wrench will get that bolt out. That black gunk is melted coil. You'll need a new clutch assembly at the minimum...
 
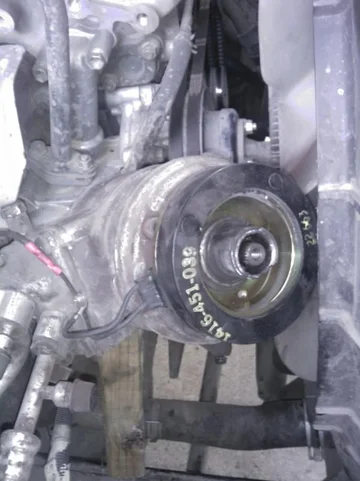
Pic of clutch

Here is what I'm talking about. I briefly tried to get an impact on the nut, but I was afraid to bend the compressor up too much. Should I pull of the plastic shroud to get more room, or just work the compressor more upright?
IMAGE_002.jpg
 
You can do whichever is easier, just be careful not to kink the lines. I see it's the damper on the hub that's melted, which is often from the clutch cycling on and off rapidly and overheating.
 
You should be able to remove the 4 long compressor mounting bolts and lift the whole unit so the pulley is facing up then stick a block of wood under it to hold it in place while you work on it. There is plenty of soft hose between the compressor and the hard line to allow that.

Or, while it is still bolted to the engine, just put a 10mm socket and ratchet on it and give it a firm tap with a hammer while holding the hub from rotating with your 3rd hand. Worked for me.

Either way, there's a good chance you will need to tilt the compressor up so you can get a puller on the pulley. Mine was a very tight fit. I don't know if this is a valid conern, but I used a large socket and washer so the puller was pushing off the snout of the compressor, not the splined shaft.

Oddly, my new pulley bearing slides right on (and off) the unit with slight clearance. It's a 30mm ID, just like the original Nachi bearing. Anyone know if I should/could use some retaining compound / Loctite or something?
 
When you replaced your clutch, did the new bearing come with it? Or will I need to replace that as well?
 
Oddly, my new pulley bearing slides right on (and off) the unit with slight clearance. It's a 30mm ID, just like the original Nachi bearing. Anyone know if I should/could use some retaining compound / Loctite or something?

The bearing should fit snug on the shaft. I'd avoid the use of loctite, etc.

When you replaced your clutch, did the new bearing come with it? Or will I need to replace that as well?

The bearing comes installed in the pulley.
 
Arg... First, thanks to all for the info. There is enough slack in the lines to flip the compressor facing up to work on it. It is also possible to remove the 10mm bolt with an impact regardless if the clutch is shredded like above.

Unfortunately I just ripped the free wheel part without first removing the slotted snap ring that was around it thus destroying the lip that retained the bearing portion.

For future replacements, be aware there are two snap rings. Disassembly is as follows:

1. Remove electrical plug and two screws holding down electrical harness at the back and top of the compressor.
2. Remove a/c belt by loosening nut on tension puller and loosening the adjusting bolt as much as possible. Both are 14mm.
3. Remove 4 long 12mm bolts on the passenger side of the compressor.
4. Twist compressor up by pushing the high side hose under the intake, then place some blocks of wood around it to support it in this position.
5. Remove 10mm bolt on the front of the compressor. This allows one of three pieces to be removed. Mine just slipped off, YMMV.
6. Remove the slotted snap ring that is around the snout of the compressor that retains the freewheel bearing. The freewheel can then be removed.
7. Remove the large snap ring inside the electromagnet portion of the clutch. This third piece will now slip over the snout.
8. Splice the connector from the old clutch on to the new.
9. Assemble in reverse order.

In my case I omitted #6 and basically jacked my compressor. Is there any way I can replace just this front portion of the compressor without releasing pressure? it looks like its just a couple of allen bolts holding it on.
I put it all back together to see how it would run, and engaged it runs fine, but disengaged, the freewheel is at an angle and rubs against the front plate because the snap ring has nothing to push against, NOOOO! When it is running though it is a lot quieter than before, so I think my bearings were shot which caused the failure in the first place.

Any one got an old compressor they've replaced? I would like to just replace the front cast piece and maybe avoid all the recharge and drier replacement hassle...
 
Last edited:
Pics of my stupidity

Here are two shots of what I'm talking about.

The first is the best angle I found to work on the clutch, this is looking down from the passenger side:
IMAGE_004.jpg

The second shows the flange I broke off. Hopefully my stupidity can help another avoid the same, in this pic you can see the second snap ring that holds the magnet in place:
IMAGE_006.jpg
IMAGE_004.jpg
IMAGE_006.jpg
 
Sorry to say, but you will lose the charge. You are going to need a new nose. Buy a reseal kit too if you can find someone that will sell you the nose for a 10PA17C, it's a center mount, the front mount 10PA17's nose won't work. I can sell you a compressor for $170 plus shipping, it's new, but it's not a Denso. I wouldn't sell you a Denso though.
 
Last edited:
That's a great price on a new compressor, better than anything I've found. What's wrong with Denso?
 
FWIW, I bought a brand new Denso 10PA17C with clutch for under $130 shipped. Do some searching. They are out there. IMO Remanufactured is not worth the risk when you can pay as little as $30 more for a brand new one with clutch. If I can locate the paperwork that shows the place I bought it from, I'll post it up.
 
Whoa, that's a good price, what was that 10 years ago? j/k, yeah if you've got details please post them up. Any thoughts on a good affordable vacuum to boil out moisture before you fill?

Just to resolve this thread. I replaced the compressor and drier. One of the Autozones in the area rent the manifold gauge and vacuum pump for free. Now my a/c is extremely cold and extremely quiet.
 
Last edited:
I replaced my AC clutch last night with mixed results... At first start up, the pulley was very tight and whined for a while when i got up to speed...but after a while it appeared as if the AC was working well. Also, when the AC is off the pulley still moves very slowly...does that indicate compressor problems? Edit: well, the pulley must have been too tight, the new belt broke off from the tension. How is the gap set? Torque settings on 10MM bolt on the front? What else could it be, hope its not the compressor itself :(

Any advice???

:beer:


Replacing the clutch isn't particularly difficult. You may want to loosen or remove the compressor mounting bolts to better access the front of the compressor. First remove the bolt holding the front hub on, and remove the hub. There will be one or more small shims behind the hub. Make sure not to lose them as you may need them to adjust the gap on the new clutch. When you look inside the front pulley, you'll see a snap ring holding the pulley on. Remove that snap ring and then the pulley. What's left is the coil. It may be held in place by a snap ring or a few small screws. The coil wire is usually held in place by a phillips head screw. Check the condition of the snout of the compressor. If it's worn, it's time for a new compressor. When you re-install the new clutch, be sure to check the clutch gap, it should be between .014-.026". A re-man clutch is $97, a new Denso compressor is $259.[/QUOT
 
Last edited:
bump for ideas :bang:
 
The air gap is set wrong, find another spacer/washer. I don't know the exact measurement, but a business card should be able to fit between the two faces of the clutch. That's why it's grabbing when it is not engaged magnetically.
 

Users who are viewing this thread

Back
Top Bottom