
Navigation
Install the app
How to install the app on iOS
Follow along with the video below to see how to install our site as a web app on your home screen.
Note: This feature may not be available in some browsers.
More options
Style variation
You are using an out of date browser. It may not display this or other websites correctly.
You should upgrade or use an alternative browser.
You should upgrade or use an alternative browser.
Phils 2005 4runner SAC
- Thread starter Medic83
- Start date
This site may earn a commission from merchant affiliate
links, including eBay, Amazon, Skimlinks, and others.


- Thread starter
- #13
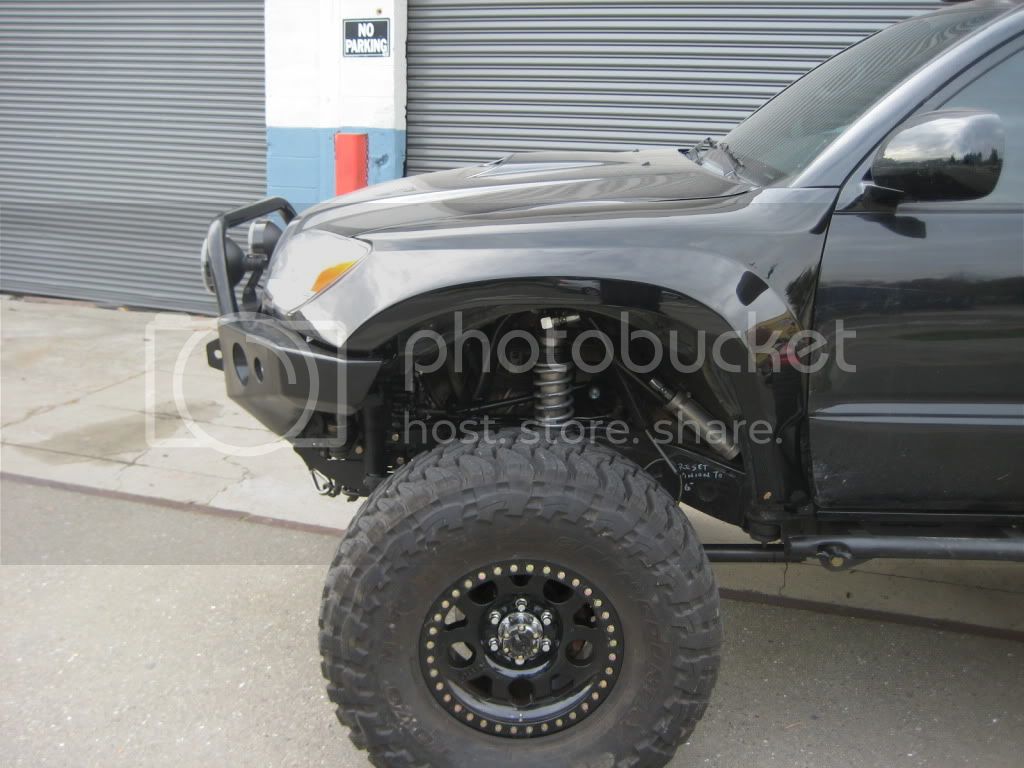
..........So we decided to relocate the steering box in an attempt to get the ride height of the truck down a few inches. I moved the box forward about 7 inches (as far as I could get it). I had to relocate the body mount in the process.
One of the problems with these trucks is that the radiator mounting bung on the lower driver's side extends over the frame, making it impossible to get the box flat against the frame. SO I cut off that bung with my air saw and made a mount off the bottom of the radiator using a vintage Ford Bronco radiator mount.
Check out the pics. One of them shows the passenger side body mount as a comparison.


- Thread starter
- #14
Here are some axle pics, some pics of the clearance I put in the radiator support for the PS box and the ram lines coming off of it, the radiator (after I cut the nounting hole off, the new steering shaft...oh yeah, and Merle, my shop squirrel.
There are two pics of how the panhard frame bracket tuck in between the axle and tie rod under full stuff.


...........
- Thread starter
- #15
So here it is!!! I gotta say, I was in shock with the final result. I was speechless!!! Matt did a fantastic job with my truck.... His fab skills are hands down BAD ASS!!! This thing tracks straight, no bump steer anymore, no drifting, no play in the wheel, no dive when breaking, no airplane takeoff when accelerating. Before, my truck was sky high and drove like $hit. When going around turns, this think felt like it was gonna roll.... now I can actually swerve if theres a hazard, before, I might have rolled. This thing handles like it did when it was IFS. It drives fantastic! I feel completley safe with my wife driving in it with our child. Overall.... very happy!!
Final numbers
Frame height----23"
Gap between tire and fender in both front and rear is 12"... Keep in mind, I have fiberglass fenders in the front so the gap is the same but there is a nice 3.5" difference between the front and rear giving me the nice rake I was looking for. I can still go down another inch but Im gonna drive it for a while. I like how it sits now so I doubt Ill be changing it.


- Thread starter
- #18
Added some stereo upgrades the last couple weeks. I got the JBL sub box from a limited as well as the rear panel for the cargo area that has the speaker screen. I also removed the little mirrors in the corners of the cargo area and added tweeters in the corners and got the OEM screens. I got a 2 channel MTX amp and bridged it for 225watts rms at 4 ohms. I installed it under the passenger seat. I used a JL W3-8v3 to the JBL box. This speaker is massive and will not fit without modifications. I shaved down the inside of the box and then got a 1" thick spacer made at Tap Plastics to give enough room to mount the speaker. This thing hits so hard!!! I really was just looking for a little bass but this W3 is awesome!!! Its perfect. I had to shave down the inside of the rear panel as well.... right now the speaker almost touches the inside of the rear panel. Im gonna just cut out a circle big enough for the speaker to clear and then get a 10" jl audio speaker screen and mount that to the rear panel to protect the speaker. Here are some pics. Ill update when I get the speaker screen.
Rear corner tweeters


JL Audio w3 in stock box


Rear corner tweeters
JL Audio w3 in stock box


