Hey everyone,
Over the past couple months I've been chipping away at a dual battery/solar project. Countless folks have done the same, but I thought I'd write up a bit about my decisions/likes/missteps in the process. My budget is limited, so I'm sure a lot of you can relate. I'll upload pics later on. Also thank you to @chap79 for help with wiring questions/purchase decisions.
It all started after picking up a used Dometic DZ fridge/freezer. I camp in the field for sometimes weeks at a time, so this will be an improvement over using ice. Plus the freezer will extend the life of meat products.
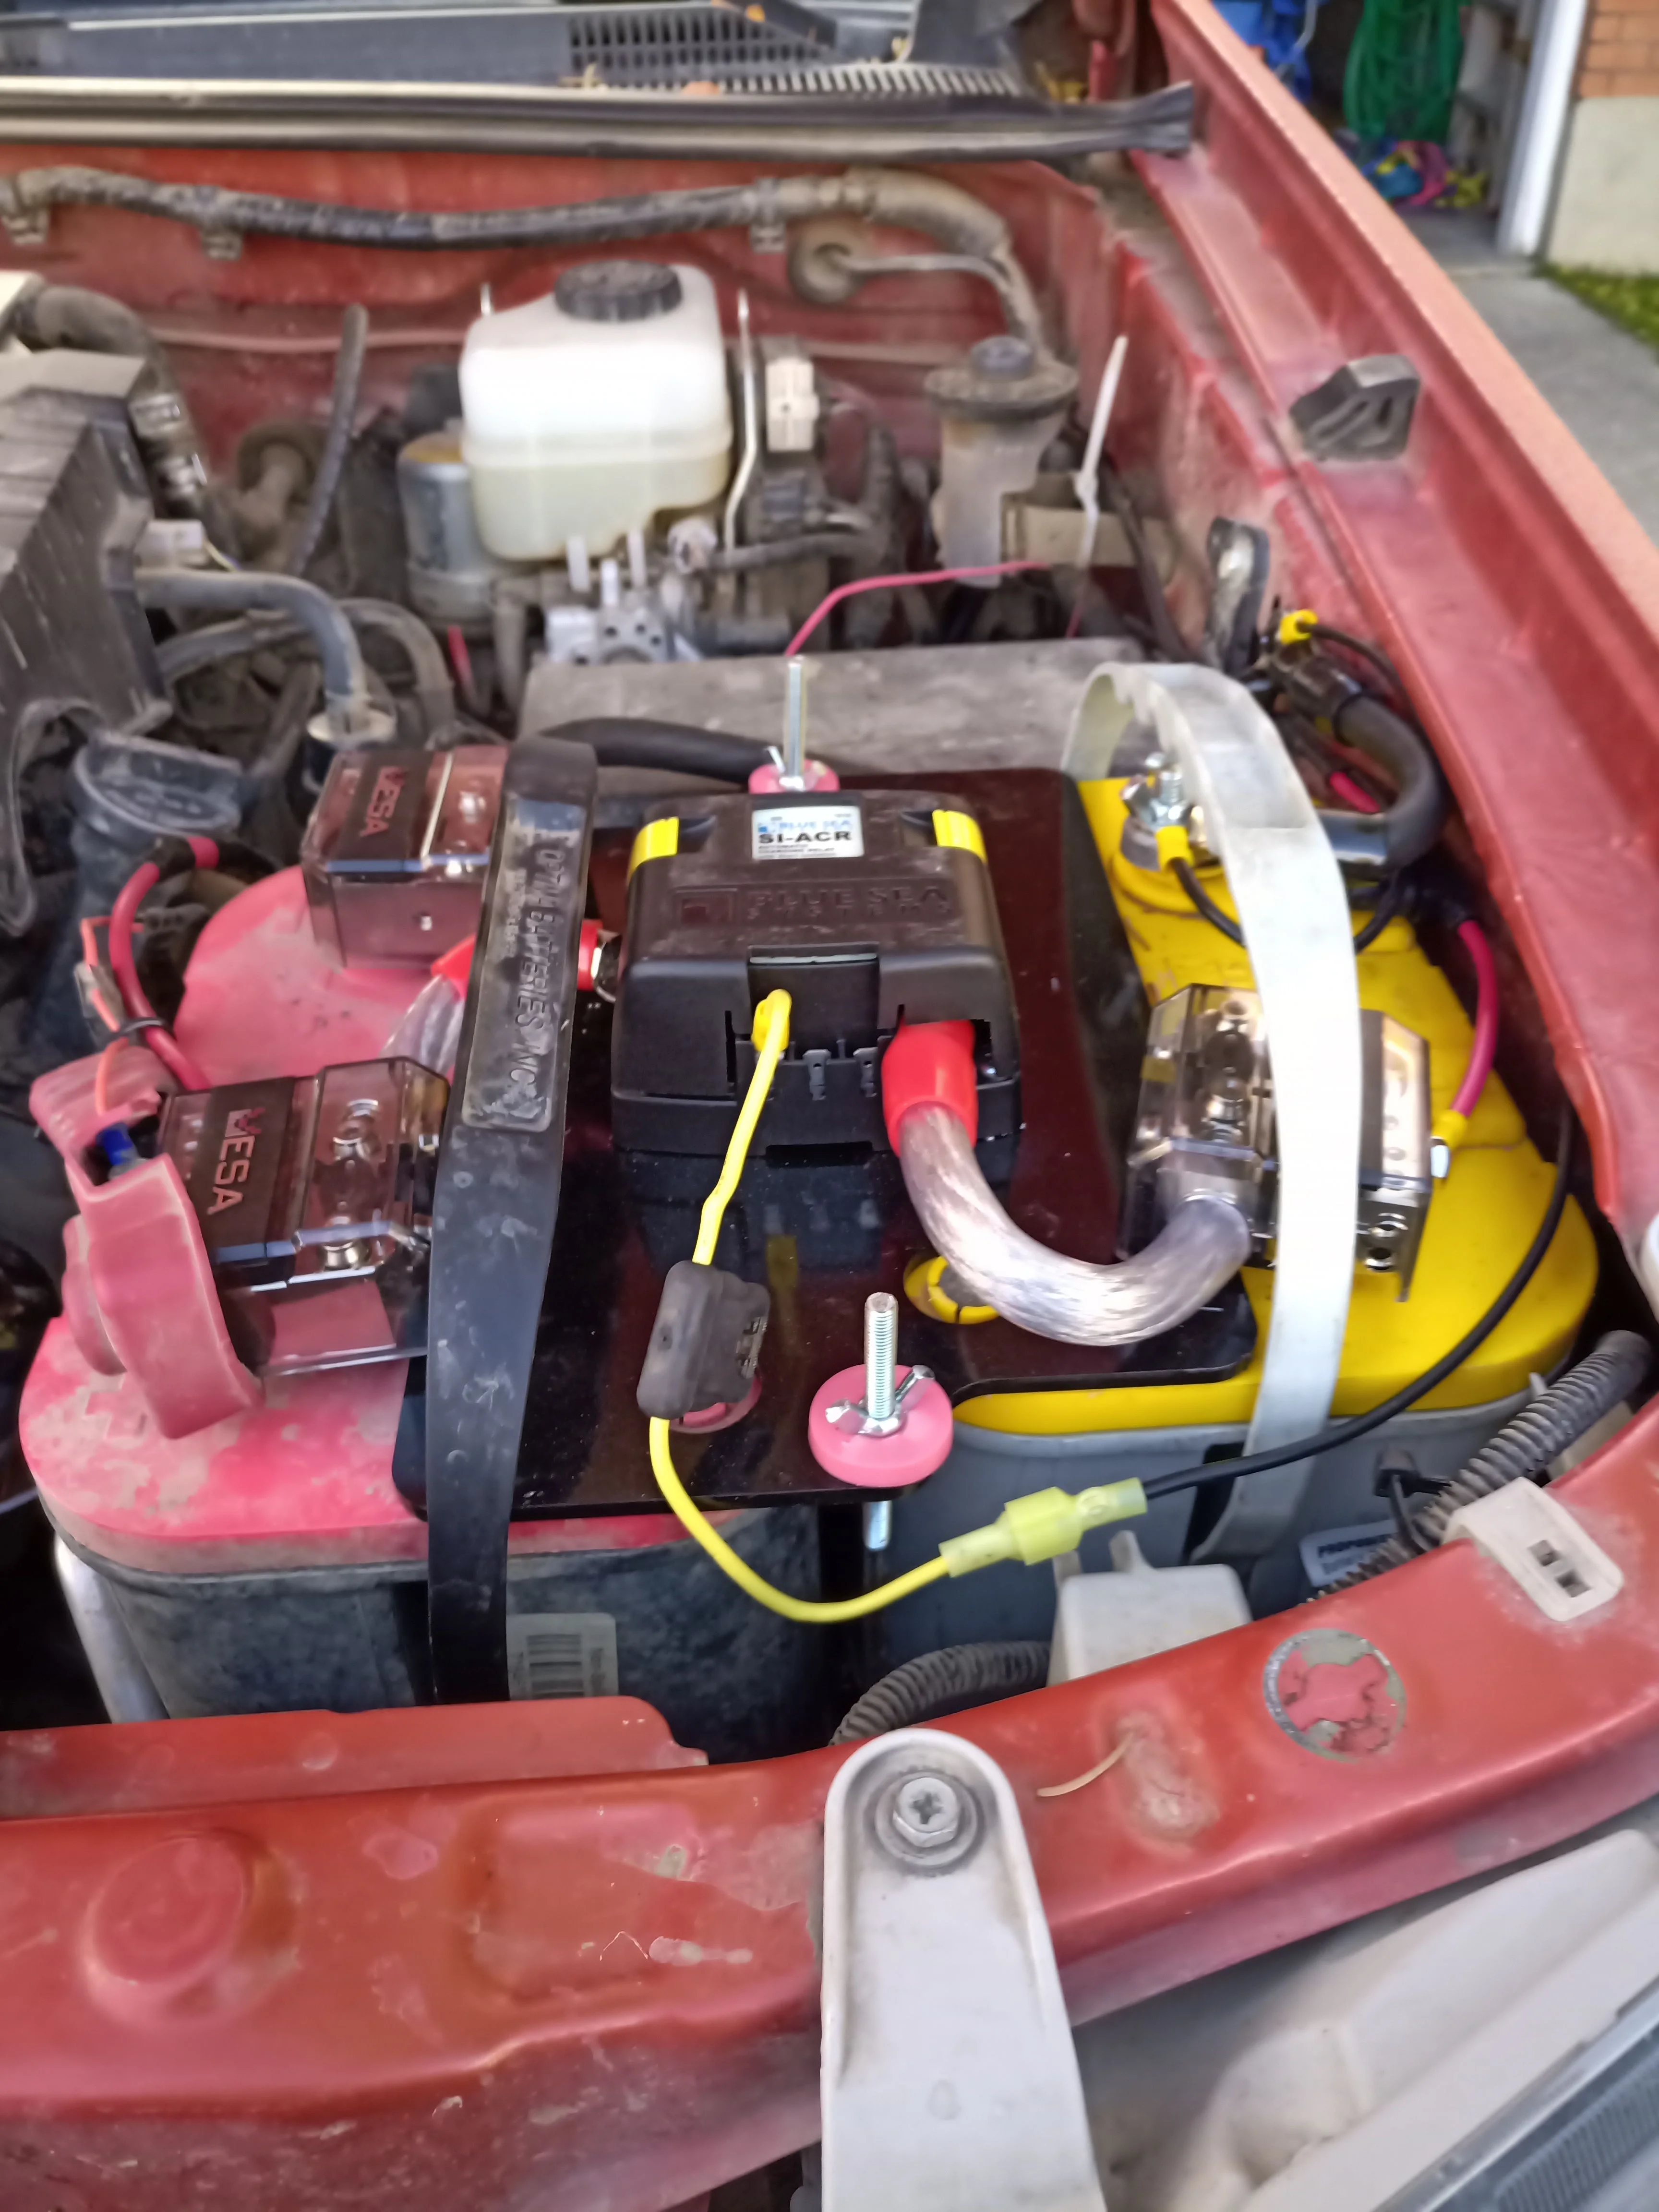
I already had a RedTop, and picked up a lightly used yellowtop locally, and went with the 4xInnovations dual battery tray. Couldn't be happier - affordable, very robust, great retention. I drilled some pilot holes in the top retainer and mounted my Blue Sea 7610 ACR to that with self tappers, then ground off the tips so they are flush. Since the RedTop and yellowtop have their poles on opposite ends this simplified the wiring a bit. Since I don't run a winch I did not feel it necessary to put a switch in.
For the terminals I went with Mesa Ultimate Battery Terminals. They had these locally, and have 2 built in fuse holders on each (I'm running 2x125A in the positives). They have 2x 1/0 ports, 2x8 ports, plus a stud for ring terminal connections. I did not want to cut factory wiring, so this was key. Plus the studs are nice in case I need to jump the RedTop with the yellow, or attach trickle charger. This simplified the wiring a bit. 1/0 wiring from + to ACR, as well as from - to factory ground. I ran a ground from the ACR with a 2.5A fuse as it said so in the diagram, although not sure why. I had to cut a bit of the ACR cover to snap into it's retention tabs.
For power to the read for the fridge I bought the Dometic hardwire kit. It was overpriced, but having a two pin outlet for the fridge makes me feel better when bouncing for hours off-road.
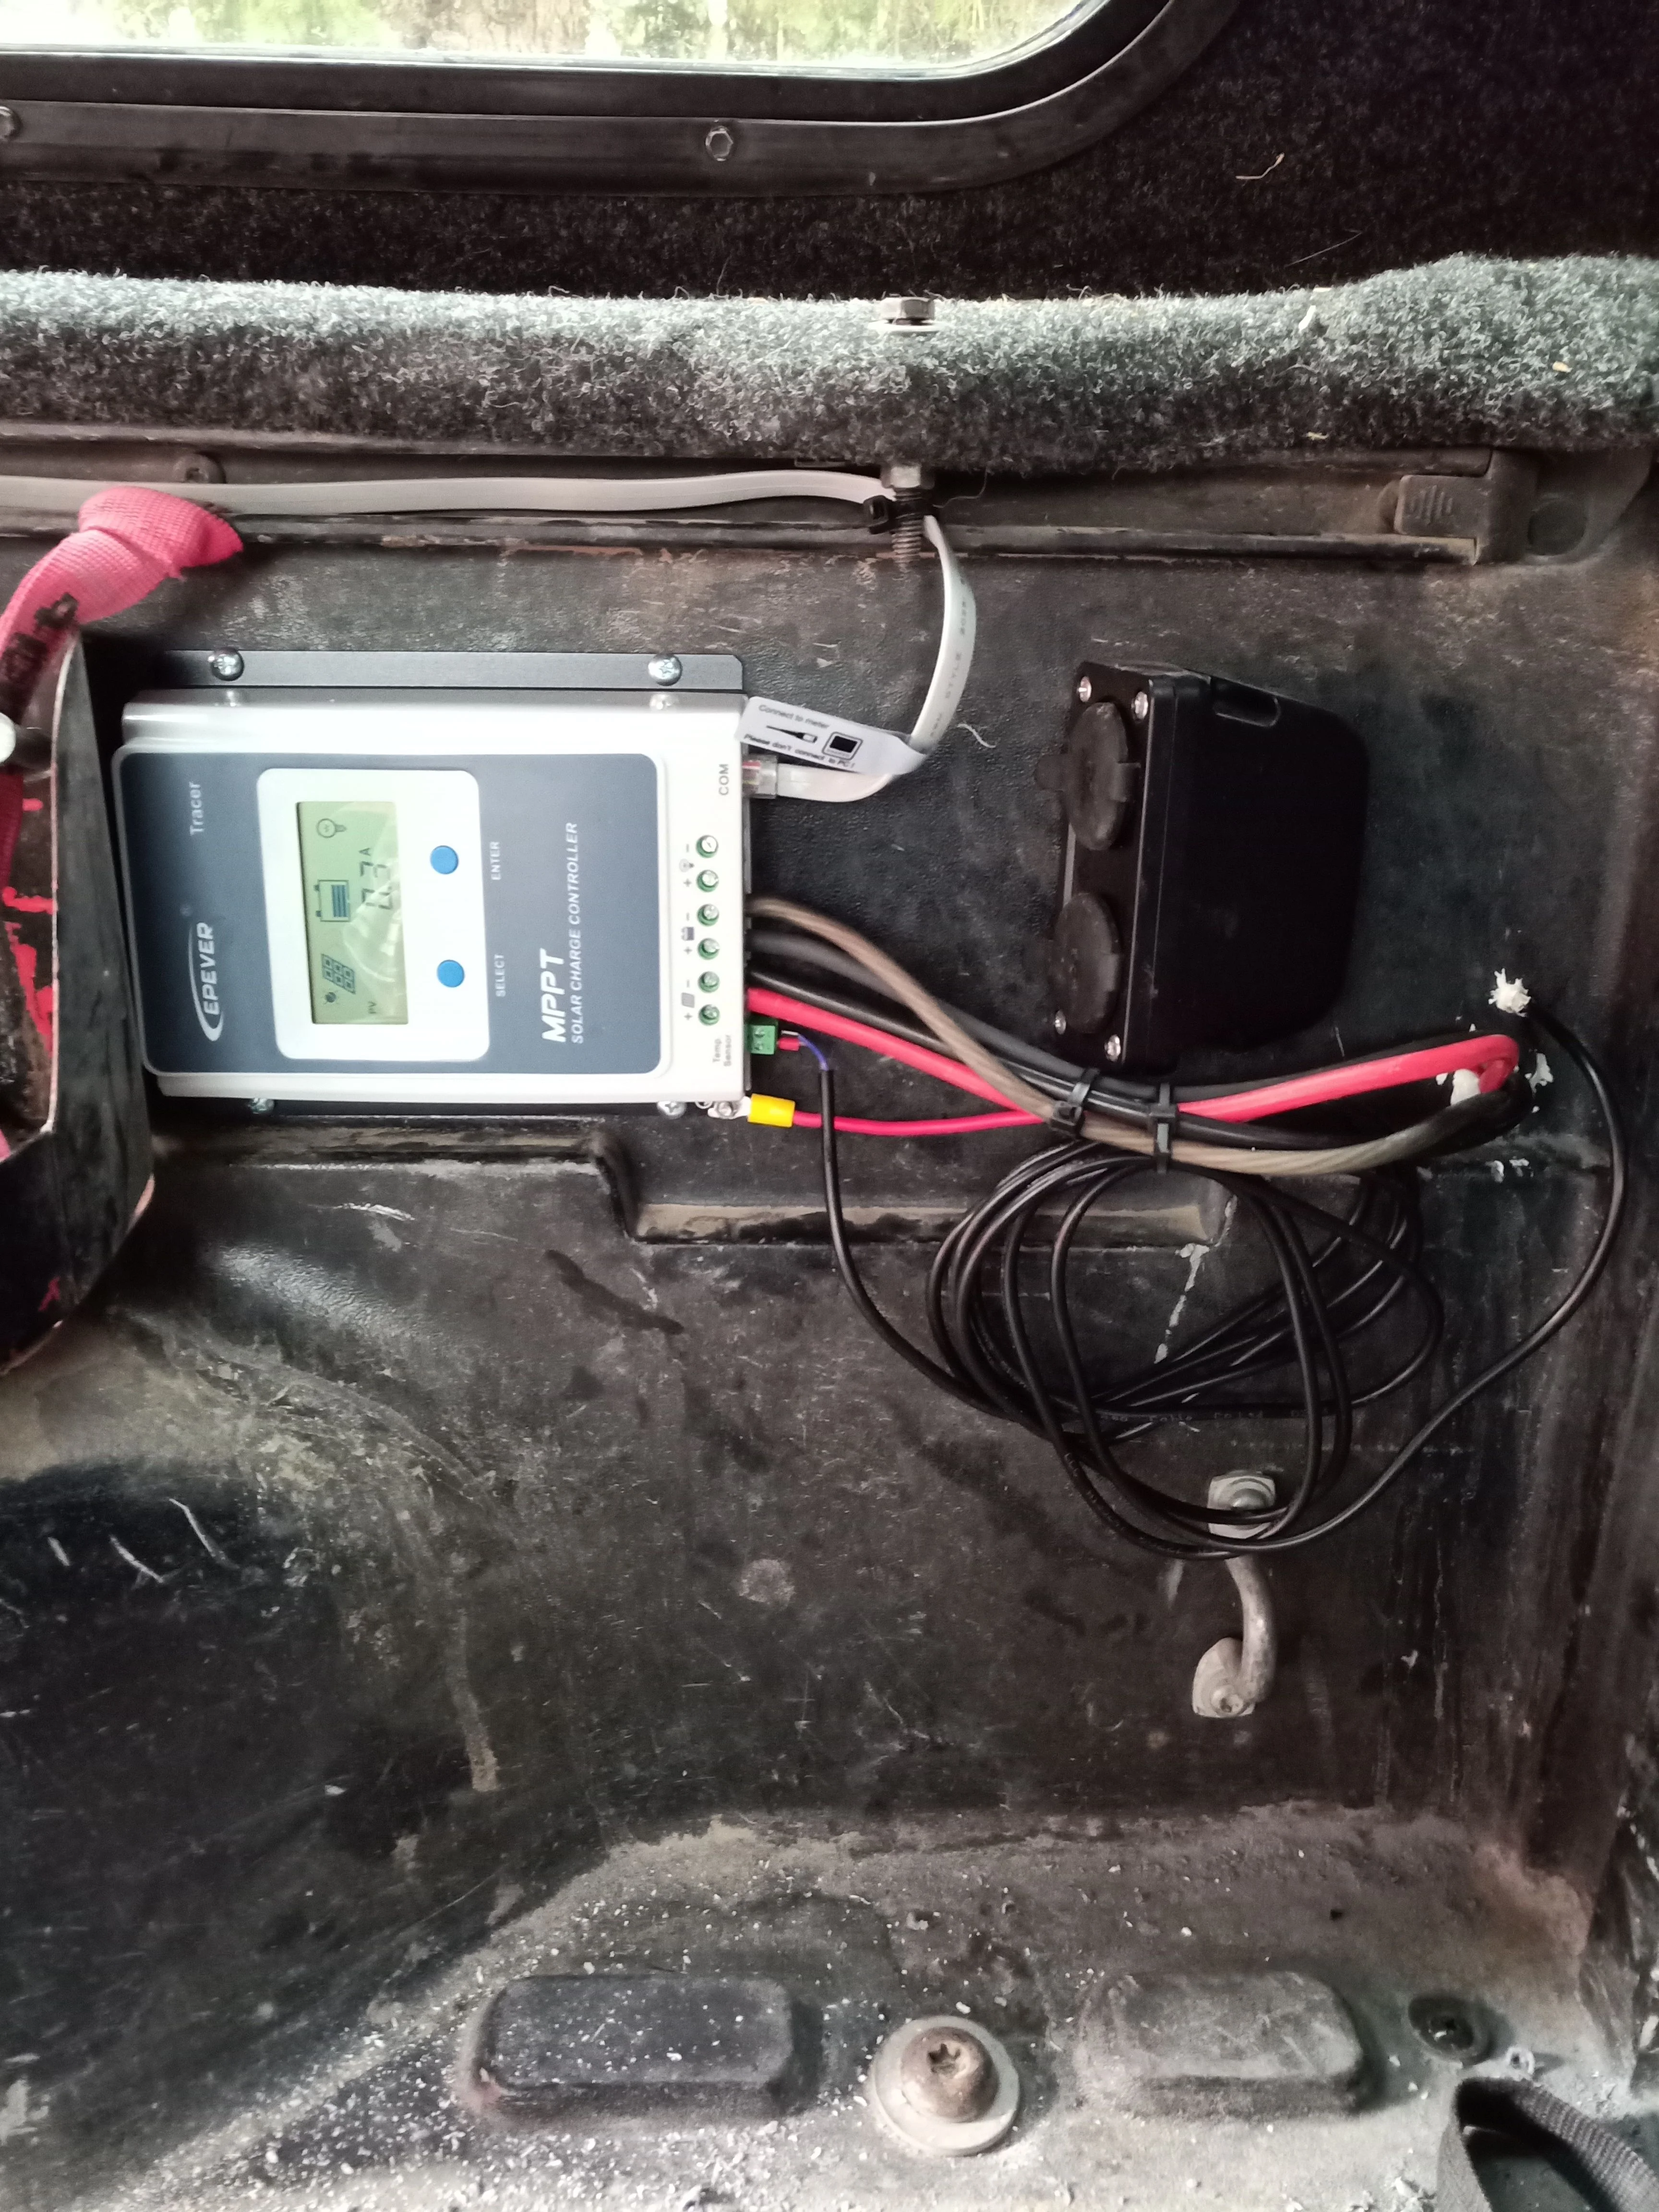
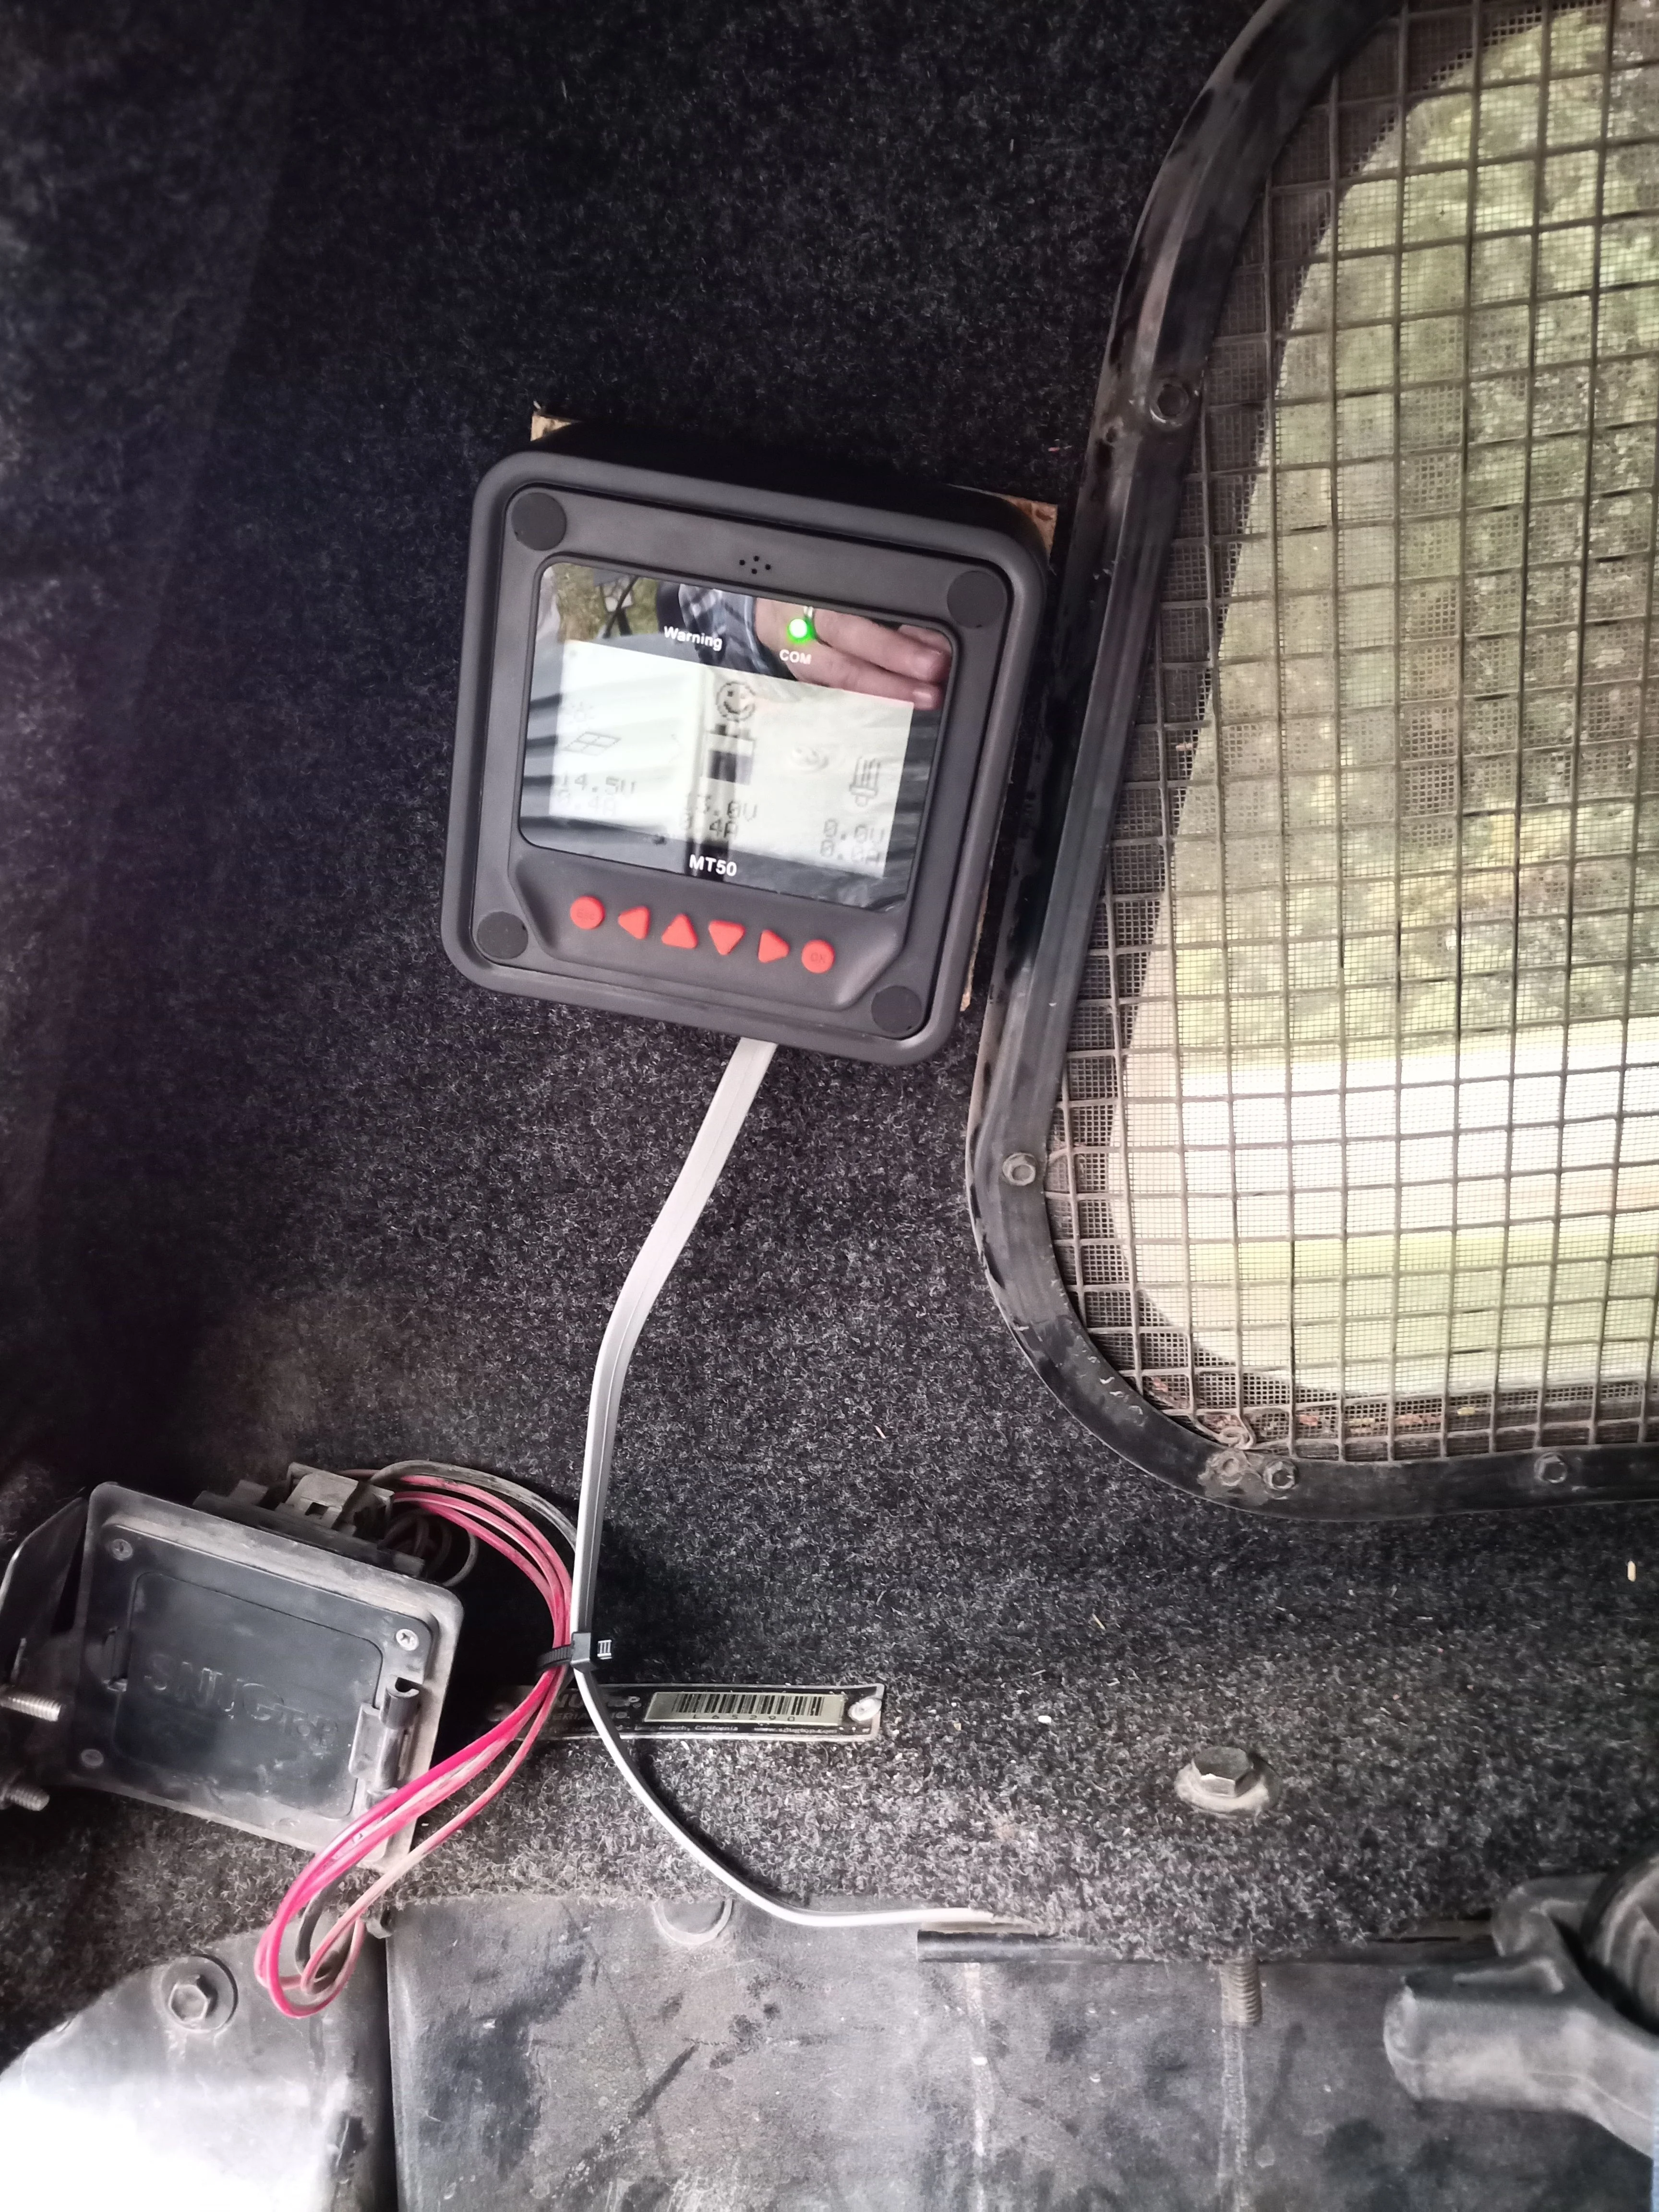
I picked up demo-model Renogy 100W panel locally, including wiring/connectors and mount. I purchased a EP Solar MPPT charge controller with remote panel. I initially intended to put the second panel in the cab, but there is not good place, so I put it by the camper shell window. Since the charge controller is blocked by the fridge I can easily see the battery/charging status this way. Plus inside the cab I have 2 cheapo outlet voltage meters (one for house one for starter) so I can see the status of the batteries while parked/driving from the cab. I hardwired a switch to a usb port from the house battery inside the cab for this purpose. 8 awg from charge controller to battery.
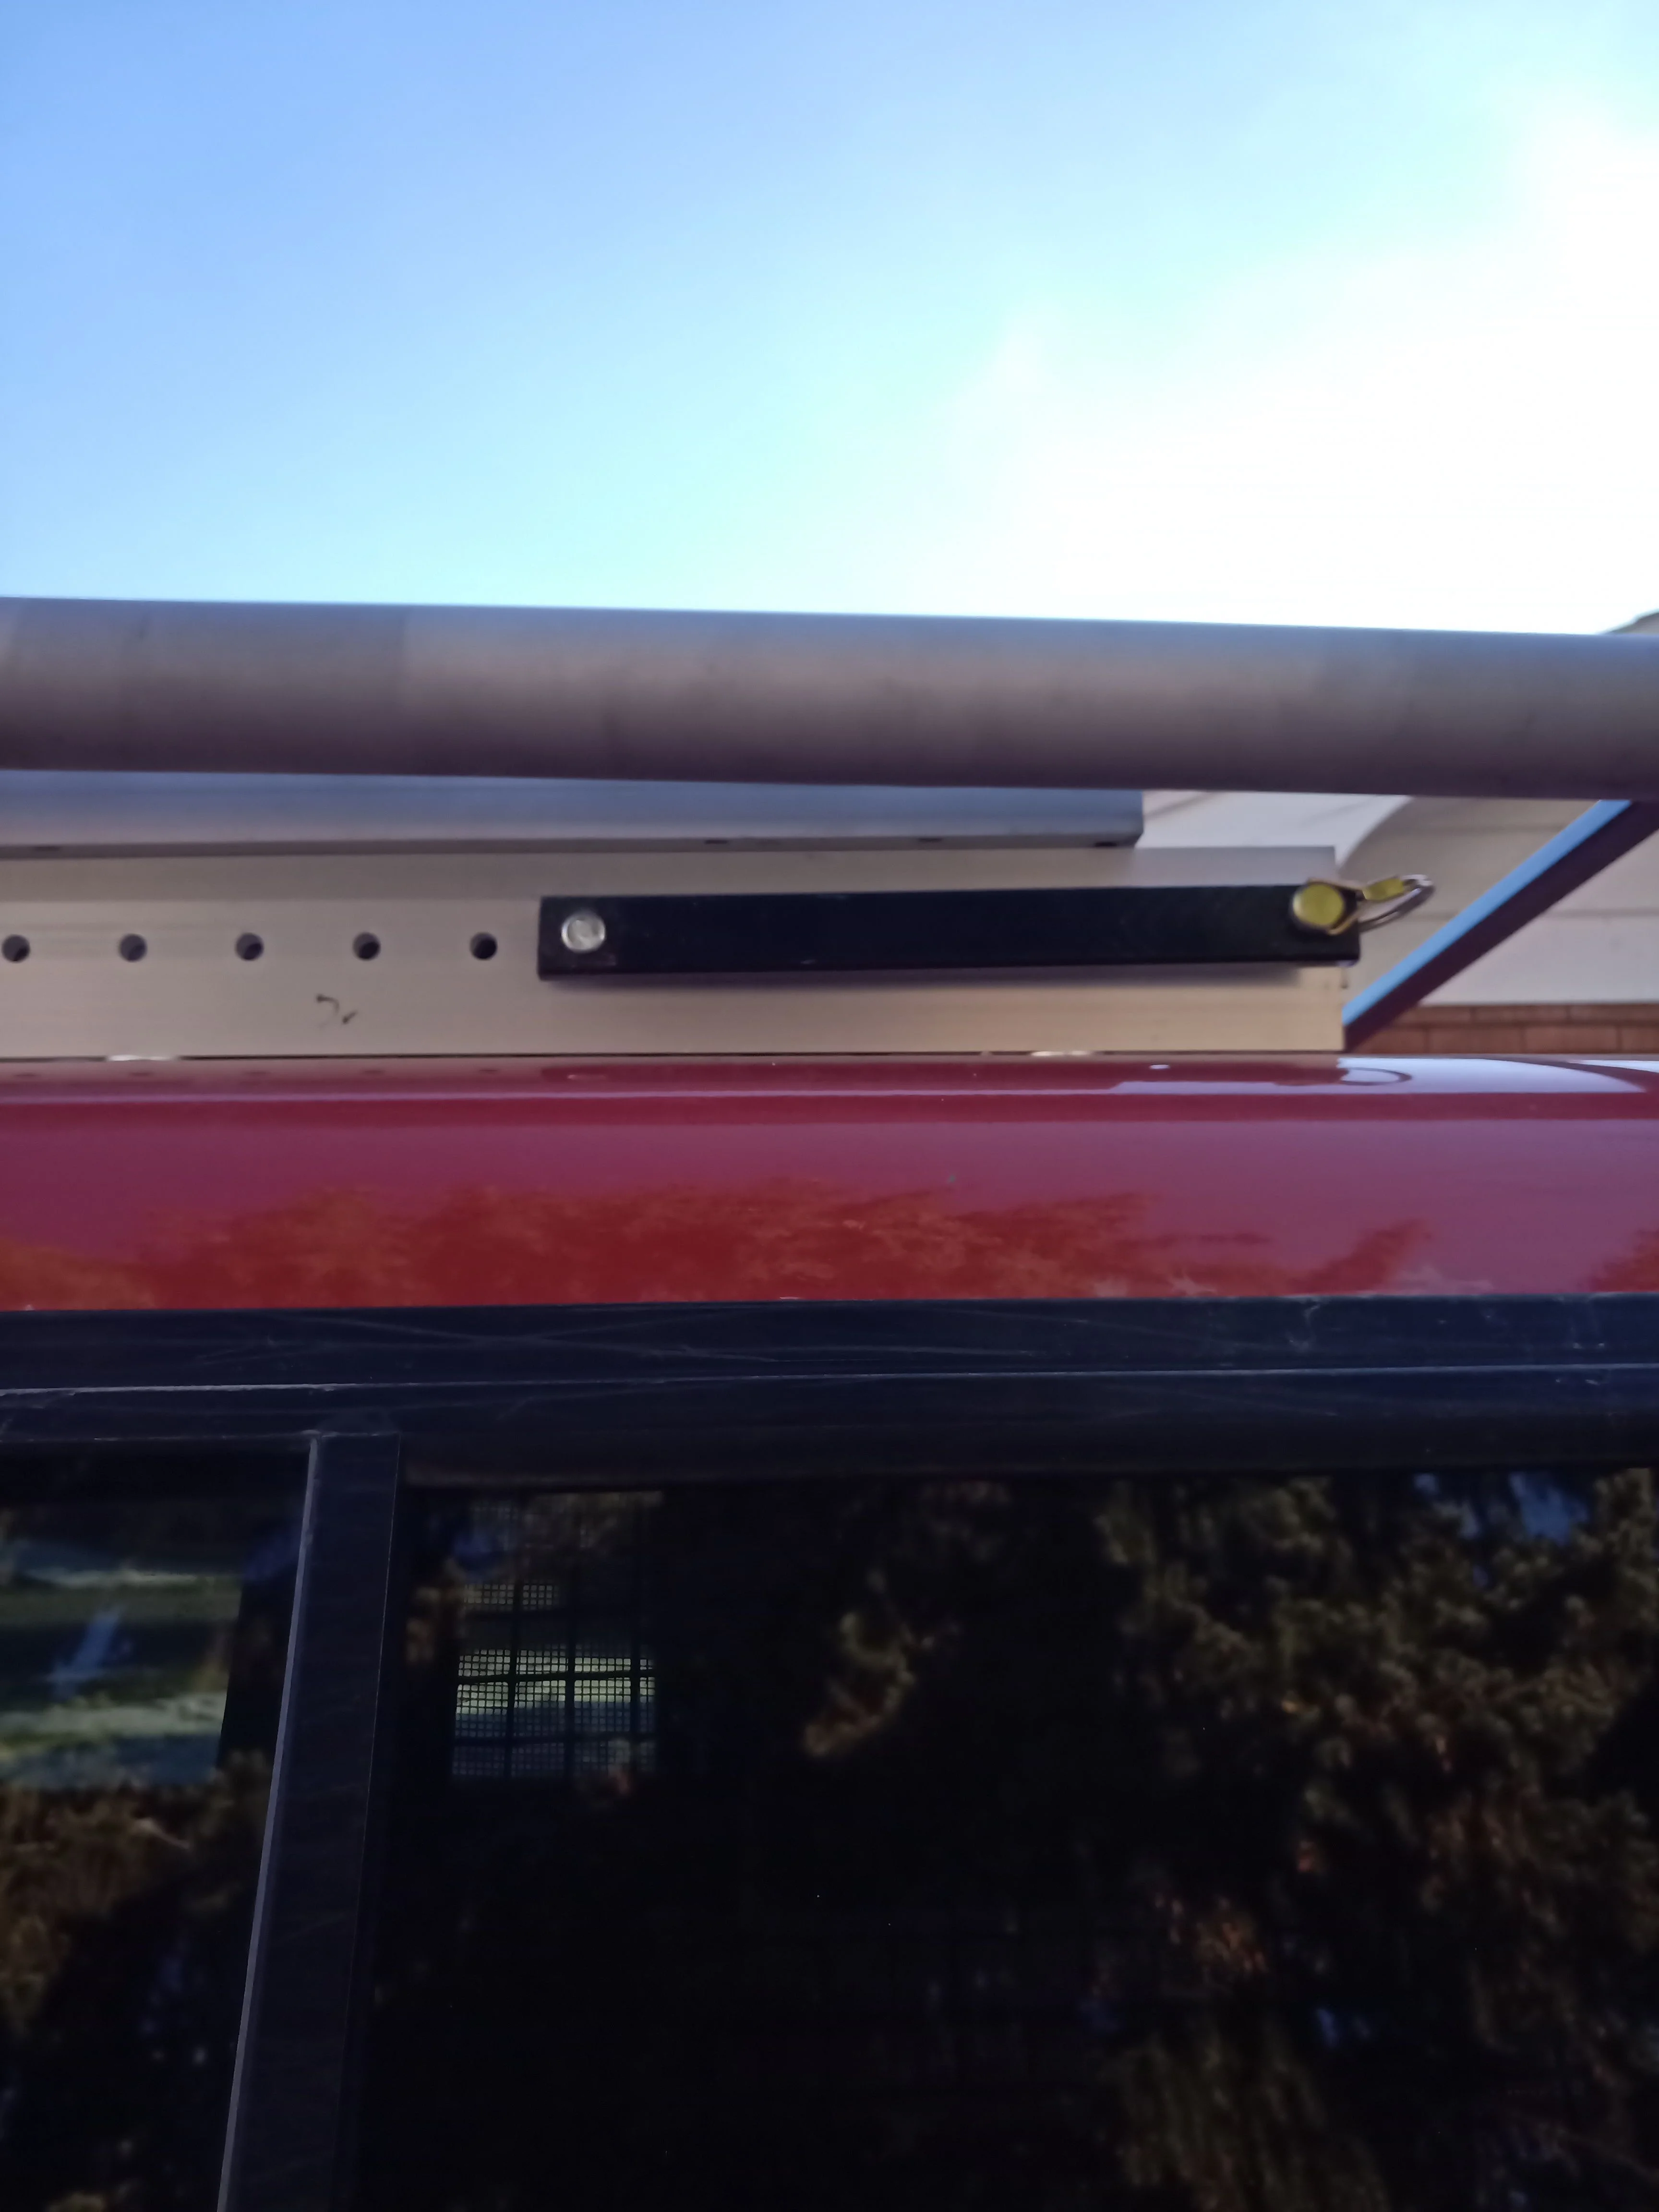
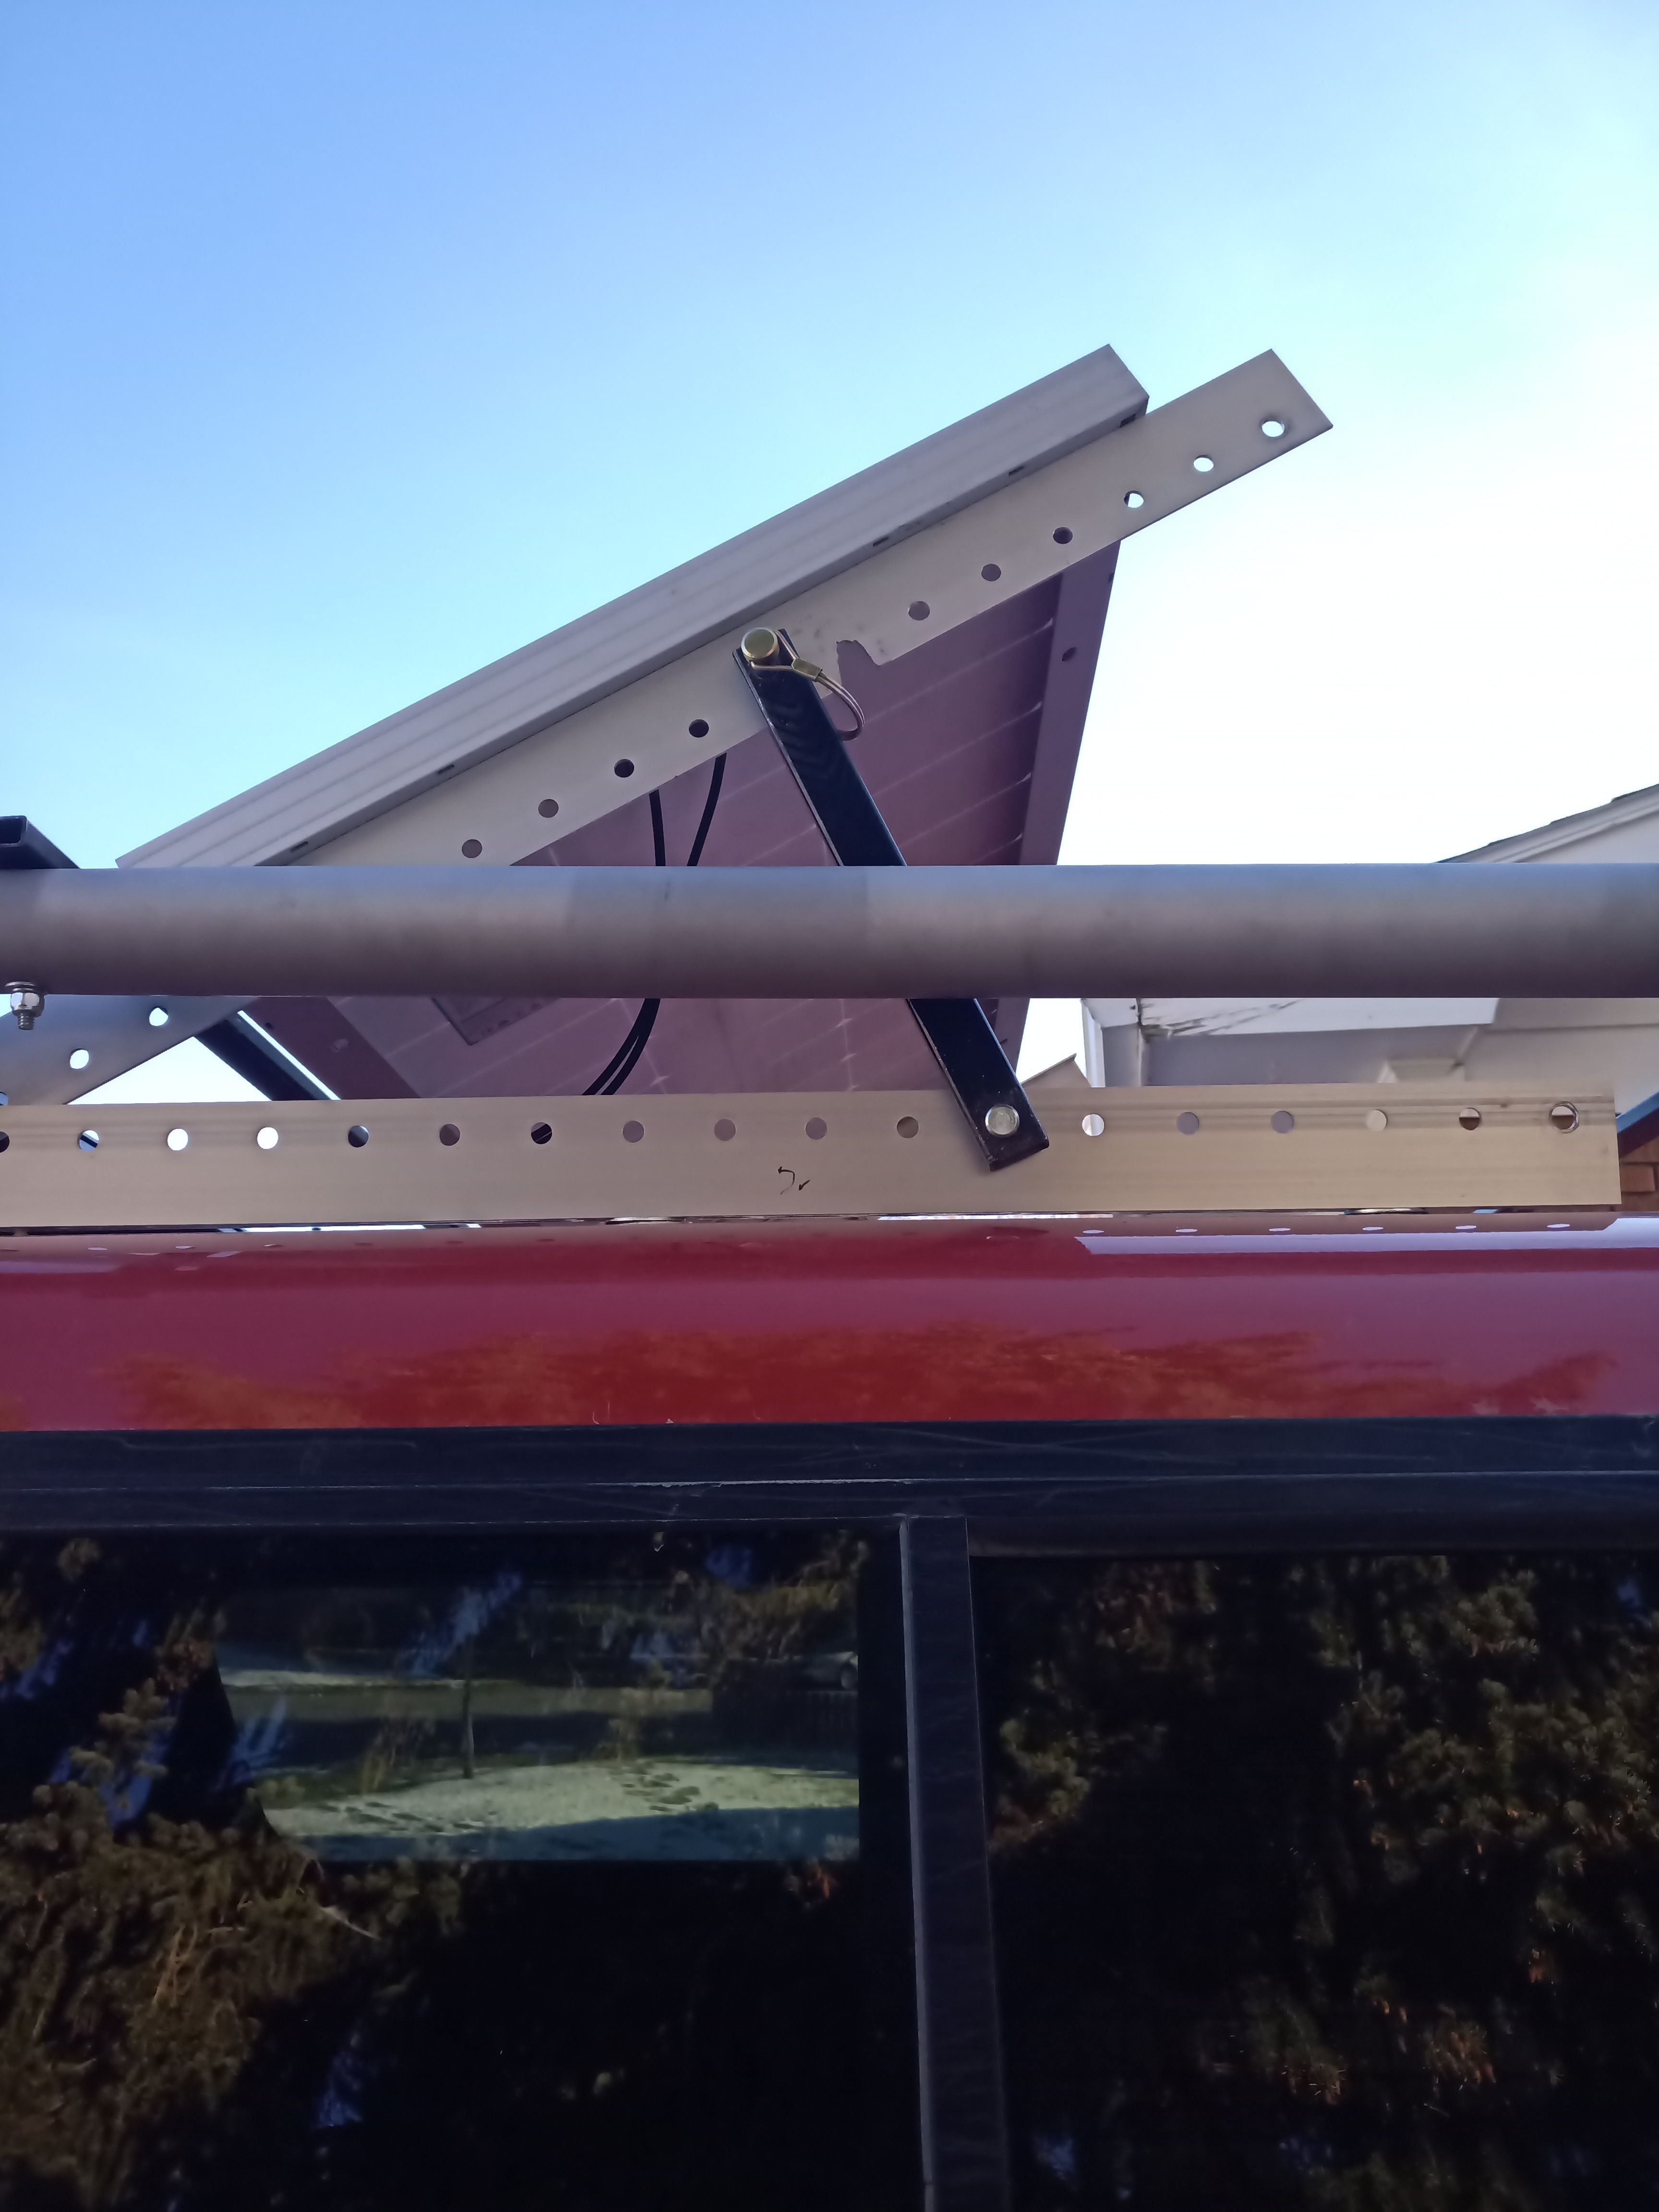
I had some scrap 1x.5" steel tubing lying around, so I added legs to prop up the solar panel when I will be parked stationary for several days. I put all-weather padlocks on the front to prevent thievery, in the middle I put a small hitch pin with a cotter (I cut out this area on the solar panel mount so that the pin only goes through the frame mount and the prop peg, and NOT the solar panel frame piece) and a loop pin on the back. This way I can undo the loop pin on one side, then walk to the other side and do the same, life the panel and prop peg, and reinstall the hoop pin, then return to the first side and reinstall that hoop pin through the panel and prop leg. Takes about 15 seconds to angle/store the panel. I'll upload pics.
I do not choose where I off-road, so often this means driving through equipment-destroying brush. So I knew I needed to protect the panel somehow. Because I mounted the panel in a "wide" orientation (mistake, I should have done it long-wise, and I would not have made the roof rack situation easier and cleaner without reducing usability) this meant essentially no rails were wide enough from the factory. So I measured my minimum height reqs and headed to the junkyard. I settled on a factory rack off an early 2000s Frontier. I used some rectangular tubing to make new crossbars, and aluminum traction board and tubing to rivet together a wind vane. I will add more rectangular tubing to run along the rails between the bars in the future, just to give it a little more clearance. The fit was not perfect, but it is very strong, and I trust it will do its job.
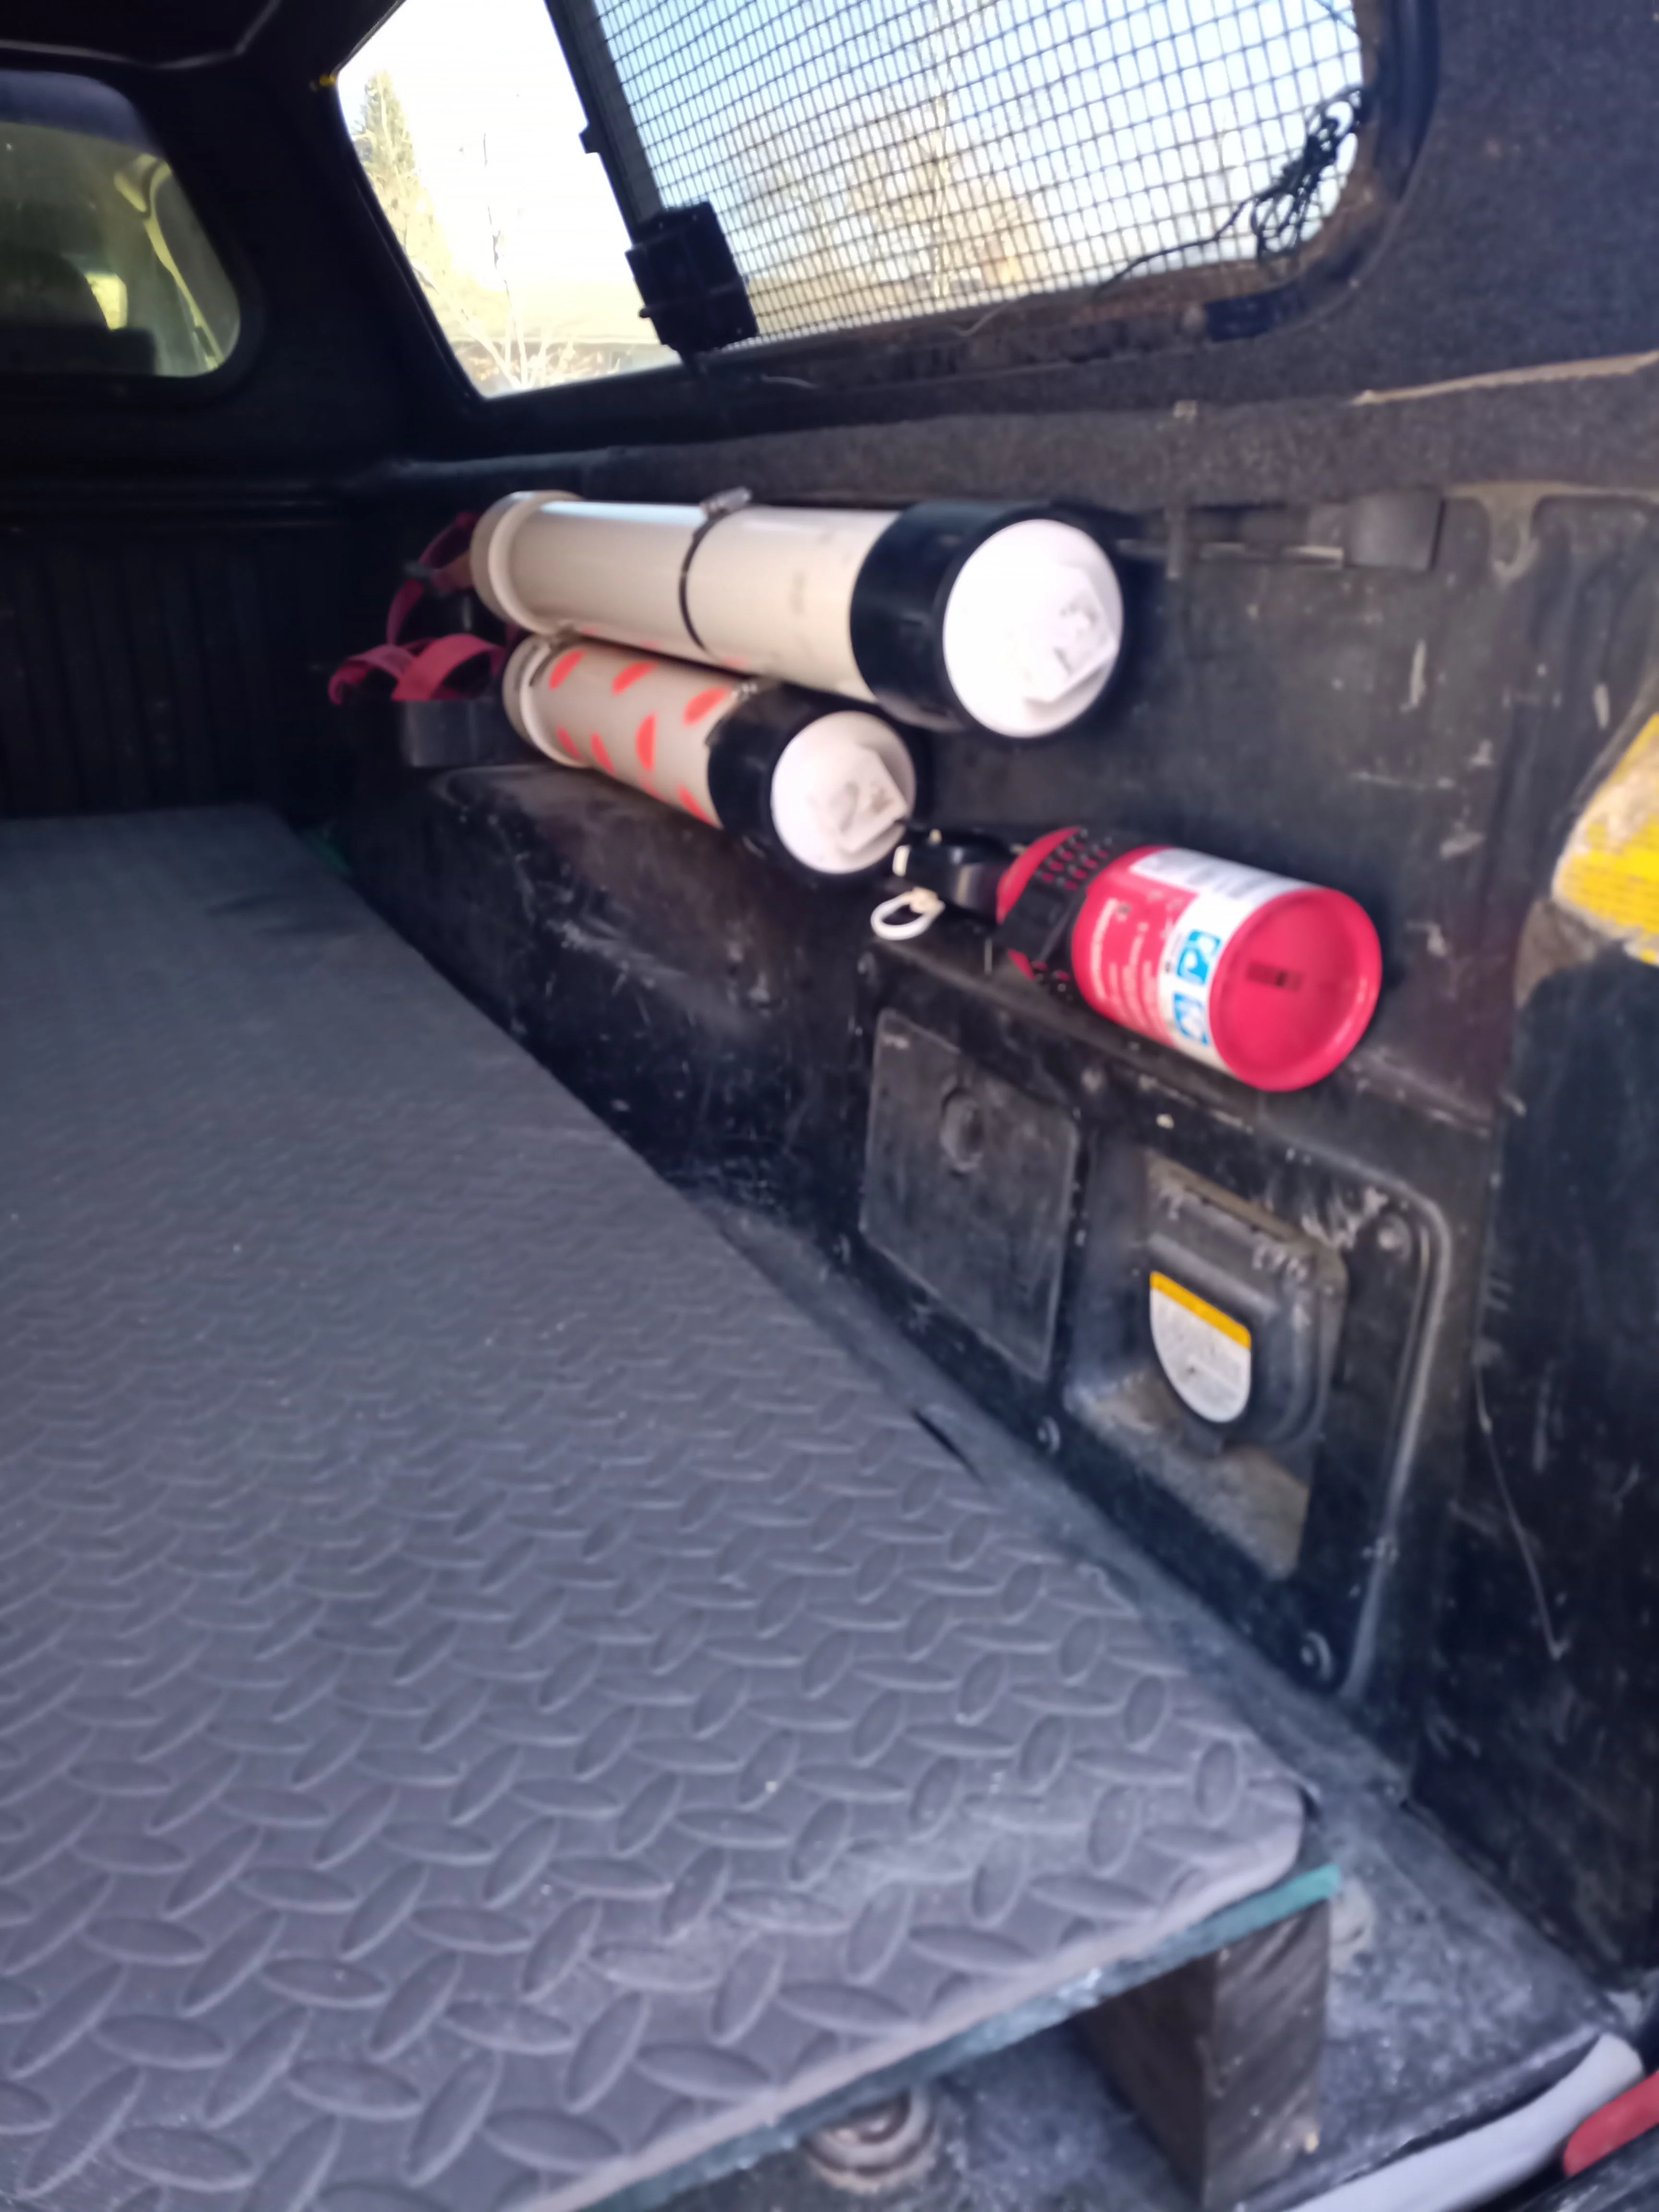
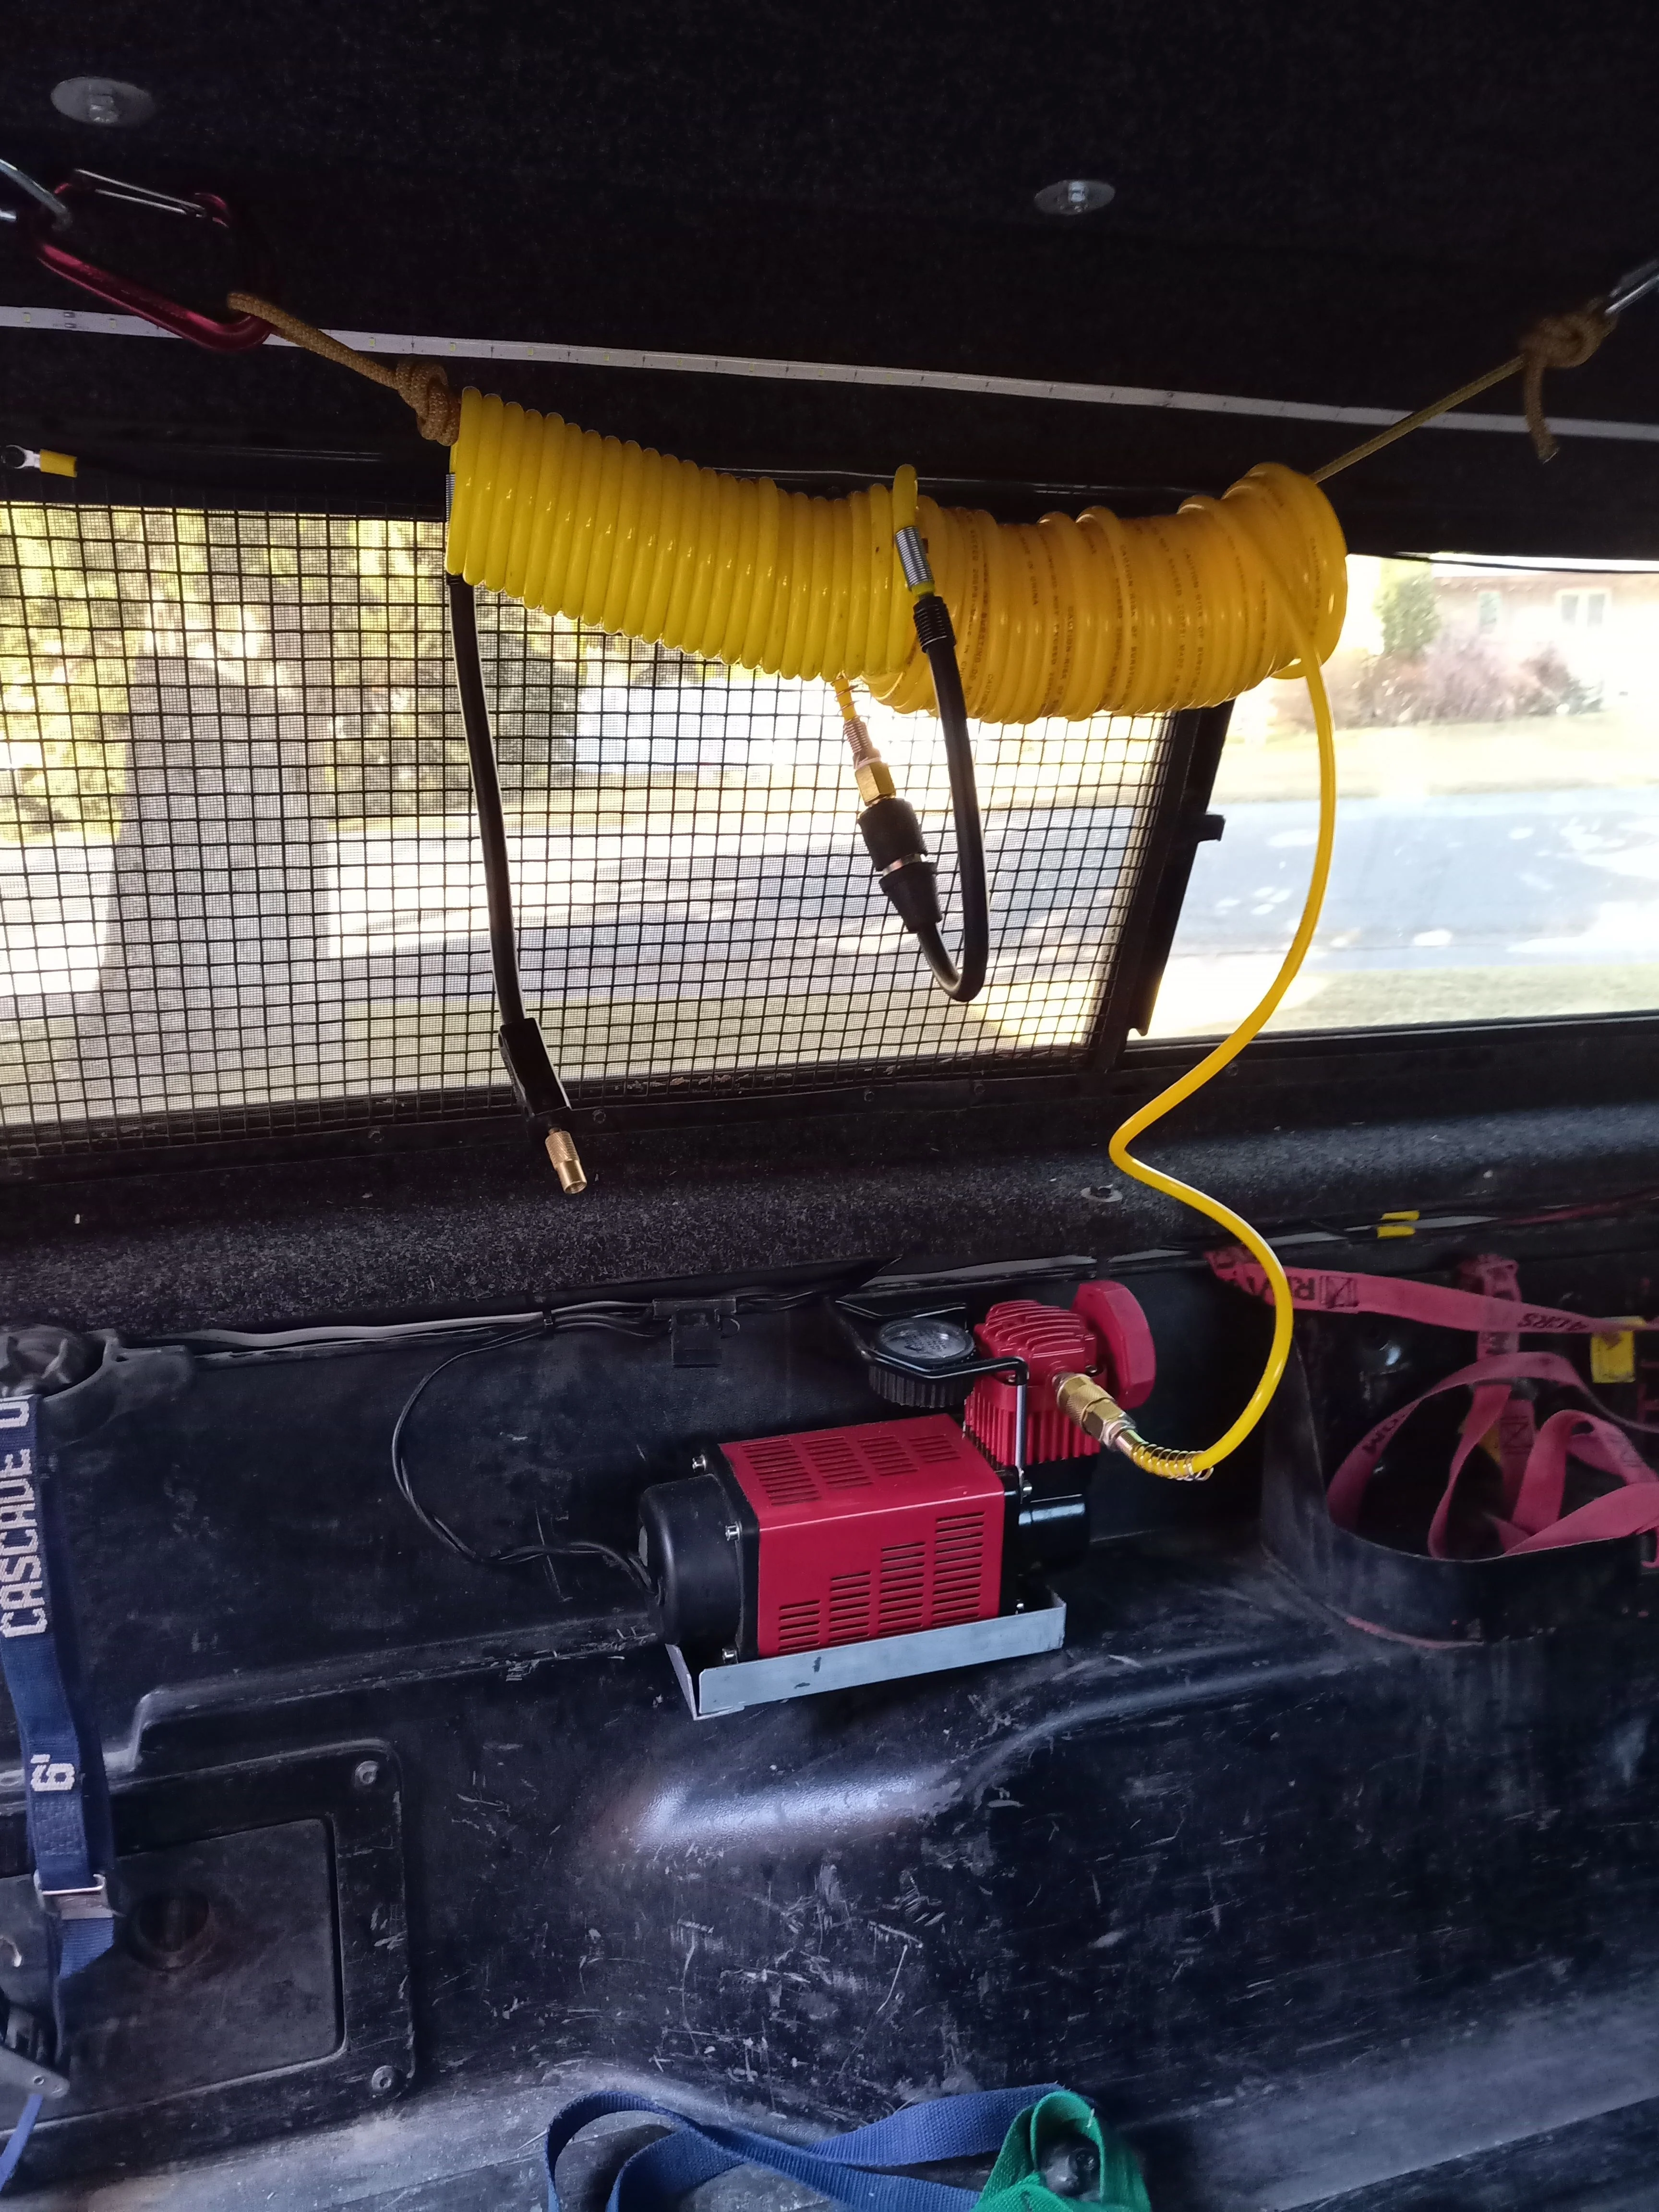
I also decided to hardwire my air compressor in the back, add a hose extension, and make a hanger with some cordellete and a carabineer. Had to build a platform with aluminum angle and flat steel playing to support it in place. I added a bunch of tie-downs in the bed that go down and out from the handles on my gear, and a simple sleeping platform so I can stow my shovels/survey equipment below. Now the only item I unstrap at camp is a single water jug. I can carry my fridge, aluminum drybox, 2 jerry cans of fuel, 3 jerry cans of water, and my misc tools and not have to fuss with them multiple times daily. All tiedowns added have 1/8" steel backing plates underneath. I used hose clamps with either a self tappers through bed or simple ran through factory rails to put a couple pvc tubes (one holds my gas funnel so it doesn't stink up the back, the other holds bear spray canisters). Figured I should start carrying an extinguisher too.
If I could do it all over, a bus bar up front would tidy up the grounds. I kept adding more things hardwired in the rear, so it would have been best to have run some 4awg to a fuse block to minimize all these wires ran between the hood and the bed. Orienting the solar panel 90° different would have made installing roof rails/protection much simpler as well. I was able to entirely avoid drilling into anything other than the shell and the composite bed, which was the goal. All holes were sealed with 3M Marine Adhesive, and no leaks have occurred. So far I have loved the new setup, but I am sure I will notice/rethink things as time goes one.
I'll get pics uploaded when I have time. Thanks
Over the past couple months I've been chipping away at a dual battery/solar project. Countless folks have done the same, but I thought I'd write up a bit about my decisions/likes/missteps in the process. My budget is limited, so I'm sure a lot of you can relate. I'll upload pics later on. Also thank you to @chap79 for help with wiring questions/purchase decisions.
It all started after picking up a used Dometic DZ fridge/freezer. I camp in the field for sometimes weeks at a time, so this will be an improvement over using ice. Plus the freezer will extend the life of meat products.
I already had a RedTop, and picked up a lightly used yellowtop locally, and went with the 4xInnovations dual battery tray. Couldn't be happier - affordable, very robust, great retention. I drilled some pilot holes in the top retainer and mounted my Blue Sea 7610 ACR to that with self tappers, then ground off the tips so they are flush. Since the RedTop and yellowtop have their poles on opposite ends this simplified the wiring a bit. Since I don't run a winch I did not feel it necessary to put a switch in.
For the terminals I went with Mesa Ultimate Battery Terminals. They had these locally, and have 2 built in fuse holders on each (I'm running 2x125A in the positives). They have 2x 1/0 ports, 2x8 ports, plus a stud for ring terminal connections. I did not want to cut factory wiring, so this was key. Plus the studs are nice in case I need to jump the RedTop with the yellow, or attach trickle charger. This simplified the wiring a bit. 1/0 wiring from + to ACR, as well as from - to factory ground. I ran a ground from the ACR with a 2.5A fuse as it said so in the diagram, although not sure why. I had to cut a bit of the ACR cover to snap into it's retention tabs.
For power to the read for the fridge I bought the Dometic hardwire kit. It was overpriced, but having a two pin outlet for the fridge makes me feel better when bouncing for hours off-road.
I picked up demo-model Renogy 100W panel locally, including wiring/connectors and mount. I purchased a EP Solar MPPT charge controller with remote panel. I initially intended to put the second panel in the cab, but there is not good place, so I put it by the camper shell window. Since the charge controller is blocked by the fridge I can easily see the battery/charging status this way. Plus inside the cab I have 2 cheapo outlet voltage meters (one for house one for starter) so I can see the status of the batteries while parked/driving from the cab. I hardwired a switch to a usb port from the house battery inside the cab for this purpose. 8 awg from charge controller to battery.
I had some scrap 1x.5" steel tubing lying around, so I added legs to prop up the solar panel when I will be parked stationary for several days. I put all-weather padlocks on the front to prevent thievery, in the middle I put a small hitch pin with a cotter (I cut out this area on the solar panel mount so that the pin only goes through the frame mount and the prop peg, and NOT the solar panel frame piece) and a loop pin on the back. This way I can undo the loop pin on one side, then walk to the other side and do the same, life the panel and prop peg, and reinstall the hoop pin, then return to the first side and reinstall that hoop pin through the panel and prop leg. Takes about 15 seconds to angle/store the panel. I'll upload pics.
I do not choose where I off-road, so often this means driving through equipment-destroying brush. So I knew I needed to protect the panel somehow. Because I mounted the panel in a "wide" orientation (mistake, I should have done it long-wise, and I would not have made the roof rack situation easier and cleaner without reducing usability) this meant essentially no rails were wide enough from the factory. So I measured my minimum height reqs and headed to the junkyard. I settled on a factory rack off an early 2000s Frontier. I used some rectangular tubing to make new crossbars, and aluminum traction board and tubing to rivet together a wind vane. I will add more rectangular tubing to run along the rails between the bars in the future, just to give it a little more clearance. The fit was not perfect, but it is very strong, and I trust it will do its job.
I also decided to hardwire my air compressor in the back, add a hose extension, and make a hanger with some cordellete and a carabineer. Had to build a platform with aluminum angle and flat steel playing to support it in place. I added a bunch of tie-downs in the bed that go down and out from the handles on my gear, and a simple sleeping platform so I can stow my shovels/survey equipment below. Now the only item I unstrap at camp is a single water jug. I can carry my fridge, aluminum drybox, 2 jerry cans of fuel, 3 jerry cans of water, and my misc tools and not have to fuss with them multiple times daily. All tiedowns added have 1/8" steel backing plates underneath. I used hose clamps with either a self tappers through bed or simple ran through factory rails to put a couple pvc tubes (one holds my gas funnel so it doesn't stink up the back, the other holds bear spray canisters). Figured I should start carrying an extinguisher too.
If I could do it all over, a bus bar up front would tidy up the grounds. I kept adding more things hardwired in the rear, so it would have been best to have run some 4awg to a fuse block to minimize all these wires ran between the hood and the bed. Orienting the solar panel 90° different would have made installing roof rails/protection much simpler as well. I was able to entirely avoid drilling into anything other than the shell and the composite bed, which was the goal. All holes were sealed with 3M Marine Adhesive, and no leaks have occurred. So far I have loved the new setup, but I am sure I will notice/rethink things as time goes one.
I'll get pics uploaded when I have time. Thanks