I decided last night to have a go at repairing my steering column cover. Mine had the typical breaks, but being cheap, I decided to have a go at repairing this set instead of spending the $$$ to buy a new set. I found the one other thread suggesting to just simply replace the two piece cover, but I thought the other members suggestions of using epoxy to rebuild the posts seemed like a good idea.
When I removed my covers, the broken 'washer' pieces stayed attached to the steering column, and so I was able to remove them & reuse them in the repair. I carefully superglued them back into place, and time will tell whether they'll hold - I see several members say it won't, but hey, sometimes you have to learn the hard way.
Here's my column covers & the broken pieces after removing them:

Here's the breaks where the lower cover attaches to the column:

Using some Gel Super Glue, I simply stuck the broken washer pieces back on:

The posts that attach the upper cover to the lower cover were a little more complex. The pieces that broke off actually fractured in several places, and there was just no way that Super Glue was going to be strong enough to hold it together. Here's the worst of the two posts:

I decided to use some DevCon Plastic Welder (picked up at my local Ace Hardware) to build the posts back up:

I used some blue painter's masking tape to wrap the post and create a 'tube' of sorts to pour the epoxy into:

I mixed up a small amount of the epoxy, and then using a toothpick, daubed it into the tube. I pushed at much down into the opening of the original post as I could, hoping to use as much surface area to adhere to as possible. I let the epoxy cure over night, and the used a file and sand paper to smooth it all out & get the correct post height. A couple of trial fits between the upper & lower covers, and everything looked good. I then carefully drilled out a 5/32" hole into the new epoxy for the screws to bite into.

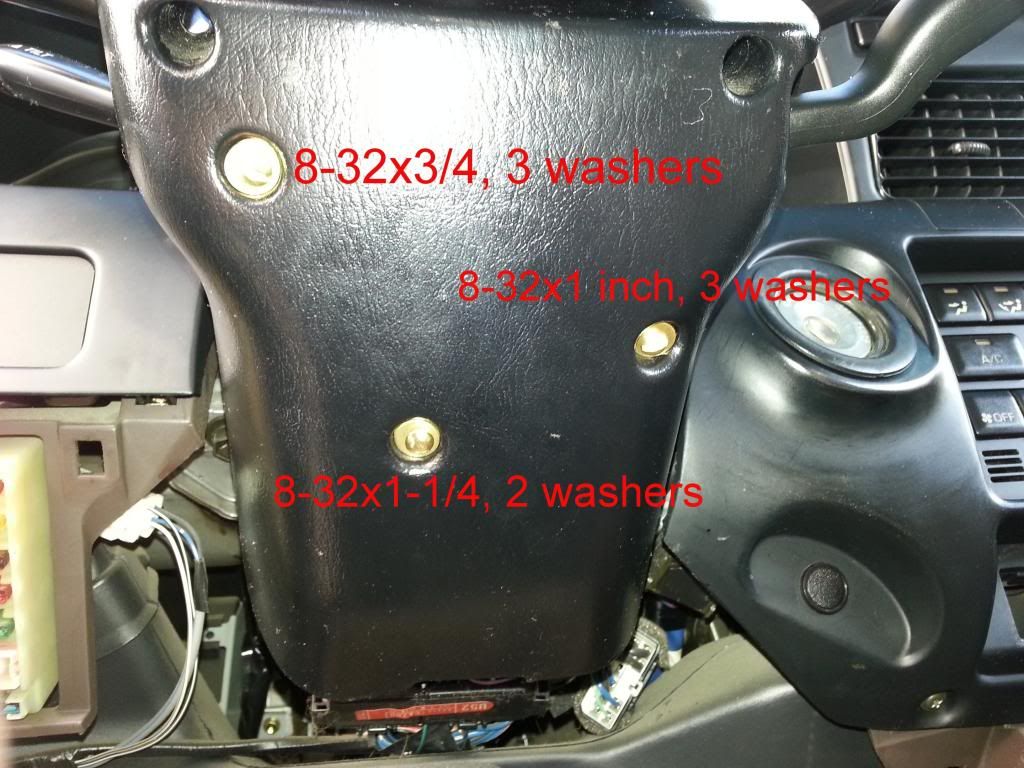
I reinstalled the covers, and everything went together just fine. Time will tell if this setup will hold - if it doesn't, I'm out less than $10 in adhesives and a little bit of my time. If it does hold, I've saved quite a bit of coin - I think new covers are in the neighborhood of $80+.
Anyways, hopefully this will help someone else out there.
When I removed my covers, the broken 'washer' pieces stayed attached to the steering column, and so I was able to remove them & reuse them in the repair. I carefully superglued them back into place, and time will tell whether they'll hold - I see several members say it won't, but hey, sometimes you have to learn the hard way.
Here's my column covers & the broken pieces after removing them:
Here's the breaks where the lower cover attaches to the column:
Using some Gel Super Glue, I simply stuck the broken washer pieces back on:
The posts that attach the upper cover to the lower cover were a little more complex. The pieces that broke off actually fractured in several places, and there was just no way that Super Glue was going to be strong enough to hold it together. Here's the worst of the two posts:
I decided to use some DevCon Plastic Welder (picked up at my local Ace Hardware) to build the posts back up:
I used some blue painter's masking tape to wrap the post and create a 'tube' of sorts to pour the epoxy into:
I mixed up a small amount of the epoxy, and then using a toothpick, daubed it into the tube. I pushed at much down into the opening of the original post as I could, hoping to use as much surface area to adhere to as possible. I let the epoxy cure over night, and the used a file and sand paper to smooth it all out & get the correct post height. A couple of trial fits between the upper & lower covers, and everything looked good. I then carefully drilled out a 5/32" hole into the new epoxy for the screws to bite into.
I reinstalled the covers, and everything went together just fine. Time will tell if this setup will hold - if it doesn't, I'm out less than $10 in adhesives and a little bit of my time. If it does hold, I've saved quite a bit of coin - I think new covers are in the neighborhood of $80+.
Anyways, hopefully this will help someone else out there.