Navigation
Install the app
How to install the app on iOS
Follow along with the video below to see how to install our site as a web app on your home screen.
Note: This feature may not be available in some browsers.
More options
Style variation
You are using an out of date browser. It may not display this or other websites correctly.
You should upgrade or use an alternative browser.
You should upgrade or use an alternative browser.
Product review: 4Crawler (Roger Brown) 1" body lift.
- Thread starter IronYuppy
- Start date
This site may earn a commission from merchant affiliate
links, including eBay, Amazon, Skimlinks, and others.
More options
Who Replied?Nice write up, certainly FAQ worthy
I noticed the 1" right away when I started driving, I was actually surprised how much taller it felt. Now, the wife didn't notice at all. Which was good, since I did it while she was out of town for a week, and have never told her.
The shifter taking more effort to go into park, that the wife noticed. It actually will go into park, but there is a extra little click, that allows you to pull the key out. That she couldn't get the key out, the wife noticed. Fortunately it's just a matter of loosening up the bolt on the lingkage and slightly adjusting it, and problem solved.
On the t-case shifter, that I did run into an issue with. My knob hits the console. I think I'll add an extension to it eventually, right now, the console isn't fitting right either so I have to take the knob off for 4low, which must change soon. The 2" I"m sure would run into issues with most trucks.
I didn't have any problems with getting any of the bolts off (my truck is dry) except the front ones at the radiator. Those, I just cut the heads off since I didn't have a bumper on anyway.
In addition to your other reasons for a body lift, is extra room for longer body shocks - something in a 14" travel is nice...
1" isn't a huge difference in lift. In fact, it's barely noticeable at all:
I noticed the 1" right away when I started driving, I was actually surprised how much taller it felt. Now, the wife didn't notice at all. Which was good, since I did it while she was out of town for a week, and have never told her.
With the 1" lift, there's no need to modify the steering or shifter at all. I find the steering is exactly the same, with full range of motion, no vibration or funny noises. The shifter takes a bit more effort to put in "park" to remove the key. I think I'll tinker with the linkage and see if I can adjust that enough. Alternately, it just takes a bit of getting used to. No change to the movement of the t-case shifter.
The shifter taking more effort to go into park, that the wife noticed. It actually will go into park, but there is a extra little click, that allows you to pull the key out. That she couldn't get the key out, the wife noticed. Fortunately it's just a matter of loosening up the bolt on the lingkage and slightly adjusting it, and problem solved.
On the t-case shifter, that I did run into an issue with. My knob hits the console. I think I'll add an extension to it eventually, right now, the console isn't fitting right either so I have to take the knob off for 4low, which must change soon. The 2" I"m sure would run into issues with most trucks.
I didn't have any problems with getting any of the bolts off (my truck is dry) except the front ones at the radiator. Those, I just cut the heads off since I didn't have a bumper on anyway.
In addition to your other reasons for a body lift, is extra room for longer body shocks - something in a 14" travel is nice...
- Joined
- Feb 20, 2005
- Threads
- 8
- Messages
- 63
- Location
- Scottsdale, AZ
- Website
- www.scottsdale-relocation.com
Great write-up, & I'll give another thumbs-up to Roger.
He made me some beeeefy sliders for my '00 Xterra back in 2000, and they were abused and held up great. Just some touch-up paint every once in a while on the underside was all the "maintenance" they needed.")
He also did a custom mount for a rear bumper/tire carrier I found on eBay for cheap. Excellent work .
.
He made me some beeeefy sliders for my '00 Xterra back in 2000, and they were abused and held up great. Just some touch-up paint every once in a while on the underside was all the "maintenance" they needed.
He also did a custom mount for a rear bumper/tire carrier I found on eBay for cheap. Excellent work
.Your sig line has me confused.....you have a 2.5 ome lift and a 4Crawler 1" body lift??
Lockered '94. OME 2.5" lift, Longfields, VC delete, flare delete, 7-pin, IPOR Skid, 4Crawler 1" body lift, Hankook 295/75R16 M/T, I forget what else.
Lockered '94. OME 2.5" lift, Longfields, VC delete, flare delete, 7-pin, IPOR Skid, 4Crawler 1" body lift, Hankook 295/75R16 M/T, I forget what else.
- Thread starter
- #25
Your sig line has me confused.....you have a 2.5 ome lift and a 4Crawler 1" body lift??
Lockered '94. OME 2.5" lift, Longfields, VC delete, flare delete, 7-pin, IPOR Skid, 4Crawler 1" body lift, Hankook 295/75R16 M/T, I forget what else.
Yup, that's correct. 2.5" OME suspension lift and 1" 4Crawler body lift. Total 3.5".
x2 on roger. he donated a 1" body lift to the raffle truck build last year and it was the only "bolt on" mod we made! would love to meet him someday.
and be glad you did grade 8 bolts. it's never overkill. i had a body lift with grade 5 bolts on a datsun 720 when i was in college, got in an accident and the bolts snapped. body came completely loose from the frame. fortunately, the bed was welded and stopped the cab.
and be glad you did grade 8 bolts. it's never overkill. i had a body lift with grade 5 bolts on a datsun 720 when i was in college, got in an accident and the bolts snapped. body came completely loose from the frame. fortunately, the bed was welded and stopped the cab.
- Thread starter
- #27
black paint option. well worth the buck a puck premium...
Indeed. I forgot to mention that regular UHMW is white (it's the same plastic used in making milk jugs), and paint will not stick to it. For $1/puck Roger offers a coloured coating that is molecularly bonded to the UHMW. Mine are black, and I believe he has options for other colours.
On the t-case shifter, that I did run into an issue with. My knob hits the console. I think I'll add an extension to it eventually, right now, the console isn't fitting right either so I have to take the knob off for 4low, which must change soon. The 2" I"m sure would run into issues with most trucks.
Yes, I noticed the same thing shortly after posting this write-up. My solution, being the cheapskate I am, was to unscrew the knob a couple of rotations, to distance it from the console. Three turns worked perfectly. I will probably get a shifter extension one day anyway, because I don't like how short the stock shifter is.
Good write up!!
Would anyone remember the lenght of the bolts needed??
Would anyone remember the lenght of the bolts needed??
hey.
im doing a 1" lift by my self. can you tell me what are the bolts mesurments?
thanks.
im doing a 1" lift by my self. can you tell me what are the bolts mesurments?
thanks.
- Thread starter
- #30
I should have measured them before I did the lift, but I didn't. Sorry, can't help you with that part.
Measure your stock bolts, and add an inch to their length
Measure your stock bolts, and add an inch to their length
hey.
im doing a 1" lift by my self. can you tell me what are the bolts mesurments?
thanks.
You can reuse the front and rear factory bolts. I believe that the center three can be reused, but I'm not 100% sure on that as I used the ones that came with the kit.
Be sure to get some strong locktite as you will not be able to double nut them.
what about the radiator ?
hey.
i find the right bolts, and finished the job.
your post helped me a lot.
but! the engine is 1" lower now from the body, and the fan is tuching the plastic atached to the radiator. also the fan is not at the center of the radiator. it might efect the cooling system???
any ides?
hey.
i find the right bolts, and finished the job.
your post helped me a lot.
but! the engine is 1" lower now from the body, and the fan is tuching the plastic atached to the radiator. also the fan is not at the center of the radiator. it might efect the cooling system???
any ides?
- Thread starter
- #33
hey.
i find the right bolts, and finished the job.
your post helped me a lot.
but! the engine is 1" lower now from the body, and the fan is tuching the plastic atached to the radiator. also the fan is not at the center of the radiator. it might efect the cooling system???
any ides?
I cut a section out of the bottom of the fan shroud. Just enough that the blades don't hit it.
No cooling issues.
I don't recommend cutting it.
You can do one of two things:
1) Trim the bushings between the radiator mounts (on the side, middle) to drop the radiator approx 1/2". Your radiator won't be perfectly centered on the fan, and you will need to redrill the top mounts (trim the bushings first and then you can see where to drill new holes for the top mounts). This is what I did.
2) Redrill the side mounts (the metal itself) or make new ones (pretty simple). You'll still need to redrill the top mounts unless you make new ones.
Moving the radiator is extremely simple (IMHO easier than cutting the shroud even) and will help maintain the cooling effectiveness of the fan at lower speeds. If you just cut the shroud the fan is extremely off centered, and this will decrease the effectiveness of the fan.
Stumbled across this link while browsing an Aussie forum, and thought I'd share for those considering a body lift.
80's Series Lift
This addresses a 2" lift, but there are some things to watch out for on the 1" lift as well. Useful information either way.
Another link folks may find useful: Outer Limits 4x4 Board :: View topic - Manual 80 Series Body lift
80's Series Lift
This addresses a 2" lift, but there are some things to watch out for on the 1" lift as well. Useful information either way.
Another link folks may find useful: Outer Limits 4x4 Board :: View topic - Manual 80 Series Body lift
This is a great write-up. I referred back to it a few times during my install this weekend. I have a few notes from my experience that I'll share to append this thread:
Bear in mind that my project was on a 1993 model. Later models may have slightly different issues at least around the cats.
In retrospect I don't think I needed to remove the seats. I think I could have easily done this with my seats remaining in the vehicle and save myself some strain and some time. Just move the front seats fairly far forward on the sliders before you disconnect the battery because the location for puck #3 is about one inch inboard from the rear mounting bolt of the front seat. Just move the seats forward enough to get your ratchet or impact gun on the bolt. You can easily razor a small slit in the carpet to get to the bolt cover/hole and save yourself a lot of work removing the seats.
Almost all of the pictures here are of the driver's side (or the left side, for RHD guys). I have numbered the puck positions from 1-5 starting at the radiator (#1) and ending by the rear bumper (#5). As OP noted, the mounts are symmetrical so if you understand one side, you understand them both.
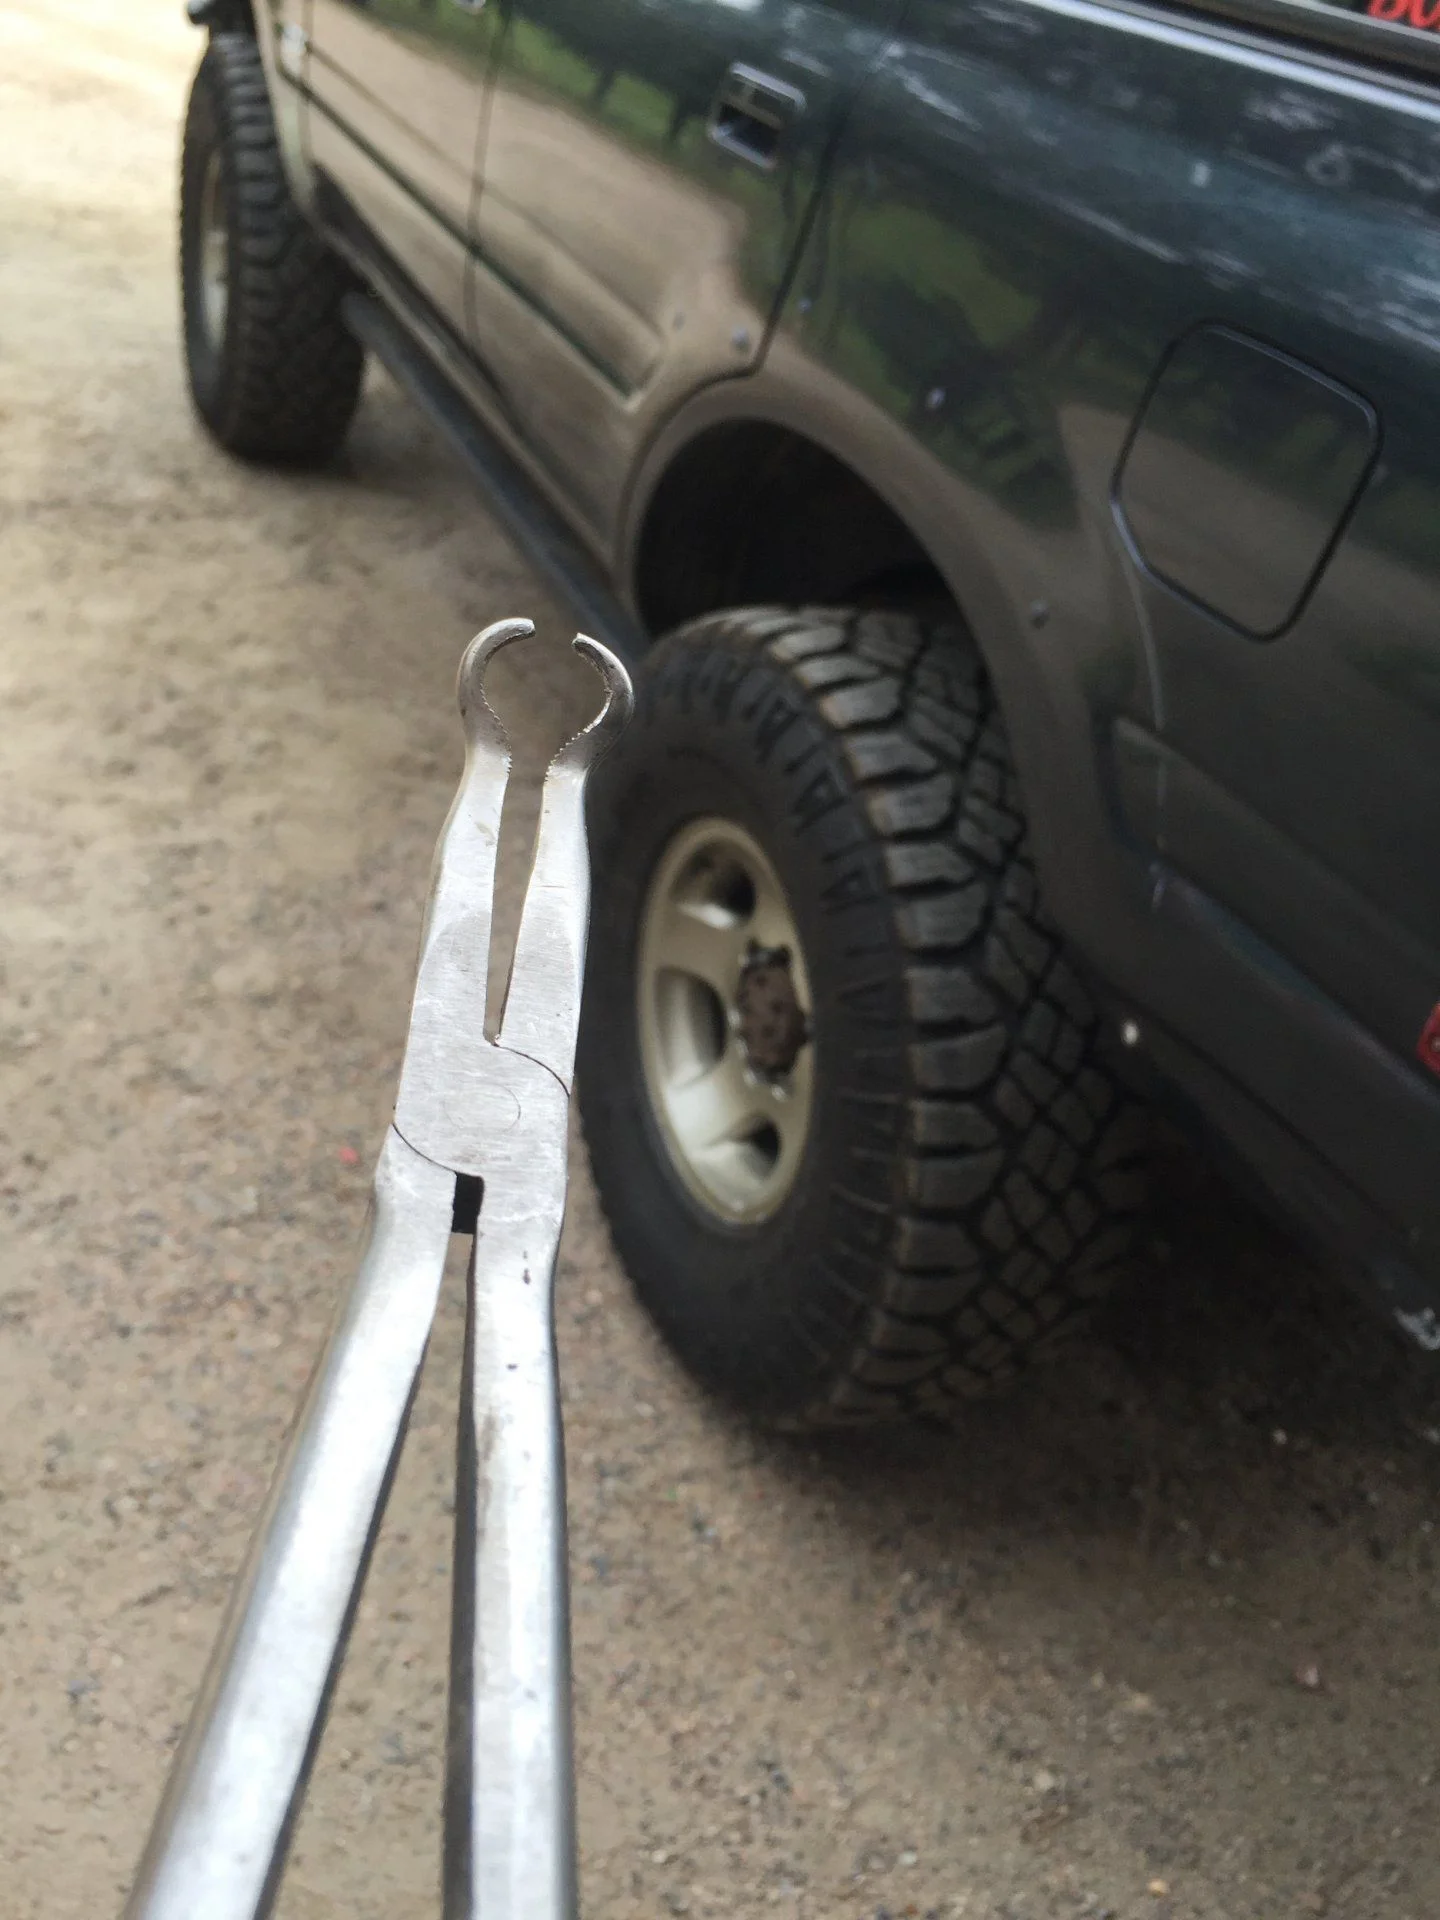
Puck #1: I removed the front bumper to get to this. I liked having the extra space. As OP mentioned this is a bit of a bear to get out. I used all my extensions and a toggle socket with my impact gun. The pass side was rusted in so I had to apply a torch and a lot of effort, but I finally got it out.
Reaching the bolt was actually pretty easy with the right tool. I had a pair of tube pullers (see pic) that made it a piece of cake to get the bolt out and put the new one back in.
Get a pair of magic fingers. (Got mine for a few bucks at Harbor Freight a long time ago.
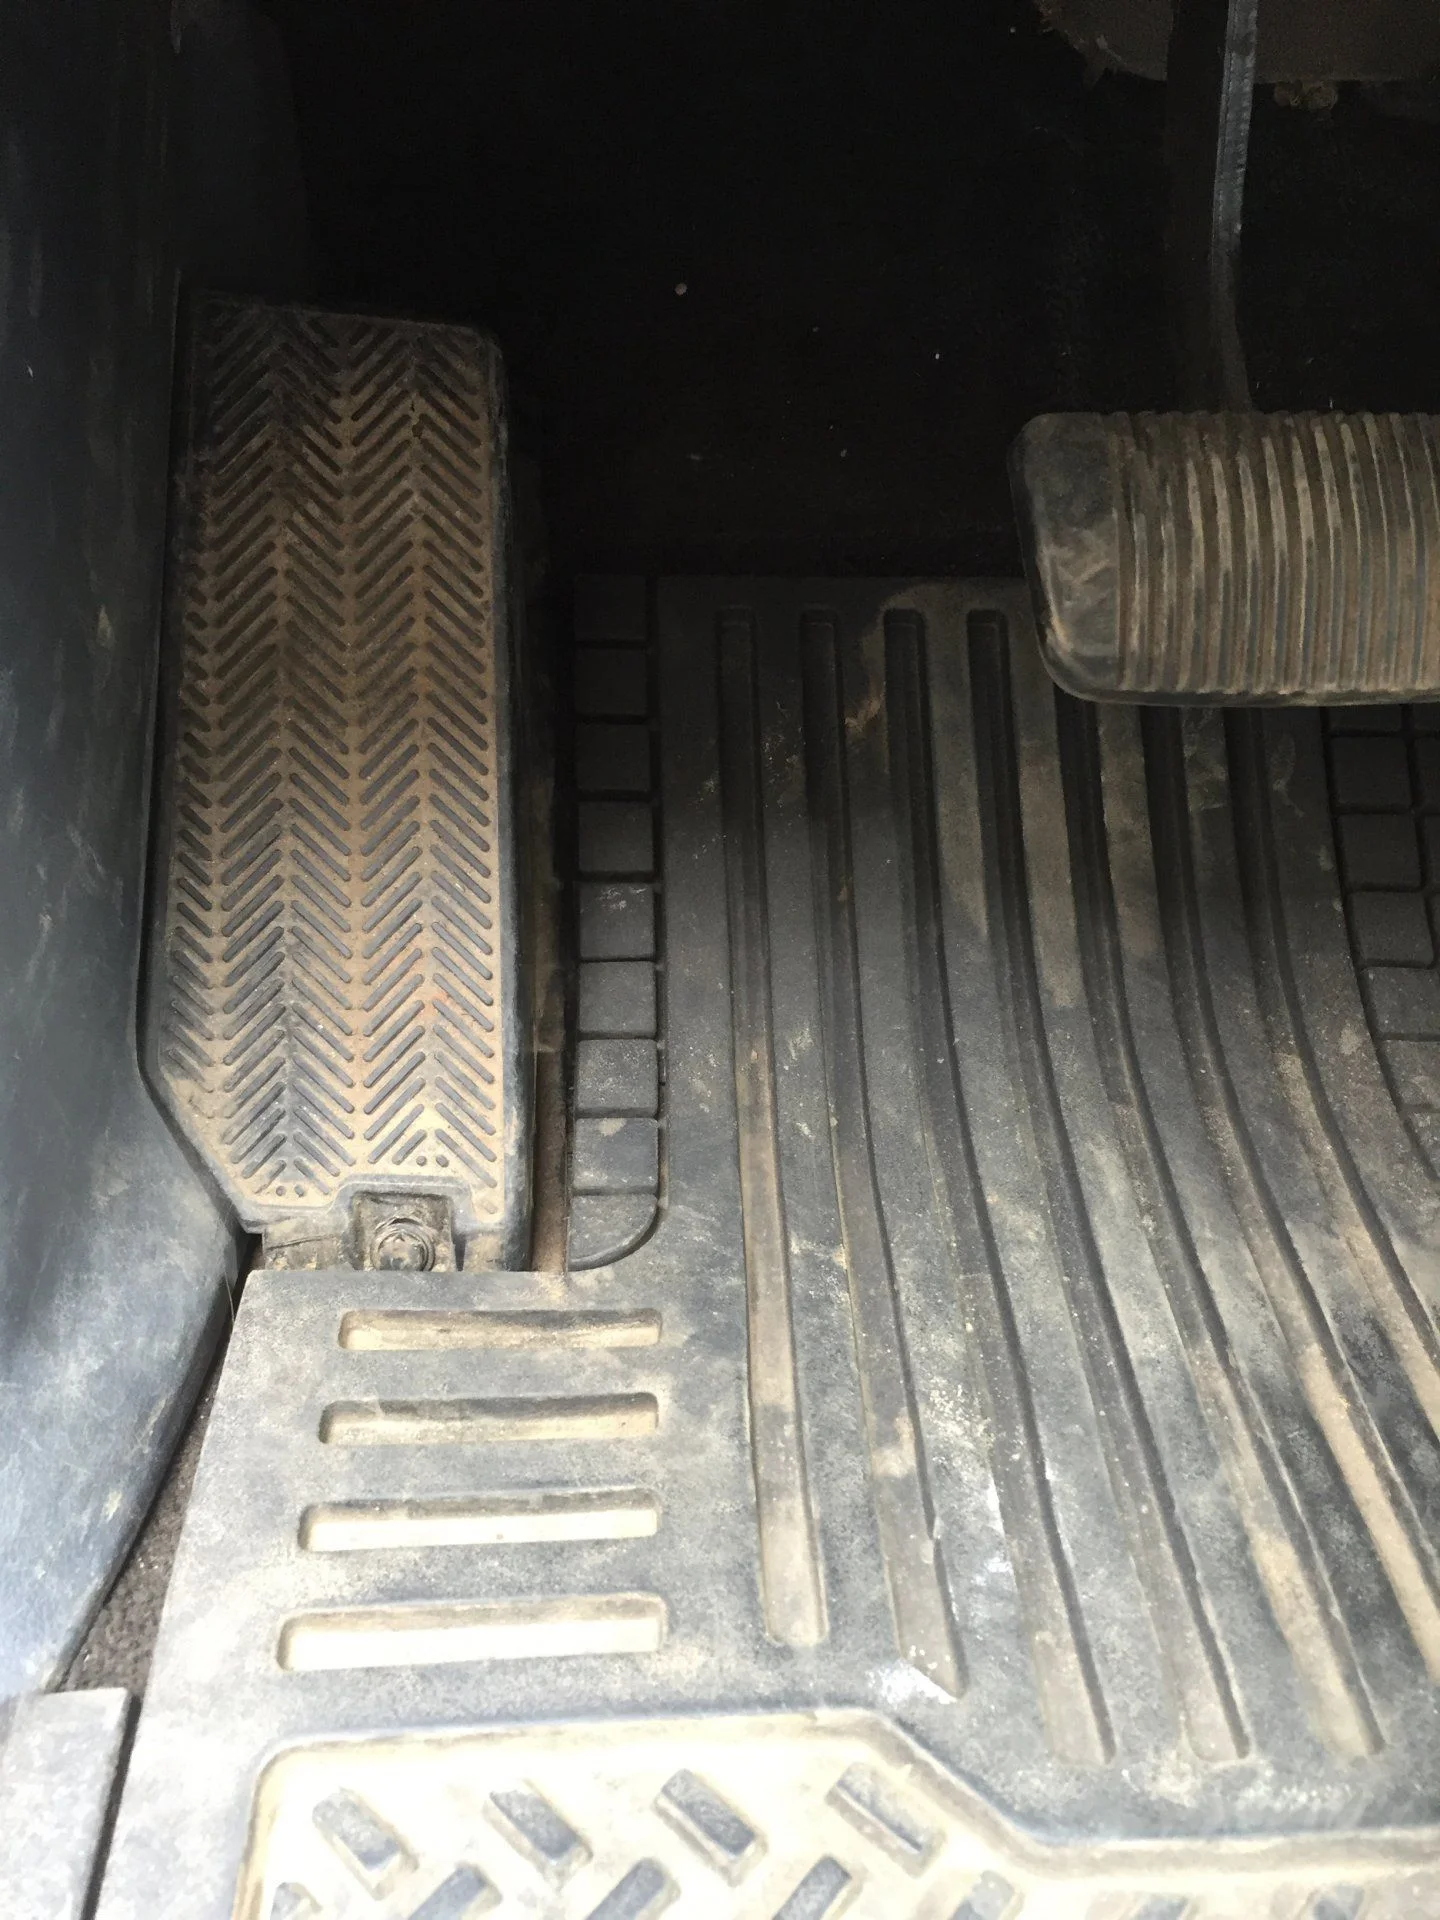
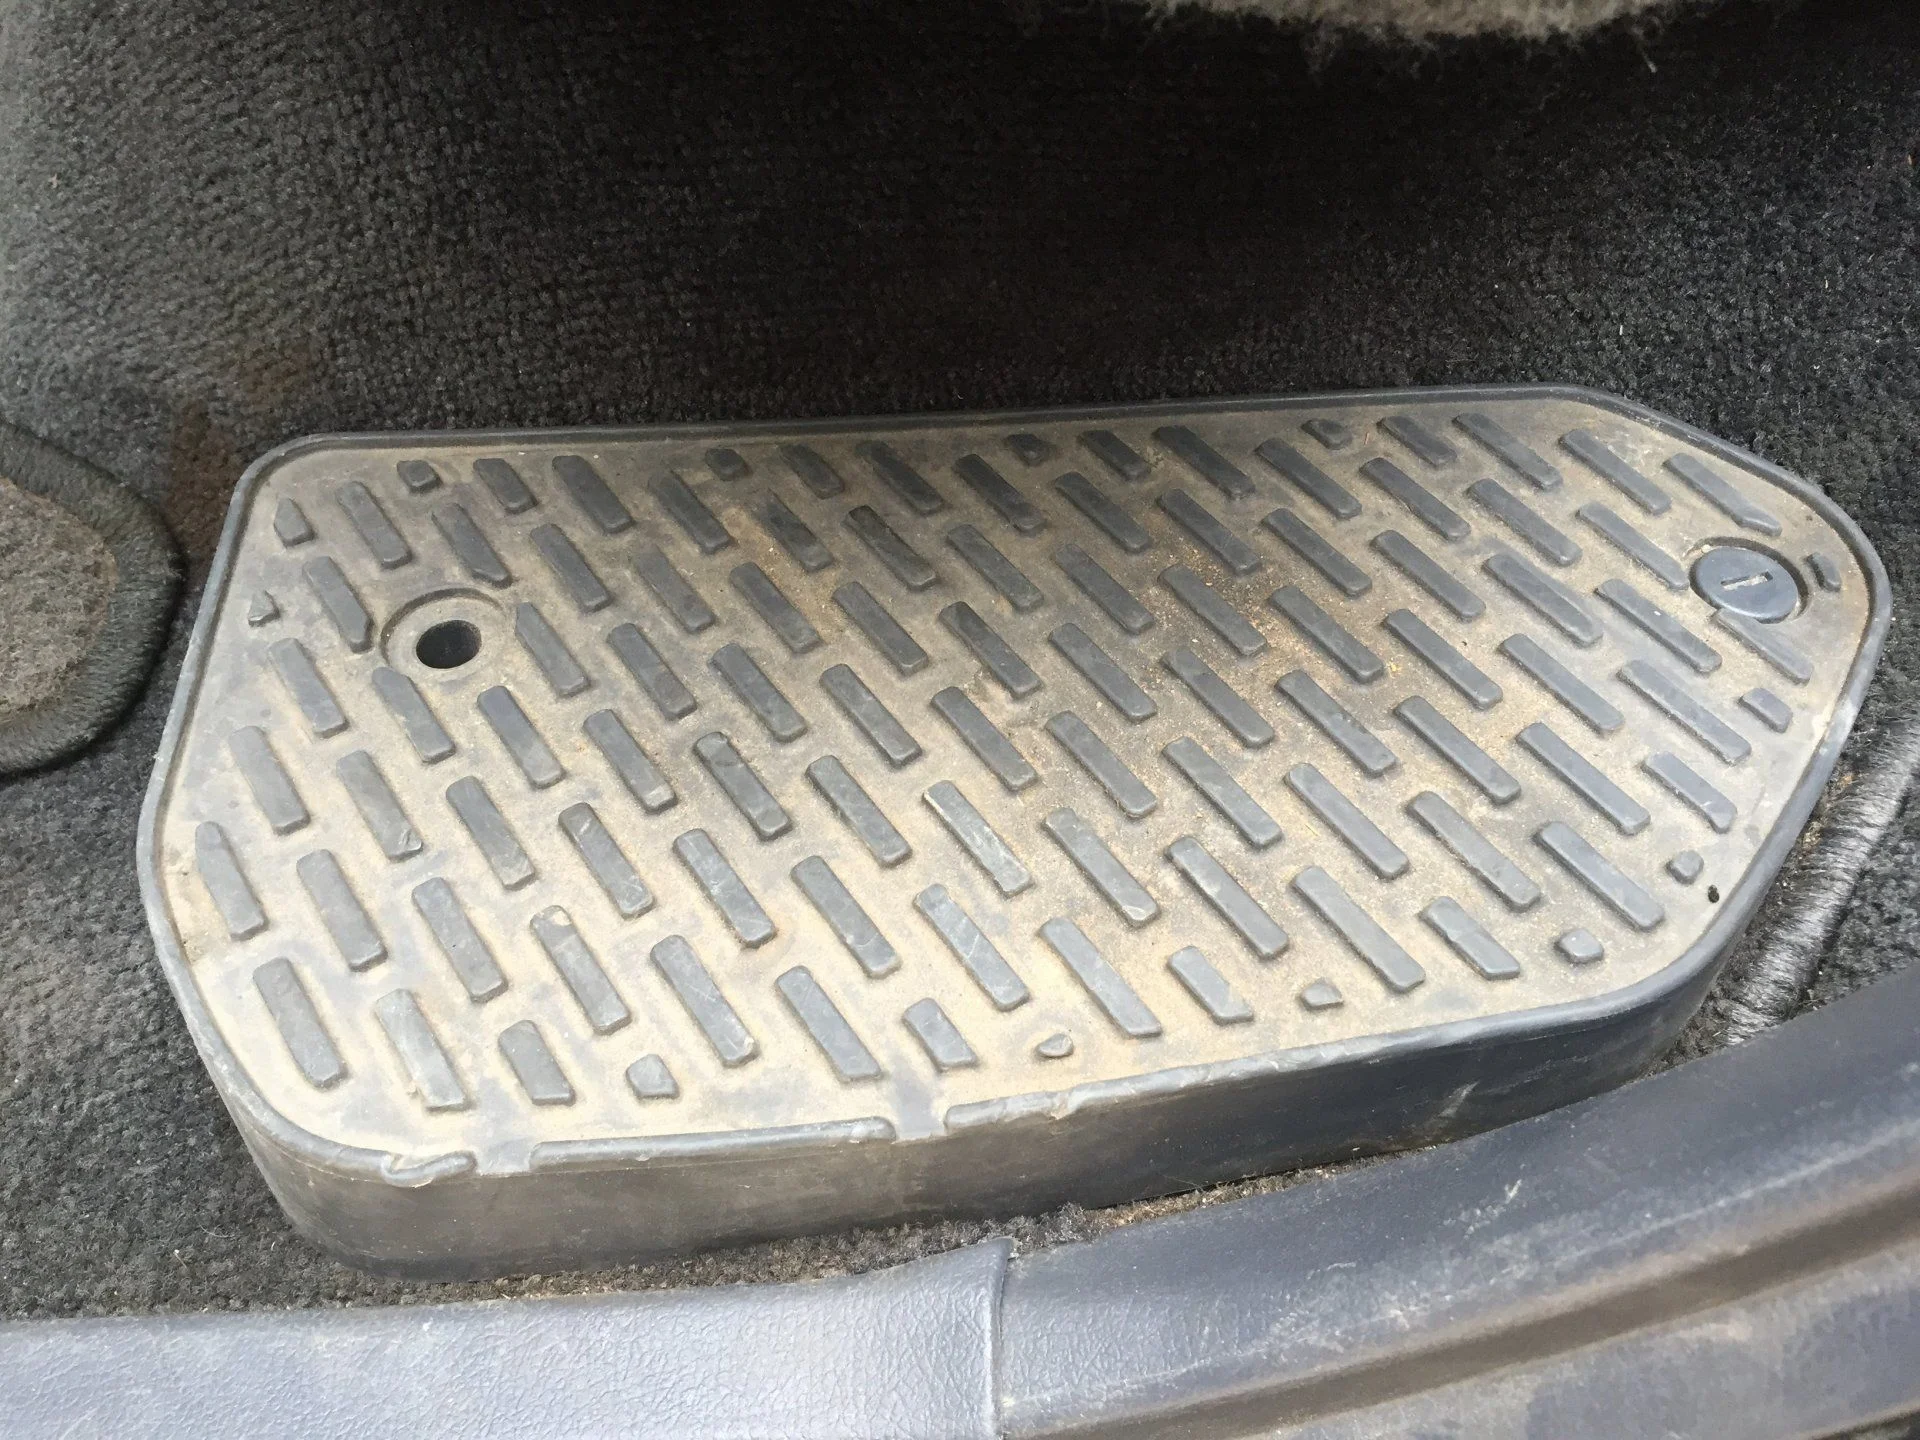
This is the position of DS puck #2. It's under the dead pedal (and under the floor mat/carpet. Get a new razor and make a small slit beginning about 1" to the right (inboard) of the mounting nut for the dead pedal. A 2-3" slit is all you'll need and it will disappear under the floor mat.
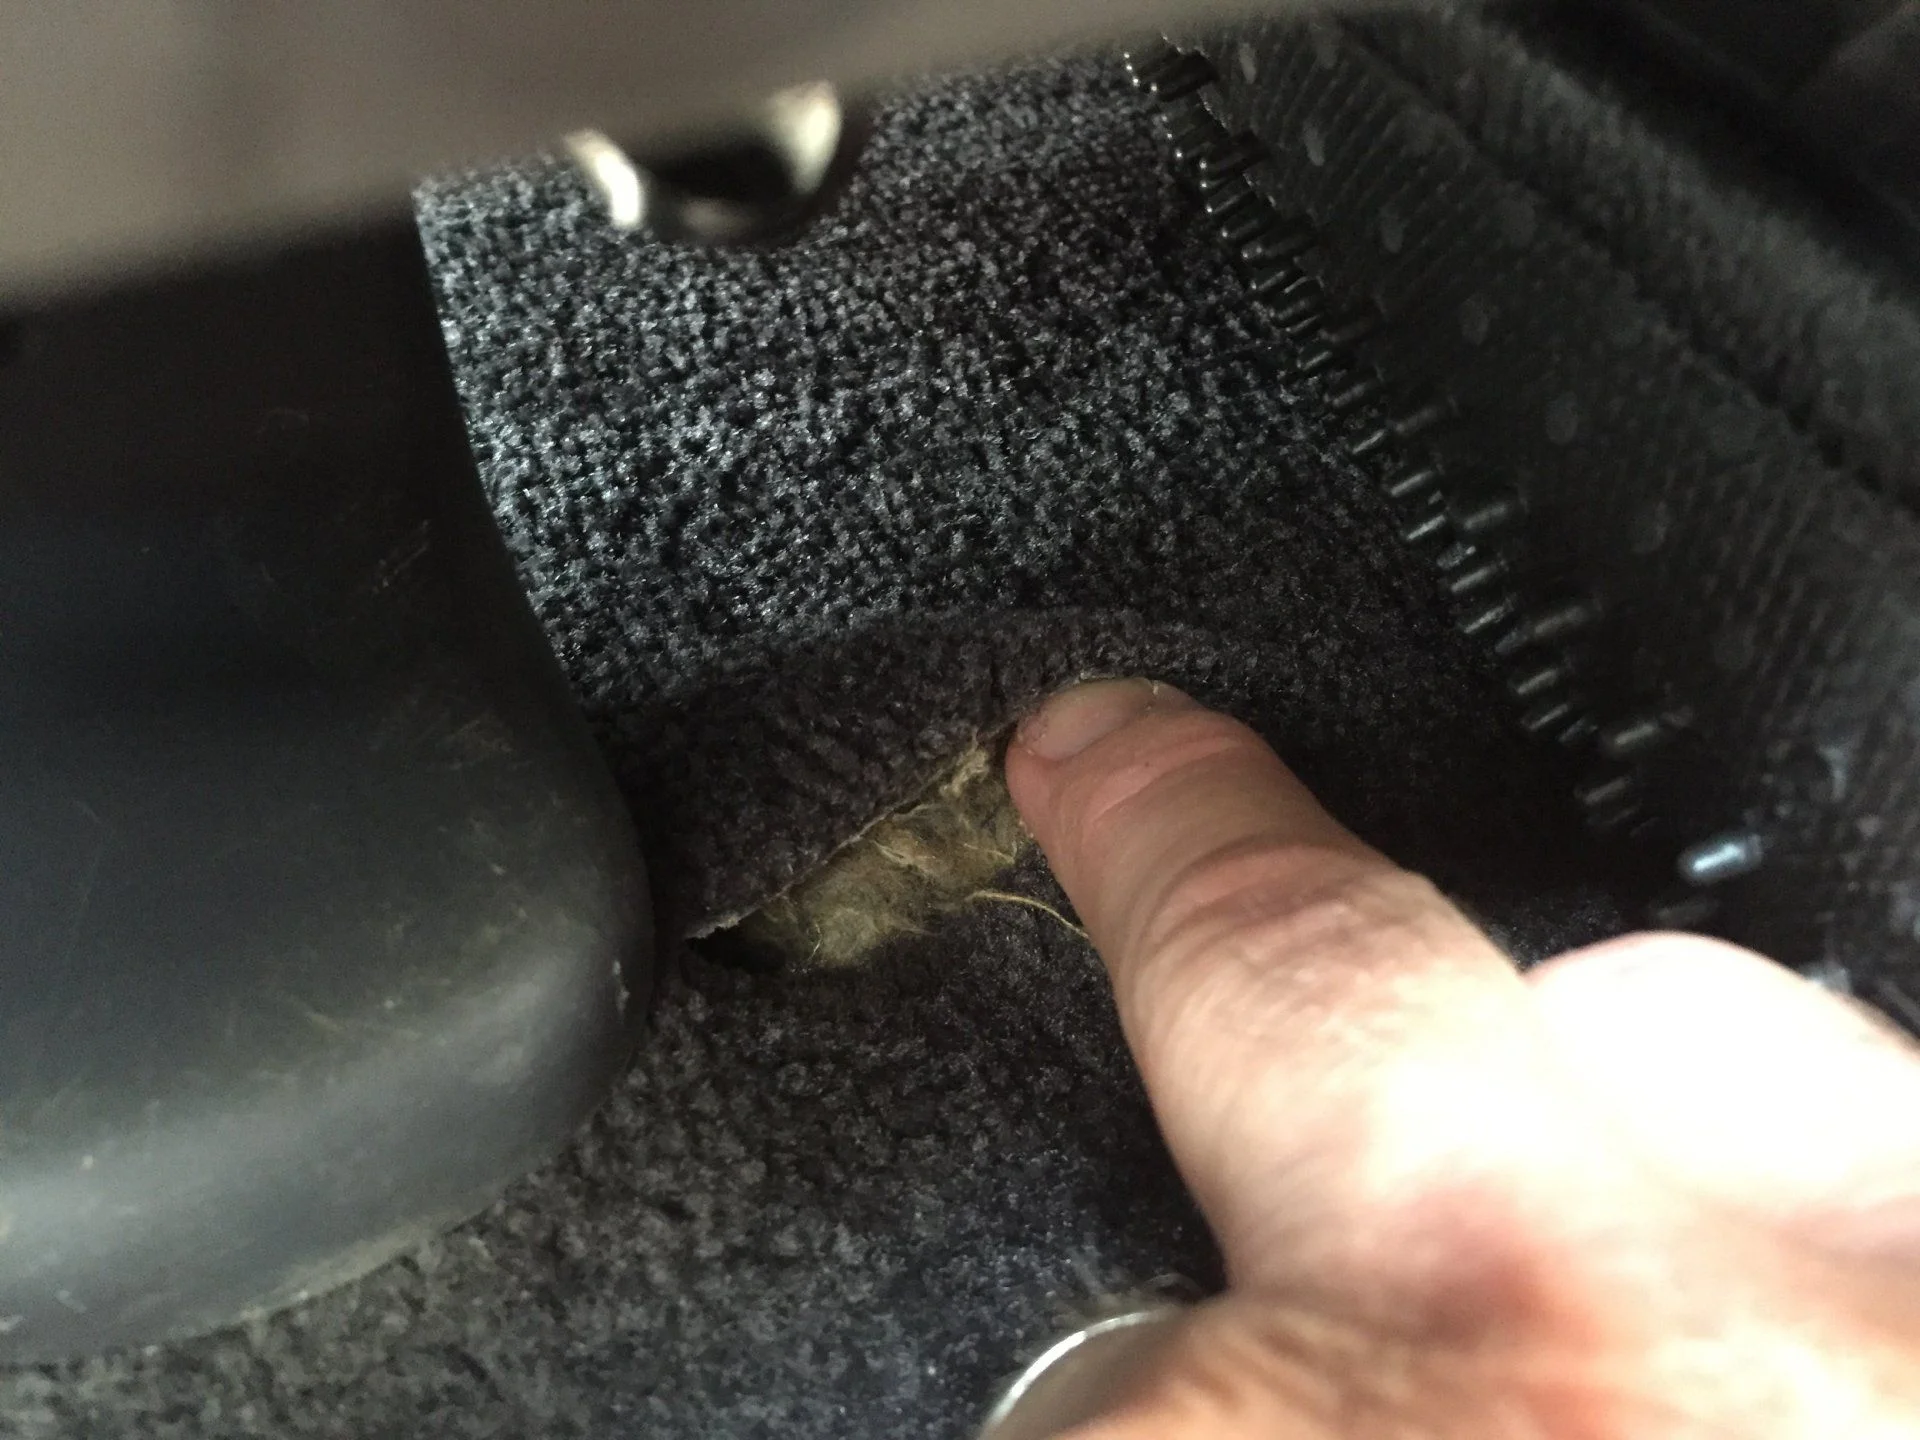
This is the location of DS puck #3. It's under the back of the front seats about 1" in from the outboard rear mounting bolt. If you move the seat up you should be able to get your air tools in there. Again, I made about a 2" slit in the carpet (shown; it disappeared under the mats) to access the bolt hole.
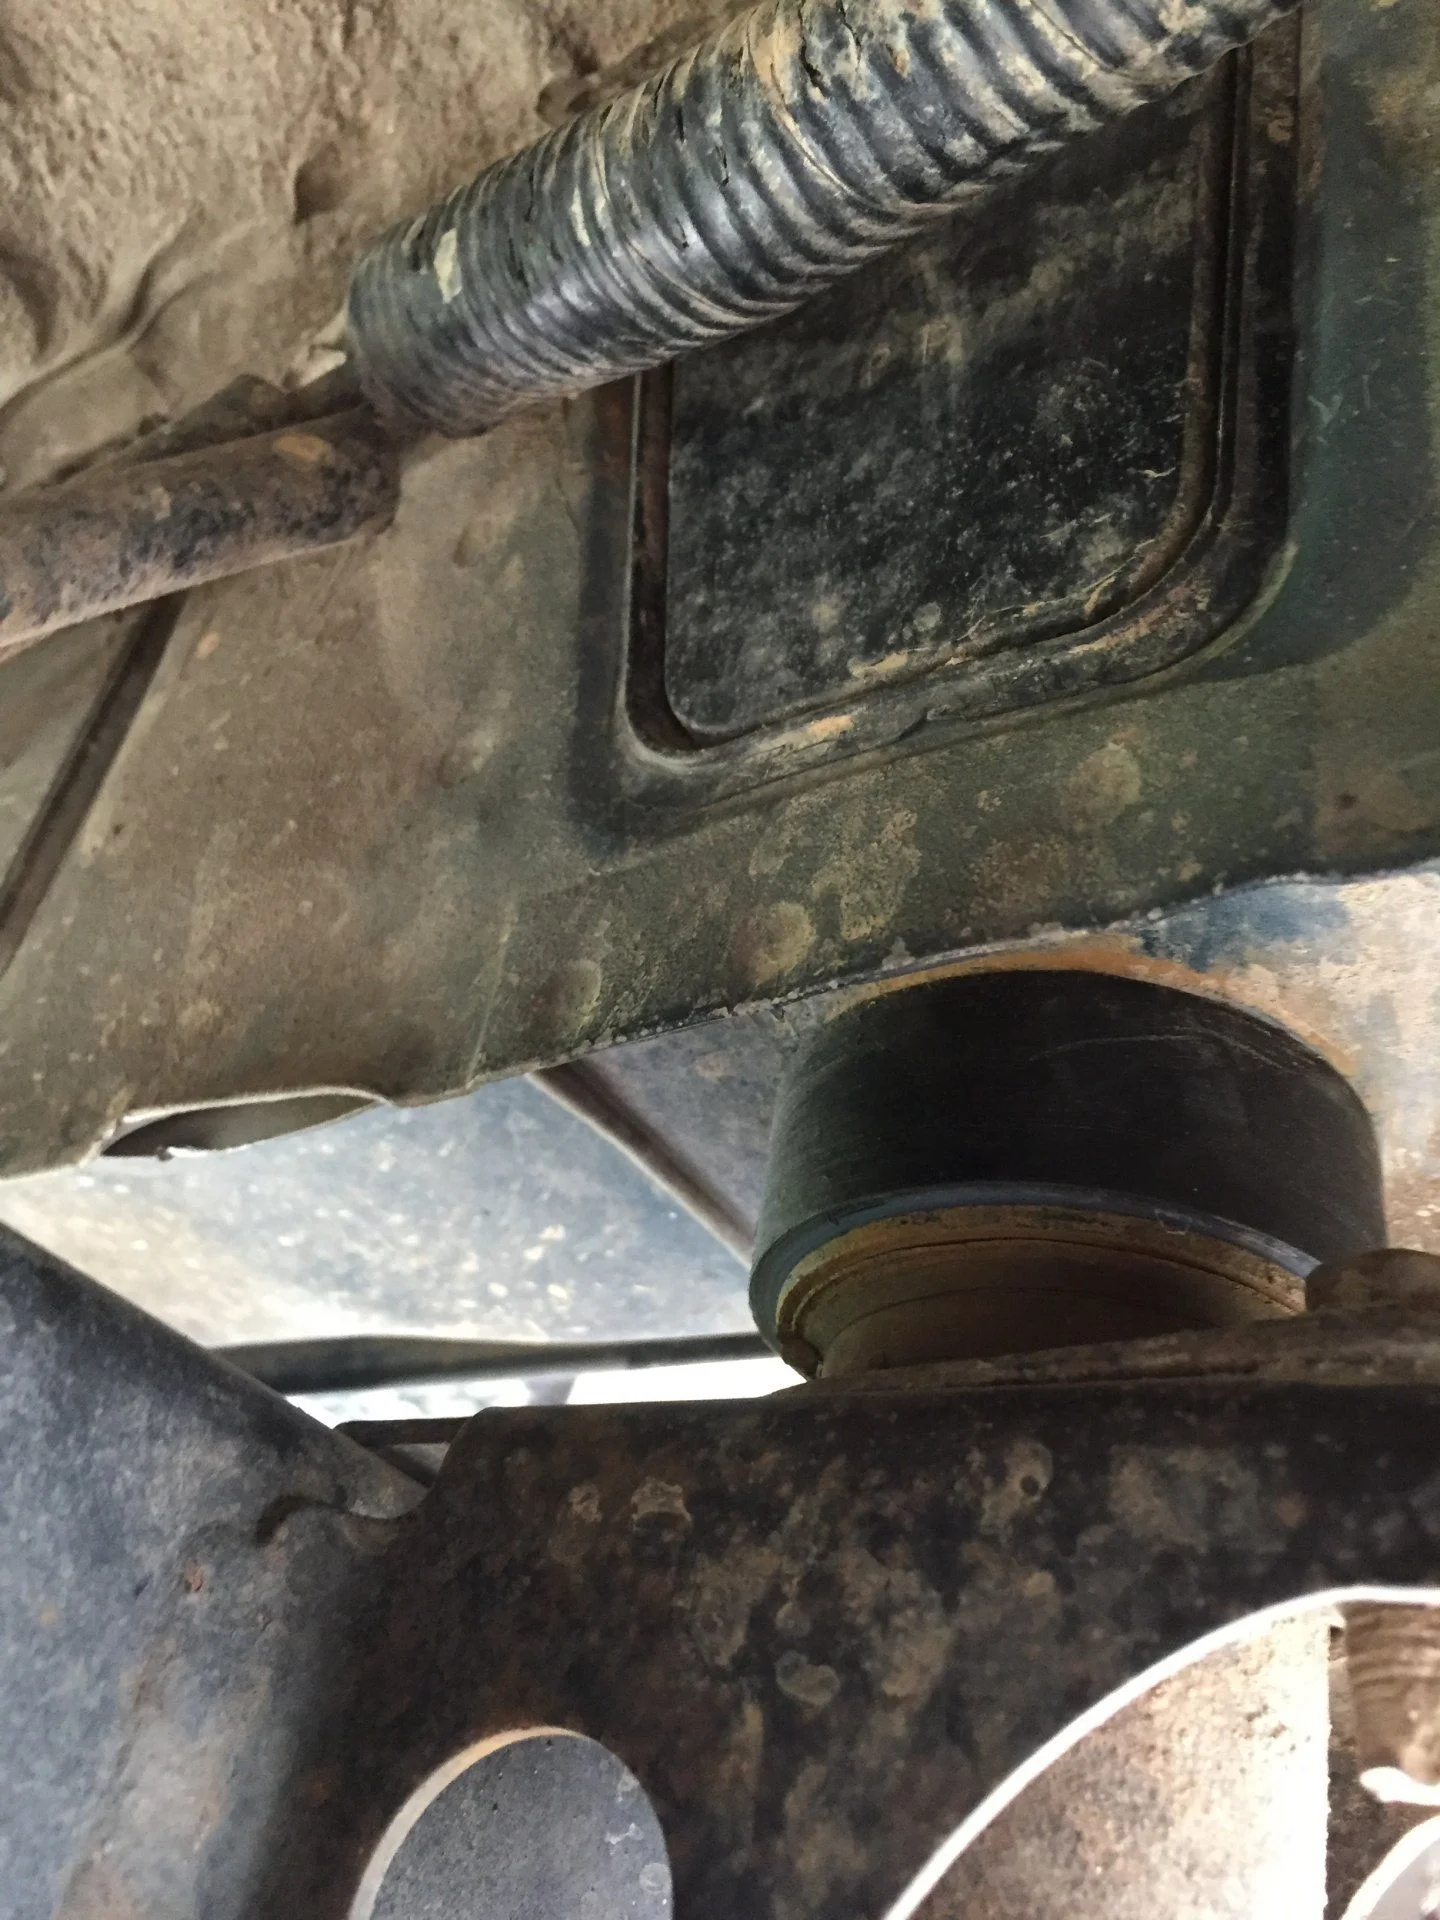
This is the location of DS puck #4. You'll find it under the plastic step plate by the rear seats.
This is the location of DS puck #5. There is a square(-ish) plastic panel that you can pop out with a flat screwdriver to access the bolt head. As OP mentioned, it's a hassle to remove this bolt because of the size of the access panel but with the 1" lift you can just move the bolt up and out of the way, insert the puck, and reattach the original hardware.
On the passenger side I had been dreading the bolt above the cats until I found it. At least on the 93 model it's on the exhaust pipes before the cats. REALLY easy to get to with an extension. Easy peasy.
I did have to lower my radiator, which turned out to be a slightly bigger deal than I had expected. Roger's brackets are great but they came with no instructions, and my manual wasn't terribly helpful. After knocking around a bit, here is how I did it:
First, my bumper was off, so having that extra room to work was really nice.
I also removed the grille, headlights, turn signals, and corner markers. Again, it was nice to have that room and it gave me the chance to clean up some stuff. All really straightforward, but you'll have to get to the front radiator nuts through the grille and headlights.
I then removed the lower radiator mounts and radiator just naturally dropped about 1".
After inserting the drop brackets I trimmed the rubber insulators and used a big fender washer to keep the radiator from pulling through the bracket.
Then I pulled out my Dremel tool and cut off the lowest stud on each side of the radiator. I then reattached the lower mounting bracket using a lower hole in the bracket and put it all back together.
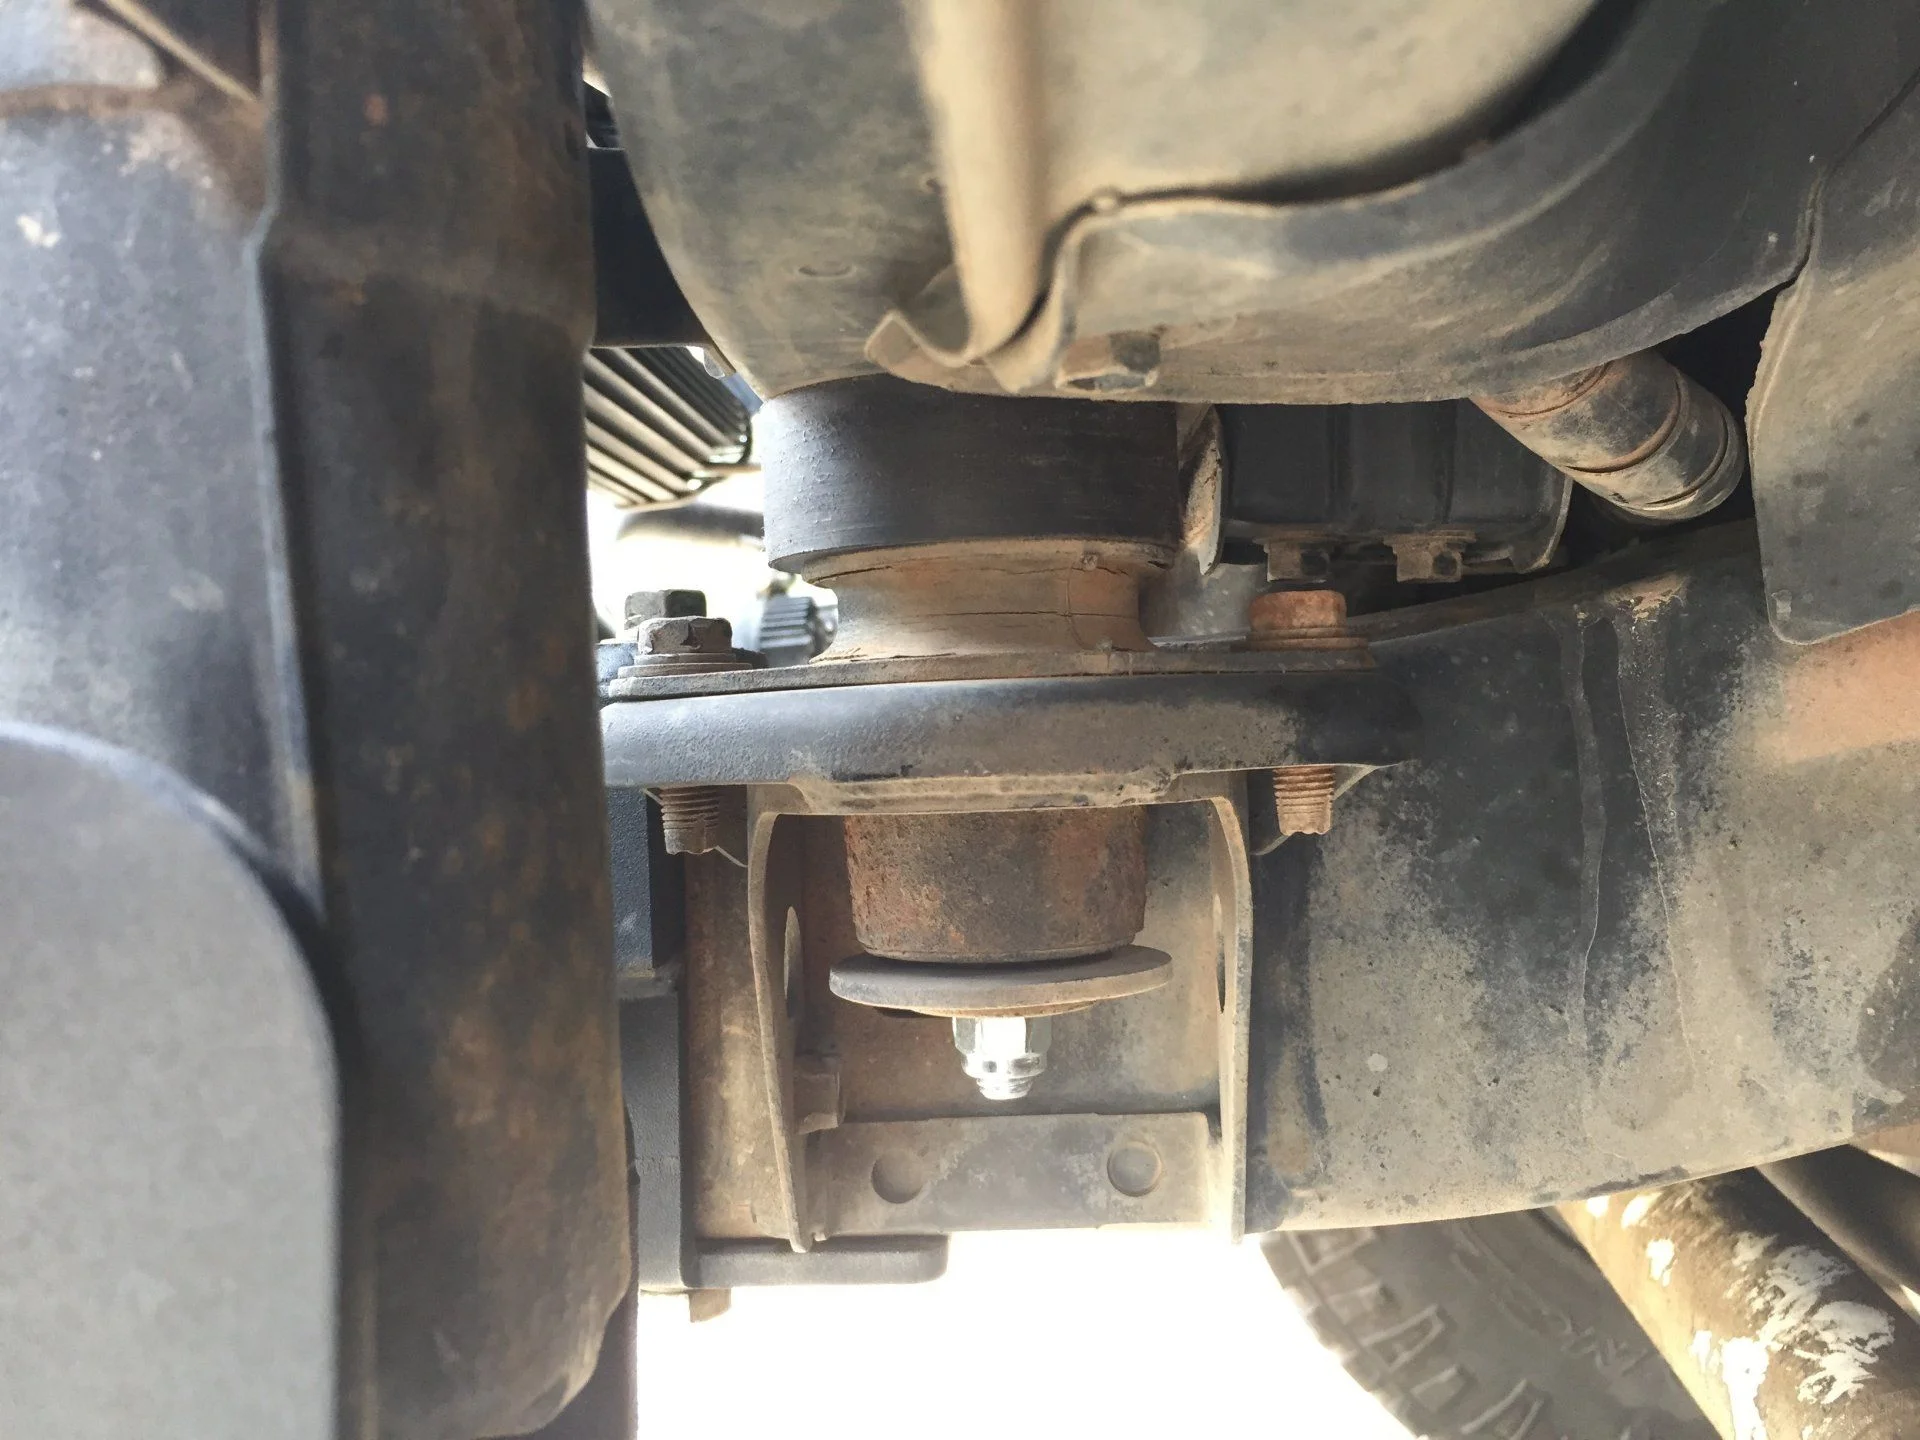
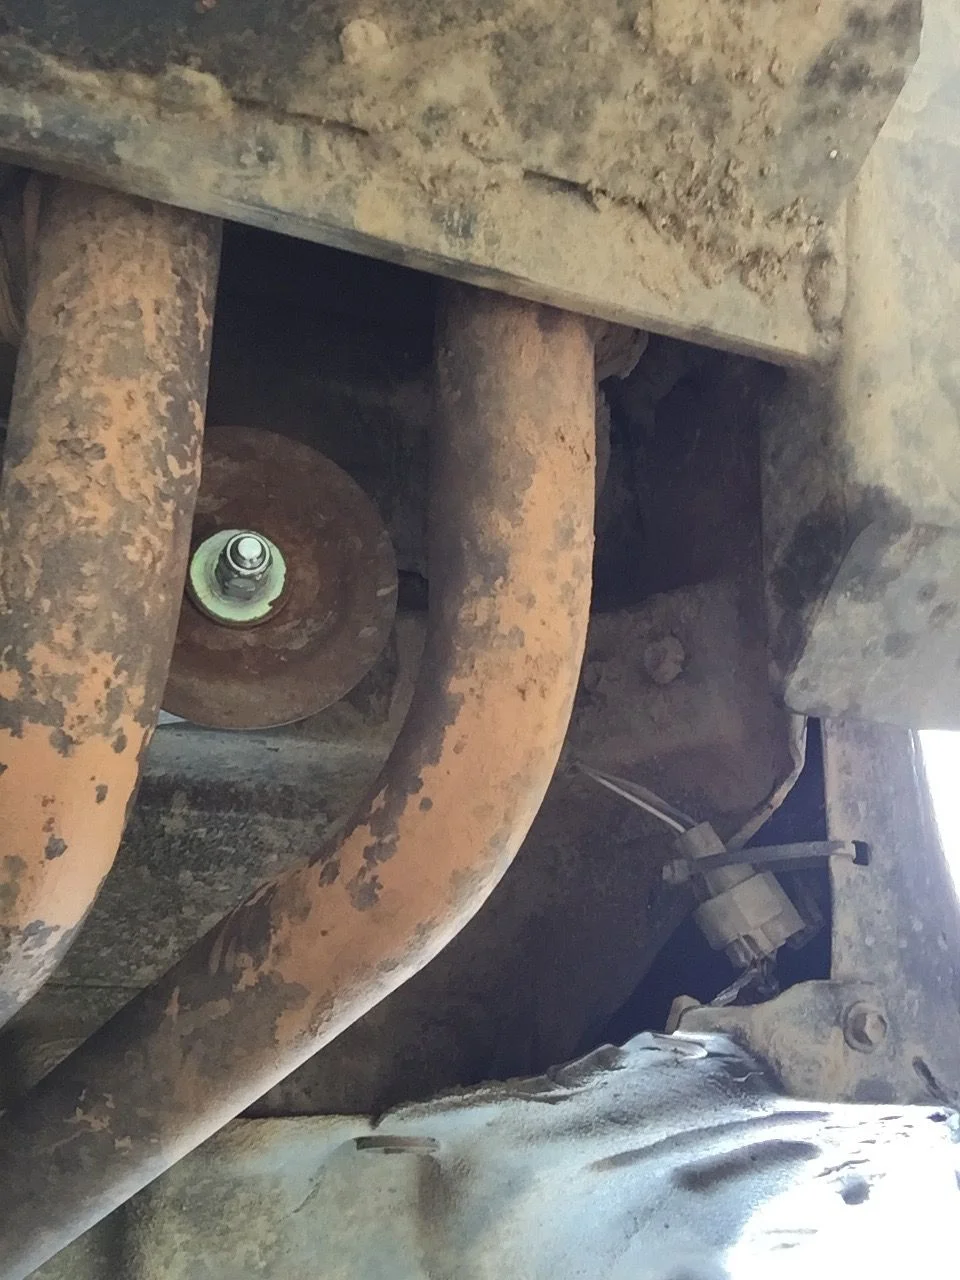
Upper radiator mount with drop bracket installed. (Symmetrical each side):

The lower radiator mount after repositioning on lower radiator stud:

I worked pretty slowly and methodically and had to struggle with a rusted-in bolt on the pass side by the radiator. I started at 9:00 AM and wrapped it up by around 8:00 PM. I took breaks and took my time, but kept at it. I was able to do this solo. In fact, I think another pair of hands might have been in the way unless you choose to divide and conquer. I had no trouble reaching the top and bottom of each body mount by myself.
In all, a gratifying project that accomplished exactly what I wanted: 1) eliminating my slider squeak by creating space below the pinch weld, 2) creating more space between the body and the cats to lower cabin temps a little, and 3) dial in my lift without having to add longer springs and screwing with panhards, etc.
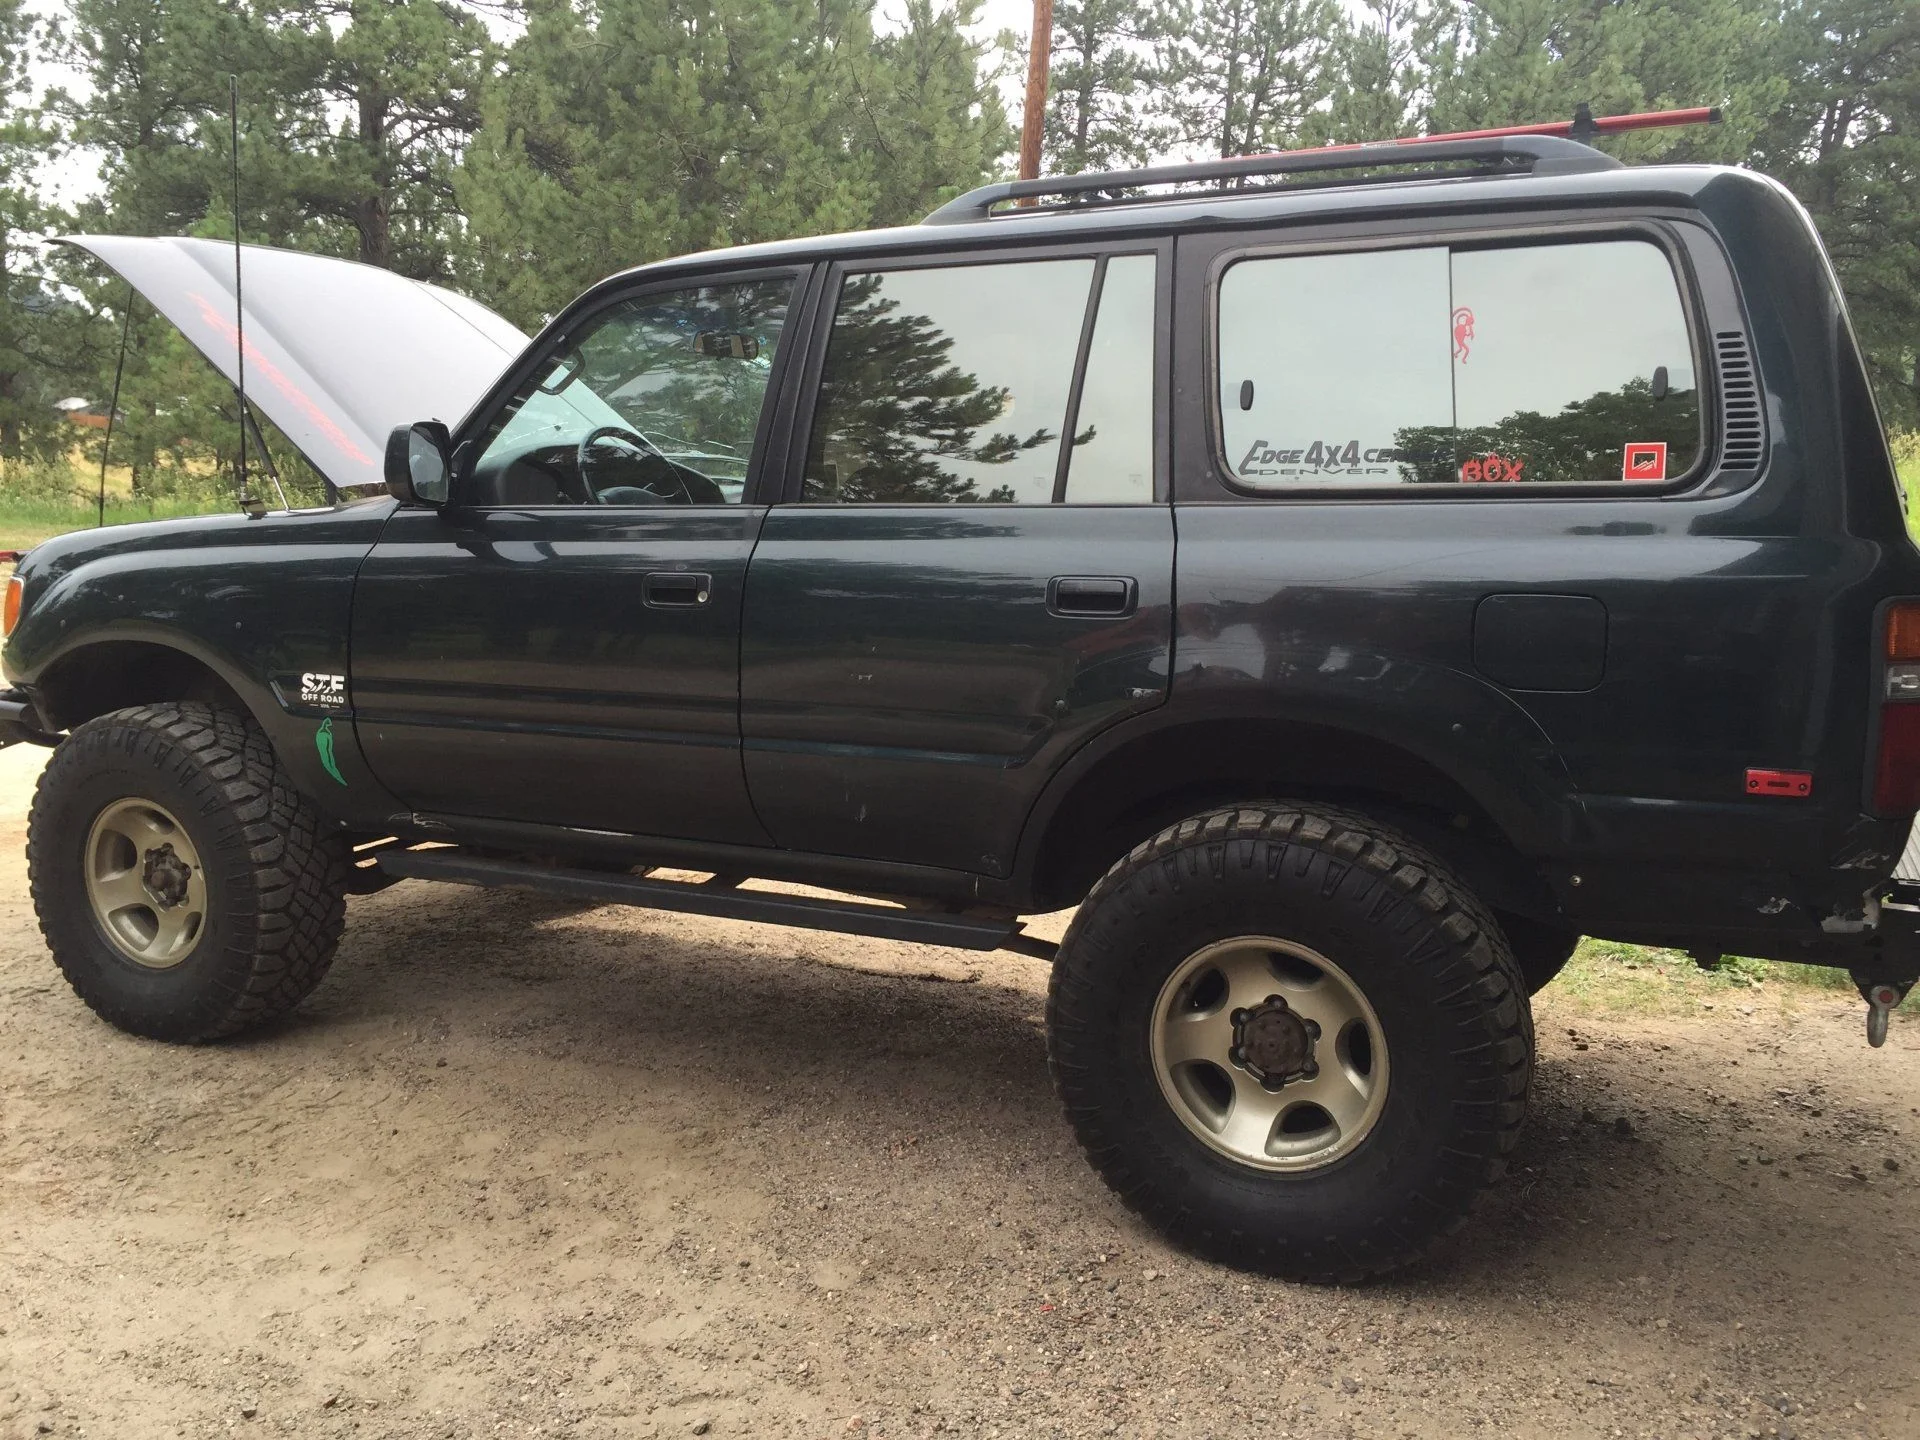
Here's the final look:
Bear in mind that my project was on a 1993 model. Later models may have slightly different issues at least around the cats.
In retrospect I don't think I needed to remove the seats. I think I could have easily done this with my seats remaining in the vehicle and save myself some strain and some time. Just move the front seats fairly far forward on the sliders before you disconnect the battery because the location for puck #3 is about one inch inboard from the rear mounting bolt of the front seat. Just move the seats forward enough to get your ratchet or impact gun on the bolt. You can easily razor a small slit in the carpet to get to the bolt cover/hole and save yourself a lot of work removing the seats.
Almost all of the pictures here are of the driver's side (or the left side, for RHD guys). I have numbered the puck positions from 1-5 starting at the radiator (#1) and ending by the rear bumper (#5). As OP noted, the mounts are symmetrical so if you understand one side, you understand them both.
Puck #1: I removed the front bumper to get to this. I liked having the extra space. As OP mentioned this is a bit of a bear to get out. I used all my extensions and a toggle socket with my impact gun. The pass side was rusted in so I had to apply a torch and a lot of effort, but I finally got it out.
Reaching the bolt was actually pretty easy with the right tool. I had a pair of tube pullers (see pic) that made it a piece of cake to get the bolt out and put the new one back in.
Get a pair of magic fingers. (Got mine for a few bucks at Harbor Freight a long time ago.
This is the position of DS puck #2. It's under the dead pedal (and under the floor mat/carpet. Get a new razor and make a small slit beginning about 1" to the right (inboard) of the mounting nut for the dead pedal. A 2-3" slit is all you'll need and it will disappear under the floor mat.
This is the location of DS puck #3. It's under the back of the front seats about 1" in from the outboard rear mounting bolt. If you move the seat up you should be able to get your air tools in there. Again, I made about a 2" slit in the carpet (shown; it disappeared under the mats) to access the bolt hole.
This is the location of DS puck #4. You'll find it under the plastic step plate by the rear seats.
This is the location of DS puck #5. There is a square(-ish) plastic panel that you can pop out with a flat screwdriver to access the bolt head. As OP mentioned, it's a hassle to remove this bolt because of the size of the access panel but with the 1" lift you can just move the bolt up and out of the way, insert the puck, and reattach the original hardware.
On the passenger side I had been dreading the bolt above the cats until I found it. At least on the 93 model it's on the exhaust pipes before the cats. REALLY easy to get to with an extension. Easy peasy.
I did have to lower my radiator, which turned out to be a slightly bigger deal than I had expected. Roger's brackets are great but they came with no instructions, and my manual wasn't terribly helpful. After knocking around a bit, here is how I did it:
First, my bumper was off, so having that extra room to work was really nice.
I also removed the grille, headlights, turn signals, and corner markers. Again, it was nice to have that room and it gave me the chance to clean up some stuff. All really straightforward, but you'll have to get to the front radiator nuts through the grille and headlights.
I then removed the lower radiator mounts and radiator just naturally dropped about 1".
After inserting the drop brackets I trimmed the rubber insulators and used a big fender washer to keep the radiator from pulling through the bracket.
Then I pulled out my Dremel tool and cut off the lowest stud on each side of the radiator. I then reattached the lower mounting bracket using a lower hole in the bracket and put it all back together.
Upper radiator mount with drop bracket installed. (Symmetrical each side):
The lower radiator mount after repositioning on lower radiator stud:
I worked pretty slowly and methodically and had to struggle with a rusted-in bolt on the pass side by the radiator. I started at 9:00 AM and wrapped it up by around 8:00 PM. I took breaks and took my time, but kept at it. I was able to do this solo. In fact, I think another pair of hands might have been in the way unless you choose to divide and conquer. I had no trouble reaching the top and bottom of each body mount by myself.
In all, a gratifying project that accomplished exactly what I wanted: 1) eliminating my slider squeak by creating space below the pinch weld, 2) creating more space between the body and the cats to lower cabin temps a little, and 3) dial in my lift without having to add longer springs and screwing with panhards, etc.
Here's the final look:
I wanted to add to this thread since it was missing the stock bolt lengths. The front mount bolt is 6.125" long and the threaded area below the washer is 1.5". The mid mount bolts are 4.313" long and the threaded area below the washer is 1". And the rear mount bolts are 4.75" long with the threaded area below the washer 1.5". Based on these measurements, I'm going with 6.5" long for the fronts, 5" long for the mids and 5.5" long for the rears. for a 1" lift. I also took a pic of the front mount since I have everything out of the way currently getting ready to pull the engine.


Similar threads
Users who are viewing this thread
Total: 1 (members: 0, guests: 1)