re_guderian
SILVER Star
So on a recent trip, I noticed the GX making a rather "unrefined" squeaking sound definitely emanating from the passenger's rear hub area. Upon disassembly and taking the rotor off, I noticed one of the parking brake (emergency brake/hand brake) pads flopping around in the in/out direction. Quick search of the FSM indicated that the hold down pin, cups, and spring were likely to blame, and visual confirmation that the pin was indeed missing from the back side of the backing plate. Got parts from Bell Lexus and tackled what I thought was going to be a half-hour, in-and-out job. I just have to say that this is the WORST design ever. There is absolutely no room to get fingers or tools in there to compress the spring and rotate the outer cup to lock it all in place.
************************
Edit: before using this tip, scroll down to post #5 in this thread...
*************************
And there are no provisions for any tool (that I know of). The back side of the pin (like a nail head) is round (should have made it hex to fit a socket), and the outer surface of the outer cup is smooth and polished, yet you need to apply a significant compression force WHILE rotating it 90 degrees to engage the locking feature. (should have holes to accept a pin-like tool, or a raised hex area to accept a socket.) But I'm sure Toyota has maximized the profits on a 50 year-old design, so I won't hold my breath. All YouTube videos of parking brake assembly make this step look so easy, because on other designs it IS so easy. They don't bury this hold down spring deep behind the flange, or have other provisions to access it. Anyway, thought I'd share what I learned...
First, after jacking and securing the truck, including chocking the front wheels, you'll need to put the truck in Neutral to be able to rotate the rear hub and align a hole in the flange with the hold down spring. If you wait to do this until you've removed the caliper, well, just remember you have to push the brake pedal to be able to shift into N...
Next, after spending multiple hours of squinting, swearing and sweating, I stopped for a break, and found an old thread over on the GX 470/Prado 120 side of GXOR that I'll reference here. It. Was. A. Life. Saver. I can't figure any other way to re-do, repair, or replace the parking brake shoes/assembly without this step.
 forum.ih8mud.com
This thread has all the FSM pictures as well.
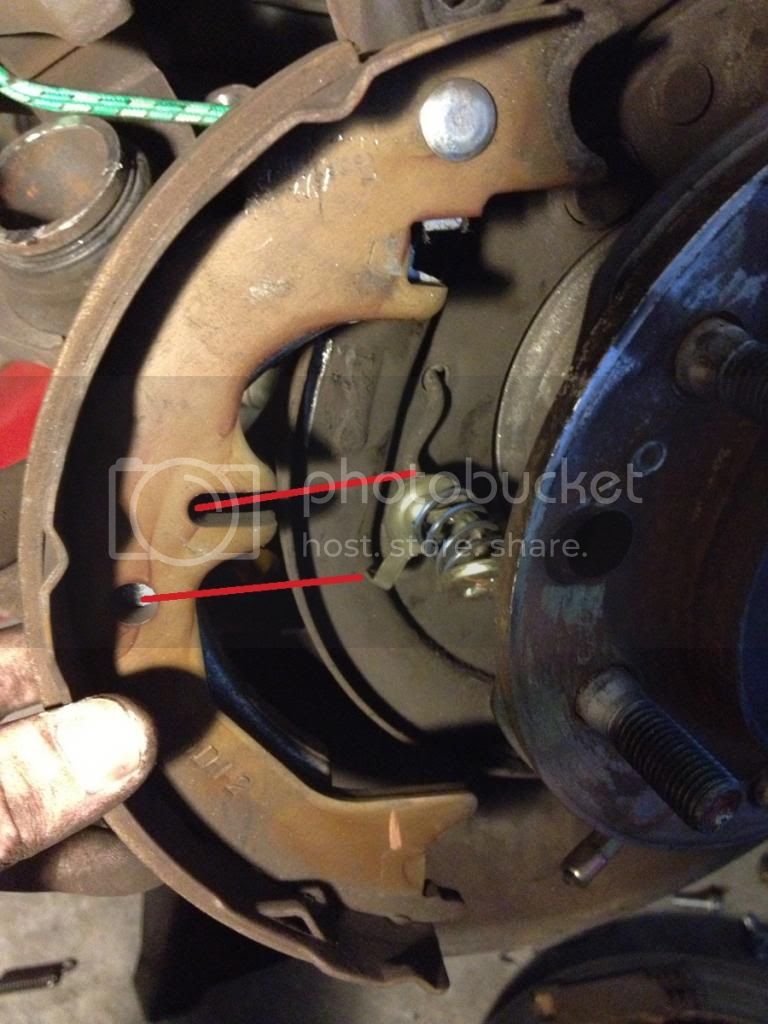
I ended up using 16 gage picture wire, and threading it through the hole in the flange, through the center hole of the outer cup along side the pin, through the spring, and through the center hold of the inner cup, then around the outside of the cup/spring assembly, back through the hole in the flange, and wrapped the loose ends around some wheel studs.
This effectively compresses the spring OUTBOARD against the outer cup and end of the pin, leaving enough room to manipulate the shoe into position behind the compressed spring while getting the pin lined up with the slot in the shoe. You may still have to use a variety of tools to do all the fiddling. I used a trim tool, small regular screwdriver, dental pick, and locking needle-nose to get everything all buttoned up.
Using this technique I was able to get it all back together in fairly short order with a minimum of drama. Enough that I no longer dread having to take that all apart again. Outside of the order of assembly, the FSM is useless. It simple says "install". But no hints as to how.
A few pics for reference.


************************
Edit: before using this tip, scroll down to post #5 in this thread...
*************************
And there are no provisions for any tool (that I know of). The back side of the pin (like a nail head) is round (should have made it hex to fit a socket), and the outer surface of the outer cup is smooth and polished, yet you need to apply a significant compression force WHILE rotating it 90 degrees to engage the locking feature. (should have holes to accept a pin-like tool, or a raised hex area to accept a socket.) But I'm sure Toyota has maximized the profits on a 50 year-old design, so I won't hold my breath. All YouTube videos of parking brake assembly make this step look so easy, because on other designs it IS so easy. They don't bury this hold down spring deep behind the flange, or have other provisions to access it. Anyway, thought I'd share what I learned...
First, after jacking and securing the truck, including chocking the front wheels, you'll need to put the truck in Neutral to be able to rotate the rear hub and align a hole in the flange with the hold down spring. If you wait to do this until you've removed the caliper, well, just remember you have to push the brake pedal to be able to shift into N...
Next, after spending multiple hours of squinting, swearing and sweating, I stopped for a break, and found an old thread over on the GX 470/Prado 120 side of GXOR that I'll reference here. It. Was. A. Life. Saver. I can't figure any other way to re-do, repair, or replace the parking brake shoes/assembly without this step.
Help to re-install the parking brake
I've been trying to put the parking brake shoes back on for 20mins and I cannot get the side springs w/ retainer clips on with the shoes separated let alone w/ the shoes joined together w/ the bottom spring and parking brake cable in place. You have to put pressure on the spring and it has a...
forum.ih8mud.com
This thread has all the FSM pictures as well.
I ended up using 16 gage picture wire, and threading it through the hole in the flange, through the center hole of the outer cup along side the pin, through the spring, and through the center hold of the inner cup, then around the outside of the cup/spring assembly, back through the hole in the flange, and wrapped the loose ends around some wheel studs.
This effectively compresses the spring OUTBOARD against the outer cup and end of the pin, leaving enough room to manipulate the shoe into position behind the compressed spring while getting the pin lined up with the slot in the shoe. You may still have to use a variety of tools to do all the fiddling. I used a trim tool, small regular screwdriver, dental pick, and locking needle-nose to get everything all buttoned up.
Using this technique I was able to get it all back together in fairly short order with a minimum of drama. Enough that I no longer dread having to take that all apart again. Outside of the order of assembly, the FSM is useless. It simple says "install". But no hints as to how.
A few pics for reference.
Last edited:


