Before:

After:

(all three photos at 1/60 sec, f/5.6, ISO 200)
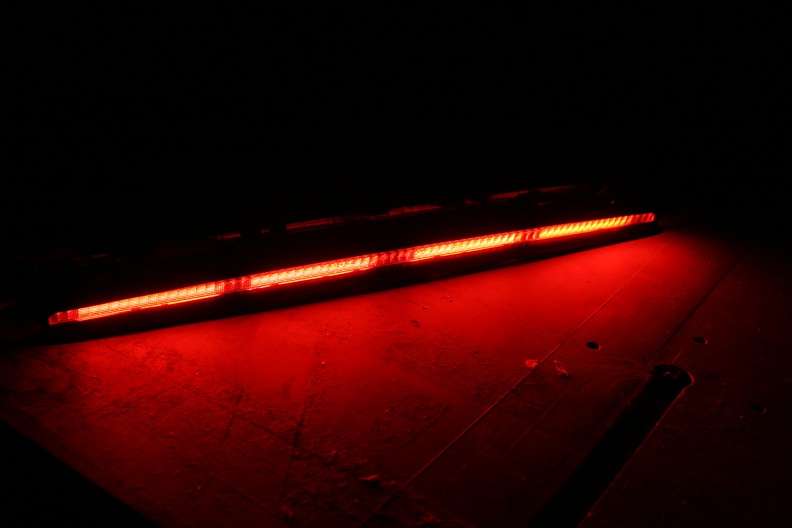
I don't know if the 3rd brake light LEDs have dimmed with age, or if it's just a sign of how much better modern LED technology is, but mine seemed feeble. My hand-dandy Mastech MS8229 multimeter (same as the Harbor Freight Centech #98674) says the original is about 40 lux at only 6 inches. After the modification, it measures about 800 lux at the same location, and about 200 lux at around 45 degrees above. It's bright, but not blinding.
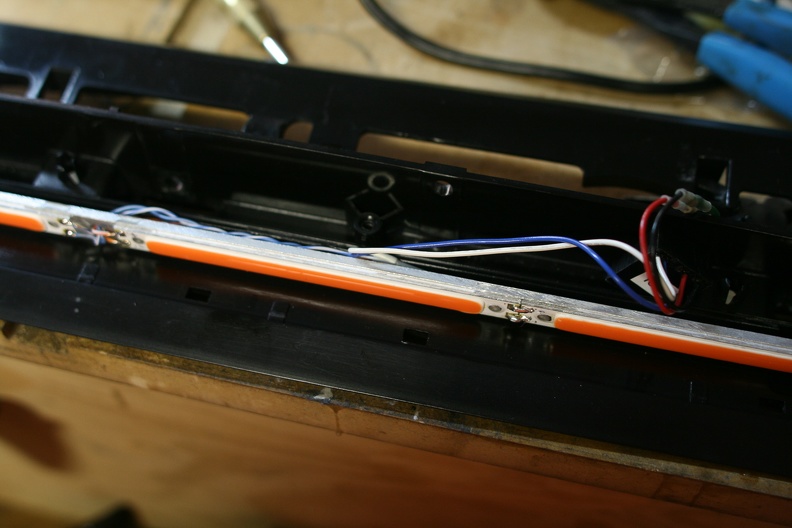
As for removal, it's pretty simple. You have to pull several plastic rivets. Push in the center, then pull the 'rivet' out. Once they're out, you just pull down on the whole assembly to pop it off of several vertical posts. To disassemble the light itself, remove the top screws and pull the top panel off. The power wires are fed through a little chicane molded into the lower portion. The LEDs are soldered to a single long, thin PCB that fits into a groove in the lower piece of plastic. The board is around 53mm long x 13mm tall x 1.7mm thick.

I bought four of these 120mm x 10mm red COB LED lights on eBay:

To power them, I used a 1000mA BuckPuck (~$13) that I had laying around. It's a constant-current LED driver. As LEDs heat up, their resistance drops, which leads to run-away in simple, resistor-regulated LED circuits. Constant-current LED drivers only provide the rated current, regardless of the resistance of the LED.

I needed something to mount them to, and I'd read that it was important to have a heat sink. I had a piece of aluminum around, so I threw it on the ol' finger eater (a "table saw" made of a circular saw mounted upside down to some MDF), cut it to size with a carbide blade, and cut a recess to fit the groove using a router (the other half of the "finger eater"). This works great, but be prepared for an enormous mess of aluminum shards.

Test fitted to refine the length and angle of the relief cut in the aluminum:

My mounting process was:
For the wire, I cut up a chunk of Ethernet patch cable. Patch cable uses stranded wire, as opposed to the solid wire used in regular Ethernet.

I ran the wires behind the aluminum, then used hot glue to stick the BuckPuck in place.
I'd read about the importance of a heat sink, but with only 1000mA split across four LED modules, after leaving it running for around five minutes, the temperature was barely above the room temperature. I don't think heat will be an issue.
After:
(all three photos at 1/60 sec, f/5.6, ISO 200)
I don't know if the 3rd brake light LEDs have dimmed with age, or if it's just a sign of how much better modern LED technology is, but mine seemed feeble. My hand-dandy Mastech MS8229 multimeter (same as the Harbor Freight Centech #98674) says the original is about 40 lux at only 6 inches. After the modification, it measures about 800 lux at the same location, and about 200 lux at around 45 degrees above. It's bright, but not blinding.
As for removal, it's pretty simple. You have to pull several plastic rivets. Push in the center, then pull the 'rivet' out. Once they're out, you just pull down on the whole assembly to pop it off of several vertical posts. To disassemble the light itself, remove the top screws and pull the top panel off. The power wires are fed through a little chicane molded into the lower portion. The LEDs are soldered to a single long, thin PCB that fits into a groove in the lower piece of plastic. The board is around 53mm long x 13mm tall x 1.7mm thick.
I bought four of these 120mm x 10mm red COB LED lights on eBay:
To power them, I used a 1000mA BuckPuck (~$13) that I had laying around. It's a constant-current LED driver. As LEDs heat up, their resistance drops, which leads to run-away in simple, resistor-regulated LED circuits. Constant-current LED drivers only provide the rated current, regardless of the resistance of the LED.
I needed something to mount them to, and I'd read that it was important to have a heat sink. I had a piece of aluminum around, so I threw it on the ol' finger eater (a "table saw" made of a circular saw mounted upside down to some MDF), cut it to size with a carbide blade, and cut a recess to fit the groove using a router (the other half of the "finger eater"). This works great, but be prepared for an enormous mess of aluminum shards.
Test fitted to refine the length and angle of the relief cut in the aluminum:
My mounting process was:
- Lay out the COBs how you want them.
- Mark the hole locations.
- Center-punch each hole location for 'traction' (no idea if it matters).
- Smear silicone heat transfer compound everywhere except where the marks are.
- Place the COB LEDs.
- Carefully dab epoxy into the holes to hold the LEDs in place. I also put a bit around the ends.
For the wire, I cut up a chunk of Ethernet patch cable. Patch cable uses stranded wire, as opposed to the solid wire used in regular Ethernet.
I ran the wires behind the aluminum, then used hot glue to stick the BuckPuck in place.
I'd read about the importance of a heat sink, but with only 1000mA split across four LED modules, after leaving it running for around five minutes, the temperature was barely above the room temperature. I don't think heat will be an issue.

