I need a brake upgrade. (1 Viewer)

This site may earn a commission from merchant affiliate
links, including eBay, Amazon, Skimlinks, and others.

Aight well I cleaned out enough of the garage to stick the truck in there, and tear into it. I got both calipers off, but couldn't manage to get the rotors off. I will have to go back at the hub bolts in order to get the wheel bearing apart and the rotors off. I have been researching the caliper rebuild, and the ABS-delete and feel confident in performing both.

This image does a good job describing what needs to happen with the ABS Brain.
attachment.php


I am going to head to the rocklin Pick-N-Pull friday and look for a T fitting for the brake lines, then hopefully as soon as im finished rebuilding the calipers, i can quickly drain all the brake fluid, delete the ABS, and bleed the brakes.

Oh, I also plan on disabling the LSPV... it looks like my rear brakes see little to no use.
 
did you end up doing the ABS delete? i pulled my fuse, but im looking to get all the lines and hoses outta here!!!!
 
Not yet. I have had 0 time to do anything. My trucks been on jackstands with the calipers sitting on the workbench for the past couple weeks :frown:

I have to take a trip to the junkyard to get the T fitting. Maybe this sunday I will try to spend some time in the garage on it.
 
Let's :wrench: !!! I am jonesing for some trail time and some wrenching!! I'm taking my rig to have armor fab'd up and will be available to work
Other peoples rigs until mine gets back... :beer:
 
Well I hit up the junkyard yesterday, and cut a T fitting out of the back of a 4Runner. Then came home and rebuilt one of the two calipers. I might find the time today to rebuild the 2nd caliper, then I want to remove the ABS brain.

I also picked up a pneumatic self bleeder kit from Harbor Freight, which I hope will do a good job of removing all the air from the system.
 
Post some pics up after you do the delete.
 
Well I did it, its done. Trucks rolling again, and stopping... kinda. I still have a ton of brake fade, and need to re-bleed the system. I only bled the front, but i know I should do all four corners and modify the LSPV valve or whatever the f ck they put on the rear end that doesn't let the rear brakes work.

But here's some pix. Its pretty simple actually. The ABS delete only took about 30 minutes.
IMG_20131202_144016


IMG_20131202_123835


IMG_20131202_144125


Here are the left over parts, what ends up being removed:
IMG_20131202_152747


The T fitting from the toyota rear axle at the junk yard worked great.
 
Nice work! You thought about getting rid of the LSPV and doing a manual valve? That's what I did a few weeks ago, posted a thread about it in the 80s section.
 
Nice work! You thought about getting rid of the LSPV and doing a manual valve? That's what I did a few weeks ago, posted a thread about it in the 80s section.

I was just going to unbolt the lever from the LSPV to the axle, and move the lever so the LSPV is always open. I was not planning on removing it.

Where's your thread? Did you notice a big improvement after you got rid of it?
 
Here's the copy/paste from my thread. Did notice a definite improvement in braking. It brakes "flatter" now instead of the nose dive it had before. It also stops a lot better when I stomp on the brake as hard as possible to simulate an emergency stop. I have the valve fully opened, so I think that would put me close to a 50/50 bias.

**I haven't tested this on the road yet since my truck is on jack stands, working on a knuckle rebuild. But I did test the system and so far no leaks**

After fighting with my rusted-to-hell LSPV and trying to adjust it, I got fed up and decided to get rid of it. Debated and bypassing it and running 50/50 but finally settled on a manual proportioning valve to give me some control. My truck would nose-dive pretty bad during braking so I knew my front brakes were doing most of the work.

I'll try to make this short and sweet. There's more than one way to skin a cat, but this is mine :)

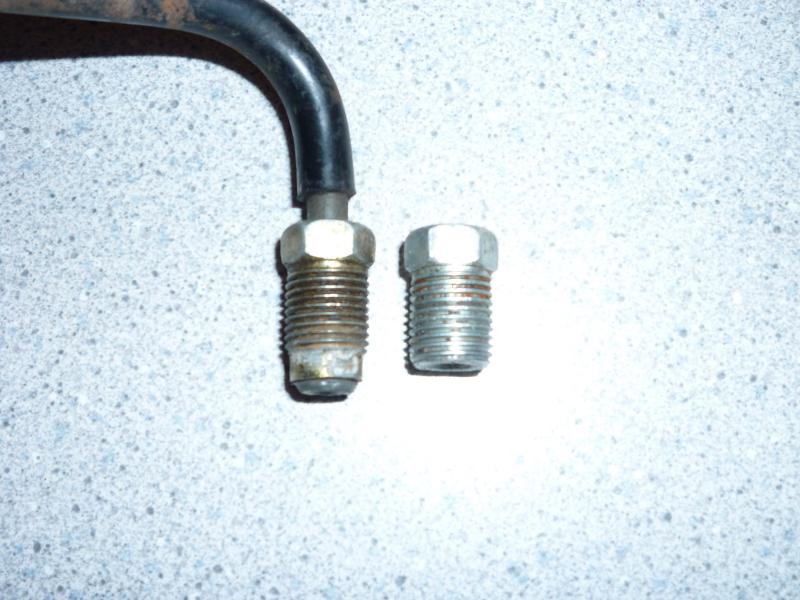
Toyota brake lines are 4.75mm OD and the fittings have a M10x1.0 thread. The flare is "double flare" also called "inverted" flare. The fittings on the left are on all the misc hardware (LSPV, tees, elbows, etc). The fitting on the right is on the master cylinder and ABS unit. They will leak if interchanged (so I read).

attachment.php


PARTS USED:

Wilwood 260-12627. It's threaded in M10x1.0 but the ports are bubble flare, not inverted flare. More on this later.
http://www.summitracing.com/parts/wil-260-12627

Two of these 12" lines with the M10 inverted flare fittings. You should be able to find these at any local parts store
http://www.oreillyauto.com/site/c/d....oap?ck=Search_N0834_-1_-1&pt=N0834&ppt=C0066

One of these, just for the nut fittings. The tubing was not used
http://www.oreillyauto.com/site/c/detail/AGS1/PAE308.oap?ck=Search_pae308_-1_-1&keyword=pae308

I used a small L-shaped metal bracket and attached the valve to an existing bolt on the ABS pump.

IMAG2206_zps81dbf897.jpg


Here's the stock configuration of the lines. Start by unbolting 1, 2 and 3. 1 is the "OUT" port to the rear brakes. 3 goes underneath the MC into a tee fitting which then goes back to port #2. The other side of the tee feeds the other line to the LSPV...not sure what this one does, a bypass of sorts? Sensing line? The entire lines 2 and 3 will not be used.

10549887833_839eaef523_h.jpg


The tee fitting underneath the MC. This whole thing gets scrapped. Remove it and unbolt all the ports.

10549694794_ad8df4d5a6_h.jpg


Another look at the tee underneath the MC

10549646926_46d9638d62_h.jpg


One of the lines coming out of the tee goes down in the driver's side wheel well goes to this elbow bolted to the frame. Undo all this. Keep the elbow and cut off the bracket if you want, I did. This line running along the frame to the back of the truck will be scrapped. Leave it in place or try and fish it out.

10549639025_0cd50e7ca1_h.jpg


Remove all the LSPV junk. You'll have some fun here. Cuss words are your friend. Bolt the main two lines together using the elbow we just removed from the wheel well. You can blow into the line at the wheel well to find out which line you're keeping and which one you're scrapping.

10549888363_49b0de2592_h.jpg


Back in the engine bay it's time to get to work. Connect one of the 12" M10 INVERTED flare lines to port #1 pictured above. As mentioned, the Wilwood valve has bubble flare ports. So you'll need to cut off the other end, use one of the nuts from the M10 BUBBLE flare line, and reflare the line for a bubble flare. I used a cheap $20 kit from a local store and it worked fine, no leaks. The newly flared line will go to the IN port of the Wilwood valve.

Now take the stock line that was connected to port #1, cut off the end and reflare like discussed above using the M10 BUBBLE flare fitting. This goes to the OUT port of the Wilwood valve.

Take the 2nd 12" M10 INVERTED flare line and connect ports #2 and #3.

10549644766_f2d406db3d_h.jpg


10549645696_876cace4ff_h.jpg


And that's it! Easy right? Can't wait to get this thing back on the road and finally have some rear brakes!

Let me know if you guys have any questions, I'll do my best to answer them :beer:
 
Wow that appears to be a lot of work.

This is all I was planning on doing:
https://forum.ih8mud.com/showpost.php?p=7135359&postcount=27

After seeing all that brake line necessary for the LSPV to operate, I've concluded it definitely needs to go. Besides, I am trying to remove anything air can get trapped in, so the LSPV itself should go instead of just being "adjusted".

Do you mind if I borrow the flare tool of yours? Im going to have to order the adjustable valve and the brake line with the bubble flare fittings.
 
Last edited:
Yeah I remember seeing that picture before too. I decided to get rid of the LSPV all together since I wasn't sure if it was properly working or not unless I checked brake pressure at each wheel with a gauge. Or heck, just find another junkyard tee and connect all 3 lines together where the LSPV is!
 
So the rear port goes to the front? You used the T under the master to route the front lines? And just a single line from the front port of the mc to the rear brakes?
 
So the rear port goes to the front? You used the T under the master to route the front lines? And just a single line from the front port of the mc to the rear brakes?

Not sure where everything routes to. But if you have to remove that T fitting from under the master cylinder, you could probably re-use that T fitting when deleting the ABS pump.

But after removing the LSPV you end up with 1 less brake line under the hood so im not sure if the T fitting is still needed.

I thought I had it figured out, then I got confused again, but then after looking at the photos I think i got it again. I will have to break out a piece of paper and pencil and draw this out.

I wish I could find a manual valve with the right fittings so we didn't have to make custom lines. I might just run it without a valve at first to see how bad it is 50/50, then if I need to add the valve later.
 
So the rear port goes to the front? You used the T under the master to route the front lines? And just a single line from the front port of the mc to the rear brakes?
There are 2 brake lines going to the rear which both connect to the LSPV. One of those lines is the "real" brake line that supplies pressure for the rear brakes. This one comes out of the ABS pump. This is #1 in my pic.

The other line going to the rear is a "sensing" line of sorts from the front brakes. This comes from that tee underneath the MC and then proceeds back to the LSPV.

Make sense?
 
Ok I get it so remove the lspv, trace the line coming out of the abs pump, put an L fitting from that line to the line that used to imput into the lspv to the one that powers the rear brakes, get rid of the T fitting under the mc and replace it with another L fitting to get rid of the sensing line?
 

Users who are viewing this thread

Back
Top Bottom