I have a build thread going over on our local board, but figured throw it over here to see what you guys think.
Starting off with a 1971 FJ40 that my dad and I got back in the Fall of 2001. All original with the F engine, three speed transmission on the column and vacuum operated transfer case. Axles were drum brakes front and rear with 4.10 gearing.
We tore it apart and did a frame on restoration with new interior pieces, some mechanical work, very minor body work since th ebody was in great shape and put a paint job on it. We swapped in a set of 3.73 gears out of a FJ55 to help on the highway as this rig will likely never see dirt. Also swapped in a set of front disck brakes and knuckles from a FJ62.
The engine was tired and instead of rebuilding it, we decided to do a swap. Our 1970 FJ40 has a SBC and 4 speed, but we wanted something a little different. We picked up a 97 4.3 V6, along with a stand alone Painless Harness, stock computer, headers, 4wd and 2wd oil pans, and flywheel to bolt it to the TH350. We sent the computer to Jim's Performance to work his magic with what we planned to run.
[URL="http://i2.photobucket.com/albums/y4/jtgraup/Engine61.jpg"] [/URL]
[URL="http://i2.photobucket.com/albums/y4/jtgraup/Engine31.jpg"] [/URL]
[URL="http://i2.photobucket.com/albums/y4/jtgraup/Engine21.jpg"] [/URL]
The remote oil filter setup was cut, so I picked up this fitting at the dealer to remove the remote oil filter setup and put the filter on the block, as with V8's.
[URL="http://i2.photobucket.com/albums/y4/jtgraup/125560761.jpg"] [/URL]
For the transmission we had a local transmission builder put a TH350 togeter with the appropriate output shaft and adapter that we go from Advance Adapters. For the transfer case, I had a lever shifted 3 speed one out of a 73 FJ40 that I had parted out many years ago that was in good shape and tore it down to mate to the TH350.
[URL="http://i2.photobucket.com/albums/y4/jtgraup/T-case1.jpg"] [/URL]
[URL="http://i2.photobucket.com/albums/y4/jtgraup/T-case2.jpg"] [/URL]
So far I have only had a few hours to work on it in the evening when the family goes to bed and this is where it currently stands with the interior pulled, along with the bib, radiator, exhaust, and some other miscellaneous parts which left me with this
[URL="http://i2.photobucket.com/albums/y4/jtgraup/interiorout.jpg"] [/URL]
[URL="http://i2.photobucket.com/albums/y4/jtgraup/enginebay1.jpg"] [/URL]
The remainder of the swap will include replacement of the steering column with on out of the previously mentioned 73 FJ40 as it is smaller and a little more modern, which will be coupled with a Saginaw power steering setup.
Made a little progress more progress.
[URL="http://i2.photobucket.com/albums/y4/jtgraup/Enginecomingout2.jpg"] [/URL]
Which lead to this
[URL="http://i2.photobucket.com/albums/y4/jtgraup/engineout.jpg"] [/URL]
[URL="http://i2.photobucket.com/albums/y4/jtgraup/tranny-t-case.jpg"] [/URL]
This engine is a pig and fought me a little coming out, but I left with this
[URL="http://i2.photobucket.com/albums/y4/jtgraup/emptyenginebay.jpg"] [/URL]
Frame rails ready to go, just waiting on my abrasives order from Lehigh Abrasives to come in to do final cleanup.
[URL="http://i2.photobucket.com/albums/y4/jtgraup/cleanframerails.jpg"] [/URL]
All steering is also gone as well and ready for install of new column.
[URL="http://i2.photobucket.com/albums/y4/jtgraup/nosteeringinterior.jpg"] [/URL]
Made some more progress. Was cutting out the frame scab plates for the motor mounts and the plasma cutter decided it was done and blew the circuit board, but luckily I had just finished cutting. New board came in and am back in business. Was able to set up the motor mounts with hard tacks to test the engine fitment. Placement is set so that the 4.3 can be pulled and a 5.3 can be installed without changing the mounts or driveshafts.
[URL="http://i2.photobucket.com/albums/y4/jtgraup/MotorMountstacked.jpg"] [/URL]
Got the Saginaw box mounted into place. Mounted it low and back to get the upper two bolts in the frame and not have to notch the front bumper. Everything clears great so far and will weld out once I test fit the engine.
[URL="http://i2.photobucket.com/albums/y4/jtgraup/Steeringboxtemp.jpg"] [/URL]
Next got the steering colum firewall plate cut and installed.
[URL="http://i2.photobucket.com/albums/y4/jtgraup/Steeringfirewallplate.jpg"] [/URL]
Then slid the 1973 vintage column in after a few cuts to get it where I want it and mocked up the Borgeson collapsable steering shaft, which should clear the motor mount and exhaust manifolds nicely - will confirm when I test fit the motor next.
[URL="http://i2.photobucket.com/albums/y4/jtgraup/Steeringshaftmockup.jpg"] [/URL]
Shot of the new steering column setup mocked up
[URL="http://i2.photobucket.com/albums/y4/jtgraup/73steeringcolumnmockup.jpg"]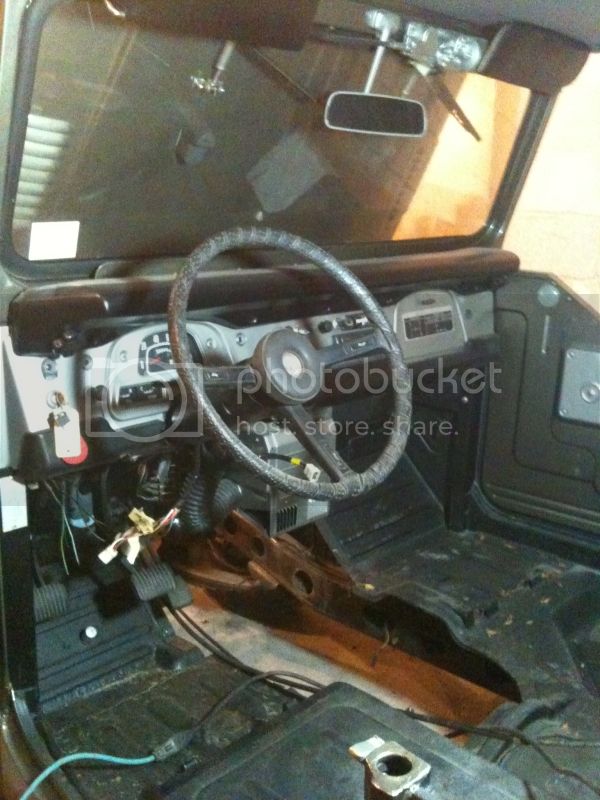 [/URL]
I called it a night shortly after having a hot weld dingle berry fall into my ear canal while welding upside down, made for some interesting noises, but luckily didn't get to my ear drum.
That brings it up to date. I have a mini harness coming from Coolerman to plug and play the steering column turn signal assembly into the factory harness - should make for a painless install.
Starting off with a 1971 FJ40 that my dad and I got back in the Fall of 2001. All original with the F engine, three speed transmission on the column and vacuum operated transfer case. Axles were drum brakes front and rear with 4.10 gearing.
We tore it apart and did a frame on restoration with new interior pieces, some mechanical work, very minor body work since th ebody was in great shape and put a paint job on it. We swapped in a set of 3.73 gears out of a FJ55 to help on the highway as this rig will likely never see dirt. Also swapped in a set of front disck brakes and knuckles from a FJ62.
The engine was tired and instead of rebuilding it, we decided to do a swap. Our 1970 FJ40 has a SBC and 4 speed, but we wanted something a little different. We picked up a 97 4.3 V6, along with a stand alone Painless Harness, stock computer, headers, 4wd and 2wd oil pans, and flywheel to bolt it to the TH350. We sent the computer to Jim's Performance to work his magic with what we planned to run.
[URL="http://i2.photobucket.com/albums/y4/jtgraup/Engine61.jpg"]
 [/URL]
[URL="http://i2.photobucket.com/albums/y4/jtgraup/Engine31.jpg"]
 [/URL]
[URL="http://i2.photobucket.com/albums/y4/jtgraup/Engine21.jpg"]
 [/URL]
The remote oil filter setup was cut, so I picked up this fitting at the dealer to remove the remote oil filter setup and put the filter on the block, as with V8's.
[URL="http://i2.photobucket.com/albums/y4/jtgraup/125560761.jpg"]
 [/URL]
For the transmission we had a local transmission builder put a TH350 togeter with the appropriate output shaft and adapter that we go from Advance Adapters. For the transfer case, I had a lever shifted 3 speed one out of a 73 FJ40 that I had parted out many years ago that was in good shape and tore it down to mate to the TH350.
[URL="http://i2.photobucket.com/albums/y4/jtgraup/T-case1.jpg"]
 [/URL]
[URL="http://i2.photobucket.com/albums/y4/jtgraup/T-case2.jpg"]
 [/URL]
So far I have only had a few hours to work on it in the evening when the family goes to bed and this is where it currently stands with the interior pulled, along with the bib, radiator, exhaust, and some other miscellaneous parts which left me with this
[URL="http://i2.photobucket.com/albums/y4/jtgraup/interiorout.jpg"]
 [/URL]
[URL="http://i2.photobucket.com/albums/y4/jtgraup/enginebay1.jpg"]
 [/URL]
The remainder of the swap will include replacement of the steering column with on out of the previously mentioned 73 FJ40 as it is smaller and a little more modern, which will be coupled with a Saginaw power steering setup.
Made a little progress more progress.
[URL="http://i2.photobucket.com/albums/y4/jtgraup/Enginecomingout2.jpg"]
 [/URL]
Which lead to this
[URL="http://i2.photobucket.com/albums/y4/jtgraup/engineout.jpg"]
 [/URL]
[URL="http://i2.photobucket.com/albums/y4/jtgraup/tranny-t-case.jpg"]
 [/URL]
This engine is a pig and fought me a little coming out, but I left with this
[URL="http://i2.photobucket.com/albums/y4/jtgraup/emptyenginebay.jpg"]
Frame rails ready to go, just waiting on my abrasives order from Lehigh Abrasives to come in to do final cleanup.
[URL="http://i2.photobucket.com/albums/y4/jtgraup/cleanframerails.jpg"]
 [/URL]
All steering is also gone as well and ready for install of new column.
[URL="http://i2.photobucket.com/albums/y4/jtgraup/nosteeringinterior.jpg"]
 [/URL]
Made some more progress. Was cutting out the frame scab plates for the motor mounts and the plasma cutter decided it was done and blew the circuit board, but luckily I had just finished cutting. New board came in and am back in business. Was able to set up the motor mounts with hard tacks to test the engine fitment. Placement is set so that the 4.3 can be pulled and a 5.3 can be installed without changing the mounts or driveshafts.
[URL="http://i2.photobucket.com/albums/y4/jtgraup/MotorMountstacked.jpg"]
 [/URL]
Got the Saginaw box mounted into place. Mounted it low and back to get the upper two bolts in the frame and not have to notch the front bumper. Everything clears great so far and will weld out once I test fit the engine.
[URL="http://i2.photobucket.com/albums/y4/jtgraup/Steeringboxtemp.jpg"]
 [/URL]
Next got the steering colum firewall plate cut and installed.
[URL="http://i2.photobucket.com/albums/y4/jtgraup/Steeringfirewallplate.jpg"]
 [/URL]
Then slid the 1973 vintage column in after a few cuts to get it where I want it and mocked up the Borgeson collapsable steering shaft, which should clear the motor mount and exhaust manifolds nicely - will confirm when I test fit the motor next.
[URL="http://i2.photobucket.com/albums/y4/jtgraup/Steeringshaftmockup.jpg"]
 [/URL]
Shot of the new steering column setup mocked up
[URL="http://i2.photobucket.com/albums/y4/jtgraup/73steeringcolumnmockup.jpg"]
 [/URL]
I called it a night shortly after having a hot weld dingle berry fall into my ear canal while welding upside down, made for some interesting noises, but luckily didn't get to my ear drum.
That brings it up to date. I have a mini harness coming from Coolerman to plug and play the steering column turn signal assembly into the factory harness - should make for a painless install.


")


