Cargo Kitchen Kennel and Sleeping Platform

This site may earn a commission from merchant affiliate
links, including eBay, Amazon, Skimlinks, and others.

Joined
Sep 12, 2010
Threads
25
Messages
234
Location
Colorado
So for the last four years, I've been building custom cargo areas for my rigs every winter or so. This thread is to share what I have done, and am doing, with others. I have never "completed" a build, I'm still testing for the final design. So I don't mess with finishing the wood nicely or anything like that yet. Thanks for all the inspiration I have gotten here on Mud.

The 4Runner Kitchen:
The whole thread of this build it here:
4Runner Kitchen - Toyota 4Runner Forum

Here are some highlight pics, and then we'll get to the 100

table.jpg


125b127d.jpg


ea9cee4d.jpg


9a4540b2.jpg


100 SERIES LAND CRUISER

Okay, so this is a bit of a mix of photos and reposting from another site. This is the first build I tried and used for a year. Good, but needed improvements.

Bucket of parts removed that will not go back (speaker, seat belts, seat anchors, jack, etc, etc.)
IMG_20100918_165720.jpg


IMG_20100918_182908.jpg


I bolted a 1/2" sheet of plywood down to the metal cargo floor deck. In the final version I will use an insulation beneath it and filling in the metal corrugation.
IMG_20110416_162418.jpg


Here is how it looked after the first weekend. This picture shows where the fridge will sit:
IMG_20110417_151954.jpg


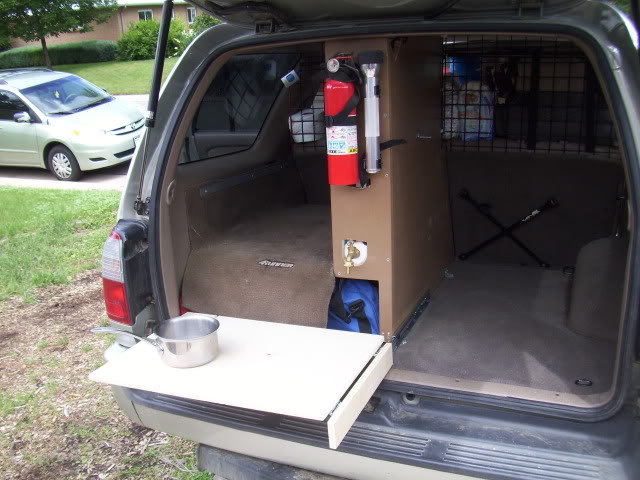
Here is how it looks now, after the second weekend. Here you see the two 7 gallon water tanks in the center. The plan is to use one and then move them and swap the faucet. That way I could tuck the one behind the center wall. The center wall will hold the fire extinguisher, mag light and etc. Unlike the 4runner kitchen (see link above) I will retain my visibility out of the upper portion (other than the center wall). I will use some nylon webbing on the cargo door side so the "granny's attic" as I call it (the area above the fridge and water tanks) can be stuffed with our clothes bags from the "extended cab" portion. (more on that later)
IMG_20110425_123838.jpg


The recess in the drawer was necessary. The faucet is as far back to the door as possible, but I didn't want to have to move all the drawers back for clearance. The water tank area will be lined in rubber membrane that will extend out under the faucet and down the face of the recess. My plan is for that to act as a shield when water is used. It will direct water down and through the gap between the floor and the door (removed the cover). It will also direct water away from my stuff if the tank leaks. I have more to plan on this whole idea.
IMG_20110425_123850.jpg


Drawers are raised so that they just barely rest on the tailgate when open. This helps support the drawers with the cheap slides I had...saves the $$ of having to buy heavy load slides. I had 24" and 30" slides on hand from the various 4runner versions, so I used both. I will decide this year what length I prefer. The drawers are 9 inches deep and 14" or so wide. They do not take the depth of the cargo area, as I have the extended cab area.
IMG_20110425_123903.jpg


The area to the left in the photos above is for our dog. When the seat is folded down, this area becomes a one-man sleeping platform. I built the drawers at this height for that reason.
IMG_20110417_152038.jpg


In the area behind and above the wheel well I can fit a lot of stuff. I have two hinged panels here. Because I hacked up the interior molding and stripped stuff like the speaker and factory jack/tools built into the sides. Future versions will include a much better finish in these areas, but I am just testing it out for functionality right now.
IMG_20110425_123932.jpg


I put a plug in a little nook in the side for the fridge.
IMG_20110425_124032.jpg


Here is the "extended cab". This area is not as wide as the whole rig, as it is cut short by the dogs area. However, the drawer does not go all the way back, so extended cab goes under the dogs platform. This way I can store long items. The hole you see goes to the small space behind the water tanks. Figured something would fit in there.
IMG_20110425_124136.jpg


Yup, it's ugly, but I don't care. It may get wrapped in carpet or something when I am all done. This is making use of a bunch of space behind the panel. Now I can fit really long stuff in the extended cab, and I have more room overall. I thought it might also be integrated into a jumper seat type thing, but it is a bit too narrow back there for that, and the depth of the fridge limits the size of the extended cab.
IMG_20110425_124108.jpg


Here is a test fit of the extended cab. I fit everything that used to be on the roof of the runner inside and I didn't fill above the seats. I fit 2 adult folding chairs, 3 kids chairs, 4 man tent, 5 sleeping bags, 4 thermarests, 1 small folding table, a large tarp and a back of emergency cloths for all five of us. Oh yeah... No more climbing up to the roof. The "attic" and the rest of the xcab area will fit our 5 clothes bags and we're set!!
IMG_20110417_114241.jpg


Side by side here's the runner build compared to the LC build.
c37af2c1.jpg

IMG_20110425_123838.jpg
 
Version 2.0

This last winter I stripped out the build and started over. Here is the progress so far and where I am today.


I had done some work before, laying out the drawers (using the old ones), fridge and water.
cargobuildv23.jpg


I got the sides of the compartments built and a top cut. That was it for the first session.
cargobuildv21.jpg


Today I made great headway.

I got all the compartments made and cut out as much wood as I could. I am going to fill in the spots with 1/2" poly insulation.
From top left, clockwise:, Water, storage, fridge, drawer, drawer
pcompartments.jpg


Here is the layout of pieces for the sleeping platform. The pieces will be connected together with hinges and latches...
platformlayout.jpg


It will fold up and lock into this. Notice Ruff-Ruff modeling is approximate location in the truck:
platformfoldedup.jpg


Folded up in the truck for dog/gear divider
platformup.jpg


Unfolded and locked into place as a sleeping platform
platform.jpg


Storage behind the fridge, with access by folding the rear seat down.
storage2.jpg


That's two thermarests rolled together in the storage area, with plenty more room. This will be for "permanent" storage. Gear to sleep in the rig and change the families clothes, etc...
storage.jpg


Here's a mock up of the second module that will be able to attach and detach, the one that goes over the fridge for storage above.
platformmockup.jpg


Here's the whole platform together:
platform2.jpg


A lot of design issues got solved today...it was a good day. My water tank should arrive next week and I've already got the pump. I need a little more wood and aluminum and some 200lb hinges for the fridge/table slide. The dog/storage divider will also be adjustable. When we have a really big trip or other reason that we need more storage, there will be another setting where Ruff-ruff has to give up some space. The divider (while at camp) will be able to be detached, unfolded, laid down over the back seats and attached in place, voila! sleeping platform. It's totally going to work.

There's a number of combinations of my family that will fit with the fridge in place. I'm also planning on adding an outlet up front, and making it so I can put the fridge in the passenger front seat for the night, fill in the hole in the back, and have a FULL sleeping platform. Even so, without moving the fridge, it will get used.
 
The next long weekend of work

I got the water tank installed. 12 gallons, 12 x 12 x 20. Perfect.
watertankinstalled.jpg


I use full length drawer slides at the bottom of the two drawers (24") so the drawers are fully supported down the length
IMG_20120331_175732.jpg


However, I didn't want the drawers to open that far. I also wanted some stability at the top since they are 12" deep. So I used one pair of 18" slide on one side of each drawer at the top. This really took the wobble out of the drawers and limits their opening length.
IMG_20120331_175724.jpg


Both drawers out.
IMG_20120331_175810.jpg


Fridge slide pulled out.
IMG_20120331_175832.jpg


Bar table.
IMG_20120331_175940.jpg


The idea is that one person could be standing to the left of the "bar", with the drawers closed, and using the tailgate table to prep food. At the same time someone could come up on the right side of the "bar" and access the fridge to make a drink or get food.
IMG_20120331_175950.jpg


I am going to use a kitchen spray nozzle that will mount here
IMG_20120331_180046.jpg


It will extend way out to the side so you can wash your head and body.
IMG_20120331_180138.jpg
 
Last edited:
And another session of progress

Ruff-ruff test run
IMG_20120407_192530.jpg


Water and door to tool and recovery gear storage (under ruff ruff)
IMG_20120407_192554.jpg


The cage around the fridge (so I can pack the back full of gear, but still open the fridge), has four clips, one in each corner
IMG_20120407_192636.jpg


In a matter of seconds the cage comes apart
IMG_20120407_192957.jpg


The top comes out
IMG_20120407_193015-1.jpg


Left side folds in
IMG_20120407_193024-1.jpg


Right side makes the top for the FULL SIZE sleeping platform (but where does the fridge go?)
IMG_20120407_193036-1.jpg


The top fits nicely in the front seat
IMG_20120407_193057.jpg


And the fridge move here for the night. I will put in a second plug to the fridge battery up front
IMG_20120407_193132-1.jpg


Or maybe it's an emergency, and we have to stay over night unexpected. Well...then the fridge moves under the rig, and the front platform becomes ruff-ruff's spot for the night.
IMG_20120407_193248-1.jpg


From the second row, I can fold down the 1/3 seat and pack around the fridge.
IMG_20120407_192758.jpg


Main shut off for tank and tee to drain and to pump
IMG_20120407_152557.jpg


12 volt, 35 psi pump. The sprayer will shoot 6 ft or more, just as strong as at your kitchen sink. May end up filling up bottles at the gravity drain.
IMG_20120407_152551.jpg


The gravity drain for the tank is a hose by the rear driver side seat.
IMG_20120407_152603.jpg


It's got a separate valve, and a rubber stopper over it...just in case.
IMG_20120407_152619.jpg


It took me a bit of thinking to decide what to do with the breather issue. I tried to find a one way valve that would let water in but no air out, but had no luck. Here's what I did. I had a fitting put in the top corner of the tank, out the side. From there I attached a 3/8 hose. I ran the hose upwards (so as to drain back to the tank) and up the column behind the back seats, all the way to the head liner. I would have to be more than completely on my side for it to drain out. To keep anything from getting in, I twisted a piece of filter fabric and stuck it down in the end of the pipe. I then folded the ends over and taped it off. It worked perfect!! And cheap!!
IMG_20120408_091538.jpg


Tomorrow I need to run a switch and power to the pump. My daughter filled the tank today with the hose.

I'm really liking how this has turned out. I'm stoked to have a full-size sleeping platform. I can fit me and two kids for sure, or the wife and one. In an emergency, we could all fit.
 
Last edited:
Another weekend goes by...

Cutting board trimmed to fit on the table. Slides in nice with a friction fit. Skewers could sit on top.
IMG_20120408_191830.jpg


The grill (for cooking over the fire) is wrapped in heavy plastic (dirty) and slides under the slide out table. Nice.
IMG_20120408_191849.jpg


Take a beer/soda from the fridge, and then flip up the little door to access the replacement.
IMG_20120408_191744.jpg


See the spot in the front of the drawer for cans (fits 18)
IMG_20120408_192001.jpg


Ahhh...a nice little token of history. The original 4Runner cargo mat that was modified to fit the first every dog spot. If this ever wears out, I swear I want a new 4Runner mat to replace it.
IMG_20120408_191758.jpg


The two-burner stove fits nicely into the bottom of the drawer. Finally we will have a stove to cook on when we need.
IMG_20120408_153454.jpg


Test fitting the gear
IMG_20120408_191943.jpg
 
Last edited:
I had no problem finding people to test the sprayer.
IMG_20120408_100005.jpg
 
Nice work but how much does all that weigh?
 
Right now, based on estimates I did as building, I would say about 150 lbs. No more than if I had a custom rear bumper.

When I take it apart later this year for tweaks, I am going to slot more of the wood to loose weight, and incorporate more aluminum. For now, I'm testing geometry.
 
It all looks great. Your dog is probably thinking...really I get this little cubby to sit in! :D Is that water pump loud? Thanks and good job!

~Daniel

Sent from deep in the mountains of Honduras using only sticks and rocks.
 
excellent work, if you ever find yourself in Houston i am going to kidnap you and force you to build me one.
 
It all looks great. Your dog is probably thinking...really I get this little cubby to sit in! :D Is that water pump loud? Thanks and good job!

Thanks. He absolutely loves having his special spot. He's had a spot for three years now and he knows it is his. When he gets scared at camp if there's thunder, he stands by the back waiting to get in.

The pump is not that loud at all. It only runs when you spray water.

excellent work, if you ever find yourself in Houston i am going to kidnap you and force you to build me one.

Ha, ha! Thanks! I grew up for 18 years not far away in College Station. I've avoided returning ever since moving to Denver. I can't stand the humidity. Houston's worse than CS I think when it comes to that!

We just got back from a run on the Kokopelli trail to Moab. 5 nights overall camping out of the rig. The set up did great, but of course I learned many things that need to be tweaked.
 
Looks good, defiantly modular.

I recently caught the carpentry bug again, building shelves and work benches in the garage, and am looking to do something in terms of 3rd row storage. Your designs gives me lots of ideas.
 
Test run complete

Ran the Kokopelli from Colorado to Moab last weekend, followed by three more nights in Moab. (hells revenge and fins and things).

The set up held up great and was able to support the family of 5 for 5 nights! Of course I've got a list of revisions I need to make...still haven't nailed down the final design, but I am close.

Folks asked about weight...yes, the full wood version is heavier than I'd like, but its a TEST VERSION. Once I nail down the geometry and features exactly how I want, with multiple seasons of testing (this is the third season), I will get serious, get with my buddy (welding guru) and it will be fabricated out of aluminum. It will still have some wood of course.

1) The shower was freaking genius. My wife washed her hair twice. This is a big deal. She's a tough camping woman, but she hates all the sand that gets in her hair in Moab. The last five night trip there (with no shower) she was ready to kill me by the last day. Still...she' doesn't want to stop on the way through Moab to use the pay showers..."that's not camping". So...I was a hero...even with cold water only.

We had twelve gallons for the five of us and the dog. We used it cautiously, but not sparingly. We had more than a gallon left when we got home. I even washed my hair one morning, but since it's shaved, it doesn't take much water. GREAT way to wake up in the desert!

washinghair.jpg


2) As expected...the pooch LOVED his spot. One night at camp by the fire he got spooked. He ran over to the back of the rig and sat there looking up to his spot. He knows it's for him.
Here he is getting a nap after a hike up Negro Bill Canyon.

sleepyruffruff.jpg


3) A chilly day at Kane Creek for the kids to play in the sand-bottom, clear water creek. Batty kids still got their swimsuits on and in the water. I kept my Carhart jacket on. Here's a shot my wife took...I was taking a little nap too. You can see the cargo build in action!

napsatKaneCreek.jpg


A few things I learned that need to be changed:

--Placing the stove in the bottom of the big drawers is DUMB. Everything has to come out to get the stove out. This is our first camping trip EVER with the kids (4 years now) that we have had a stove. We always cooked on the fire. WOW. It's nice to make hot breakfast without starting a fire. We used the stove a lot more than I planned, now that we have one. I think I'm going to try to modify the tailgate void space to store the stove.

--Limiting the drawers to not pull out all the way was DUMB. I didn't want them cumbersome and hard to reach over, but again, to get something from the back of the drawer, everything had to come out. I need to plan the storage in the drawer better.

--The tolerances for the fridge were too tight. Even with the slides it was hard for my wife to pull the fridge out. It also seemed like it wasn't getting enough airflow during the times we were fully loaded with gear. I need to work on that.

--I need some rear cargo lighting. I'll be referencing the current thread on that soon.

--I am going to take my daughter on a trip soon, just me and her, so we can test the functionality of the full sleeping platform conversion.

And since I mentioned "Moab", I figure I better throw up some pics. They're not that great...the other folks on the trip took most the wheeling pics, mine were mostly family.

My daughter has decided she is responsible for air up and down. She's teaching her little brothers too. I love this picture. I told her. "bring them up to 20 psi", and the job got done. Heck ya!
kaiaairingup.jpg


One wheeling shot.
rockcrawling.jpg


The rigs of RM4x4 that were on the trip. Some good friends...good people.
thegroup.jpg


My buddies insane 3rd gen runner, as he emerges behind a climb on Fins.
glensrig.jpg


There be the fins...there be things...
finsandthings.jpg


Ancient pictographs off a hiking trail from the Koko.
pictographs.jpg


WHO LOVES MOAB? I DO, I DO!!


.
 
Last edited:
I'm jealous...looks like a blast!

~Daniel

Sent from deep in the mountains of Honduras using only sticks and rocks.
 
--Placing the stove in the bottom of the big drawers is DUMB. Everything has to come out to get the stove out. This is our first camping trip EVER with the kids (4 years now) that we have had a stove. We always cooked on the fire. WOW. It's nice to make hot breakfast without starting a fire. We used the stove a lot more than I planned, now that we have one. I think I'm going to try to modify the tailgate void space to store the stove.
You can also add rails about 4" from the top of the drawer. That way they stove sits on top... like the pull-out tray in your armrest.
 
Last edited:
You can also add rails about 4" from the top of the drawer. That way they stove sits on top... like the pull-out tray in your armrest.

Hey, hey...now that's a good idea. So what If I have to pull the stove out everytime...not that big a deal. That would keep from further complicating the issue.

Simple. I like that...even if I get complicated at times.

When I make the drawers come out all the way, I could probably just lift one end of the stove to reach underneath.

NICE. Thanks!
 
So I did some more "work" yesterday. The most important kind. The kind were you stand there staring at your rig for hours as you devise your next step in the mod.

Here is the sleeping platform in "full" version. The dog divider is unfolded and secured over the rear seats. In this mode, the cover for the fridge is moved to the front passenger seat (as previously shown) for the night
IMG_20120510_122236.jpg


In "full" mode it is 59.5 inches wide. Three thermarest mats are 60" wide. Considering we're trained to sleep 5 people and a dog in a 4 person tent, with only 4 thermarests, the "full" platform would allow the various combinations:
wife and I
Me and two kids.
IMG_20120510_123025.jpg


The next mode is "2/3" mode. The 1/3 seat can be left up and the dog-divider-platform-extension is folded over. This mode would work when it is just me and one kid. At night, the seat is folded down and the platform just flipped over. The fridge again moves to the front passenger seat.
IMG_20120510_120840.jpg


The kids seat.
IMG_20120510_120942.jpg


There's more modular awesomeness though...

If I am solo or just me and my wife, I can move the fridge top to the passenger side back row seat the same as I can the front seat. This allows the 2/3 platform to be ready for camp and the fridge is accessible from the front seat while driving. Simply move the fridge to the front seat for the night, flip over the platform, and we've got the "full" platform for us for the night.

So...with this build:

-I have three potential locations for the fridge, all fast and easy to set up.

-I can go from a solo person rig...to a family of five and a dog...in not too much time at all. I can do arrangements for everything in between, me/wife, me/wife/one kid, me/one kid, me/two kids. The dog can be mixed into that combination at any point.


I will put some loops on the top of the fridge platform so the fridge can be strapped to it. the front edge of the platform is locked under the front seat due to the angle of the seat back. When in the front passenger seat, it is locked under the dashboard.
IMG_20120510_121035.jpg


I will incorporate something so that the seatbelt can be used to secure the back side of the platform in place. This would work in either front or rear passenger seats
IMG_20120510_121507.jpg
 
Looks like the dog has rather tight quarters. Put the fridge back there and give him/her shotgun.

So, I should just have my wife walk?

Better yet, would he be more comfortable if I left him at home?

Seriously...I take a family of FIVE for 5 night trips away from the world using ONLY an SUV. The dog is lucky he has any quarters at all...and he knows it. We make quite a bit of sacrifices to give him that spot, and this whole build is centered around it.

I also don't think it would be as safe for him or us to have him flopping around in the front seat while 4wheeling. His ability to lay down and turn around allowed him to ride Fins and Things in Moab. The steeps on that trail would have had him through the front window if he was sitting in the front seat.

Tight quarters is like a seat belt for a dog.
 
Back
Top Bottom