Help me understand my horns - HJ60

This site may earn a commission from merchant affiliate
links, including eBay, Amazon, Skimlinks, and others.

Joined
Oct 5, 2011
Threads
34
Messages
464
Location
Pitt Meadows BC
Well, I thought for a moment my horns were broken, or at least somewhere along the lines, the wire was shorted or something. What made me come to this conclusion?

Well, they didn't sounds for one. And using a continuity beeper on my Multimeter, it showed a closed circuit when I touched the two ends on each socket. All this without engine running or anyone touching the horn button. This, plus when I joined one socket with the negative batt post or grounded it anywhere, it showed 24.9v. The other socket showed 12v when joined with the +ve post. This was the same on both sides.

Then on a whim I started the cruiser up and decided to turn the steering wheel around whilst pressing on the horn. Wait...was that a faint beep? Did it again, same thing. So it looks like somehow the horn is working!

So ok, how does this work? I thought there should be no closed circuit until the button is depressed right? How does this work?

The other question of course, is, how do I get the darned steering off to fix the bad contact that must be happening in the steering? I can't move the bloody screws under the 3 posts of the wheel! :mad:
 
Well, they didn't sounds for one. And using a continuity beeper on my Multimeter, it showed a closed circuit when I touched the two ends on each socket. All this without engine running or anyone touching the horn button. This, plus when I joined one socket with the negative batt post or grounded it anywhere, it showed 24.9v. The other socket showed 12v when joined with the +ve post. This was the same on both sides. ...

The horn circuit is live all the time so when you push the "horn button" you simply complete the earth side of the circuit Mark. (This is the opposite to the way most items ... like wipers, lights, heater-blower are wired. And btw - most vehicle manufacturers tend to do this for the horn.)

..Then on a whim I started the cruiser up and decided to turn the steering wheel around whilst pressing on the horn. Wait...was that a faint beep? Did it again, same thing. So it looks like somehow the horn is working!

So ok, how does this work? I thought there should be no closed circuit until the button is depressed right? How does this work?

The other question of course, is, how do I get the darned steering off to fix the bad contact that must be happening in the steering? I can't move the bloody screws under the 3 posts of the wheel! :mad:

You're right in that the problem appears to be in the device that "maintains connection with the horn button(s) while you turn the steering wheel".

Usually this task is accomplished by a piece of spring-copper that rests on a circular mating-contact (and rubs along it ... maintaining electrical contact... as you turn the wheel). But this is one area I haven't delved into on my BJ40 so I don't really know what Toyota did.

Typically the end of the spring-copper wears away and/or breaks off (which could be your problem ... and if so ... I've repaired such things in the past by soldering an extension on ... or simply by bending what's left.)

Edit: I did a search and found this thread:
https://forum.ih8mud.com/60-series-wagons/203694-85-fj60-horn.html

I'm not sure which 3 screws you're trying to remove but you need to remove your steering wheel to gain access to this area.

:beer:

PS. Please post some photos of the culprit when you find it because I can't recall anyone posting pictures of problems/repairs in this area before. And the FSMs seem to me to be of no help here.
 
Last edited:
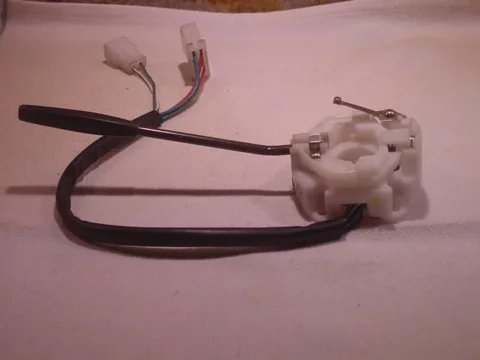
Here is a pic of my unit. It's from my BJ40 but on most trucks it works the same.
The spring touches the bottom of your steering wheel and provides ground for your horn buttons. This is where 99% of the problems happens.
DSC06574.JPG

Good luck,

Rudi
DSC06574.JPG
 
Had the same issue, the copper-springish thing that LostMarble talked about was the faulty item, it's been worn out from all this year of steering. Really easy and cheap fix!

Cost me 23$ Cdn with the pin and contact ring (Toyota PN #84312-20011 and #45176-20030)

See attachment (pic I stole somewhere here, but I had saved locally).
horn.jpg
 
I made a card board spacer out of a beer box & put it behind the ring. Only takes a few minutes.
 
I'm not sure which 3 screws you're trying to remove but you need to remove your steering wheel to gain access to this area.

:beer:

PS. Please post some photos of the culprit when you find it because I can't recall anyone posting pictures of problems/repairs in this area before. And the FSMs seem to me to be of no help here.

Thanks for all the replies folks. Marbles, the 3 screws reside behind the spokes of the steering wheel. I figure I have to get those off before i can dismantle the wheel right? I don't think its like the ones with the centre circular button where all one would need to do is (ostensibly) pop the centre and away you go.

This one has three buttons. And I can't get the damned screws off without stripping them! BTW, thanks for the explanation of the way the horn circuit works. The fact that the both sockets are always live explains the constant continuity.

Hopefully there's an easier way! I read (in one of my searches) of someone who cleverly used the spent brass of a 22 for some pin or something. I figure I can make something like that...if only I could figure out how to remove the steering wheel! :D
 
We replaced the pin on my brother HJ60 think it cost $10 from Toyota and 10min of work.
 
10 min!! I spent over an hour with my head bent at an angle my chiropractor would wince if he saw it, and still couldn't get those screws out. Are they welded in or what! I might have to break out the impact screwdriver, but with all the steering components looking like plastic, I'm afraid it'll just break. :mad:
 
Lift the cap from the center, remove bolt, lift steering wheel.
steering wheel.jpg

Good luck.

Rudi
steering wheel.jpg
 
THANK YOU RUDI!! That's the info I've been waiting for! Looking at the rectangular badge on the wheel, I debated wether to take a screwdriver to pry it out, but it didn't look like it was the way. The drawing says it all, thanks!
 
Thanks Biche...yes, I've seen those posts. That's what got me thinking that I needed to take out the three screws underneath. According to Rudi's picture though, the wheel should be removable with the removal of just the badge.

In my case, the horn buttons themselves are not the problem, but rather, the pin that the 22 casing fits over. So, maybe I don't have to remove the three screws, but just the centre nut, so as to remove the whole wheel and access the pin.
 
I've went to the truck, unscrew the front panel and take a shot of the back of the badge. Hope it help.
PA251034.jpg
 
Thanks a lot Biche, that helps for sure! So it does confirm that we can actually just remove the badge and get access to the nut that removes the wheel. This will help future members find answers as well. I'll be doing this tonight when I get back home!
 
Just a quick update for future searches. I just used a very sharp chisel and pried off the centre badge. I was worried that it would be glued in place, but its only a pressure fit, so no damage.

Took off the entire wheel (took a LOT of shaking, to the point I thought I was going to break the wheel!) and found a large amount of "brass dust". The pin had been worn down to nothing! I dug around my stash of casings and found a spent 22 and simply pushed it into the pin and voila! Horns!!

Wife was complaining that she couldn't sleep cos some idiot kept tooting the horn in the middle of the night ;-) Now she complains that the steering isn't straight. Oh well, at least I know how to remove the steering now!

Only downside is, the three screws to split the wheel are buggered. Cannot be opened. I might have to drill them out one day :(
 
Just a quick update for future searches. I just used a very sharp chisel and pried off the centre badge. I was worried that it would be glued in place, but its only a pressure fit, so no damage. ....

Well done Mark. (I was worried that your badge may have been more than simply pressed-in too.)

....Wife was complaining that she couldn't sleep cos some idiot kept tooting the horn in the middle of the night ;-) Now she complains that the steering isn't straight. Oh well, at least I know how to remove the steering now! ...

Good heavens! I wouldn't expect your wife to be the only one complaining if you were working on the horn late at night! What about your neighbours?

And you can't have fully-contracted the disease (that most of us here seem to have) if you don't share your wife's concern about your wheel not being straight.

You gotta fix that!!!

And the best way is to go for a drive with the nut on (so the wheel can't possibly come off the splines) but with the steering wheel still loose enough so you can periodically stop, undo the nut, easily lift the wheel off, and then temporarily resecure it in a slightly different orientation on the splines.

You'll probably have to repeat this quite a few times till you get the positioning perfect (so that the wheel spokes and centre-badge sit exactly right when you're travelling straight on a reasonably-level section of road).

Once it is set right, of course you fully-tighten the centre-nut.

Those of us who REALLY have this disease would be tormented into depresssion/violence etc by driving with our steeringwheels out of kilter by even JUST ONE SPLINE! :lol:

...Only downside is, the three screws to split the wheel are buggered. Cannot be opened. I might have to drill them out one day :(

It's a bit late to say this now ... but the way to tackle this is to make sure you use a "driver head/bit" that's unworn and fits the screw perfectly on your first attempt. Furthermore, you must put 95% of your effort into "pushing the head/bit into the screw" (rather than "turning the screw"). And if it doesn't turn with that, then use an impact driver (again with a head/bit that has sharp edges and is a good fit).

These heads/tips I use are cheap yet they have good sharp edges and are extremely wear-resistant (so I would always go for them for any tight screws):
DriverBits.jpg

Unlike this head on a typical screwdriver (which I'd use on normal screws that aren't locked-in-place):
DriverWorn_NEW.jpg

But once you've grawnched a head (particularly one in a recessed hole like you have here) ... you're rather in sh#t-street as you know!

:beer:

PS. The older you get, the more of these bad-experiences you've had .... So the more you realise the need to "do it right on the first attempt". :lol:
DriverBits.jpg
DriverWorn_NEW.jpg
 
Hi Mark,

Good job. Glad you solved the problem.

Rudi
 
Thanks guys. The steering is back in its correct place and the centre nut cinched up tight. All is good, and I don't need to get a new pair of horns (I was looking at a pair of 24V Supertones, but I guess I can save that money now for diesel, which just hit 1.40 a liter last night).

The screws on the back of the steering were buggered (I think) before I even started. The PO must've figured the same thing (about the pin) and tried to open the steering wheel. I think this was the case as two out of the three screws were buggered and the one that wasn't, unscrewed when I applied the proper 95% force on it. I guess when the day comes, I might have to cave and buy an easy-out driver and see if all the hype about them is true :-)
 

Users who are viewing this thread

Back
Top Bottom