
Wow, Very nice work!
Navigation
Install the app
How to install the app on iOS
Follow along with the video below to see how to install our site as a web app on your home screen.
Note: This feature may not be available in some browsers.
More options
Style variation
You are using an out of date browser. It may not display this or other websites correctly.
You should upgrade or use an alternative browser.
You should upgrade or use an alternative browser.
Full-length cargo box & sleeper panel
- Thread starter LandCruiserSteve
- Start date
This site may earn a commission from merchant affiliate
links, including eBay, Amazon, Skimlinks, and others.
i cant tell you how dismayed i was when i found out that here in NJ its illegal to carry a gun of any sort for any reason other than going to the firing range, hunting, reapir or sale... even then it has to be locked in a box out of reach. i'm from Tx (as you can probably guess) and that was a major shock to me, i was really looking foward to having a similar setup to that in (box and all) in my FJ. i have one question though, i'm considering doing almost exactly the same thing as you, i hadnt thought about modular box for the back seats, i was just gonna permanently sacrifice them so thanks! but my question is, are the drawers deep enough to sacrifice about 2 1/2 - 3"? i'm cosidering having a slide out shelf in addition so that lid contains extra 'counter space' (cleaning fish cooking whatever) so basically i'd have the lid, the sliding shelf and then a 3/4" filler btw. the shelf and the drawer. will that defeat the practicality of the drawers? i hope i'm painting the picture clearly. thanks.
Very few states these days allow transporting firearms in your vehicle without it being locked up, and pretty much all states require them to remain unloaded in most environments. Even Texas has recently changed its laws recently; some good and some more restrictive.
That's why carry permits are getting more popular. It's the only way most states will allow you to even take them out of our house without having them under lock and key, and even then they usually have to be hidden along with many other restrictions. A few states won't even let you own a gun without a permit.
It makes you wonder what happened to the 2nd amendment, and why so many politicians and other people still think we don’t have enough gun control laws already. That's why I support the NRA.
I posted this over on FJCruiserForums a couple of days ago, and thought it might be appropriate here as well.
(Sorry, but lots of pics.)

I began planning this project about a month before I even bought my FJ. And, it was about two months in the designing and actual building stage (a lot of hit & miss) when time permitted.
I wanted a rear storage unit that would meet this criteria:
Cost under $200 total. (I was too cheap to go out and buy something already built. Plus, there were no aftermarket systems that provided exactly what I wanted and needed.)
Be a modular system that could either be used as a rear cargo area storage box only, or a full-length system that could occupy the back seat area as well. (Since I had no use for the back seats, I removed them completely shortly after the FJ’s purchase. However, the cargo area only module could be used for those wishing to retain their back seats.)
Be sturdy enough to carry anything from off-road recovery equipment, to tools and parts, to camping gear, to miscellaneous supplies and gadgetry.
Be completely removable and returned to stock configuration if desired.
Use existing OEM bolt and mounting holes without any cutting, drilling or otherwise molesting the FJ’s original state.
Follow the contours of the FJ’s interior design.
Be professionally-built looking (even though I’m not a professional, nor do I play one on TV).
Supplies required:
Two 4x8 sheets of ¾” plywood.
About 40 feet of ¾” aluminum angle.
2 sets of 24” heavy-duty drawer sliders.
One and a half 6’ x 8’ rolls of gray indoor/outdoor carpeting (from Home Depot @$15.95 a roll).
Carpet adhesive.
Miscellaneous hardware and screws.
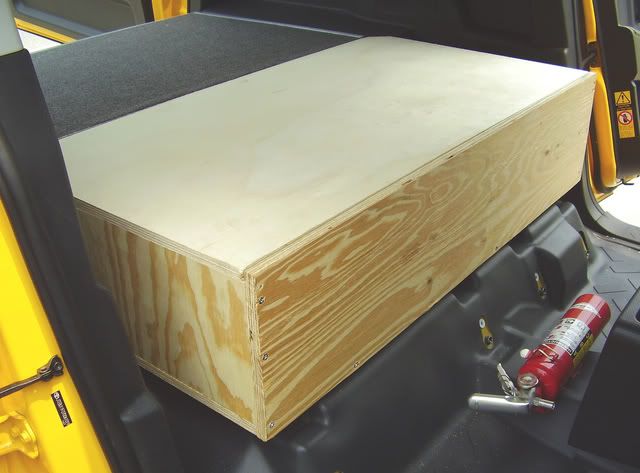
I began by building the rear drawer storage box with a center divider and pre-installed the drawer sliders. The box was carpeted prior to installation in the truck. Aluminum angle iron was installed along all edge surfaces and filed smooth. (I used 3" L-brackets to set up the shape of the box until the actual 2" wood screws were installed from the outside.)


I removed the rear tie-down hooks and used their holes as the rear attachment points for the box. (I installed the previously removed tie-down hooks on the forward section of the box to secure it with a pair of turnbuckles to the other set of tie-down hooks.)

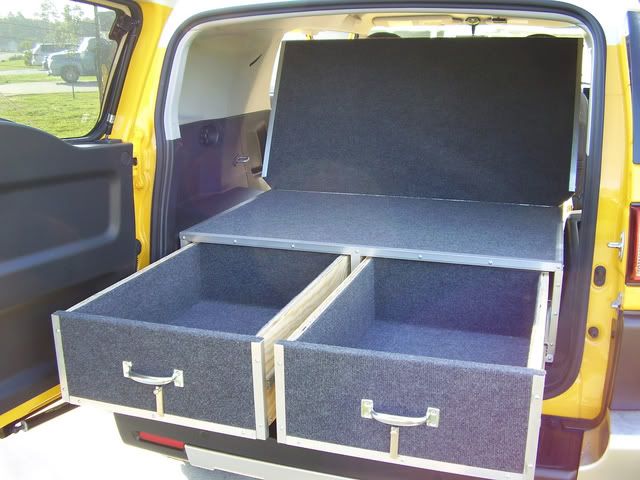
Two drawers were built, carpeted, and aluminum angled.


The forward module was created by first cutting to size a base platform that slid snugly up against the rear divider wedge. To level the platform perfectly, I attached pedestal shims along its front base.


The sides of the forward module were installed to meet the height of the rear box, and the front face panel was attached. Upon completion of the structure, I removed the entire forward module to carpet and aluminum angle the edges.

The forward module was re-installed and secured to the side bolt holes that were previously occupied by the back seat attach points. The front of the forward module was secured to existing bolt holes under where the back seats once were. (Eventually, a pair of filler panels were built to fill the spaces between the rear and forward storage boxes.)

The forward module top surface area was measured and a top was created, notched for contour, carpeted and aluminum angled.


The open-able top was attached to the face of the rear storage box with a 45” heavy-duty continuous “piano hinge.” (I’m awaiting the arrival of a flush-mounted lockable latch handle for securing the forward lid when closed, and a pair of hatch struts to hold the lid open when in use.)


(More to follow in next post . . . . )
I couldn't find any photos. Please point me in the right direction.
My apologies for quoting the entire write up. Once I got home to view your article all of the photos loaded. This looks great. I can't decide whether to do something similar or go with a "rack" type unit in the rear.
- Joined
- Jul 1, 2011
- Threads
- 6
- Messages
- 39
Nice job man, I'm gonna have to borrow some of the ideas for the back of mine, thanks for the pics.
- Joined
- Jul 24, 2011
- Threads
- 0
- Messages
- 1
Amazing job!
I've been searching for methods on how I should build my FJ bedbox and your post has really helped! Such a good job and it really looks nice! If you have the time to provide measurements of each piece and hardware, I would be more than willing to post it on my world expedition site with your name on it! I'm building an FJ Cruiser for a planetary expedition. Your box looks perfect for all of the equipment and cameras I need to take for inside safe keeping. I'll of course customize the foam cut for inside the box to protect it's contents!
Thank you again for posting this! It looks professional!
Chad
Super nice set up. Thanks for taking the time a few years ago to put this together.
- Joined
- Apr 13, 2011
- Threads
- 90
- Messages
- 894
Admirable job, well done!
I’m about 15 years late to the post, but damn that is a hell of a job. Very niceBut, wait . . . . there’s more!!
Here’s something to sleep on . . . . .
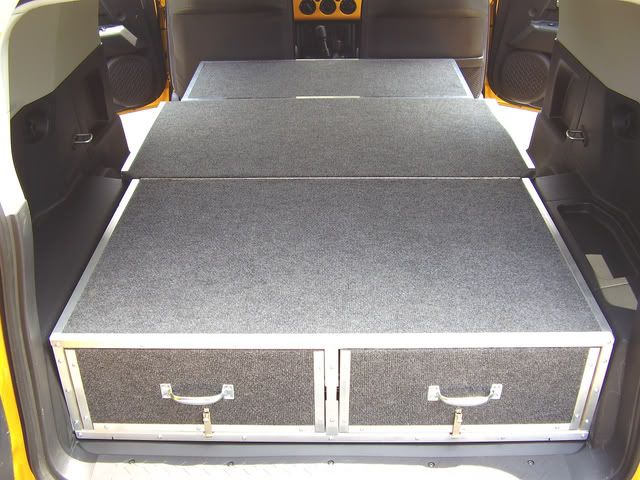
With the front seats all the way forward, there’s an additional 19” of space that could easily be filled by an additional panel. So, I did.


I attached a pair of footman loops to the front section of the forward module, and fabricated a pair of aluminum L-brackets / slot-hooks to the rear of the additional panel. And, attached a pair of ½” threaded female pipe flanges to the front of the panel.
Screwed into the flanges are a pair of painted steel “legs” that provide forward support for the panel. (Rubber cushion tips for the bottom of the legs.)


Now I have a 72” long sleep surface that (snugly) accommodates an inflatable full-size bed air mattress and allows the rear door to close.
Edit: Correction . . . turns out this is a queen-size mattress. A standard full size / double bed wouldn't be as snug.


When the sleep panel is not in service, the legs remove and clip to the bottom of the panel. And, the panel itself stores perfectly into the base of the forward module box.


I’m 6’ 4” and 250 pounds, and the bed fits me quite nicely, with plenty of room to spare.

Well, that’s it. During the course of building, a few scuffs found their way to the interior plastic. However, I came in well under budget. And, the storage boxes and drawers do exactly what I had envisioned.
Time for a rest . . . . .
