FAQ: Member Audio/NAV/electrical mods (1 Viewer)

This site may earn a commission from merchant affiliate
links, including eBay, Amazon, Skimlinks, and others.

Joined
Nov 27, 2003
Threads
182
Messages
4,646
Location
Socal
Post up your audio, navigation and portable gps mods here. This includes new headunits, navigation, speaker additions, fuseboxes and all related.

If you have a detailed link, provide a few pictures with a quick description and the link to your details.

If you don't have a detailed link, make sure you provide enough info that someone could copy your solution.

photos and step-by-step of your process and choices are going to be really helpful
 
Installing an Eclipe 5435 Navigation System in the FJ Cruiser

First and foremost, thanks to the many people that answered my stupid questions, offered their experiences, made suggestions and everything that made this install as easy as it was.

Secondly, this is how I chose to do my install and while I would love to hear suggestions or criticisms please do not take what is to follow as the singularly correct way to install a nav. Basically, use this information at your own risk.

Original purchase:

Purchased through crutchfield.com

  • 099AVN5435 Eclipse AVN5435 CD/DVD Player with DVD Navigation
  • 099SIRECL1 Eclipse SIR-ECL1 Sirius Satellite Radio
  • 099RMC105 Eclipse RMC105 Infrared Remote Control for Car Audio
  • 604RPL2YA ServiceNet 2Yr Replacement
  • 120958202 Toyota Kit 2000-up, DD 2000-up, DD (free)
  • 120701761 Toyota/Geo Wire Harness receiv receiver, 1987-up (free)

1183h2x.jpg


The AVN5435 in box:

1183hba.jpg


Wiring Diagram:

1183hig.jpg


Pretty simple stuff here. Just wire the wiring harness you buy to the 5435's wiring harnesses. In almost all cases the colors match but to be safe just use the wiring diagram and match it with the text on the wires in the 1761 wiring harness or on the instruction sheet.

Couple of exceptions to note (see: don't make the mistakes I did)

Factory Sub Be sure to connect the blue "power antenna" wire in the 1761 harness to the "ACC ON/OFF power supply terminal (blue/white) on the 5435's harness. Toyota jumpered the power antenna wire to power the factory sub. If you are hooking up your own sub skip this. Also, either find a corresponding connecter for the ACC ON/OFF wire or strip it to make the connection.

Sirius Sat Radio The sirius module's connection cable has 2 wires. One is yellow (constant power) and the other is black (ground). Be sure to tie these into the connections you are making between the 1761 harness and the 5435's harness. There are other ways to get power and to ground the sirius unit but I found this to be the easiest.

Feature Shut Off / Mobile Movies Not going to get into my thoughts on this, only to say that you are all adults, be responsible. Anyway, find the Red/White wire on the 5435's harnesses. It will also have a sticker on it identifing it as the "Parking Brake Signal". Tie this into the ground between the 1761 harness and the 5435's harness. If you are doing Sat Radio there will be 4 wires connected for the ground.

1183hqo.jpg


(note: this was before I realized I needed to ground the sirius unit)

All wired up:

1183g2a.jpg


Disassembly

I highly recomend downloading the factory XM radio install instructions as they detail the dash disassembly. http://www.trdsource.com/Pictures/XM radio.pdf

First step is to remove the 2 screws on the bottom of the side trim.

1183jep.jpg


Once the screws are removed lift from the bottom:

1183jmh.jpg


Once the side trim is removed you will see 2 screws, one on each side of the center trim piece.

1183k03.jpg


Once these are removed, lift the center trim from the bottom to remove. Be VERY careful here, this plastic is thin and your climate controls are attached to it. Once you get it unclipped remove the 3 harnesses from the guages.

1183k9x.jpg


Now you will have access to the factory head unit. You will need a 10mm socket on an extention to remove the radio. Remove the 4 bolts and pull the radio out. Detach the harnesses and the antenna. You need to remove the mounting brackets to reuse for your install.

1183ko5.jpg


Place the factory brackets on the 5435 unit. The alignment indents will line up the correct mounting position.

1183l1c.jpg


Place the trim kit over the brakets and install. The trim pieces do not sit perfectly, they actually pull away from the unit. When you put the FJ's center trim back you can correct this

1183mh1.jpg


Take a break and route the antenna wires. I installed both the Sirius and the Nav so I had two to run. Some have had sucess with mounting them inside, I decided to put them on the roof.

Place the antenna where you want it and use the channel at the front of the truck to run the wires. (per the factory XM install). Use tubing to hold the wires in place. You can get this at a hardware store.

1183muc.jpg


sbechtold was nice enough to post pics of the factory install. I mirrored what he has, see link below:

http://www.fjcruiserforums.com/forum...3&postcount=32

After you get these run and the plugs up to the radio area it is time to install the head unit and sirius module.

Here is where I mounted the Sirius unit:

1183n8p.jpg


In addition to the shared screw (see pic) I used the sticky padding that came with the unit and some elect tape to provide additional support. Be sure to hook up the sirius cables prior to mounting it. Luckly, I didn't make that mistake :cool:

Now plug everything into the 5435 and into the FJC. You just connect the wiring harnesses to the truck's harness. Plus, you need to connect the antenna (use the factory adaptor plug) and plug in the steering wheel control harness. (there is no adaptor harness needed, this is plug and play). Also, be sure to run the speed control wire (Purple/White) to the glove box area. You will need to remove the glove box to gain the access needed for the connection.

1183ns2.jpg


Now is a good time to turn on the truck and make sure everything works. Check FM/AM reception, NAV functions, Sirius Reception, etc...

If everything is good to go, bolt it back up. Be sure to adjust the trim kit peices as you place the center trim back on. (remember they want to bow out)

Time to connect the speed sensor if you have not done so already. FJ Lee provided the insight here:

http://www.fjcruiserforums.com/forum...ead.php?t=3187

And a pic of mine:

1183o13.jpg


Antenna placement:

1183zp1.jpg


Unit Installed:

1183pte.jpg


At night:

1183q51.jpg


Total time was about 5 hours but had I not stopped to take a ton of pictures and avoided some of the wiring mistakes it would have taken about 2 or 3. Not bad when you consider the sound shop I was going to use is 45 minutes away and they needed the truck for 2 days.

I tried to cover all I remembered about the install. Obviously if you have external amps, backup cameras, etc... then this overview will come up short. Use what you can and enjoy.

If you have any questions please feel free to PM me.

Hope this helps,

granger
 
Last edited:
Here is my Pioneer AVIC-D3 that was installed earlier in the year.
It is rather lengthly :D

Please note the dual subs in one of the pictures is not mine, I was using it as a reference for if I ever add subs later.

I have since added a Pioneer Sirius tuner to it July the 6th, and I never listen to FM anymore.
In fact I hardly even que up the iPod.
The iPod shown also is now in the glovebox, and not that cradle.
I use that cradle to hold the CB mic when wheeling.

Here is a good Flash video showing it in action.
http://www.pioneerelectronics.com/pna/v3/pg/top/cat/article/0,,2076_310069607_466315207,00.html
This is the same info I have on my website in the mods section, and I also posted a few weeks in my mods thread, but this thread here has more info and added pictures.

My FJ Cruiser came with a 6 CD MP3 capable stereo that lets you hook up an iPod and other music players via auxiliary port.
The FJammer as the stereo is called is not bad, but not loud or clear enough when turned up.
And the iPod support via the auxiliary jack sucked, you still had to do everything via the iPod itself.

That was fixed when I installed the DICE iPod integration kit as seen elsewhere here in my mods section.
However, the FJammer is still a weak system.

I had Cartoys install the new Pioneer AVIC D3 DVD navigation server as they call it.
Yeah, it is called a server, not a stereo.
Believe me, it really serves up the data to you in fine fashion!

It has the usual 3 FM bands for saving presets to, the AM band, CD discs support for MP3, WMA, regular music discs, DivX vids, DVD movies, and iPod support.
You can even get a Bluetooth add-on to use with your cell phone if so equipped with that feature.
It also supports XM and Sirius satellite radio modules that must be added in order to listen to satellite radio.

On the iPod support, you must buy a cable for it, the CDI200.
Once installed, you control the iPod completely via the headunit.
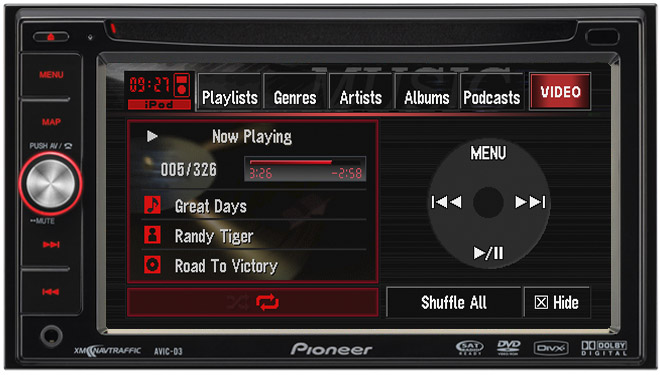
On the screen of the headunit it looks exactly like your iPod.
How cool is that?
The only time you ever have to physically touch your iPod is when you select iPod video playback from the headunits touch screen.
Touch screen you say?

Yeah, I was going to get to that ;)
Most functions are all controlled via the Pioneers LCD screen with your finger.
Very rarely do you have to use the other two buttons labeled Menu and Map.

The headunits LCD screen is a widescreen that supports the 16:9 ratio for widescreen format of DVD movies that are encoded for it.
In other words, no black bars top or bottom on your screen!

Some have complained that the unit only has one disc slot.
To use the navigation feature, you need to leave the DVD in the slot so it can pull the info when you program in new routes.
You can take out the DVD once you start to use the system to navigate for you, as it puts the data into memory.

For me, I will leave the disc in at all times, unless I am going to park somewhere and watch a DVD.
To be honest with you, that will not happen to often, if at all.
Besides, music discs are so stone age.
Even the cavemen have moved upto iPods now, and my iPod Video is the 30 GB one, so I have all of my music CDs ripped to it anyways, and my entire MP3 collection on it.
Who needs discs anymore???

I also had them install the Pioneer backup camera model NDBC2.
The backup camera comes on anytime you put the vehicle into reverse, regardless of what else is showing on your screen.
You can also go into the navi menu under the various map views you can choose from, and select camera.
This will allow you to see full time what is behind you.
Pretty cool feature, and really lets you see the tailgater's.

Also installed was the Swips adapter so my steering wheel controls would work as before with the new headunit.

Below are some specs of the headunit taken from Cartoys website:
Find the perfect route
The Pioneer AVIC-D3 in-dash navigation system comes with two DVD-ROMs containing a massive Tele Atlas database, enabling the unit to provide a massive network of turn-by-turn routable roads. Within seconds,

the unit?s extremely fast processor calculates multiple routes and provides directions to destinations via the graphic map interface and voice guidance. In addition, you?ll have access to 12-million points

of interest throughout the United States and Canada, meaning the nearest gas station, restaurant, or ATM is always only a finger?s touch away.

Circumvent congestion
Add the optional XM NavTraffic?* service to the AVIC-D3, and you?ll be one step ahead of traffic every time. Using the available GEX-P10XMT XM NavTraffic? Satellite Radio Tuner, traffic information is

provided through a continuous broadcast. The AVIC-D3?s intelligent navigation will alert you of traffic jams and provide alternate routes. And with XM?s satellite radio service, you?ll be able to enjoy a

great selection of music, talk, and sports channels with loads of exclusive content. Being aware of traffic has never been easier.

Sharp look. Smooth fit.
In addition to being multifunctional, the AVIC-D3 was designed with ease and style in mind. The unit features a ?double-DIN? size that?s standard in many vehicles, providing a perfect placement in the

dashboard for a fit and finish similar to factory systems. And the integration gets even better with the AVIC-D3?s multi-color illumination, which gives you the ability to match the interface to the colors

of your dashboard, or your mood.

Best seat in the house
Whether your preferred media is CD, DVD, MP3, or satellite radio, the AVIC-D3 has an array of multimedia options to enjoy in high quality playback. Navigation functions and multimedia playback can be enjoyed

simultaneously, thanks to the AVIC-D3?s memory navigation, which allows you to load a route, eject the navigation disc and pop in a CD or DVD.

Connect and direct your iPod?
How much music and video can you bring to your AVIC-D3? That depends on how deep your iPod? library is. In addition to the built-in arsenal of multimedia playback options, Pioneer iPod-ready navigation

systems like the AVIC-D3 make integrating your iPod? simple with the optional CD-I200 iPod? connector. And control of your iPod? music and video library is quick and seamless via touch screen control of the

intuitive graphic menu. Once you try the AVIC-D3?s iPod? playback, you?ll be using it to play all of the songs, podcasts, and videos you can get your hands on.**

Go wireless with Bluetooth
It?s time to put that phone down. Thanks to the optional CD-BTB200 Bluetooth adapter, you can make and receive phone calls hands-free when you sync a compatible Bluetooth-enabled cell phone to your AVIC-D3.

Once you?re connected, during a call you simply talk into the unit's included microphone while listening through your in-car speakers. To make calling even more convenient, for certain compatible

Bluetooth-enabled cell phones you can copy and store your numbers from the cell phone to your AVIC-D3?s internal phone book. Once you?re set up, you may never have to lay a finger on your cell phone to make

a call in your vehicle again.

Display Features * Screen Size/Aspect Ratio 6.5 inch / 16:9
* Pixels 336,960 (1,440 x 234)
* Touch Panel
* Anti-Glare Screen Coating
* Dimmer Control Intelligent
* Picture Adjustment Brightness, Contrast, Color, Hue, Dimmer Settings
* Motorized Display Motorized Open/Close

DVD/CD Player * DVD Video Playback DVD/DVD-R/-RW
* CD Playback CD/CD-R/-RW
* iTunes/DivX/WMA Playback
* ID3 Tag / WMA Text ID3
* CD Text
* Auto Scroll
* MP3 Track List

AM/FM Tuner
* Supertuner Supertuner IIID
* 24-Station/6-Button (18FM/6FM) Presets
* BSM (Best Stations Memory)
* Local Station Setting Selectable (4-Step)

Audio Features
* Built-in Speaker Power MOSFET 50W x 4
* Continuous Power Output 22W x 4
* Equalizer EEQ (3-Band Parametric)
* EQ-EX
* SFEQ (Sound Focus EQ)
* Loudness
* Source Level Adjuster (SLA)
* High-Pass Crossover (HPF) 50/80/125Hz, -12dB/Oct.
* Subwoofer Crossover (LPF) 50/80/125Hz, -18dB/Oct., +/-12dB
* RCA Preouts 3 pair (Front, Rear, Sub/Non-Fading)
* Preout Voltage 2.2V, 1k Ohm

Receiver Features
* IP-Bus System Control
* XM Satellite Ready
* iPod Adapter Ready Yes (Full Control, Multi-Line)
* Multi-CD Control
* DVD Control
* AV-Bus Input
* 1 Composite A/V Input
* Back-Up Camera Input
* Rear-View Camera Mode
* 1 Composite A/V Output
* Bluetooth Capable (Optional CD-BTB200 required)
* Dimensions 2DIN (7" x 4" x 6-1/2")
* 1 Year Warranty

OK, on with a few pictures.
First up shows the iPod support on the headunit.
You can see the click wheel of the iPod on the screen.
It is all done by touching the screen.
Notice in the 3rd and 4th picture that I have a picture of my FJ loaded.
Yes, you can use your own pictures to replace the stock ones that are on the navigation DVD.
In the 3rd picture I choose hide from the menu.
You can choose to hide the radio, music CD, or the iPod screen and your picture you have loaded will show, and also the text of the song playing.
In the 4th picture the iPod wheel looks like it is part of my spare tire ;)

27.jpg
27a.jpg


27a1.jpg
27a2.jpg


Next up shows what the radio and map screens look like.
Not shown is the many other map screen variations.
You can also show what your vehicle looks like going down the road, and to the right of that is your actual map portion with the street names you are coming up on.

27b.jpg
27c.jpg


Next up shows the backup camera mounted to the rear bumper just below the spare tire, and a view from what I see from inside the cabin.
The camera although mounted low, is at the perfect spot to see everything behind me.
What you see at the bottom of the LCD screen is my Warn Recovery Shackle.

27d.jpg
27e.jpg


Next up is a picture I saw on this forum (this picture was not taken by me) of where the GPS antenna is located.
The front right speaker is taken out, the antenna put in, then the speaker put back, and the cover goes back on.
The antenna works prefect there, even when covered up by the speaker grille.

27f.jpg


The price is right for a unit like this that can do all it does.
There is even voice commands to tell you where to turn when using the navigation part, just like the Tom Tom units do.
I have used it already a few times to find places, and it is dead on when guiding me.

I probably will not add in an amplifier for the speakers, as the headunit puts out a lot of sound.
However in the future I will have Cartoys add back in my old school Rockford Fosgate 500a2 amp and run dual 10" subs in a custom box made specially for the FJ similar to the picture below.

27g.jpg


Here are a few additional pictures from Pioneers website showing the detail of the LCD with both the navigation map and the iPod screen.

27h.jpg
27i.jpg


Parts used
Pioneer AVIC D3 from Pioneers website
Pioneer AVIC D3 headunit from Cartoys
Pioneer NDBC2 backup camera
Pioneer iPod cable CDI200
Swips steering wheel adaptor, no part number, and it was thrown in for me from Cartoys, I am such a good customer of theirs :)

Summery:
Anyone looking for a great double DIN headunit that supports your iPod and does NAV, this is a bargain for the price.
 
Anyone going with the Eclipse model and adding the backup camera should install it directly on top of the hitch. I had mine relocated there and I can hook up on the first try without any assistance. It is terrific.
And anyone who likes the factory Toyota or Lexus navigation systems will be very happy with Eclipse. It is made by Fujitso 10 and it works exactly the same. Really user friendly.
 

Users who are viewing this thread

Back
Top Bottom