
gotta love the hall monitors. ABS is crap on ball bearing gravel roads. It actually increases your stopping distance, we have lots of it in Australia, so is it ok to disable your ABS, is it ethical, is PC, is it legal, is it...? This is a tech forum, save us all from your unsolicited 'legal?' advice.
Navigation
Install the app
How to install the app on iOS
Follow along with the video below to see how to install our site as a web app on your home screen.
Note: This feature may not be available in some browsers.
More options
Style variation
You are using an out of date browser. It may not display this or other websites correctly.
You should upgrade or use an alternative browser.
You should upgrade or use an alternative browser.
ABS Engaging 99 LC
- Thread starter mainecruiser
- Start date
This site may earn a commission from merchant affiliate
links, including eBay, Amazon, Skimlinks, and others.
Thanks to agasains' DTC procedure [without the factory tester] it pulled a failed wheel speed sensor code. Got one on order, and hopefully that will get the problem solved.
ABS is never perfect, but it is better than flat spotting nice new LTX tires on a hard stop. I tow my race car rig with this truck, and without ABS it can be hard to avoid flat spotting front tires when some idiot causes a situation that calls for heavy braking.
ABS is never perfect, but it is better than flat spotting nice new LTX tires on a hard stop. I tow my race car rig with this truck, and without ABS it can be hard to avoid flat spotting front tires when some idiot causes a situation that calls for heavy braking.
Seem to be lots of Aussies on this board. I'm from Sydney and lived in Melbourne for 10 years before moving to the US.
Re: Agasain's DTC prcedure,
1. Is SST 09843-18020 basically a paperclip?
2. Where are terminals Tc and E1 of DLC1?

Here is the current state of my dash:

These relays checked out OK using the FSM Diagnostics section and a Voltmeter:

1. Is SST 09843-18020 basically a paperclip?
2. Where are terminals Tc and E1 of DLC1?
Here is the current state of my dash:
These relays checked out OK using the FSM Diagnostics section and a Voltmeter:
Last edited:
pfran42 said:Re: Agasain's DTC prcedure,
1. Is SST 09843-18020 basically a paperclip?
I like to use 18 gauge wire (iirc) but i think many use paperclips too.
I like to use 18 gauge wire (iirc) but i think many use paperclips too.
Thanks for the reply!
Easy enough on using 18 gauge wire. Can you tell me where I find this?
Re: Agasain's DTC prcedure,
1. Is SST 09843-18020 basically a paperclip?
2. Where are terminals Tc and E1 of DLC1?
1. Regular hookup wire is easier on the DLC connector pins, but a paper clip will work in a pinch. SST 09843-18020 is a basic shorting link.
2. The DLC 1 connector is in the engine bay, pass side, on the lip of the bay. The connector cover is marked DIAGNOSTIC. The pin layout is printed inside the cover. Don't forget to remove the shorting link for the test, and replace it after the test. Its the silver link between the two pins on the left of the connector.
Last edited:
2. The DLC 1 connector is in the engine bay, pass side, on the outside end. The connector cover is marked DIAGNOSTIC. The pin layout is printed inside the cover.
What APKhaos said.
In engine bay, on passenger side (US).


Last edited:
Thanks all. Will report back with findings...
2. The DLC 1 connector is in the engine bay, pass side, on the lip of the bay. The connector cover is marked DIAGNOSTIC. The pin layout is printed inside the cover. Don't forget to remove the shorting link for the test, and replace it after the test. Its the silver link between the two pins on the left of the connector.
I don't know if I am reading this incorrectly but this doesn't seem right. The FSM says to use the shorting link during the test:


Anyways, I shorted E1 and TC on DLC1, turned the ignition to on and waited. I pulled codes 33 and 34 from the ABS side and 43 from the VSC TRAC side.
33 - Right rear wheel speed sensor malfunction
34 - Left rear wheel speed sensor malfunction
43 - Malfunction in deceleration sensor (constant output)
I then disconnected the short running from TC and E1, tried turning off my Nav panel that was showing Japanese ECU status checks and turned off the vehicle.
Note: My NAV panel had a Japanese screen show up with ECU check status (I think) but I could not turn the panel off per FSM instructions.
The fact that I threw all of these at once out of the blue makes we wonder if these are false positives.
I pulled both rear wheel sensors (had to use PB and Channel Locks) sprayed them off with electric contact cleaner (they were fairly clean to begin with) and re-installed.
Next I reconnected the short form TC to E1 on DLC1 and ran diagnostics again. The same codes flashed again. I then tried clearing codes by turning the vehicle off and back to on but this time stomping on the gas pedal 8 times in under 5 seconds right after turning the key to the on position. This produced a situation where all warning lights appeared along with a buzz or a steady beep (I forget which one). After that my NAV panel turned on with the same Japanese writing about ECU status. There were two buttons on the lower right on the NAV display. Pressing the left one did nothing but pressing the right one changed screens on the NAV display and cleared all of my codes for about 5 seconds. Right after that the original codes shown in the picture a couple of post up came back.
So, what do I do now? Is there any way to reset or clear these codes to see if I have at least partially addressed the issue? Should I disconnect the battery and go to bed and reconnect, let idle for 15 minutes in the AM and see if that accomplishes anything? I read the FSM directions about 400 times but I am still at a total loss.
(1) Disconnect the short pin from DLC1.
(2) Using SST, connect terminals Tc and E1 of DLC1.
SST 09843−18020
(3) Turn the ignition switch ON.
My two FSMs (2002 and 2004) don't mention step #1. Am I missing something?
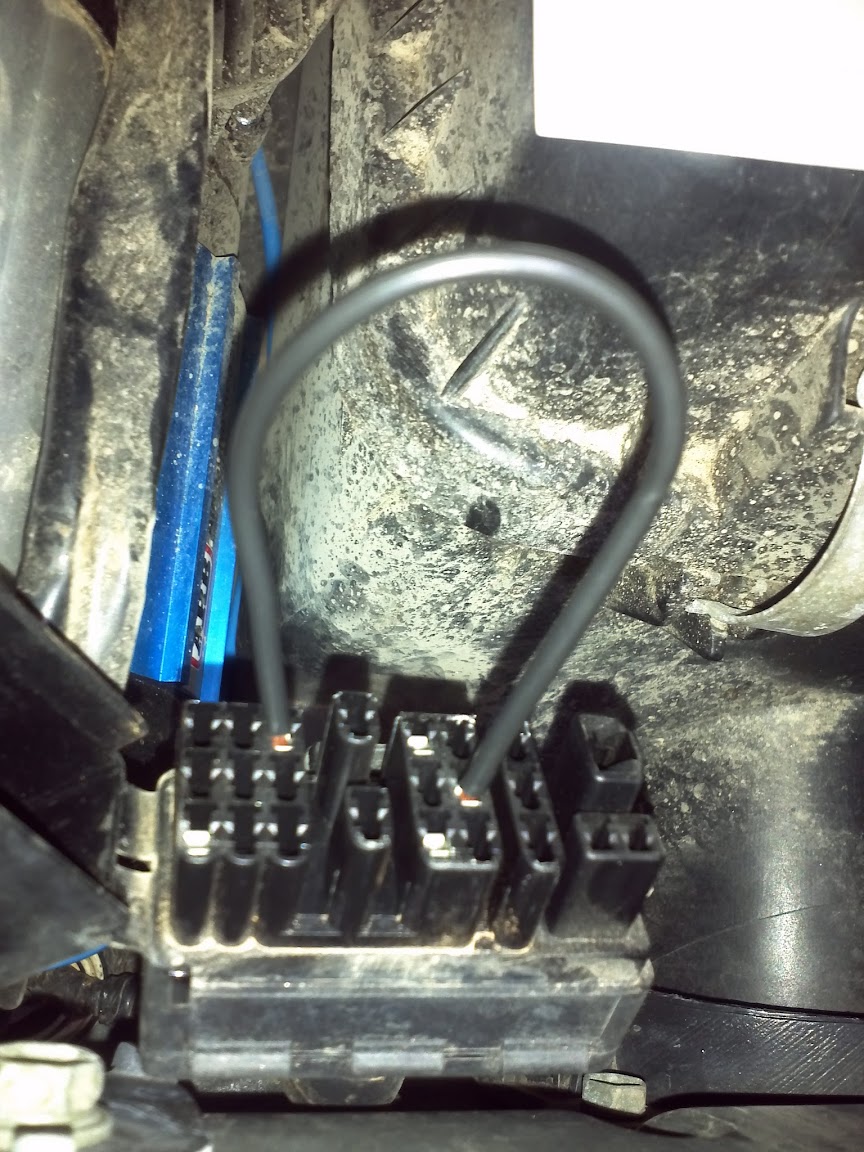
Here is a close up of my DLC1:

my quote was from '99 fsm for OP.pfran42 said:My two FSMs (2002 and 2004) don't mention step #1. Am I missing something?
Here is a close up of my DLC1:
I just checked my 05 FSM and the first step is like yours:
(1) Using SST, connect terminals Tc and E1 of DLC1 or Tc and CG of DLC3.
So no, I don't think you're missing anything, the instructions in the FSM clearly changed from what was in the '99 version. Don't know why. Not only do you not need to remove the 'short pin' (I guess there isn't one in later models?) but you can also run the test from DLC3.
Last edited:
Thanks! Anybody have any useful advice for clearing codes using the material referenced above?
- Sent from a very small supercomputer.
- Sent from a very small supercomputer.
pfran42 said:Thanks! Anybody have any useful advice for clearing codes using the material referenced above?
- Sent from a very small supercomputer.
pretty sure the fsm also has a procedure to clear the codes. wont be able to look it up until later but if you have acces to fsm keep looking.
Thanks! Anybody have any useful advice for clearing codes using the material referenced above?
- Sent from a very small supercomputer.
Just checked the 2004 FSM - Diagnostics, page DI-506
The process to clear the DTC is the same as the 1999 FSM except that removing shorting link is not mentioned. I suspect the shorting link is specific to the early years. My 1999 has it, and the 1999 FSM references it. The 2004 FSM does not.
Here's the DTC clear process straight from the 2004 FSM:
In case of not using hand-held tester:
Clear the DTC.
(1) Using SST, connect terminals Tc and E1 of the
DLC1 or Tc and CG of the DLC3.
SST 09843-18020 or 09843-18040
(2) Turn the ignition switch ON.
(3) Clear the DTC stored in the ECU by depressing the
brake pedal 8 or more times within 5 sec.
(4) Check that the warning light shows the normal
code.
(5) Remove the SST from the terminals of the DLC1 or
DLC3.
Hope this helps!
Just closing the loop on my particular problem:
- Thanks to agasains' DTC procedure [for the 99 model without the factory tester] it pulled a failed wheel speed sensor code.
- Replaced the front left wheel speed sensor. In my case, the original sensor was solidly frozen in the steering knuckle. The only way was to remove the hub & rotor, then drive the old sensor out from the outside. then thoroughly grind out the rust that had formed [Dremel with a flex extension and sanding cylinder got that part done nicely]. New sensor went in easy once that was done.
- Used agasain's procedure to clear the old code, which resulted in a flashing ABS light which is the 'no codes' display.
- Ignition off, removed the DLC test link & replaced the shorting pin.
- On start up, got a solid ABS light on, and thought all was lost. A quick test drive is all that was needed to clear the ABS light. I'm guessing the controller needs to see the signals from all wheel sensors before clearing the light.
Terrific result. ABS back in operation for $167 in parts [new sensor] and despite the fact that the simple 'replace the sensor' turned into the bigger hub & rotor R&R job. Great stuff")
- Thanks to agasains' DTC procedure [for the 99 model without the factory tester] it pulled a failed wheel speed sensor code.
- Replaced the front left wheel speed sensor. In my case, the original sensor was solidly frozen in the steering knuckle. The only way was to remove the hub & rotor, then drive the old sensor out from the outside. then thoroughly grind out the rust that had formed [Dremel with a flex extension and sanding cylinder got that part done nicely]. New sensor went in easy once that was done.
- Used agasain's procedure to clear the old code, which resulted in a flashing ABS light which is the 'no codes' display.
- Ignition off, removed the DLC test link & replaced the shorting pin.
- On start up, got a solid ABS light on, and thought all was lost. A quick test drive is all that was needed to clear the ABS light. I'm guessing the controller needs to see the signals from all wheel sensors before clearing the light.
Terrific result. ABS back in operation for $167 in parts [new sensor] and despite the fact that the simple 'replace the sensor' turned into the bigger hub & rotor R&R job. Great stuff
Last edited: