1911
chupacabra
I've been working on something similar to Mtbcoach as far as flattening the belly profile of my FJC, but I didn't want to horn in on his thread and also my design is slightly different. I started with the same basic premise as Mtbcoach and BellyDoc, an Inchworm "Lefty" transfer case installation that leaves a good 3 to 3-1/2" of empty air between the bottom of the new transfer case and the bottom of the stock exhaust and frame cross member. My implementation has benefitted materially from ideas and work previously done by BellyDoc and Mtbcoach, both of whom were generous enough to share their respective ideas and experience with me, and I wish to acknowledge their pioneering efforts.
This picture (without the stock cross member bolted back on) gives you some idea of the room available below Lefty:

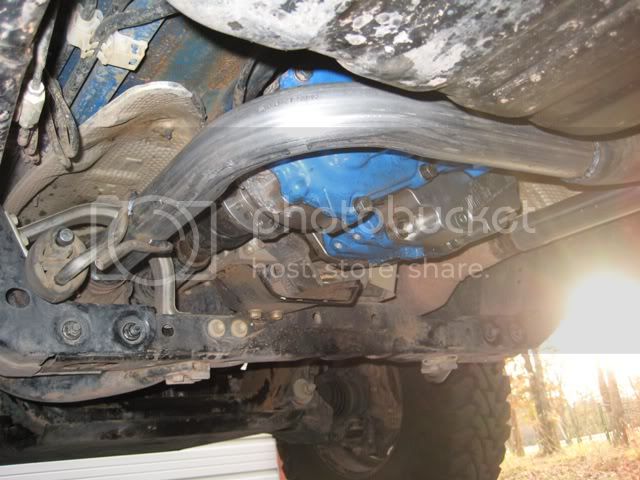
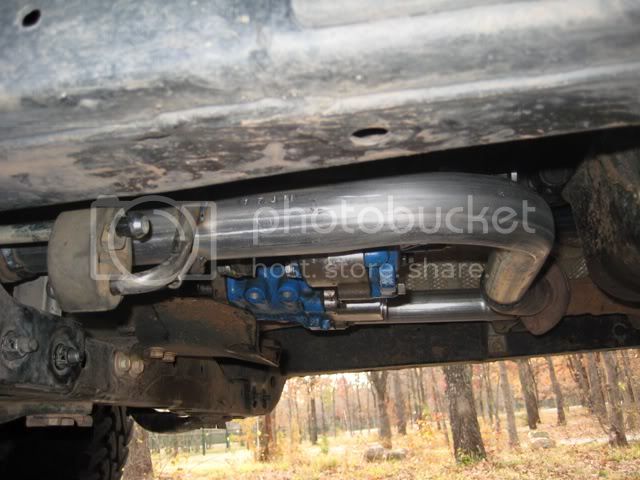
The next step was to relocate the exhaust "Y" pipe further aft and up. The stock exhaust goes right under the stock transfer case. With Lefty, there is room aft of Lefty, up higher and in front of the gas tank:
The final step is to remove the stock frame cross member that hangs so low, fabricate a new higher cross member to hold the transmission mount and a skid plate, and attach a skid plate.
For this, I took a slightly different tack than Mtbcoach. Rather than a perfectly flat "belly" all the way from the front suspension cross member, I chose to make a sloped ramp from the rear edge of my Demello skid plate (under the engine oil pan) back to the new fabricated higher cross member, with a new skid plate, thusly:


Detail of the mounting method of the new cross member:

Like BellyDoc, tubular steel was chosen for the new cross member.
The skid plate itself was actually made from two jeep skid plates (that were free), and reinforced on the back (upper) side with channel steel. The result is not as thick as the 3/16" steel of the Demello front skid, but is pretty sturdy. If it doesn't hold up, then I can replace it later with heavier steel.
A side profile shot of the new skid plate:

This method gives most all the advantage of a higher break-over, without requiring relocation of the secondary catalytic converters. The cats are somewhat exposed (not covered by the skid plate) and if trail damage is incurred then relocation or removal may be an option later.
Cutting and cleaning of the stock cross member and fabrication of the new cross member and skid plate was performed by BaerTrax Offroad Specialist in Dallas, TX:
BaerTrax Offroad Specialist
Future work may also include more skid plates for the transfer case and gas tank.
This picture (without the stock cross member bolted back on) gives you some idea of the room available below Lefty:
The next step was to relocate the exhaust "Y" pipe further aft and up. The stock exhaust goes right under the stock transfer case. With Lefty, there is room aft of Lefty, up higher and in front of the gas tank:
The final step is to remove the stock frame cross member that hangs so low, fabricate a new higher cross member to hold the transmission mount and a skid plate, and attach a skid plate.
For this, I took a slightly different tack than Mtbcoach. Rather than a perfectly flat "belly" all the way from the front suspension cross member, I chose to make a sloped ramp from the rear edge of my Demello skid plate (under the engine oil pan) back to the new fabricated higher cross member, with a new skid plate, thusly:
Detail of the mounting method of the new cross member:
Like BellyDoc, tubular steel was chosen for the new cross member.
The skid plate itself was actually made from two jeep skid plates (that were free), and reinforced on the back (upper) side with channel steel. The result is not as thick as the 3/16" steel of the Demello front skid, but is pretty sturdy. If it doesn't hold up, then I can replace it later with heavier steel.
A side profile shot of the new skid plate:
This method gives most all the advantage of a higher break-over, without requiring relocation of the secondary catalytic converters. The cats are somewhat exposed (not covered by the skid plate) and if trail damage is incurred then relocation or removal may be an option later.
Cutting and cleaning of the stock cross member and fabrication of the new cross member and skid plate was performed by BaerTrax Offroad Specialist in Dallas, TX:
BaerTrax Offroad Specialist
Future work may also include more skid plates for the transfer case and gas tank.
")