2H valve clearance adjustment

This site may earn a commission from merchant affiliate
links, including eBay, Amazon, Skimlinks, and others.

Joined
Oct 14, 2009
Threads
20
Messages
520
Location
NSW
(EDIT: write up starts at post #13.)

Hi everyone,
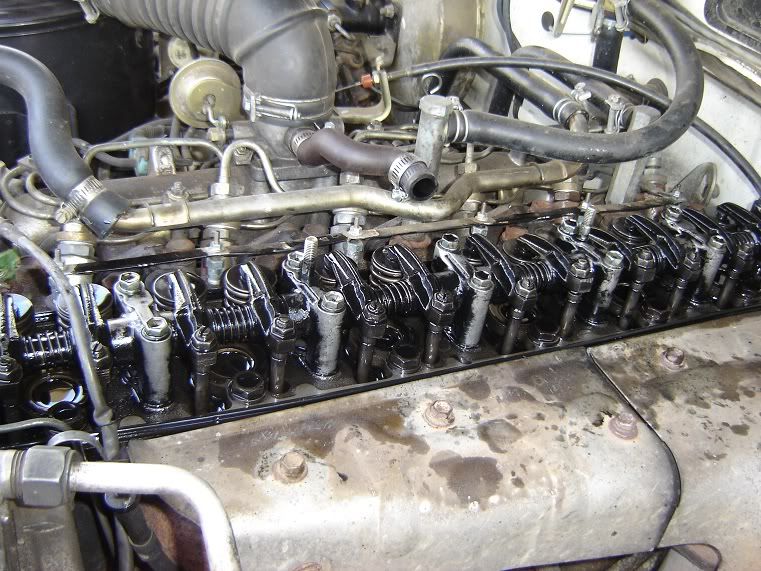
I am planning to adjust the valve clearances for the first time on my 2H.
I've done it once before on another car, and from that I learned two things:
-Don't run the engine with the valve cover off. (oil squirting everywhere)
-Engine sure cools off quickly. I had to restart the engine twice to get it back to operating temp during the adjustment.


I've got a couple of questions about it:
1. I need a 46mm socket for the crankshaft nut? (according to FSM)

2. Is that easy to get to, should I access the nut from above or below?

3. How much effort will/should it take to rotate the 2H?

4. It's an auto, so leave it in 'P' I take it?

5. Most important question for me: adjust at operating temp, but can I do all 12 valves before it cools off? Should I restart the engine every 4 valves or so? Or so long as it is not cold? (I plan to do it after a 40km trip into town, and at 30+ celcius)

6. And finally, what is 'a very slight drag'? Enough to bend the feeler gauge as you push it in, or just enough to not be completely loose?


In addition I'll make sure I have all tools at the ready, including the correct feeler gauges
(I=0.20mm, E=0.36mm) to speed things up.

If you have any other tips, let me know.

Thanks,
Vince
 
Last edited:
Vince, I'm no expert, but I certainly would not bother to restart the engine in the middle of setting valves. Suggest you put the transmission in Neutral. As for the "very slight drag" question, I prefer the "go-no go" method. Set adjustment so the correct feeler gage fits, yet so that the next size up does not fit.
 
Thanks for the replies.
Those are good tips.

Especially the go-no go mehtod sounds very good.
 
Pull the rocker shaft assy and inspect the valve stem contact surfaces of the valve rockers, often they are grooved or pitted, which will cause some you some issues getting the clearance right as the feeler gauge will bridge the wear gap and your end clearance will be quite a bit more than you want.
Ideally you want to get the worn rockers resurfaced and hardened, but some folks have opted to just use a dial gauge and measure the clearance from the top of the rocker.
 
Hi fellow Aussie

It should not be to hard to turn over you engine without removing glowpug's or anything like that .

Every body seems to have a different feel when adjusting valves , I set them so I can only just move the feeler gauge just by using pressure from my thumb and finger , you are not pulling on them with all your might .

Should you restart the engine ? That depends on how fast you do your valve set .

70sguy gave you some good advise the rocker arm's on them old girls do tend to wear a bit and can cause some frustration .
 
70sguy: That's a bit more than I was hoping to do this time round. Very good idea, but just the valve clearances is already a big step for me. I might do that next time round.

Thanks 123456. (cool name :))

I was hoping to do it tomorrow, and started doing some prep work today. It seems going in from above is made difficult by the fan. And from below I had to remove the stone gaurd from under the radiator, but then ran into a bit of a snag.
The clearance between the radiator shroud and crank pulley is only about 2cm. And I can't really get my 46mm socket + wrench in easily.
I slid the socket in at an angle a bit higher, but then the socket still can't be slid onto the nut because the radiator shroud makes the angle impossible.
The obvious thing would be to unbolt the shroud, and raise it slightly to get my wrench in there.
But the shroud can only go so high because of the fan. However, the FSM and my other manual mention nothing about removing a shroud or fan in the VC procedure.

Long story short: I can't get my socket on the nut from below due to the shroud.

Is there some other angle/direction I should be approaching from?
 
Yeah, it's a problem. In my truck, with the manual transmission, I jack up the rear wheels, put the transmission in 5th and turn the rear wheels to rotate the engine.
I understand you have an auto tranny, so that's not as easy - is it possible to lockup the high gear without the engine running? Just hypothesizing - I have no idea whether that would work...
 
I read on here somewhere about splitting the shroud and even adding a hinge to it. Might be a good idea for the auto trans guys out there.

I like your idea of putting the rear up too. Nothing like innovation eh :D

You'd need an assistant though right? To line things up just right for adjustment?
 
No, I've done it by myself. It takes a bit of back and forth, but you get a feel for how far to push the wheel to turn the crankshaft.
 
I bent the fan shroud up a little and used the sliding bar with socket to turn my 2H crank - worked for me :D I like Freewheels idea to jack up the rear and turn it through the trans - never thought of that one :doh:
 
I've decided to turn this into a write up thread, to collect and show info on valve clearance adjustment for future reference, for this particular setup. (2H in an HJ60)

Though, the same procedures and clearances apply to the 12HT as well.

As always, safety first. This is a guide only. Use at own risk.
And always defer to the FSM.

Collect all necessary tools. You will need:
-Feeler gauge for intake 0.20mm (0.008 inch)
-Feeler gauge for exhaust 0.36mm (0.014 inch) =>detach both from the set.
-Spanner for valve cover.
-Philips head screw driver for ventilation hose
-Spanner for radiator shroud
-Spanner for fluid coupling to pulley seat/fan to pulley seat
-46mm socket for crank pulley nut.
-have a new valve cover gasket ready in case the old one is damaged or worn.

1. Before doing the adjustment, detach the fan/fluid coupling from the pulley. It is held in place by 4 nuts. Hold the pulley in place by hand, undo the nuts.

2. Now that the fan is loose, you can remove the shroud. It is held in place by 6 bolts.
Remove the shroud and fan. The shroud just barely slides out. Pinch the upper radiator hose so the shroud doesn't cut into it. Then, the shroud has to be slid/bent over aircon compressor.
It's a very tight fit. Only now that the shroud is off, can you finally get to the crank nut.

3. To aid future valve clearance adjustments, cut the shroud in two pieces horizontally.
I opted to cut the lower 1/3, so that the upper 2/3 is held in place by 4 bolts, and the lower third by 2 bolts.
And rust proof and file down the cut sections.

4. Remove the stone gaurd from under the radiator so you can access the crank nut from below.

5. Reinstall the fan.

<I split the procedure in two at this point, doing the previous on one day, and the remaining steps on another day>

5. Confirming all tools and loose bits have been removed from engine bay, start and warm up the engine.

6. Ensure the engine gets to operating temperature. To ensure the engine stays as warm as possible, you might want to loosen the valve cover bolts and vent hose clip while the engine is running. Turn the engine off.
For the 12HT, you also have to remove the turbo pipes.
(Note: I rotated the engine from below, but this way you cannot see the timing marks. Alternatively, you can remove the fan again to rotate the engine from above, but that will delay the procedure further, so I opted to go from below. If you don't have a second person around to tell you when you've reached TDC, use a telescopic mirror.)


7. Rotate the engine to TDC, for number 1 cylinder. This means number 1 cylinder rocker arms are loose, and number 6 are tight. TDC is the left most timing mark. (The other two, which are close together, are 11 and 18 degrees before TDC. Respectively the 12HT and 2H injection timing marks, but not relevant for this procedure.)
[URL="http://i35.photobucket.com/albums/d161/darthvincor/DSC05500.jpg"][URL="http://i35.photobucket.com/albums/d161/darthvincor/DSC05500.jpg"][/URL][/URL]

8. Check and if necessary adjust clearances for 1in, 1ex, 2ex, 3in, 4ex, 5in.
Do not mix up the different clearances for intake and exhaust!
If it is properly adjusted, you should feel a light drag.
(see previous posts on what exactly is a 'light drag')


9. Rotate engine again, another 360 degrees, so that rocker arms of number 1 cylinder are tight, and number 6 are loose.

10. Check and if necessary adjust clearances for 2in, 3ex, 4in, 5ex, 6in, 6ex.
I made a diagram, for easier reference.
[URL="http://i35.photobucket.com/albums/d161/darthvincor/scan0001-1.jpg"][URL="http://i35.photobucket.com/albums/d161/darthvincor/scan0001-1.jpg"][/URL][/URL]

11. Check that all tightning nuts are secure. I was not able to find any torque values in the FSM. And you're done. Put the valve cover back on with a new gasket if the old one seems due, vent hose and clip, turbo pipes if you have any.


If anything's incorrect, let me know.
 
I've always just put a spanner on the alt. nut pully and gone easy when rotating it. But i like the sound of lifting the back wheels...
 

Users who are viewing this thread

Back
Top Bottom