
Navigation
Install the app
How to install the app on iOS
Follow along with the video below to see how to install our site as a web app on your home screen.
Note: This feature may not be available in some browsers.
More options
Style variation
You are using an out of date browser. It may not display this or other websites correctly.
You should upgrade or use an alternative browser.
You should upgrade or use an alternative browser.
When & how to replace stabilizer bar, bushings, cushions & links (AKA sway bar)
- Thread starter 2001LC
- Start date
-
- Tags
- links replace stabilizer
This site may earn a commission from merchant affiliate
links, including eBay, Amazon, Skimlinks, and others.
- Thread starter
- #82
It's not uncommon to find, rear end alignment off a tiny bit, from the factory. We've no way to fine tune this, with factory's 5 OEM control arms (upper and lower along with lateral).
Stock hieght with or without AHC. There's typically no need for adjustable arms. The minor variation in rear alignment, are within spec. But there are two cases where rear is to far out, even with good OEM control arms:
Stock hieght with or without AHC. There's typically no need for adjustable arms. The minor variation in rear alignment, are within spec. But there are two cases where rear is to far out, even with good OEM control arms:
- Accidents, damage!
- Lifted rigs!
Last edited:
Thanks yes I was leaning towards OEM. Especially if none of the experts on MUD are upgrading these rear links.Insane that they recommend that aftermarket set.
Plug your VIN into Partsouq and look through the suspension diags. Its all there.
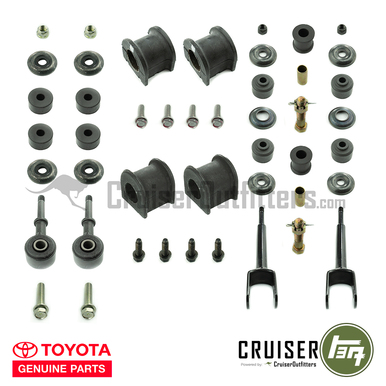
I did this last year on our 2006 LX470, using this mostly OEM kit from CruiserTeq.
Here's the link if anyone is interested...
 cruiserteq.com
Here's the link if anyone is interested...
Sway Bar Refresh Kit - OEM LX470 & 100 w/ AHC (SUS470SBKITOEM)
Toyota Land Cruiser Sway Bar Refresh Kit
I did the fronts today. I am slower than most here, it probably took me two hours or so by the time that I got all of my tools, looked up torque specs, etc. Much of that time was spent trying to line up the sway bar bushing mounts and the link bolts where they meet the LCAs. I ended up using my jack to push up on the back of the sway bar, forcing the front of the sway bar down so I could get the bolts threaded in (see pic to show what I mean). Another good use of the @LandCruiserPhil jack adapter!
Goes without saying but if you take this route only jack a little at a time and be very careful putting your hands near anything that can move.

Goes without saying but if you take this route only jack a little at a time and be very careful putting your hands near anything that can move.
Last edited:
Thank you for your supportI did the fronts today. I am slower than most here, it probably took me two hours or so by the time that I got all of my tools, looked up torque specs, etc. Much of that time was spent trying to line up the sway bar bushing mounts and the link bolts where they meet the LCAs. I ended up using my jack to push up on the back of the sway bar, forcing the front of the sway bar down so I could get the bolts threaded in (see pic to show what I mean). Another good use of the @LandCruiserPhil jack adapter!
Goes without saying but if you take this route only jack a little at a time and be very careful putting your hands near anything that can move.
View attachment 4024462
I want to replace this rusted bolt that holds the front passenger side sway bar bracket to the frame (where the A/C drops water hence the rust) on my 2002 100-Series Land Cruiser. Any suggestions how to do this?
I have the A/C adapter/hose kit from @cruiserpatch coming in the mail to prevent this from happening again but definitely want this bolt out before the rust spreads any further.


I have the A/C adapter/hose kit from @cruiserpatch coming in the mail to prevent this from happening again but definitely want this bolt out before the rust spreads any further.
- Thread starter
- #88
Clean threads with plumbers carbon steal brush, on all sides. Extra time spent, could save you from drilling out frame capture threads. Soak with penetrating oil (ATF works well). The more you clean and longer (over days if needed) of adding oil. The better the chances, bolt doesn't break. When you do start turning with a 6 point box wrench. Turn loosening just a little at a time. Start with no more than 1/8th 1/4 turn. Then turn back tightening, but not fully hard tightening. Brush threads again and add more P oil. next loosen 1/4 to 3/8ths of a turn, tighten again. Brush and add P. oil again. Repeating working in and out a little more each time. Keep repeating working very slow. Take your time here, pays! Slow is fast!I want to replace this rusted bolt that holds the front passenger side sway bar bracket to the frame (where the A/C drops water hence the rust) on my 2002 100-Series Land Cruiser. Any suggestions how to do this?
I have the A/C adapter/hose kit from @cruiserpatch coming in the mail to prevent this from happening again but definitely want this bolt out before the rust spreads any further.
View attachment 4030002
View attachment 4030003
View attachment 4030004
One bolts capture thread are in the bracket, the other in the frame. If you bust the one in bracket, no big deal. Just replace the bracket. But do all you can to not bust bolt, capture thread in frame. Or you'll need to remove T-bar to drill busted bolt from frame.
Anybody ever have to cut this bolt? It is the rear stabilizer bar to link bolt. Didn't think it was going to be a big deal, but the nut really won't budge. Soaked in PB days before job. Hitting it with impact. Nothing. And its both sides too. Every other bolt in the job loosened with no drama. Wish I had ordered replacements. Should I cut them? Other ideas?

GTV
SILVER Star
Anybody ever have to cut this bolt? It is the rear stabilizer bar to link bolt. Didn't think it was going to be a big deal, but the nut really won't budge. Soaked in PB days before job. Hitting it with impact. Nothing. And its both sides too. Every other bolt in the job loosened with no drama. Wish I had ordered replacements. Should I cut them? Other ideas?
View attachment 4094009
Heat.
I put a bigger wrench on it, got one out but the other snapped. 
In other news:


In other news:
Last edited:
I put a bigger wrench on it, got one out but the other snapped.
In other news:
View attachment 4094137
I was going to say Heat >> Cool with PB Blaster or Kroil >> Rinse and Repeat
Then I saw that picture of the SwayBar shedding it's skin and I'm gonna say WOW! instead...
Then I saw that picture of the SwayBar shedding it's skin and I'm gonna say WOW! instead...
Yeah. Do you think it should be replaced? Or just roll with it?
Heh, just noticed your handle! Just lettin' ya know, I am the GartenMeister! My wife might say I'm a GartenPutterer though...Yeah. Do you think it should be replaced? Or just roll with it?
I think I would replace that, but not sure if it NEEDS to be replaced. Probably not.
That is one impressive shedding for sure.